
ScottishDave
-
Posts
368 -
Joined
-
Last visited
Content Type
Profiles
Forums
Gallery
Everything posted by ScottishDave
-
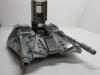
[MOC] AT-DP from Star Wars Rebels
ScottishDave replied to DarthTwoShedsJackson's topic in LEGO Star Wars
IT LIVES! Bwa-ha-ha-ha-ha-ha! Many thanks, DarthTwoShedsJackson. That was a great set of pictures. This one is built from parts which I had to hand, so it is missing a few small details: and one or two bits are built differently. The kids love it. Ezra has destroyed it half-a-dozen times already! -
[MOC] AT-DP from Star Wars Rebels
ScottishDave replied to DarthTwoShedsJackson's topic in LEGO Star Wars
Thank you also! That's certainly enough detail to build this walker. -
[MOC] AT-DP from Star Wars Rebels
ScottishDave replied to DarthTwoShedsJackson's topic in LEGO Star Wars
Thank you for posting the breakdown of the legs. I hope you don't mind, but I'm reproducing your MOC - it looks so much better than the official one, and my kids are clamouring for it. (By the way, I also love you Ghost, Phantom and Toop Transport. How did you get to be so ridiculously talented?) Would you mind posting a quick exploded view of the cockpit, similar to what you did for the legs? -- David. -
misupix: that's much, much better. I love your solution for the "A" pillars. They look about the right length and angle for those on a DeLorean. How about flat silver? light in colour, yet different from the car. You could even use grille tiles if you widened the bumper by one stud, which would also look more accurate overall.
-
Thank you, I'm glad someone understands . I'd never heard of that guy, and I sure wish I hadn't now. Curiously: that is Charlie Higson under that wig, who amongst many other things is author of a very fine Doctor Who story. Is it possible that he modelled an abrasive clown named Colin on a certain Doctor? .
-
Intruiging... looking forward to seeing those. God Complex was an excellent episode, and Tomb of the Cybermen is one that I re-watched with the kids recently. There are so many good cybermen designs out there. This one by Mark Stafford is my current favourite "purist" design, but it is difficult to get hold of the parts. Ah.... thank you. That is good. I may well have to try that. I have both a red and a dark blue cape somewhere. I also have a set of Aragorn legs, so I'll try both. *cough* wouldn't change anything apart from better hair, which is a given. I have a "Tennis Ace" with that hair in tan on order. When he arrives, I may well paint the hair grey and post another pic. BYW, what legs did you use on the War Doctor? EDIT: Nevermind, found them. Lone Ranger legs in dark brown. I wasn't even thinking of that when I used the CMF bases - but you are right! Hmmm... how to make it up to 16. Perhaps a Master and a Missy? Or a Cyberman? I think we do need some galaxy-spanning foes in the mix!
-
Awesome - another great Diorama. I think your War Doctor especially looks great - I can't think of anything I'd do to make him better. I note also that you have the eighth Doctor from the audio adventures - excellent choice, sir! I see it's not so much "share the secret" of the twelfth Doctor as "hide him behind a bloody great Sonic" then . I think I'm seeing: Owen Lars hair Magneto Head Town Blazer torso Black trousers ... and something red wrapped around his middle? It's a great combo, especially the Magneto face. Have you considered Aragorn legs with this combo, perhaps with an eraser taken to the middle of the hips to match the cut of the blazer?
-
[MOC] Midi-scale Super Star Destroyer Executor
ScottishDave replied to Pellaeon's topic in LEGO Star Wars
Yes, the hinge finger plates can be replaced. The one on the bottom - as I just stated - with a 1x3 plate if you use the new-style jumper plates. The ones on the internal frame can be replaced by 1x2 plates with clips and 1x2 plates with handles: but you will have to modify the frame to do so. The ones holding on the engine are hardest to replace as they are forming a 1-plate thick 180-degrees SNOT system. Up to you how you solve this one :-). -- David. -
Ah, yes. That's the ones. I'd forgotten about the blue version. Not if you're going to swap the passenger and cargo modules around, I'm not . Seriously: I have one of these somewhere. If I want any more, I might follow your example and build one out of Lego.
-
Indeed he should. I see that the Tennis Ace collectible minifig has this hair in tan. That's probably close enough: and if it isn't, I can paint it . Good suggestion. I almost used that hair, but then I realised that it fitted the 8th Doctor much better. I didn't want to use the same hair on both... they don't really look the same to my eyes. The hair I used on ol' "Teeth & Curls" is the Disco Diva hair - I thought that this was appropriate, given that he is a Prima Donna from the '70s. Thanks! I have detailed the parts I used for each minifig in their descriptions on flickr, with links to bricklink: so if you want to have a go at making them, the info is all there.
-
I built an Eagle back in 1988 . It was my last MOC before my Dark Ages. It had yellow landing pods, a blue cockpit, a grey "spine" (made out of space Lego plates) and probably other colours which I have mercifully forgotten. (Sorry, no pics. It's been 27 years, people!) I blame the Dinky die-cast toys, which had green cockpit and landing pods, red engine nozzles and thrusters. Eagles in "accurate" grey and white look wrong to me. I also blame black and white TV. We didn't get a colour one until 1980. I used to think the TARDIS was red, just like the actual police boxes in Glasgow. So this is pretty cool IMHO Yeah, the landing pods could do with beefing up, but that's about all. You did a good job on the shape of the cockpit, and I love the split module!
-
I have seen your flickr page - excellent thirteen doctors! I love the torso on the War Doctor - is that a custom, or a regular lego piece? Looking forward to seeing your 12th.
-
I've been building Doctor Who stuff lately. The first eleven Doctors plus War Doctor: Classic console room: There are more photos on my flickr album. If you want to make these minifigs yourself: I have listed the parts I used for each miniifig in the descriptions of the photos on flickr. I have also included links to the parts on bricklink. Have fun :-). Feel free to suggest better designs for any of the Doctors: and if anyone has a purist way of making ol' grumpy eyebrows (the 12th Doctor) I'd be very interested.
-
[MOC] Midi-scale Super Star Destroyer Executor
ScottishDave replied to Pellaeon's topic in LEGO Star Wars
Hi Admonisher, Thank you for the full and informative reply. As an aside: I just realised that, if you replace the jumper plates at the front of the lower city with the new style jumper plates with "interior stud holder", you can then replace the 3-finger hinge with a regular 1 x 3 plate. The only reason I used the hinge plate at all was because I needed something about three studs long which had hollow studs - to attach to the bottom of the old-style jumper plates -
[MOC] Midi-scale Super Star Destroyer Executor
ScottishDave replied to Pellaeon's topic in LEGO Star Wars
1. 500 grams, 56 centimetres long. 2. That depends upon how rough your 8-year-old is: but it isn't exactly as sturdy as Lego would have made it. My nephews kept theirs together for a few months before breaking it up for parts. 3. As GuyDudeMan27 says: www.bricklink.com. Run the LXF file from post #63 of this thread through LDD Manager to get a "wanted list" which you can upload to Bricklink. Good luck! -
[MOC] The GHOST from Star Wars: Rebels
ScottishDave replied to DarthTwoShedsJackson's topic in LEGO Star Wars
Oh, I am looking forward to this. Thank you very much indeed. -
I'm guessing you mean this? This is the design I used before getting stuck in - so to speak - with the clear vinyl. You got the parts I used correct. The technic gear is this one. I used an octagonal frame - this or this, either will do - to hold the 90 degree mechanical arms in place. The bar through the entire lot was a 4L "lightsaber blade" in lbg. I copied elements of the design, along with the dish stand, from Mike Psiaki's Falcon. Good luck with your mods!
-
Absolutely: and this is also a good tip for anyone using the thicker vinyl stickers with an inkjet printer: I smudged several of my stickers before working this out. Then again, I was using the soapy-water technique to position the stickers properly. Will do. I'll try to post some nice side-by-side photos!
-
Jay, That is an excellent answer: thank you once again. I think I have all the info I need to try this for myself. Thanks for the offer of a completed decal, but I think I can spring for the cost of a few sheets of inkjet decal paper myself. I have some other, non-lego projects which are suddenly looking like they need decals, so it's all good :-). Go for it. The basic UCS Falcon clone was my first project out of my dark ages (started March 2009) so I know it can be done. I wish I'd had bmerigan's blog posts in front of me when I started it all those years ago. Thank you! I was attempting to replicate the detail on the 32" studio model, so I'm pleased by your reaction. I'm afraid that there are no full-on step-by-step guides for the rest of my mods. The closest I have are the pictures in my flickr album, which ought to get you started. I do fully intend to take the time one of these days to pull the entire thing apart and photograph it to death - right after I've done the 101 urgent DIY projects I keep getting presented with...
-
Hi Jay, Many thanks for the answer - that all sounds good, and when I get my hands on a spare dish, decal paper and free time, I'll give it a go. By the way, did you use any additional products, like decal softeners, fixatives or protective sprays? The rigidity of the engine mod is quite good. Mine is strong enough to withstand the most destructive force it is ever likely to meet: a seven-year-old boy . If you are looking for a clean and simple modification of the UCS design, I suggest that you take a look at bmerigan's excellent blog. At an educated guess, I'd say that his design is as rigid as the original.
-
JayCal, that looks awesome. Well done! It takes a lot of time and effort to get the parts and to build this beast, so I'm impressed at you getting it all done in a single month. Your radar dish looks impressive - very neat and clean. I created my own earlier this year on clear vinyl. The biggest frustration I had with the thicker vinyl is that it did not follow the curve of the dish very well, so I had to cut around each printed element, making a star shape. The resulting lines are clearly visible. Did the decal film stretch to follow the curve of the dish? Did it wrinkle or tear? Did you have to cut around the elements? Thanks in advance for any answers.
-
Hi mentalmike, That looks about the right number of parts to me. You may want to have a few more 3022 to hand - I count 78 on mine. You do need a few extra parts, to join the new engines onto the existing framework. I did this in three places: - at the middle, where I replaced two of the 3022 with 2x10 plate 3832. I also joined the engine block at the sides. To do this, I shortened the existing blocks on either side of the new engines - the originals are shown here. I removed the 1x8 technic beams and replaced the grey plates with some shorter ones (1x4) Finally, I joined the engine to the sides using a combination of 1 x 2 technic bricks and technic locking hinge pins You don't have to do exactly as I did: bmerigan came up with his own solution, which he has posted detailed pictures of on his blog. I hope this helps!
-
No problem. If I'd had a post like this for reference, it'd have saved me a lot of hassle. BTW, you may also want to check out the LDD and LDraw forum here on Eurobricks. They have a lot of useful info indexed, especially the LPub guide One thing I ought to mention: In the end, I found it easiest to export the Groups from LDD as seperate files, then work on them in MLCad individually. It made it quicker to sort the parts into the desired steps. Then I imported all the seperate files into one LDraw file and shuffled them into the correct physical position. I started on 15 August and finished right before Christmas, I can see that much from the file dates. ... but looking in more detail at all the working files, I may, just possibly, have goofed off for three months then gotten serious about mid-November. -- David.
-
I used LDD and LDraw to produce instructions for Pellaeon's midi-scale Executor. Here are a few pointers: I built the model first in LDD: it was a lot easier to use than Ldraw. I scaffolded bricks into place where they had illegal connections, and left them floating at as close to the correct spot as possible To set up LDraw: I found my way to Ldraw's beginner's guide. I ended up using two programs: MLCad (Windows) and LPub (OSX or Windows). MLCad is fiddly and looks dated, but it is very powerful. I used it to do the bulk of the work of sorting the parts into the steps I wanted. I also used it to move the floating parts around and get them into the "correct" spots. LPub then let me add all the rest of the stuff - part lists, step numbers, page layout and formatting. There is a complete guide to working with LPub here. There is a special file, "ldraw.xml", bundled with Lego Digital Designer, which theoretically fixes LDD parts so that they export correctly to LDraw. The built-in Lego one does not fix many parts. I found and downloaded a much better third party ldraw.xml from Gallagher's Art. This gave me a perfect LDraw file. For this two-foot-long 761 brick model, it took five months to make the instructions, from start to finish, on a steep learning curve, with a self-imposed deadline of Christmas 2013. Never again! Good luck with your project, Smitty500, and I hope this has helped.
-
[MOC] Midi-scale Super Star Destroyer Executor
ScottishDave replied to Pellaeon's topic in LEGO Star Wars
Good luck with your build!