
ScottishDave
-
Posts
368 -
Joined
-
Last visited
Content Type
Profiles
Forums
Gallery
Everything posted by ScottishDave
-
[MOC] Minifig-scale B-Wing (with instructions and LDD)
ScottishDave replied to krispy's topic in LEGO Star Wars
Thank you for your help and encouragement. Well, yes, about that.... The good news is: With some droid arms and a few tiles, it slides forward and then opens just fine. It really is quite sturdy: only the front guns are prone to dropping off if you look at them funny. Edit: fixed. I used a bracket instead of the pair of minifig neck brackets pictured in the photos. The bad news (Well, not so much bad as bad-ish, in a "You have to laugh" sort of way) ... In order to slide the canopy forward two bricks, to a position where it can flip open, you need a cockpit piece with a 2-brick-wide cutout at the back to get over the 2x1 axle bricks. The only 6 x 10 x 3 canopy I've ever seen with such a cut-out is... well: ... unless the new Jedi Interceptor has one? Here is an LXF for just the modified cockpit. Comments, suggestions, improvements all very welcome. Edit: I just updated the LXF. The link remains the same. The hinge brick thin top plates make the canopy piece stronger. The side guns DO connect to the nubs on the hinge plates, LDD is just being thick. -
[MOC] Minifig-scale B-Wing (with instructions and LDD)
ScottishDave replied to krispy's topic in LEGO Star Wars
I'd better get on with it then. -
[MOC] Minifig-scale B-Wing (with instructions and LDD)
ScottishDave replied to krispy's topic in LEGO Star Wars
I just finished this: Many thanks to: - Renegade Clone (and his brother RenegadeClone) for the original design - Krispy for his excellent LXF files - The Bear for egging me on. Built in Dark Red, because life is too short to wait around for overseas bricklink orders. BTW if anyone in Scotland or the UK is thinking of building this, you'll probably find that (besides the Sand Blue parts) you might struggle to locate sufficient numbers of: 44126 6 x 2 curved slope 6180 Tile 4 x 6 modified with studs around the edges (Especially this week, as I've just been through). The slopes can be replaced by 4x1 curved slopes or 4x2 curved slopes plus a couple of plates. This model owes a lot to both Krispy's design and to Renegade Clone's original framework (referenced elsewhere in this thread). I took great pains to make it as stable and solid as possible. I wanted to make sure that a certain six-year-old could swoosh it without worrying too much about breaking it. For example, I used Krispy's nice and sturdy framework to join the cockpit to the ship, the Clones' engine covers (with some mods), and The Bear's wing attachment mod. There are similar blendings of different versions throughout the model. Krispy, rather than give detailed feedback: I'm planning to do an LXF documenting exactly what I built - would it be OK with you if I posted it here? Finally, just for fun, some cockpit comparison photos: Dark Grey Jedi Interceptor: Light Blue-Grey Jedi Interceptor: UCS B-Wing: -
Bricklinked UCS Millennium Falcon - MODded heavily
ScottishDave replied to ScottishDave's topic in LEGO Star Wars
Well, I might possibly (cough) have put too many in the corridor. I've seen some better references since then and counted the lights a bit more carefully (There are four! Lights! ... oops, sorry, wrong show). Thank you for your kind words. It will happen. I'm currently being sidetracked by a Krispy/RenegadeClone B-Wing (light relief after the Falcon) but I will get back to it at some point. Not that I've ever seen. If you do find one, please post it here. I'd love to know how to build the interior properly. That could work. I think you'd have to recess the dishes to get the right effect - otherwise the undersides would be visible and distracting. Nice one, Bob. Either works for me (I can create my own vinyl stickers, y'know) or I could use a black/Dark bley 4x4 round plate. -
Bricklinked UCS Millennium Falcon - MODded heavily
ScottishDave replied to ScottishDave's topic in LEGO Star Wars
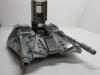
In the first post: I got bored and started reworking the engines on my UCS Millennium Falcon clone. In this update: I got a bit carried away. I've now made changes to almost every part of the upper hull. I'm not finished yet: I still want to resize the turrets, and then I need to tackle the underside, the engine room and especially the framework (to fix a nasty case of mandible sag which the old girl has picked up) but I'm taking a breather for a few weeks. I spent a lot of time examining detailed photos of the 32-inch Falcon studio model. I won't claim that my interpretation is is perfect, but it is a whole lot closer to the actual studio model than the original UCS was. I've managed to squeeze in most of the pipes and a lot of the greeblies. I’m quite pleased with the way the hull plates worked out. For the rear engine deck I took a lot of inspiration from Mike Psiaki's incomplete Falcon. All the parts on the engine deck are just about where they ought to be. The 8x8 circular "vents" are too large, but I’ve yet to see an alternative that I like. Does anyone have any bright ideas? It needs to be 6 studs wide. The circular access ports on the mandibles are in the correct position, and nearly the correct size. (They should be 5 studs wide. Again: can anyone suggest a better part?) Here is another WIP picture for comparison. The 6-stud-wide access ports that Lego used (on the right) are far too big. Because they are so large, the edge of the main hull is pushed further back until it is oval, nor circular: The greeblies on the sides of the mandibles are now accurately positioned and the wedge plates on the mandibles are the correct angle. I used the older 4x8 with notch wedge plates, which are perfect for the job. There is now also a lip over the greeblies running two thirds of the way along the mandibles. I tried a few times to buy a UCS Falcon radar dish on ebay, but got frustrated with the silly prices. In the end I spent a few hours with a vector drawing package and came up with this. Click on the thumbnail to open full size on Brickshelf. Alternate URL in case Brickshelf goes down again. I suggest that you print it out onto clear sticky-backed vinyl, spray it with varnish or inkjet fixative, cut as close to the edge of the actual design as you dare and apply carefully. Cut out thin triangles between the individual radial elements for a better fit on the curved dish. The inner square and outer circle are guidelines. If you cut them off as closely as possible, the sticker should fit perfectly over the central four studs and go almost to the outer notches on the 10x10 dish. If you've sealed it with varnish, you can use the soapy water trick to get it into position. More pictures are available in my flickr set. As usual, all comments and suggestions are welcome. -
Yes, it is done simply by stressing the bracket against the slope brick. You don't get much movement out of it, but it is enough to move the tip of the barrel a few mm inwards.
-
Thank you! In that case, you will be pleased to know that my snowspeeder can indeed be built in light grey with almost no part changes (the 18 degree 1x2 slope with slots needs to be in dark grey, but I think that's all). I have no strong opinion on this topic - I did have one in light grey for ages until I gave it to a young friend who needed one more than I needed two. I just wish Lego had (a lot) more parts in very light blueish-grey, so that we could all be happy. Thank you! I'd love to see an updated version of your Snowspeeder, if you do rebuild it.
-
Show Your Army, Navy, and Collection Display
ScottishDave replied to BillytheKid's topic in LEGO Star Wars
Apologies, also. Rather than veer this topic further off course, I've started a new topic over here -
Hi! This is an old MOC of mine - strictly speaking a MOD of Larry Lars' excellent snowspeeder model, which I urge you all to take a look at. He has provided instructions, and they are a masterclass in advanced SNOT techniques. I put the LXF file on Brickshelf in July. I notice that someone else on this forum has picked up on it: so rather than clutter up another topic, I thought this might be a good time to take some photos and do a full post. As I said: most of this is lifted straight from Larry Lars' design. However, I was never completely satisfied with the accuracy of Larry's MOC. The changes I made were: The sides slope all the way up to the canopy: The heatsink/grille at the back is angled slightly: The engines exhausts are positioned closer to the centre-line of the ship: The underside is as accurate as I could make it. One of these days I might SNOT it, but for now: The LXF is very similar to the physical model, but four pieces at the back would not attach, no matter what I did: To aid anyone who wants to build this model, here is a photo of one of the missing parts in place, with the top of the housing removed so you can see how it fits: More photos are available in my flickr set. EDIT: Brickshelf keeps on disappearing, so I've put the files in my dropbox folder: White: LXF XML Grey: LXF XML Thanks for looking!
-
I'm sorry if my remark came over as sarcastic - not what I intended at all! I honestly do appreciate the efforts which people on this board put in to make their models accurate. On my shelf I have a Pellaeon SSD, a Psiaki X-Wing, a Petersen Y-Wing, the under-discussion Krispy A-Wing and a Larry Lars Snowspeeder. I'm also midway through building a Krispy/RenegadeClone B-Wing. Whilst I have modded all of them somewhat, that is just my borderline OCD at work. I'm happy with the overall accuracy of the original models, and grateful for the work of all the people involved. Thank you for the heads-up on the Toro pictures. I had no idea they had a flickr stream, but I've found it now. I think I found the A-Wing pictures via the Studio Scale section on the RPF forum, which turns out to be a great place to find detailed close-ups of obsessively accurate reproductions of the original studio models. I did! I have enjoyed the discussion of different fin designs, and the alternatives which people have found. I'm glad we have so many options to try. As you can see from my pictures, I favour the studs-traditionally-facing-up solution. Generally I prefer it when a "smooth" model is smooth as possible (as opposed to, say, the Millennium Falcon, which looks better in studs). Mixing studs and smooth doesn't look nearly as nice, IMHO.
-
Show Your Army, Navy, and Collection Display
ScottishDave replied to BillytheKid's topic in LEGO Star Wars
Hello Scott-S6, nice to meet you. I see that you are man with impeccable good taste. . (Yes, I am that David). I notice that you left off the pair of 2x3 wedge plates at the back, which Lego Digital Designer wouldn't let me attach. Was it unclear where they should go? I can provide photos of the original model if that would help. The rest of the models are also very nice. There are some well-chosen MOCs in there. Just remember to leave a metre square surface for the inevitable UCS Millennium Falcon! You mean like the Stella Fighter canopy which I used on my Psiaki Xwing mod? I appreciate that it isn't for everyone, but it is a nice piece (the rest of the toy should go straight in the bin, however). It's the right colour and the right shape. It drops in nicely as a replacement for the part Mike Psiaki used. As a bonus, it even has a canopy fram painted on. -
Thanks! Do you happen to have a link to pictures of the underside of Jerac's model? The two pictures on flickr show every other angle, but not that one. I'd love to see how he did it. I used photos of the actual studio model for reference (radical, I know!). I think it was this page The one thing I am unhappy about is that the grilled (intake?) area on the bottom should be narrower at the back: but in the end I decided to ignore that detail in favour of my sanity.
-
[MOC] Midi-scale Super Star Destroyer Executor
ScottishDave replied to Pellaeon's topic in LEGO Star Wars
No problem. No, nothing like that. The LXF might have one or two small parts which are different from the instructions but I honestly think that any errors will be in less than 10 parts total, and none of them in vital areas. Well, if the one in the instructions and LXF is no good, Pellaeon showed some alternate designs further up this thread. You are most welcome. -
Thank you Brickdoctor: that sounds like my cue. Thank you, Krispy, Scott and Jerac for a wonderful model. I altered Krispy's 1.4 A-Wing design to include a smooth SNOT bottom and a landing leg at the front: There are a lot more photos in my set on flickr. It should be enough to let someone recreate my modifications. If you need more photos taken from any angle, please let me know.
-
[MOC] Minifig-scale B-Wing (with instructions and LDD)
ScottishDave replied to krispy's topic in LEGO Star Wars
Thank you for posting this, TheBear. As it happens I was in the middle of sorting through my Lego looking for parts for a Krispy B-Wing this evening. I'll test out your mods as I go along . -
[MOC] Midi-scale Super Star Destroyer Executor
ScottishDave replied to Pellaeon's topic in LEGO Star Wars
Hi muzin. Sorry about that. It looks like Brickshelf is down. I've put the LXF file here: Executor.lxf The parts list is here: Parts List I'm 99% confident that this particular file and parts list match up with the instructions. Have fun, and do let me know if you have any further problems. -
As someone who has a strong interest in Falcon mods, I shall be following this topic closely. I like what you did with the rear grilles. I think it looks better than the standard UCS version. I see that you are using 2x3 plates on the back of the landing gear boxes. It looks cool, and again better than the official Lego version. Are you planning to make the ship smoother, sleeker, less covered in pipes? This is the Falcon before Han made his "special modifications" after all!
-
Bricklinked UCS Millennium Falcon - MODded heavily
ScottishDave replied to ScottishDave's topic in LEGO Star Wars
I may have gone a bit overboard with the lights :-). I'll revisit it at some point! I also found removing the technic frame to be very difficult. I do intend at some point to revisit internal structure: at which point I will post some photos. In the meantime, here are a few pointers: I put a lot of technic beams under the floor. I doubled up on the most important beams, i.e. I put two beams side by side, joined with pins. I put plates on top of and on the bottom of the paired beams for extra strength I tried to plan "holes" in the framework (e.g. the inspection hatch in the hold.) Wherever possible I used the " 1 x 3 technic thin lift-arms with pins" to join different layers of beams for extra strength, as in the original model. I used a lot of technic rectangles and "L" beams to join it all together as strongly as possible. The bits to keep IMHO are: The beams which go out from the central hub to the ends of the docking tunnels - but you can shorten them considerably. The click-hinge bricks which act as mounting points for the curving side walls. The L-shaped bricks which go between those two (for bracing - but I am not sure that they are really needed.) The wall between the forward mandibles and the rest of the ship The support around the front landing stand, attached to that wall, between the mandibles. The rest CAN be removed and/or moved under the floor. This gives you all the room you need for a full interior. I've removed almost as much as I'd like to. Currently it looks like this: Caveats: The result is less rigid and creaks a bit when you lift it (from below, with both hands - no more swinging it around by the gun turret ). It also has a slight but worrying sag to the front, which I have compensated for by adding extra techic bushes to the forward landing stands. Finally, I could not fit in the smuggling compartments: that area had too many important beams running through it. Good luck if you intend to do this. Just remember: It is entirely possible! -
Thanks! I got the basic idea from Mike Psiaki's (non-UCS) Falcon. I wasn't sure about using the droid arms at first, but they are growing on me. I'm pretty happy that I got the shape and look of the central dome right. However, I am thinking of using OceanBlue77's radar dish stand, as from the pictures I've seen, it is even more accurate than Mike's...
-
Thanks! Do you mean the green 1x1 round trans-green plates lining the corridors? They are representing the Falcon's corridor lighting, as seen on this render of the Falcon's corridors (I can't find a decent still from the film).
-
Bricklinked UCS Millennium Falcon - MODded heavily
ScottishDave replied to ScottishDave's topic in LEGO Star Wars
Thanks! The official model has a single gun turret (with a steering wheel for a control) and half a cockpit, with just enough room for Chewie and Han. The rest of the model is filled with technic beams and bricks. Weirdly enough: I move or removed most of those technic bits, and the ship still holds together just fine. I'll be posting again just as soon as those pesky Bricklink orders arrive, TheBear. I'm clean out of 12*3 wedge plates. Except... no. Not even Han would steal hull plates from The Executor... -
This post last updated: 24th February 2017 with LXF file of 90% complete outer hull and Engines. LXF files can be found at the bottom of this post. I started this project in 2010 with a Bricklinked UCS 10179-1 Falcon. I immediately started building a full interior, heavily inspired by Matt De Lanoy's Falcon (not a mod of the UCS Falcon, but very nice). Most recent overall pictures Engine modifications WIP photos and comments: This is a a strip of 18 cool white LEDs on a 30cm sticky-backed strip: they cost about £8. As you can see, I’ve stuck them in at about 10 studs from the engine “grilles". They look great when lit, both in full darkness and with the room lights on. The LEDs are pointing straight at the grilles and there are lots of them. Sorry to any purists reading that they aren’t Lego LEDs, but 18 power function LEDs and a battery box would have set me back about £150! The rest of the LEDs are a LifeLites eLites Advanced 2 kit bought from www.BricksForKids.com in France. These LEDs are designed to be compatible with lego bricks, e.g. they are 3mm wide and the switch box sits on a 2 x 4 lego Technic plate. I plan to use them for floodlights, landing lights and interior lighting. I haven’t fitted them yet. I’ll post more pics when I do. Since I now have a nice curve on the engines, I decided to take advantage of it to get the "Thrust Vector Baffles" sorted out: I borrowed the idea wholesale from Matt De Lanoy, once again (I really need to buy that man a beer sometime). The alternatives which I considered were this by OceanBlue77, or this by Brian Tobin. Since I was doing the engines anyway, I redid the entire rear hull: More pictures are available on my Flickr set. Comments, criticisms and - especially - ideas on how to improve this model are all very welcome. LXF files: Added 24th Feb 2017: Complete Top and Bottom Hull plus Engines Added 13th October 2015: Engine Mod and Rear Hull as pictured above. Upper Docking Tunnels (From OceanBlue77's mod): Port Starboard Episode VII (The Force Awakens) Radar Dish (see seperate thread) Upper Gun Turret (no major mods, just a re-skin) Landing Gear(template, really need to finish this) Added 17th Jan 2016: Brick-built round dish (LXF) Added 26th Feb 2016: Engine mod - just the engine grille (LXF)
-
Since you asked so nicely, HanShotFirst... On second thoughts: to avoid swamping this [highly useful] index, I'll post this in a new topic.
-
Great idea! I've been collecting references for a while now. You got most of the good UCS Mods which I know of, plus some others I hadn't seen before. Here are a couple more: Brickplumber's interior Brian Hasting's interior flicker404's exterior mods
-
Review Review: 10240 Red Five X-Wing Starfighter
ScottishDave replied to Rufus's topic in LEGO Star Wars
Very true, but as seen here, 6-wide engines are more than possible. NB: this is not my MOD. I just found it.