ScottishDave
-
Posts
368 -
Joined
-
Last visited
Content Type
Profiles
Forums
Gallery
Everything posted by ScottishDave
-
I love the entire thing - it looks totally badass. I like how the head looks nearly like the one on your AT-ST - but not quite. I especially like the wings. They actually LOOK like the wings on the Inquisitor's TIE, unlike the lumpen things on the official set.
-
The Millennium Falcon colour thread (White, Grey or Blue!)
ScottishDave replied to appiah4's topic in LEGO Star Wars
"Rusty" red is right. The red which Lego use isn't a bad match, but the original colour has a lot more orange in it than you'd expect. These guys do pre-mixed Falcon paint colours (for the DeAgostini partwork model which is being published at the moment): http://www.starwars-doa.co.uk/doa-starwars-millennium-falcon-single-bottles-4-c.asp See how yellow the "ESB Grime" shade is? (this is the basic colour of the 32" Falcon). See how orange-y the panel red is? -
The Millennium Falcon colour thread (White, Grey or Blue!)
ScottishDave replied to appiah4's topic in LEGO Star Wars
In conclusion: it's mostly a light shade of yellowish grey, with lots of subtle colour variation: which looks grey or white depending upon the studio lighting. -
The Millennium Falcon colour thread (White, Grey or Blue!)
ScottishDave replied to appiah4's topic in LEGO Star Wars
As people have said on this thread already: The 32" studio filming miniature was painted in Floquil Grime, which has an RGB value of (231,231,223). The closest colour to Floquil Grime in the lego catalog is 208: Lght Stone Grey (also known as Very Light Blueish Grey on Bricklink) with an RGB of (229, 228, 222) Since the UCS Falcon is 32 inches long, this is the EXACT colour which it should be built in. Since we cannot do that, due to there only being 46 different parts in Light Stone Grey (and none of them terribly useful), I vote for the next nearest shade: Stone Grey (Light Blueish Grey). The colour of the original miniature looks slightly yellowish under most lighting conditions, and the hull has a variety of subtly different shades. I therefore also suggest building it with about 50% old grey parts, and the more yellowed the better. Photographed properly, it looks very convincing and not too grey at all. I've put one together just to use as an example on this thread: -
Well, that is what I did! Obviously it worked, but it's taken me five years to get it to this point, and I've lost track of how much I've spent on it (or that's what I tell the wife anyway).
-
A bit of both, actually. The more I compared the UCS to pictures of the studio miniature, the more problems I could see. The Modding bug bit me deep! YMMV, and I don't want to dilute your pleasure at this amazing achievement.
-
Congratulations on finishing this huge project. Good luck finding a place to put it! Personally, I'd almost forgotten what a stock UCS Falcon looks like, so thanks for the photo ;-).
-
It is worth building my engine mod if you want to build the flaps. Each top flap is attached by four studs directly to the top of the modded engine. Each bottom flap is attached base-to-base using two "plate with clip light"s on their side, and to the flaps on either side using hinge plates. However, you can probably build each set of flaps seperately, if you join them together with hinge plates and then find a way to secure them to the existing engines. Some experimentation will be required. If you do create the flaps, you will have to modify the surrounding hull plates, either using my design or rolling your own.
-
I have updated the first post of my build thread with LXF files for my engine mod (including the thrust flaps and the entire rear half of the upper hull), the docking tunnels, the upper gun turret, the radar dish and the modified landing stand. No promises, but I might add more soon.
-
That would be me again. I replaced the flaps when i realised that the 4x9 and 4x8 plates, alternated, had a near-perfect curve. Then I found that the original hull panels didn't fit. Then I gradually realised that the entire rear upper hull would have to be reworked... The thread is over here. Just in case you are seriously contemplating this one, I have added the LXF file for the engine and rear upper hull modifications to the first post: along with all the other LXF files I have generated along the way.
-
Thanks, H_Solo .
-
The TFA dish was me: http://www.eurobricks.com/forum/index.php?showtopic=106483 I also tried a brick built dish: Finally, I have a vector dish sticker design that I can send you in any resolution you desire. You will have to print it out and apply it yourself.
-
It's amazing how much more the white and blue one actually LOOKS like an X-Wing. I wasn't impressed with the orange and black X-wing, but I really, really like this one. I realise that the intent was a straight "color-swap", but have you considered adding a Psiaki-style fuselage forward of the cockpit? The new X-Wing has a shorter, more steeply-sloped fuselage than the original trilogy model - with a few small changes, Mike Psiaki's design would capture it brilliantly.
-
LXF can be found here
-
I bet that will look superb.
-
Innit just? I hope you have a spare desk or table to put it on
-
I realise that I'm late to this conversation, but here goes: I bricklinked an Imperial Shuttle eighteen months ago. I used about 1000 bricks from my own lego collection and bought the rest on Bricklink. I placed ten orders in the end. The total cost was about £250. The parts which cost the most (and had to be posted from Spain IIRC) were: White Slope 75 2 x 2 x 3 Double Convex (x6) White Technic, Liftarm 1 x 9 Thick (x25) White Technic, Liftarm 1 x 2 Thin (x36) White Technic, Brick 1 x 1 with Hole (x51) - these four innocent-looking items cost a third of the price of the build: so be warned! The resulting shuttle IS rather patchwork, and has some yellowing: mainly on the wings. However, I think it looks OK - weathered, like it's been in use. I hope this helps!
-
Why not buy a few extra parts and build both: one for regular, one for Sunday best?
-
I'd forgotten what a big beast the UCS Y-Wing is. From memory, Brickwright's Y-Wing is 55 to 56 studs long. The UCS Y-Wing is about 20 studs longer. There is a UCS-sized Y-Wing on flickr, but you'll have to figure out how to build it yourself, unless you can persuade the builder to share his LXF file with you. Finally, I built one myself and put the LXF file on Brickshelf. It is also 56 studs long, but it could be lengthened, especially in the cockpit and the engine... frame things. To return to our regularly scheduled program: you asked about tricky parts. In no particular order, you may struggle to find the following in the UK - or indeed anywhere for a decent price: The white domes on the front of the engines The double convex 33 degree slopes The dark orange brick with handles Any and all of the 3mm hoses The Y-Wing-specific printed cockpit canopy ... and not forgetting our old friends, the light bluish grey levers with light bluish grey bases. Good luck!
-
Great. Now my Y-Wing is sulking in the corner. Soul, I have a couple of thoughts: There are different colours of 2L tube available which you could paint. You could use Flat Silver, which is very common and cheap.A quick look on bricklink shows that you can pick up 107 for 5p each from a UK-based store - and they might even look quite good unpainted. Secondly: does it have to be a 10134 Y-Wing? I can see that you are a UCS Collector, so the answer is probably "yes" (and I do respect that). However, there was a wonderful Y-Wing MOC posted on this board a few years ago, complete with instructions, which might make a worthy alternative: http://www.eurobrick...showtopic=84780
-
Welcome to the board, and well done on bricklinking the UCS Falcon! Thanks for sharing your experiences - it looks like you found lots of ways to keep the cost down . I sympathise with you regarding the price: I've spent a lot more than £350 on my own bricklinked Falcon... but to be honest, that's my own fault: I keep modding it!
-
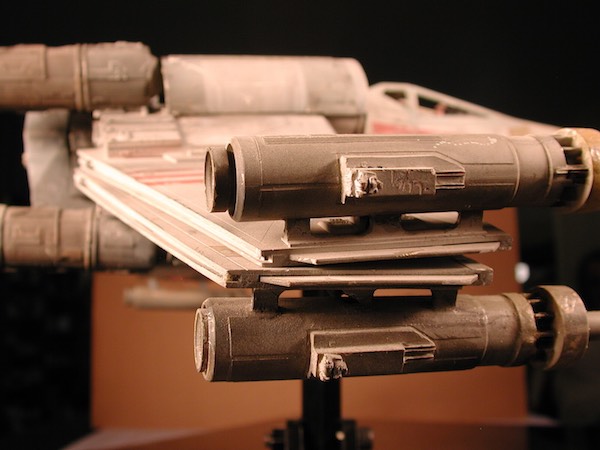
This looks great! It's an excellent start. I like what you did with the nose: it's a good shape. You are absolutely right about the system x-wing engines being too small, and the design you are working on is a much better diameter. I totally appreciate that this is WIP, and you may be aware of these points already, but just in case... You may need to make the engines slightly longer, by a couple of plates. The rear part of the engines (the yellow round brick & everything aft of it) should be half a stud higher: there is a distinct offset between the forward part of the engines and the rear part. This photo hopefully shows what I mean: It's taken from the ModelerMagic gallery of the actual Red 3 x-wing model, which is as good as it gets for reference! The wedge plate you used for the rear of the wing (which has a slope of 1 by 3) is an OK choice, but the most accurate choice is a 1 in 4 slope - again, there is a photo or two on the modelermagic gallery which was shot straight down onto the wing which shows this pretty clearly. Why yes, I often hold bits of lego against my computer monitor when planning a model, doesn't everybody? Good luck with your build, and with your sophomore year.
-
[Model MOC] T-47 Airspeeder (Snowspeeder)
ScottishDave replied to LiLmeFromDaFuture's topic in LEGO Star Wars
Yes, these are all excellent ideas. In fact, apart from the sloping sides to the canopy, I've done all of the above. My speeder's heatsink slopes from top to bottom. The string was not included in the LXF: but it goes around the hidden winch drum and goes out through the middle of the heatsink. The cockit interior is reasonably detailed, and the bottom of my snowspeeder is as accurate to the studio model as can be achieved in this scale - if non-SNOT and a bit bland - and I have made mine available in grey :-). However, I have always wanted to try a SNOT wing design, and your snowspeeder certainly has that. It also has that cool and interesting grille design in the engines. I also love the look of the cockpit. I'd love to figure out a way to angle your heatsink (either with dark gray 2x2 tiles or more modern 2x4s) and I have an idea about the cockpit canopy which I'm not quite ready to share just yet! -
[Model MOC] T-47 Airspeeder (Snowspeeder)
ScottishDave replied to LiLmeFromDaFuture's topic in LEGO Star Wars
Well done on completing your MOC! Thank you very much for the LXF file. I'd like to have a go at adding your wings to my MOC (to create the ultimate accurate snowspeeder )and this will help a lot. -
Well done! that is one lovely-looking snowspeeder. I especially like the smooth studless wings, and the use of the new windshield. Can we possibly see a shot with the cockpit open? The next time I rebuild my own snowspeeder, I'm going to incorporate your wings and canopy, and get the best of both worlds. I've made a start already, having spent a tenner on a lego porsche just for that windscreen.