Search the Community
Showing results for tags 'northern pacific'.
Found 3 results
-
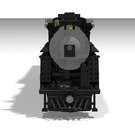
A 4-6-6-4 type steam locomotive. First conceived by the Northern Pacific in the 1930s, they were among the steam locomotives that represented "super-power" where engine builders learned to create locomotives that combined both power and speed. The first batch of 12 of these engines were first delivered in 1936 to replace double-heading methods. The locomotives please Northern Pacific so much in fact that 9 more were ordered in 1937. They could be found all over the NP's divisions hauling fast freight trains and reefer trains. Their 69 inch drivers allowed them not only strong pulling power but also the ability to go 60 miles per hour. I thought it could bring a real "challenge" to those who want to build it. It has OVER 2000 parts total. It has a side rod system that needed to be reversed engineered a few times to perfect it to where no 3rd party elements are required. Unlike most other articulated steam engines I have seen on YouTube and other places, mine has a FIXED rear engine unit and a front free swinging engine unit just like Union Pacific 4014 that was restored in 2019 if I am correct. Description: Locomotive is powered by 4 LARGE motors, these sit inside the boiler and provide the means of going forwards and backwards. Both the IR receiver and battery box sit inside the tender. I would recommend some extension cables given the fact that the locomotive itself is very long. The IR receiver also plays a part in the tender for the locomotive is designed to look like an oil burner. The bogies on the tender are specially designed to not only to look realistic but also to take turns at the same time. And the same can be said on the lead truck in front of the first engine unit. The cab will actually let you house an engineer and fireman to simulated them driving the locomotive. To look at my other creations go to BrickLink and search under Strader987 https://www.bricklink.com/v3/studio/design.page?idModel=160723 This locomotive is also on The Lego Ideas website, here is where to find it: https://ideas.lego.com/projects/7a2adb34-7fc5-401a-aa28-c8eddd37480c Please help me get 10,000 supporters please.
-

MOC- the streamlined North Coast Limited passenger train
zephyr1934 posted a topic in LEGO Train Tech
[ full gallery] I am pleased to present my MOC of the Northern Pacific streamlined Vista Dome North Coast Limited. The North Coast Limited ran between Chicago and the Pacific Northwest (the train split and went to Portland and Seattle). Much of the attractiveness of this build is simply due to the prototype, designed by Raymond Loewy. More info on the actual train can be found here. One of the unusual features on this train was the full sleeper domes (as opposed to the dome-observation sleeper cars found on several trains). More info on the domes can be found here. I have been working on this MOC for over two years and it remains a work in progress. The initial assembly occurred about two years ago and it has been displayed a few times. However, without the lettering, I considered it far from complete. I just applied the decals this past weekend and uploaded the photos to brickshelf. The cars are 42 studs long plus diaphragms (another stud total), to strike a balance between realistic scaled length at 6 wide (more like 52 studs) and the operational constraints of lego curves. The cars have a real vestibule on the door end (set off from the interior) like the prototypes. They also feature close coupling for display, with the diaphragms connecting, while with the insertion of an extra magnet allows for sufficient clearance to take a curve. The domes were my focal point. The use of the 3x6x1 curved windscreens was one of my favorite features, but there is a lot of snot in the domes themselves to get the right shape and form. I used transparent headlight bricks so in principle one could see through the dome, but in practice only a bright light can make it through all of that plastic. Still it does a good job reflecting the ambient light so the design worked, just not as originally intended. There are lots of subtle features to be picked out, including the detailed under-frame (no great shots at the moment) and the half plate vents on the side of the dome cars, e.g., as seen below the dome here. Throughout the cars I used an unconventional approach. Sand green plates are way expensive. So the lateral strength of the cars comes from white 6x plates between the sand green and dark green layers. This has the added bonus of making the windows much more apparent than they would have been without the reflective color on the inside. I did seek bonus points for the use of a large unruly piece for the roof of the observation car. I had to leave out several cars (including the RPO/dorm; travelers rest lounge; several coaches and sleepers; and a sleeper dome). The locomotives have a lot of subtle features going on, e.g., the louvered openings between the porthole windows and the much more complicated snotted nose. Unfortunately for me, the NP was one of the few railroads to actually paint over the chrome upper grills on the F-units, still, I took the liberty to use chrome lego grill tiles since they are typical of most F-units and dark green grills would not show up well. The train is powered by a pair of PF train motors in the b-unit, which also houses a rechargeable battery, IR receiver, and extra weight for traction. I've made a few small changes to the build over the years, e.g., swapping out 1x2 grilled cheese for 1x2x2/3 curved slopes on the nose of the locomotives. The train runs fine around standard lego curves, but it looks a little awkward, It looks REALLY sharp on the wide radius curves, e.g., on PennLUG's layout (videos can be found here) All of the photos thus far are from before applying the decals. Here are few shots with the custom decals applied, Many more shots are in the full gallery. Enjoy the ride, questions and comments welcome, [ full gallery] -
[ full gallery] Here's my take on the classic SW1200 yard switcher, this time in NP colors. I chose my subject from the MTM collection for several reasons, (1) my son is fond of this specific locomotive in part because it is featured in several episodes of the Choo Choo Bob Show (if you've got railfans under the age of 8 in the US I highly recommend this show), (2) I am fond of this specific locomotive because I spent way too many hours running it and maintaining it as a volunteer 20 yrs ago. On a side note, I know of at least one earlier build of the same subject by the folks at GMLTC. I built this locomotive as a gift for my son. He like's his 7939 set but although he is barely in the recommended age range he much prefers his dad's trains. So I wanted to build a very realistic train for his birthday. Since he is still young, it had to be kid tough, which meant one or two compromises, the biggest one being the cab. I managed to get a lot of great details in the cab, I am particularly fond of the back, getting the windows pretty close to correct. Shortly before building this I was commenting to a friend about the reintroduction of 1x1 trans clear bricks and how you could almost always substitute the much cheaper 1x2 bricks... oops... I needed four 1x1's for this and the photos predate my acquiring them. I also like the fact that I was able to work in the all weather cab windows. The thing I don't like about the cab is its length. It is 4 long and I would much prefer to have done it in 5 long, but all of the designs I came up with would have been a lot weaker. As it is, the 4 long cab is the weakest point on the locomotive (plenty strong for AFOL use, but you can't stand on it), I've had to rebuild it a few times ("now remember, the most important thing is that if it breaks, you collect all of the pieces"). To keep the structure tough, I used a lego train base. I also wanted to keep some flavor of classic trains, so I used the train railing on the ends. My son likes to push his trains around, so no motors on the stock build, but I made the trucks the same size as a motor so one can quickly swap in a 9v motor when desired, e.g., The hood is 5 wide, mostly snot. I am particularly fond of the stacks, I think I got the look pretty good (as original, not with the spark arresters that were subsequently added to the MTM unit). I borrowed the hood doors from my GP20 The taper at the cab was inspired by Jeramy's BN kit (the production of this kit reportedly consumed all of the available 2x2x3 double convex slopes in black at the time, though now they are becoming more common). With instructions now available for free here. At the time of the build I contemplated building a second one for myself, but I did not want to take away from the magic of my son's locomotive. In spite of some of the compromises, there are a lot of features on this build that are among my most advanced. I really wanted to give it to him and have him build the set, but in the end (sadly) I built it and presented him with the completed model (in a few more years I can give him the bricks and instructions, just not yet, this build took me a few hours to assemble). Some point in the future I will likely revisit this prototype to incorporate a few changes- 5 long cab, slightly longer frame, replace the train baseplate with regular plates, and motorized from the start. [full gallery]