Search the Community
Showing results for tags 'winter village'.
-
Call me crazy. This year I'm making custom Lego Advent calendars. Every year we seem to buy two of the 3-4 available Lego advent calendars for my two girls, and we usually end up disappointed. Apart from the minifigs, the builds are usually a little too close the micro build size for us and a little too far away form the mini build size. In addition, the parts usually just end up in my "parts" pile and no one ever really builds those models ever again. This year I'm going to make it a little more fun. (Hopefully) The first mini build I've designed is this fountain. All of the models will have some use (every year hereafter!) in our small Winter Village. Since I have two girls, I'll have to make more than the usual 24 builds. Some days will be one each, others will be a "you need to work together to make this one" build. Wish me luck. If you're at all interested in building this model, the building guide I'll be giving the girls with this one is on my site: http://www.charlesp.org
-
Winter Village Station_4 Introduction Lego have released two trains and a lot of nice buildings for the winter village, but it still misses a nice place to stop. This is a station with a nice clock tower with two bells so that the citizens can keep track on the time during the Christmas shopping. Inside the station building there is a waiting room, full ticket booth and a small workshop in the tower for maintaining the clock and the bells. On the right side of the station you have a nice fountain and the train schedule. As you can see in the pictures this would be a very nice supplement for the old holiday train (10173) and this years new winter village set (10254). Basic Info Approx Dimensions: Length 62 cm x Width 12.8 cm x Height 37,4 cm Number of pieces (with minifigs, without track): 1200 Clock print: 17038 Input and support will be appreciated. https://ideas.lego.com/projects/154973 Winter Village Station_with Train Winter Village Station_Detail
-
This is my year's Winter Village addition, a train station. Something that has been missing from the Winter Village, so I chose to build one. The station consists of a clock tower and a cover platform, with an extension platform that can be removed if so desired via technic pin connections. The interior is furnished with a counter, a register, newspapers to buy, a mailbox on the right side and a Christmas tree, bench and an old style phone on the left. There are stairs for entry and a clock to finish it off. Winter Village Train Station Emerald Night arriving to Winter Village Train Station Winter Village Train Station (back section) and lastly the same Xmas tree with a micro Emerald Night Micro Emerald Night Miro
-
Finally finished the build and here is my review on 10267 Gingerbread House: THE GOOD: The Gingerbread House looks great and it surprisingly the right size! (The photo looks a bit over sized but love the end product.) New version of the Gingerbread Minifigure. Surprisingly detailed interior, love every aspects of it. Very great use of the new glittering pieces for the windows. Love the way the star is built on the Christmas tree THE NOT SO GOOD: The roof can be a bit of a hassle to put together. I wish there is an actual gingerbread baby figure. (Still happy with a printed piece but just wanted more) Overall, this is an excellent set and is one of the best winter village sets in recent years. I totally will recommend this to everyone. I absolutely love the look of it. Seriously thinking to buy another one to make a fully enclosed gingerbread house!
-
Well after taking much inspiration from others here and having moved into a large home this fall I present our family's Winter Village this year! There are far more pictures here http://www.michaeldaykin.ca/2017/12/this-year-as-we-are-in-larger-home-we.html if you are looking for more detail. I had a lot of fun setting up pictures of the crew putting the village together after the move, right from laying the track to the finishing touches. They layout is on a Costco folding plastic table, which by the way are almost exactly 3x7 32 stud baseplates in size. At first I was just laying it out on a white table cloth but after finding white 4x6 plates on the PAB and deciding to try some 3rd party white base plates, I was able to almost completely cover the table with studs. The Village is made up of all of the official Winter sets (less the cottage) as well as a some of the smaller seasonal sets and a couple advent calendars. There are 12 32x32 3rd party baseplates occupying the front 2/3s of the table with the back 1/3 brick and plates. I raised each of the buildings in the back by one brick and used, the 4x6 white plates to texture up to them. The PAB wall also had the round one stud red-trans tiles which I used to mark some paths, and then I went back and they had the red and green 4x4 plates which made the main paths around. My wife also filled in the back of the station a little bit to make the back look more finished. What I really wanted to do this year though was the mountain with Santa's workshop on top. After a BL order I was able to build it to what you see. There is a dish shelf from Ikea providing the structural support. I also used the Creator Mountain Hut to serve as the base of one side of the mountain. The plan for next year is to make it completely brick built and more of an L shape, possibly with a ski hill but definately a second tunnel portal. How it gets fleshed out next year will partially depend on next year's winter set and how it would fit in. I'm going to get one more 4 pack of the base plates I bought so they go all the way to left side of the table and then a couple to go under the back side of the mountain. I hope you enjoy our little village, our family is having a lot of fun with it and setting up little scenes as we go.
-
 I wanted to share with you my Christmas village for 2017. This year my main additions are a ski lodge and resort area, the new official Winter Station (expanded), and a new city block made of Creator 3-in-1 sets. Here is a video tour of the village: Below are some of my favorite pics of the new stuff. Trying not to overload you with too many (but probably still did), but all the photos can be found in my Flickr album: https://www.flickr.com/photos/42918210@N02/albums/72157690735608385/with/38211832374/ I guess I'll start with the ski lodge. It and the ski lift were a big challenge for me this year. I'm not a master builder by any means, but it was a lot of fun putting it together. The lodge is pretty crammed full on the inside with a sitting area, cafe area, and ski rental spot. Here is the front of the lodge with some skis being delivered, car by @de-marco: Inside the lodge: Little coffee shop inside: Ski rentals and lockers: Hitting the slopes: I purchased some of the Friends ski related sticker sheets to help around the resort, like here at the ski lift operator shack: These are the Friends Ski Chalet sets that have been recolored. Thanks to @Cheatay for the LDDs to get these started: Taking a ride on the ski lift. Unfortunately, no the ski lift is not operational. That would be ideal and may be one day in the future but I will have to get a lot better at the technic side of MOCs. The chair design was inspired by @twigman Sitting atop the ski slopes of course is the North Pole: Now heading into town we have the Winter Station that I expanded: Coming home for Christmas: Christmas tree farm: Carolers: Creator 3-in-1 sets in the holiday spirit. Cars by @de-marco I actually have another train station on the "city" side of town: Here is a grand shot of the whole village: That's just a few of my favorite pics. Be sure to check out the video to get a tour of the whole town. You can also see many more photos in my Flickr album: https://www.flickr.com/photos/42918210@N02/albums/72157690735608385/with/38211832374/ Eurobricks provides so much inspiration for my village, I wanted to thank you all. I want to credit as many as I can for the inspiration. The expanded train cars was done last year by @mouseketeer. The sidewalk pattern was from @alex54. @Alebricks has just an awesome diorama that has inspired me as well. Thanks for looking!
 -
This is my first Moc after coming out of the Dark Age. I have always loved winter and Christmas and I am very happy to have spent two years building this village; unfortunately the time available is always little and I can put some bricks only a couple of times a month. The photos are a bit old and a new version of this village is already under construction _DSC2659 by Alessio Stebel, su Flickr _DSC2611 by Alessio Stebel, su Flickr Link to the complete gallery: https://flic.kr/s/aHsmbqiRwn
-
Please remember - sugar is bad for your health. Sugar kills, so beware of the gingerbread houses. This is also my small tribute to Coen brothers' Fargo, the spooky girl minifigure and Grimm brothers: And I built this as a counterpoint to my Baba Yaga's garden (sisters keep the businesses side by side): More: my flickr
-
Hello guys! This is my first thread on this forum and I'm very excited to share with you our 2019 version of Lego Winter Village! I really hope to hear some thoughts and suggestions :) Not sure if I can add a video here, but it's all on my flickr page, so welcome )) - https://www.flickr.com/photos/155653610@N02/with/45713102655/ Sorry for average picture quality, but this is what I was able to get with my phone and trembling hands :) Next year we're going expand dramatically adding custom train, mountains and lots of sweet details :) But for now this is what we have, and yes, there's no fire house, WV Train and station since we simply decided to pass on them :) Also, I would really appreciate if you could take a second and support my Ideas project (in signature) :)
-
Hello dear Lego fans, After having signed up here in the Eurobricks forums in 2011, I posted a new thread in the "Hello my name is..." section about my plans to create my own Lego City layout. Now almost 9 years later, I can finally show you some of the progress that has been made just at the beginning of the new decade :) Good things come to those who wait. Renovations on the attic are finally complete (apart from the lighting) and we now have around 110 m² to unleash our imagination. The current plans of the Lego city layout add up to around 60m² in size and they are, as you can see in the video, far from finished. However, I thought you might be interested in some of the things that my girlfriend and me were designing in the last couple of days. The name of the city is still unknown, but the overall design has started to take shape with a downtown area, which includes all the modulars, and shops, a residential area, an amusement park, a winter village, a train yard and a harbor/beach area. I would also like to add an airport to the city and some of the classic monorail tracks have been placed already. We are also getting into MOC a little bit and we will add our own creations to the layout as soon as they look nice! The commentary of the video is in German, but I am trying to add English subtitles into the system. Please let us know what you think here in the forums or in the comments section of YouTube. I will keep you posted on future updates if you like :) Note: All of the parts used in this layout are original Lego parts, except for some of the baseplates. I thought that lime green in the Hogwarts castle area might look cool, but I will probably exchange it for regular grass green baseplates in the near future. Thank you so much for taking a look! :) Christof
-
-
this is a quick christmas/winter winter diorama I built this past weekend to go beneath the Christmas tree. My sister with family is coming over, and my niece's favorite color is bright yellow, so it was obvious what had to be the main color of the house . Total building time: ~12h Built with parts I had on hand. Some are VERY old - can you spot the 4x8 plate with rounded corner and waffle bottom? Someone's having trouble getting in... Also, lights : Merry Christmas, everyone!
-
Hi, after two years my family and I build a new Winter Village... but of course a bigger one than the last time ;-) Hope you have fun watching it... [media]http://www.youtube.com/watch?v=twOEtpAlFrA[/media] http://www.youtube.com/watch?v=twOEtpAlFrA
-
Finally finished this after 18 months of tweaks and fussing around. Due to requests, you can get the building guide/instructions here: http://www.brickmonster.toys
-
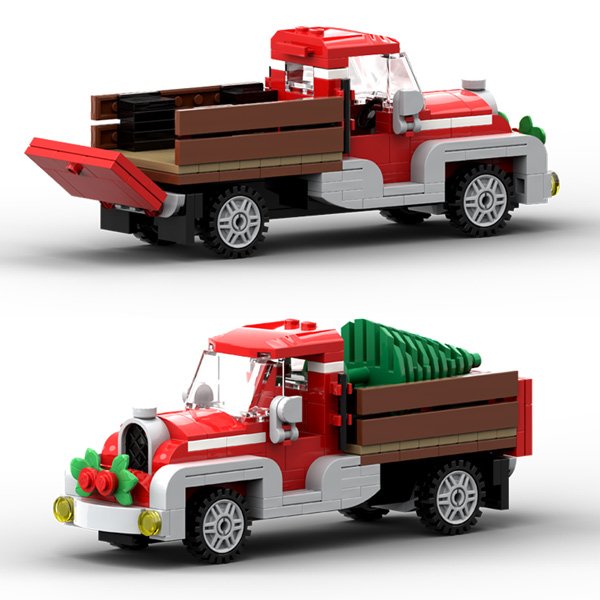
Maybe a little early to be thinking about Christmas and the Winter Village, but I've updated my 2016 Old Red Truck MOC using some new techniques and newer parts. I've also made a pdf instruction manual that you can get for free at Rebrickable. Others to follow.
-
Hi everybody This is my latest creation, a special Christmas edition of my MOC modular building, "Brick Square Post Office". Hope you like it. Twas the night before Christmas... ... and all the kids at Brick Square were getting excited, building snowmen and putting up the Christmas tree. The children had been busy writing their lists for Santa. They handed their letters to the postman, who was loading up his van ready for the last mail run of the day. He set off in to the snowy night with his precious cargo, but by now the snow was falling thickly. Then there was trouble! The post van hit a snow drift much bigger than usual. Stranded in the snow, the quick thinking Postman grabbed his phone and telephoned ahead. Meanwhile back at Brick Square everything was silent and the children were feeling anxious. It was getting late and the Postman should have returned by now. Just then a friendly whistle sounded in the distance and the air was suddenly filled with the sweet smell of steam It was Santa. He had ditched his reindeer and sleigh and instead opted for good old fashioned steam power, courtesy of The Old Workhorse Traction Engine. Don’t forget The Old Workhorse is on LEGO Ideas. https://lego.build/2vRfVGL Please spare a couple of minutes to give it your support if you’d like to see it made as a real LEGO set. Anyway, shameless self-promotion out of the way, lets continue the story ... The Old Workhorse arrived at Brick Square carrying Santa himself and all the presents for the children. And just in case you wondered what happened to the Postman. Don’t worry, he made it back home in time for Christmas Day! THE END! I hope that you've enjoyed reading this and looking at the pictures. I'd like to take this opportunity to wish everyone on Eurobricks a very happy Christmas, and all the best for 2019.
-
As we are close to Christmas, I wanted to present some photos of my Diorama Winter Village in the full 2018 version, never presented before. This landscape completed in 2016 is the result of 5 years of work. Each building from the smallest to the largest has been built with a continuous search for quality and study in the details of the interior furnishings. The diorama currently consists of 42 bases of 32x32 studs with 300 minifigs and over 62,000 pieces. I was fortunate to have been called to exhibit my complete work at the "Palacio de Gaviria" art museum, Madrid, Spain for a period of 3 months from 10 December 2018 to 24 February 2019. On my Flickr profile you can see some other photos as a whole and in the other Albums you can see the details of each individual building that make up the village. Thank you all for your comments and for the vision of my project! Greetings from Sandro Flickr Gallery: https://www.flickr.com/photos/sdrnet/albums/72157676542427648
-
Two Christmases ago, I designed my first six custom cars for the Winter Holiday Train, and this year I doubled it in size with six brand new Christmas cars PLUS a rebuild of the locomotive itself to better fit the scale of the expanded train! My initial six cars were: - A Passenger Car - A Christmas Tree Car - A Hot Cocoa Tanker - A Gingerbread Car - A Present Car - A Reindeer Car Now I've added: - A Snow Globe Car with sugar plum fairy, that rotates as the train moves along! - A Christmas Dinner Dining Car with a full spread of food, hanging chandelier, and kitchen! - A Toy Machine Car with working conveyor belt that moves doohickeys from the machine to the packing crate as the train moves along! - A Sleigh Flatbed to transport Santa's sleigh when he's riding aboard his locomotive! - A Christmas Lights Car with reels of Christmas lights ready to decorate any station Santa pulls into! - A Mail Car to transport all of the letters to the North Pole! A full album for the first six cars can be found at: https://www.flickr.com/photos/146006635@N03/albums/72157674354338110 And a full album for the six new cars (including a VIDEO of the full train in motion) can be found at: https://www.flickr.com/photos/146006635@N03/sets/72157703037145161
-
Introduction Winter is coming... And with it comes a horde of undead warriors the new Wnter Village set: 10263 Winter Village Fire Staion. So let's the spirit of Christmas and the smell of burning buildings surround us and let's see what Lego Santa has brought us! Thanks to EB and the LEGO CEE Team and Designers for giving me the opportunity to review this set! Set information Name: 10263 Winter Village Fire Station Theme: Creator Expert Year: 2018 Pieces: 1166 Price: $99.99, GBP 84.99, 89.99€ Resources: Brickset, BrickLink Packaging The box has an usual size for medium sets, at almost 50cm height, 30cm large and 10cm wide. It shows a very nice Winter Village scene in front of the fire station building, with all of the smaller builds included in the set. The back of the box shows detail pictures, describing play features of the set, with all the minifigures in action. Content of the box The box contains a sealed bag with a two instructions booklets and the sticker sheet. The seven bags are numbered from one to three. Instructions booklets The set comes with two instructions booklets, a smaller one with 51 pages, and a bigger one with 83 pages. The instructions themselves are simple and easy to follow... Maybe a bit too simple for a 12+ set. In the biggest booklet, the parts added to the assembly at each steps are highlighted in green. Build The first booklet will guide us through all the smaller builds of the set, using first set of bags. Here are pictures of each of those smaller builds: With bags number 2 we'll build the first floor of the fire station. And we'll finish the fire station with the 2nd floor and the roof using bags number 3. The build is pretty straightforward and not very enjoyable, except for the nice snot assembly of the white laticed windows on the tower on the left side. The completed set looks like a nice scene, with all the smaller builds adding life outside of the fire station, and will make a great addition if you already have some of the other Winter Village sets. The fire station feature a lightbrick on the roof, which can be activated to illuminate the 1st floor... well sort of... I think the lightbrick itself could have been a little more concealed. The roof can also be removed to have a better access to the kitchen and especially the coffee machine, that the chief officer seems to like a lot. To me the roof is lacking snow, with all the tan plates showing, something that could have been improved with a few whites plates and slopes. My favorite build is the fire truck, despite the too many stickers used. It's not a complicated build, but it looks nice, and could easily be modified to a more solid build. The christmas tree build is pretty simple but still interesting, using 4 wedged sides to recreate the conic shape of the tree. It could be improved to create a bigger tree, with more space for ornaments! The frozen fountain on the other hand isn't as nice as the rest, and could have been better with higher borders and more work on the firefighter statue pedestal. Minifigures The set comes with a nice selection of minifigures: a young girl, a baby (always protect your baby's hands with gloves when it's cold!), a ice hockey player, a musician with his saxophone, 3 firefighters and a dog. The three firefighters have the same pants and torso, and all minifigures have backprinting, except for the baby and the hockey player, but including the dog! Interesting parts The set includes some exclusive parts (for now): a few bars 6L with stop ring (63965) in tan, the baby with dark turquoise body and the firefighters' torso. The set also contains a big load of dark red bricks, which are always welcome, but I would have liked some dark red brick bricks (98283) as it would have given more texture to the wall of the upper floor. Conclusion Design: 7/10 - A nice design, but with some flaws like the back of the headlight bricks showing both the exterior and interior of the walls. Parts: 7/10 - Some new parts, but nothing too fancy. A nice selections of minifigures. Build: 6/10 - A basic build, with simple techniques for a 12+ set. Some improvements could have been easily included. Price: 7/10 - With a ppp of 0,077€, this set is rather average. Overall: 27/40 (67,5%) - A nice set, especially if you like the Winter Village sets. It makes a good playing set and may please children more than adults, but in this time of the year we're all children again, isn't it? Well...
-
Not sure if anyone else is getting into the Holiday spirit already or if it's too early for many of you, but I surely am. Here is my updated Winter Village Cider Mill, so far in digital version, and still needs interior built out, but here is the reveal of it. I will post updates with more pictures to come. Winter Village Cider Mill Revisited cheers all, Miro
-
Another X-Mas competition, another entry. I do love this compo :) The Globe Tavern always holds the best Christmas & New Year parties. The fancy dress New Years Eve party is huge in the Winter Village, even the staff get involved! The two stalls always do a brisk business in Mulled Wine & Hot Dogs for the journey home afterwards. As you can see the party is in full swing! The red light brick hits the disco ball and the Christmas mix fills the dance floor. The ground floor features a lovely fireplace (working light brick), spiral staircase & dart board - Oh and don't forget a fine selection of beverages ! The Upper Floor is where the banging tunes of MC Santy keep everyone happily dancing. The two stalls - who doesn't like a Hot-Dog or Mulled Wine on a Winters night? Anyway thanks for looking. I wasn't sure about entering a tavern in the compo but after the success of last years brewery, it seems the townsfolk like a warming nightcap! I'd usually wish all a Happy Christmas at this point but as tonight is 12th night, maybe a belated hope that all had a happy holidays will suffice!
-
Every rail line needs a train station and this one lets passengers from Eastern Ontario, where my Winter Village is located, travel to the North Pole to visit Santa’s Workshop. There are a few old Canadian Pacific and Grand Trunk Railway Stations in Ontario that have a large round architectural element to them and this was the inspiration for my MOC. A cast iron wood stove warms the inside of the train station that is decorated for Christmas. I have included some photos of my Winter Steam Engine train as well. Hope you enjoy and have a very Happy Holiday Season! image by Karen Metz, on Flickr image by Karen Metz, on Flickr image b y Kareimage by 2 by Karen Metz, on FlickrKaren Metz, on Flickrn Metz, on Flickr image by Karen Metz, on Flickr image by Karen Metz, on Flickr image by Karen Metz, on Flickr There is no indoor plumbing so an outhouse was required. Winter Village Outhouse by Karen Metz, on Flickr The Train Winter Village Train Station by Karen Metz, on Flickr Winter Steam Engine Train by Karen Metz, on Flickr In keeping with the rules of the contest I have deleted 3 of the photos that were originally posted. If you want to view more photos of this MOC you can follow the links to my flickr page. Thanks.
-
Although a Winter Village Contest doesn't seem to have popped up this year There is a Winter Village competition after all! I decided to spend my afternoon and evening today coming up with my attempt to expand the LEGO Winter Village. I'd been collecting pieces for this for a while, and it finally seemed time to sit down and do something with them! Earlier this year I got the one WV set I was missing (the Post Office), and had the realisation that if I want my Winter Village to keep growing by more than one set a year, I'd have to design some things myself! I've already built a Winter Village Church (https://www.flickr.com/photos/146006635@N03/albums/72157672738224763), now here's my second addition: a Winter Village Chocolate Factory. My goal with this was to make it as close to what an official Winter Village set might be, so I made sure to match it in scale and part count to the official sets, and include some supplementary builds with the hot cocoa van, the chocolate house sculpture, and the festive lights. There are also play features! The handle on the interior makes the Christmas wreaths rotate above the door outside. I've also included chocolate bars for sale on the shelves, mugs hanging behind the counter for hot cocoa, and even a chocolate fountain with marshmallows on sticks! And just like the official sets, it includes a light brick! In this case it lights up the boiler, used to melt the cauldron of chocolate pieces ready for the hot drinks! Just over a month ago I had a go at making some extra cars for the Winter Holiday Train (http://www.eurobricks.com/forum/index.php?/forums/topic/142031-modmoc-expanding-the-10254-winter-holiday-train/#comment-2682886) and got some great responses to my Hot Cocoa Tanker. I like to imagine this van works for the same company, shuttling hot cocoa around the Winter Village! More images are available on my Flickr at https://www.flickr.com/photos/146006635@N03/albums/72157673365615964
-
Here's my entry for the Winter Village contest! I hope you guys like it! Happy Holidays!!!! (Also, just as a little comment: I'm from Southern California where there is no snow. This is my depiction of a not so white Christmas!) Winter Village: Corner Store by Carson Hart, on Flickr
-
I've been working on my Christmas village the past couple months and I've finally finished (at least for this year ;). I've been coming to this site for about a year or so and I've really enjoyed seeing everyone's creations and they definitely helped inspired me for this village. Special thanks to @mouseketeer's Holiday Train additions and @alex54's sidewalk idea, they both added so much to my scene. I used the major Lego Winter sets like the Post Office, train, bakery, toy shop, cottage, and market, but then also added some City sets and just winterized them like the train station and corner deli. The big thing I added was the ski slope with train tunnel underneath. First time building something like that and it came crashing down quite a few times as I was learning how to make it sturdy. Here is a video of the village as well as some of my favorite pics. If you want to see all my pics, you can look at the album here: https://www.flickr.com/photos/42918210@N02/albums/72157673805943793/with/31192649580/ Holiday train pulling into the station: A good look at the additional train cars designed by @mouseketeer This is a good look at how I winterized my train station and you can see my traffic signals and the sidewalks inspired by @alex54. Christmas tree farm Winter bakery with a bench outside Skating area and village market area Post office and bus stop My ski slope with train tunnel underneath: Santa taking off for Christmas Eve deliveries: One final shot of the train heading into the tunnel Let me know what you think.