Search the Community
Showing results for tags 'volvo'.
-
 Hello everyone! I posted a new video to explain how I built the tracks and the tensioner for my cutom Volvo excavator.
 -
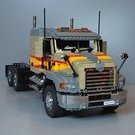
 Yes, another C-model of the 42078 set In the last 3 months I enjoyed my spare time in building a C-model of the 42078 Mack Anthem. My truck is an 8x4 flatbed version, with foldable crane behind the cab. I worked a lot on the cab shape, as already mentioned in @grego18f topic, who was building a Volvo FH too! It has opening doors but no tilting cab and no fake engine (I preferred a better looking cab than changing the shape to let the cab tilt). The crane is functional (all functions are manual), knobs are on both sides of the model. Main problem is the absence of the turntable. The crane is quite stable, but of course cannot load heavy loads. You can of course mod it adding a small turntable Outriggers control knob is on the back: I added 2 attachments: fake hook with chains, to move a small container, and forklift to move small pallets. Video: Model consists of around 1500 parts (so you have around 1000 leftover parts - mostly small parts and Lego System bricks). Instructions can be found on rebrickable: https://rebrickable.com/mocs/MOC-34643/technicprojects/volvo-crane-truck Stickers are custom made and could be available for purchase soon. I hope you like it!
 -
 Piece count 2193. Price 249.99 EUR. Special part and features: - New C+ motor with horizontally driven axis (like LEGO ® Spike 45602 (Large Angular Motor) - 1 Control+ XL motor, 1 Control+ L motor - Control+ Hub - 2 Land Rover mudguard 15 x 2 x 7 46882 in yellow for front wheels - XL linear actuators - 1 Corvette mudguard 42531 in LBG for dashboard - 3 new differentials, 1 old differential for center diff - Small panels #21 and #22 in yellow - Shell panel 3x7 in yellow - Curved panel 3x13 in yellow Functions: - Driving - Steering - Lifting and lowering bed - Hood can be opened manually Go nuts
 -
 The Volvo FMX is an oddly styled truck, its bulldog nose like design stood out to me instantly. Having an inherent weakness for the odd I decided to build one all the way back in 2015. Four years later I proudly present my latest model :). Developing the Palfinger crane took the better half of the development time for this model. In order to house all the electronics necessary a flatbed truck design was chosen with 4 axles, 2 under the bed and 2 to support the crane and cabin. The crane is operated by 3 servo-controlled pneumatic switches, the newer style switch allowed me to build this more compact than we ever could! The Pneumatic cylinders for the extension sections have been modified to allow for a more realistic reach. Two original cylinders were cut and acetone welded together for each one of them. The compressor is powered by an L motor and assisted by a rubber band to reach the pressures necessary to operate the crane. The crane is able to reach the back of the bed, as was my goal, but isn't able to lift much anymore then, the limit of pneumatic control is really stretched when a single-cylinder needs to push an arm of 30+cm on a point 5 studs away from the pivot point. With all this functionality, details are fun but also frustrating to add. Two tiny tool compartments have been fitted on the rear of the truck stowing away lifting equipment. The engine is only built for the upper 2/3 to accommodate for the suspended axles and steering mechanisms. The model is also fitted with a full custom led kit. A custom electronics board with an Arduino pro mini takes the signals from the Sbricks and converts them into turn signals, driving lights, hazard lights and much much more. More can be seen on the Flickr album and in the Youtube video!
 -
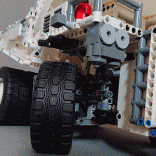
Volvo H9X Specification of the excavator Length 60s / width 31s / height 20s (47/24,5/16 cm) - without excavator arm Max dimensions of excavator arm: 60x35 cm(length x width) Weight: 3637 g Front suspension: none Rear suspension: none AWD Steered both axles Power - 2x 8878 BB 3x M 4xL 2x XL 3x Servo Specification of the trailer Length 55s / width 25s / height 17s (44/20/13,5 cm) Weight: 1398 g Power: 1x 8881 BB 1x XL Functions Driving - 2x XL Steering - M Gearbox - M Lifting the blade - M Excavator rotation - L Movement of the arm - 3L + 3 Servos Lifting the trailer's tipping bed - XL Today, I want to present wheeled excavator Volvo H9X with trailer. Model was built for Lego contest „Build the construction machines of the future”. Later it received many improvements… In short: it is wheeled excavator without operator’s cabin. I didn’t pattern the model on any real machine. As a scale I took Claas’s wheels. For driving there are two XL motors, which drive the 4 wheels, through two-speed gearbox. First gear ratio is 5:1, and second 1,8:1. The gears are changed by M motor and two 1x7 racks. Both axles are steered by M motor with gear ratio 3:1. In the front there are blade, driven by another M motor. In the upper part of the excavator there are three comperssors for three pnematic functions. First, which drives the four big pnematic cylinders, consists of L motor and two pnematic pumps. Next two compressors are the same (L motor + one pump) and they drive the pneumatic cylinders for moving second section of the arm and the bucket. The valves are steered by three Servos. For excavator rotation I used L motor with gear ratio 155:1. In the front there are double Led lights, powered by a switch. The trailer is a simple liftarm construction. The bed is tipped by one linear actuator driven by XL motor. It is powered by switch, because of lack of free channels on the IR receivers. Gallery
-
Volvo dump truck, with tipper bed from set 4434. Rear Wheel mudguards need to be attached to the bed....
-
 Hey guys, here's a new project I started recently. It is a model of the Volvo EC350E excavator, featuring pneumatics and SBrick control. As of right now I have the superstructure completed. All electronics for the model are contained within here. At the center of the superstructure is a 8043-style gearbox that switches the 3 L motors between left track, right track, and superstructure rotation, respectively, and boom valve, jib valve, and bucket valve, respectively. A M motor powers the gearbox shifting and the pneumatic pump simultaneously. This is possible thanks to a clutch gear on the gearbox shifting mechanism, allowing the motor to drive the pump even when shifting is complete. This will be my last MOC before I go off to college. I move in next Thursday, so I'll try to get at least most of it done before I leave. I won't be building as much anymore with college starting - maybe a MOC or two over breaks. However, if I don't get this MOC done before I leave I'll try to finish it in small increments in the weekends I come home. Photos:
 -
 Post your 42114 mods here. Does someone has a fix for the "hanging head" aka weak pivot joint for the front section of the truck?
 -
 Hey , i am Daniel ( new to the site btw) i am sure that many of you know the volvo a40g made by dgustafsson13 4 years ago , since the first time i saw his video i wanted to have mine , so few months ago i started making it. My main requierement was to make a working tiltable bed , for that i had to fit 3 motors , after finishing the chassis i started with the rest which was very challenging because i tryed to match as much as possible my version with dgustafson´s.The hauler turned into cool consisting of 1150 parts and FREE INSTRUCTIONS (i was allowed by Dgustafsson) LINK TO REBRICKABLE (FREE INSTRUCTIONS): https://rebrickable.com/mocs/MOC-42577/DLTC /volvo-a40g-articulated-hauler-dump-truck/#parts VOLVO A40G Articulated hauler Render of the mechanisms : -Dark purple : drive -Green : steering -Red : bed tilting Sticker sheet with display sheet is avaiable here : https://www.ultimatecollectorstickers.co.uk/product-page/lego-technic-ucs-moc-sticker-for-volvo-a40g Here you can see dgustafsson´s video: IF you like my work , you can support it : https://paypal.me/DAngos?locale.x=es_ES Inatructions were designed using a sbrick but it can be built using Buwizz or IR (i have recently tryed with buwizz and infrared myself and it was easy to fit)
 -
 Hi Lego friends! A short video of my Lego truck, a Volvo F12 Globetrotter log truck. I've been building it over the last couple of years, when money and energy has been present. It's close to 1:10 in scale and weight is 7,1 kilos. It's driven by two buggy motors and the steering is provided by one XL motor. Until the other day it also had a gearbox, but when making the video that gearbox failed utterly so I removed the whole thing and connected the motors straight to the axles for now. There's some more information in the video description if you are interested in the build. It's quite uncertain if I will work more on this truck or not, maybe it will be scrapped, but at least I wanted to share this short video of it here. Hope you enjoy!
 -
 Hi Again, I can not find an unopened boxed set of 42030 in perfect condition. I of course will pay as long as the price is not "over the clouds". I live in Istanbul. Can anyone help me in this? Many thanks in advance, Idris PS: The admins can lead me to a "buying-selling" topic, if any, because I couldn't find one as a newbie.
 -

[WIP] Volvo L350H
grego18f posted a topic in LEGO Technic, Mindstorms, Model Team and Scale Modeling
Hi, I recently went back to Lego after a while and have decided to try replicating the new Volvo L350H wheel loader. This MOC is meant to fit the scale of my improved Mack Anthem (dimensions corrected): So, it is roughly 1:22 scale. The finished product will be red (yeah, another red loader) and will be equipped as the one above.All of the functions will be manual, except the arm movement operated thanks to Power Functions. I have obviously begun by the front end of the loader. This was quite hard for me to put all the functions in, as the quasi-vertical cylinders, while keeping proportions correct. The front is quite robust, and functions run smoothly. I think I manage to get a correct Z linkage (see photos). I am now building the rear part of the loader. It will have a 42078 inspired engine as I think the Lego cylinders are way too big for this scale. In addition, there will be a pendular axle and easy battery replacement. Mechanical functions will be operated by an L motor via gearboxes. In the following photos, you can see how I progressed. At this stage, there is mainly beaming to delimit the spaces (cabin, trunk, etc). At first, I wanted to put two two-way gearboxes, but it resulted that I have not enough room because I am limited to 7 studs wide in most parts of the loader (this is partially due to the 94.8 wheels and scale). I ended up with a simple gearbox... Be aware, the gears are not held properly, but I just wanted to show the routing. This one is meant to reduce the number of gears and thus maximize lifting capacity. https://bricksafe.com/pages/grego18f/mack-granite/volvo-l350h If I submit this loader at its early development stages, this is to obtain your feedback. I really think there is room for improvement (and maybe two-way gearboxes!). So, any suggestion is welcome. At the same time, I am reworking the lower central articulation. In the previous iteration, I realized there would be 2 studs ground clearance. That is why I ended with the actual design (allowing 3 studs ground clearance). I am not yet satisfied with the connection because it limits the lateral movement of the U-joints… That’s all for now ? -
Hello! In march I completed my latest Moc, and today I took some photos. It's a wheel loader Volvo L 350H in 1.22 scale. It is an updated version of L 350G by Lego, which I used as parts pack. The bucket is in 1.22 scale, so I decided to build in this scale. I used XL motor for driving, and M motor for steering, by 2 mini LAs. Arm and bucket are controlled by L and M motors, and they have quite good movement range. Battery box and receivers are inside the bonnet. The tyres are third party, 96mm diameter. Sticker are home made! I hope you like it!
-
Inspired by official lego model 8264 Hauler with enhanced functions: * Openable hood with fake 3-piston engine (driven by front wheels) * Independent rear swinging suspension * Articulated chasis with big and small turntables in the centre - HOG controls turning, tilting of the model copies surface it runs on * Bigger manually operable dump bed with automatic closing back side via string * white bodywork, black cabin, gray dump bed There is no motor and battery box (as in original model), I wanted to have all functions operated manually, it gave me place to create exhaust system behind the cabin Except parts from 42043 set, you would need at least 30cm string 74 pages of generated instructions (A4 landscape orientation) details and instructions: https://rebrickable.com/mocs/MOC-23454/klimax/volvo-articulated-truck-42043-mercedes-benz-arocs-3245-c-model-inspired-by-8264-hauler more pictures: https://bricksafe.com/pages/klimax/volvo-articulated-truck-8264-alternate-42043-c-model Model sturdyness tested by 3 years old child :)
-
 I am finally done with my first real MOC that I am happy with and proud to show to all of you LEGO fans out there. This is my version of the Volvo L120H wheel loader. It is build in scale 1:17. I have used a M-motor for the sterring and bucket tipping, a L-motor for the bucket-arm lifting and a XL-motor for the drive. All of them are geared down to ensure enough power (except the sterring). I am using two standard IR receivers and the small rechargeable battery pack. I have considered lights but I think the wires will look messy. I am considering building it in Stud.io to get a brick count and if I do that then instruction might be an option. I have made it from these specs (page 18): https://www.volvoce.com/-/media/volvoce/global/products/wheel-loaders/wheel-loaders/brochures/brochure_l110h_l120h_stagev_en_21_20057313_b.pdf?v=QA5EPw Worker on Studio gallery: https://www.bricklink.com/v3/studio/design.page?idModel=82000 Worker instructions: http://liex.dk/LEGO_MOCs/Worker_1-17/Worker - scale 1-17.pdf And now for the pictures, I hope you enjoy.
 -
I tried my hand at Volvo's construction truck, the FMX. This time I went for a smaller scale, 1:45 which should be around minifigure scale. The model features articulated suspension, allowing for some excellent posing and the bucket can be raised. For the rest it is really a display model. Note the detailed exhaust aftertreatment system closely resembling the real thing. I'm considering building some other Volvo models in this scale though I anticipate an FH to be quite the challenge. I've uploaded building instructions at ReBrickable.
-
 Hey everyone!The time has come for us to reveal a special alternate build for the 42156 Ford GT! We have rebuilt it to be a VOLVO iron knight.VOLVO IRON KNIGHT BACKGROUNDWithout further ado let's go into what the Iron Knight is. The Volvo Iron Knight is a race truck specially designed by the Volvo racing team that was specifically designed to be an absolute beast. The truck featured 4 turbochargers released 2,400 Horsepower and 4,425 pound-feet of torque. It used a dual-clutch system that is also included in most of Volvo's trucks but the whole body was redesigned to be a light, lean record-breaking machine! Features of our VOLVO IRON KNIGHT A realistic working V6 engine Iron Knight's unique exhaust and detailing RWD Rear solid axle suspension Front independent suspension HOG (Hand of God) Steering for front wheels Smooth drivetrain Racing Minimalist Interior Iron Knight lights Opening the front Grille to reveal the steering And it of course is only built from parts included in the LEGO 42154 FORD GT Suspension and SteeringThe IRON KNIGHT uses a solid axle in the rear and independent front suspension which is steered. The rear axle drives the V6 engine in the back of the truck. For looks, we decided to keep the model levelled for those who want a more aesthetic display of the model, this means that the rear solid axle suspension has limited suspension capabilities in its current state. This can easily be changed by doing a quick modification we are going to release to those who want this option on our website. The suspension modification simply moves the connection point of the rear suspension pieces down 1 stud! It's very simple and effective.....
 -
 I had seen the Volvo FH Aero cab a couple of times before it was publicly presented but I hadn't decided to actually build a lego version of it until the weekend before the press release Last week my model premiered at the Volvo Trucks Factory in Ghent, where I work. I'm not so happy with how the upper front grille turned out, my previous model really was spot on, in fact I dare even say that that one is the best out there when it comes to that section. But! There is a good reason why this one's upper grille is rather mediocre, I managed to include a cool feature that would not have been possible on the previous model; Cab Tilt! I have more pictures in my Brickshelf gallery, for some reason I am no longer able to embed those in here. You can check these out once the gallery is public: Brickshelf. As you can see in the video, the model is motorized: A System PoweredUp hub sits under the cab, an L motor for drive and angular M motor for steering are fitted in the wheelbase area. The model features front and pusher axle steering. However due to the unbalanced weight distribution I have experienced a lot of issues with the driving stability. The weight on the front axle is massive, giving the rear driven axle a hard time to find some grip on the road. A reflection I had; I'm quite happy with the fifth wheel, it's the first one I ever made and I wanted it to actually look like a real fifth wheel. Strangely no one else seems to care much about a realistic looking fifth wheel. Don't forget to check out my Volvo FH Hooklift!
 -
 Hi Folks, let me allow to share a new creation. This replica of famous Volvo Iron Knight Race-Truck is completely built with parts only from set 42156 Peugeot 9x8 Hypercar as an alternate model (B-model). Only a copy of donor set 42156 is needed to build this iconic truck. You can buy the instructions for this model here if you're interested in building. Features & Functions openable doors on both sides HoG-steering with removable knob independent push rod suspension in front and back V6-engine with moving pistons connected to rear differential openable lid in back to see suspension working Volvo brand with no sticker detailed design and interior lights that are glowing in the dark modular building with splitted premium PDF-instructions measures 44cm x 20cm x 18cm Impressions Headlights Lights in front are made with fluorescent bars from donor set to represent instantly recognizable headlights. A Lego addicted heart beats higher for the first time when the iconic V-shaped lights are glowing in the dark. No custom sticker Thanks to the inventory I'm happy to share my first model with a completely brick built front to recognize Volvo's brand only with pieces from 42156 and without any need for custom sticker. Suspension The model uses a soft push rod suspension in front and back. Due the fact that this truck is two studs shorter in wide than its base model, the suspension design is not only a simple copy, but an own approach with a way different building instead. Through an openable lid in the back, the suspension can be watched working. Steering Driving and steering the truck works directly with a steering knob on top of the cabin. This steering knob is removable and can be easily pulled out for better displaying the model. Engine The real Iron Knight uses a straight 6 piston engine instead of V6. Due limited inventory and missing crankshaft parts, it was not possible to form a straight working engine out of V6. Some compromises are made here and as a result, this alternate model uses a working V6-engine with moving pistons. Instructions & building process Premium instructions for this model comes in two separate PDF-files with high quality images and building steps very close to the original Lego Technic ones to ensure a satisfying building experience. Building this Iron Knight alternate model starts with the 249 pages long main PDF to finish the rear end first with differential and suspension included. The second instruction file takes over to assemble the entire front section together with a suspension and steering system you never built before. After 132 pages the front section becomes married with the rear end. Frames and structural elements are added to make the model solid. The working V6-engine becomes attached and connected to the rear differential through drivetrain. More parts are added to form characteristic lines and shapes, getting closer to a real looking Volvo Iron Knight. Some parts of the cabin are attached and the drivers seat and doors take place at their final spot of the model. After 381 pages of joyful building in total, this Volvo Iron Knight alternate model is finished in all glory and ready to drive on your shelf or desk. Grab instructions here Crafted in Sweden. Rebricked with passion in germany. Have fun with this 42156 Volvo Iron Knight alternate build. Follow me on Instagram
 -
 Hi guys and gals, today I'd like to present my MOC based on an old Volvo LM 841 Front Loader: The main goal was to achieve the mechanism used for the bucket with the oddly placed hydraulic/pneumatic cylinder. Due to stability, I used a 3x11 panel and could get the right mounting point for the small cylinders. Also, the narrow 1x11 cylinders I intended to use for the lift weren't strong enough, so I went with the stronger 2x7. This sadly led to a lower lift height. Pneumatic pump is placed in the cabin like in the 8455, while I rather place a fake 6 cylinder engine in the hood. In this size I went with front driven engine, although the real thing is 4WD. Main functions are: - steering with pendular rear axle - lift of the bucket - tilt of the bucket - fake inline 6 driven by front wheels I just love older equipment, which gives more a feel of old Lege technic also :-)
 -
 Hello! I recently found a 42114 Dump truck at a toy fair and picked it up super cheap, as the seller wasn't sure if it was complete or not. It looks like someone started building it, then either lost interest or lost parts. It's missing all of bag 3, which is annoying but not the end of the world! So I was wondering if anyone either knew where you could search what parts should be in each bag, or know where I could buy bag 3 on its own? I know I can get the parts listing off Bricklink, which I've been doing, but it's a slow process! Any help would be most appreciated! Thanks in advance
 -
 I can say that since I saw the first photos of the 42114 set, I already had an idea for an alternative model. Unfortunately, as usual, the idea had to wait to materialize. Photo for comparison with the original: Despite the fact that the 42114 kit has problems with the articulation and a fairly limited number of useful elements, I saw potential in it. Six wheels and Volvo stickers were enough to conclude that Volvo also produces graders. I waited with this idea to start building the model for almost a year. First, I assumed the model was to use the official model A control profile. I had to use the gearbox. I explored this topic while building a Mining Dump Truck. Despite the massive rear section, the positioning of the gearbox and engines proved problematic. I moved the wheel hubs down to gain more space and that was the right direction to build. As a result, I have a lot of space for details such as the radiator, engine grille and internal air filter. Thanks to these elements, the back part is nice to build and the whole process does not get boring. Even before starting work on the grader, I knew that the front part would be a challenge. I immediately got a realistic look at the steering. I placed the motor over the front axle as far as the cable length would allow. The steering works freely, much better than in the A model. The front frame is quite an interesting story. I was concerned that the long section itself would bend. It turned out, however, that the biggest problem is that the frame is firmly attached to the rear part. Finally, the entire cabin, including the roof, stabilizes the entire vehicle, which is very long (67 cm). I am satisfied with the blade section. I managed to get the nice look of this part by turning over the linear actuators. Thanks to this, the mounts are not so massive. The blade rotates on a small turntable and is stabilized with liftarms on the sides to eliminate backlash. It can be locked in seven positions: perpendicular - 0 degrees, and left / right at angles of 30, 36, 43 degrees. An interesting fact is the arrangement of the control plus elements. The Technic hub is centrally located to allow easy access to the battery compartment. I have placed the motors in the outermost parts of the model and the cables are 100% used and no motor could be moved even one stud away. An additional interesting feature is the ripper. It is lowered manually and locked. It turned out very aesthetically and has a very positive effect on the appearance of the entire model. Marton from forwartsticker designed a custom sticker sheet for this model, thanks to which the whole thing looks amazing. Building instructions: https://rebrickable.com/mocs/MOC-83625/M_longer/42114-volvo-g990-grader/ Custom sticker sheet: https://forwartsticker.com/termek/fws74-moc-83625/ Photos and Video:
 -
 Hello! This time I'm presenting this Volvo car model. Finally, it has a suspension in a small scale - front rubber band one and rear live axle one. There is a buggy motor for propulsion and a Servo for steering. BuWizz 2.0 is powering all the electric functions. The whole body is very sturdy (despite some parts in the front), so it can handle some load. Also, I need to say that the suspension is working pretty realistically to me, so it is a success for me. :) Pretty simple model, but very fun to drive it around! It also was a good challenge to keep it recognisable in such scale. I hope it turned out great and you will like it! :D Video link: Photoes: Thank you!
 -
Finally I found the time and motivation to continue the work on my Volvo FH16 6x4. Earlier I got the 2 speed transmission to work by a M motor, raise and lower the rear axle by a M motor, steering by a servo motor and drive back and forward by a L motor. The last few day I got the fifth wheel to work by a M motor and I also fitted the fake inline 6 cylinder motor. I have finally began to work on the cosmetics, beginning with the fenders. Yesterday I changed fuel tank design, I started on the cabine where the rough outline and design is done. I have also chosen that I am using the CADA battery, as it is 2.4 Ghz, have 4 channels and has a controller that I can build on. This battery box have been mounted and all the wires have been routed in a clean and controlled way, with bricks on key places to prevent the wires to go into all the gears. Now all that's missing is the doors, interiors, the front grill and some minor details. Note about the colours, they shall all be coordinated when I am done, some bricks are not the right colour. I think that the black cabine will make many of the details blend into the cabine, hence I am thinking of making it white or red. What do you think, shall I go with black, white or red cabine? Enjoy the pictures.
-
 This model based on one of the famous Volvo truck - Iron Knight. The main idea was to replicate this truck in small scale and use for this just parts from Lego set 42123 McLaren Senna. Definitely not all shapes and parts of the original truck I was able to build properly, but I think it is compromise in scope of limited range of parts. Instructions: link to intruction Dimensions: 15x37x15.3 studWeight: 516 gFunctions:1. HoG2. Working V8 engine driven by rear axle3. Openable doors4. Detailed exterior