Search the Community
Showing results for tags 'metro'.
Found 8 results
-
 Model of a 2003 New Flyer D60HF articulated bus from Metro Transit in Minneapolis-Saint Paul, Minnesota. The model features motorized drive, steering with working steering wheel, a removable Cummins ISL engine model, and pneumatically operated passenger doors. Functions/features: Drive Steering Working steering wheel Removable Cummins ISL engine model with moving pistons Pneumatic passenger doors Instructions available on Rebrickable: https://rebrickable.com/mocs/MOC-245043/JLiu15/2003-new-flyer-d60hf-metro-transit-bus/#details In the 1990s and 2000s, Metro Transit in Minneapolis-Saint Paul, Minnesota ordered a large number of New Flyer D60 high floor articulated buses. Nicknamed the Galaxy, the D60HF entered production in the late 1980s and was produced until 2006 as a final option of a Metro Transit contract. The final units produced for Metro Transit in 2006 were the last high-floor articulated buses ever built in the United States and Canada. Over the years, Metro Transit's D60HF buses were gradually replaced with newer New Flyer D60LFR and XD60 articulated buses, and the final units in Metro Transit's fleet were retired in late 2021. My model depicts bus 3143, which is a 2003 model built in January 2004 and now privately owned by a friend of mine in Pennsylvania. Prior to its retirement, 3143 operated out of Metro Transit's South Garage, and later out of Heywood Garage in May 2020. A number of 2003 units were already retired by Metro Transit in 2016, but 3143 and several others were returned to service in May 2020 to provide space for social distancing amidst the COVID-19 pandemic. The remaining units were also retained for service during the 2021 Minnesota State Fair in August-September 2021, and were retired shortly after. 3143 operated in revenue service for the last time on September 5, 2021 and is among the final D60HF buses in Metro Transit's fleet to operate in revenue service. I had the opportunity to see 3143 in-person at the 2022 NJ Historic Bus Festival, which inspired me to eventually build a LEGO version of it. The building process began in summer 2024, starting with the rear section's chassis. Because the model was likely going to be heavy when finished, I used two Power Functions XL motors for propulsion. The two XL motors are placed transversely in the chassis, between the rear door and the rear axle, and are hard-coupled using knob wheels. Placing the motors longitudinally would have required more length, which was not ideal as the rear door and rear axle are relatively close to each other. This section is designed to be very compact, with the two XL motors taking up all available transverse space between the outer body panels and the rear door and rear axle placed as close as possible to the motors. This allowed me to still have space behind the rear axle to include a Cummins engine model, as the real-life version is powered by a Cummins ISL engine. Thanks to the high-floor design of the original bus, I was able to include a floor made using flat Technic panels, with gaps kept to a minimum. This had the benefit of keeping many mechanisms hidden as well, such as the steering mechanism, which is placed entirely under the floor except for a small portion of the PF servo motor that's exposed. The steering motor's output is also connected to the steering wheel. Unfortunately, some of the bevel gears connecting to the steering wheel are exposed as their diameter prevents covering them with Technic beams/panels. A challenge for this model is the articulated joint with seats in it - the real-life version has four passenger seats in the articulation joint's turntable which rotates halfway relative to the front and rear sections during a turn. Keeping the floor continuous here was particularly challenging as it is perfectly circular on the original bus, and perfectly round shapes in LEGO are rather difficult to create outside pre-made circular pieces. In the end I went with a design using panel fairings 2387/2389 around the perimeter of the floor section at the articulation joint, and the floor flows pretty seamlessly from the front to the rear section. The bellows use the same principle as in my New Flyer XD60 model, but thanks to the floor section at the articulation joint, I was able to keep all the rubber bands maintaining the shape of the bellows hidden beneath it. There are 68 passenger seats (34 in the front, 30 in the rear, and 4 in the articulation joint), consisting of a mix of high-back and regular ones. Another friend of mine owns bus 3200, a 2006 model, and I was able to design the seating layout exactly like in the original bus thanks to photos provided by him. AFAIK, the 2003 and 2006 models are largely similar to each other, and many of my model's details were done accurately thanks to his photos. Above the chassis and interior, there is a Technic roof frame in both the front and rear section housing two independent pneumatic circuits for the front and rear passenger door. Because the two passenger doors are independently controlled, I made each door use its own compressor and valve instead of e.g. having them share a compressor but using their own valves. A PF L motor is used for each of the pneumatic circuits, driving both the compressor (geared up 5:3) and the valve through a clutch gear and 3:1 reduction. The compressor/valve setup is built in a compact manner to ensure a mechanically efficient mechanism as the clutch gear slipping and the compressor add a significant amount of friction. They are placed below where the roof AC units are located in the finished model, as the valve's lever extends past the roof height slighly when passing through the middle position and the roof AC units can be designed hollow to allow the lever to pass through. Although I tried to ensure that the hose lengths for the front and rear sections are largely identical to each other, I still noticed the rear door to open and close slightly faster than the front door. Nevertheless, the pneumatic doors are one of my favorite features on this model, because its movement is much more realistic compared to if it was purely mechanical (e.g. a linear actuator or a worm gear). Designing the bodywork was relatively straightforward, and because Metro Transit uses a yellow and blue stripe for the livery, I was able to easily make it using LEGO pieces. This kept the need for custom stickers to a minimum. I had already designed much of the bodywork in Stud.io by January 2025, and the Metro Transit livery was recognizable even without stickers. I also like how the front destination sign turned out, as the protruding curved destination sign design is one of the iconic features of New Flyer high floor buses. This is further pronounced by the fact that Metro Transit has the area around the destination sign painted in yellow, and I feel my design captured the color break here pretty well. I also like how the rear turned out, especially for the rear grille and destination sign. However, there were still some shortcomings with the design, especially with the front and rear lights. The amber turn signal lights on the front and the two center brake lights on the rear of the real bus are much smaller, and it was difficult to go smaller than one-stud width for these lights. The side windows also had some inaccuracies which I feel could've been remedied by considering the body panels' design while designing the chassis and seating layout. Because of the position of the doors and seats, I had to make some windows smaller/larger than others by a stud (when they look to be all the same size on the real bus) to prevent the windows' positions from looking out of place relative to the doors and seats. The roof is largely made using 6x6 tiles, and because the PF rechargeable battery box is placed near the rear of the model facing upward, I added a switch on the rear that can be used to press the power button on the battery box, as well as remove a section of the roof to access the battery box for charging. The roof AC units on the real bus are sloped towards the top, and thanks to the 5540 piece becoming available in white, I was able to capture the slope shape of them while maintaining a seamless finish with the top surface primarily made using tiles. I'm overall satisfied with this model turned out. It is my fourth motorized bus model and my largest MOC to date (with over 6600 pieces). The model performed well mechanically, and the two XL motors do not struggle at all to move the heavy model. While I was initially concerned about the pneumatic door mechanisms having more possible points of failure than a purely mechanical design, the doors worked as expected every time I opened and closed them. Despite some shortcomings with the aesthetics, I had a great time designing and building this MOC, especially with this being my first time doing a model of a specific unit privately owned by a friend. It's also my first model of an older retired bus, as my previous bus models were all of newer buses in active service. Video: Photos:
 -
All my bus models up to this point have been of buses currently in active service. However, my next bus model will be of an older, retired bus: Metro Transit's 2003 New Flyer D60HF. Metro Transit, the transit operator in the Minneapolis-St. Paul metropolitan area, ordered a large number of New Flyer D60HF articulated buses in the 1990s and 2000s, with the final buses in 2006 being the last high-floor articulated buses ever built in the US and Canada. Over the years, they have been gradually replaced by newer New Flyer D60LFR and XD60 articulated buses, and the final D60HF buses were retired by 2021. A number of units were bought by private owners after retirement, such as #3143 (a 2003 model), which was exhibited at the 2022 NJ Historic Bus Festival. My plan is to make my model be of bus #3143; the simple yellow/blue livery should be easy to build in LEGO so the amount of custom stickers for this model should be minimal (only the fleet numbers, Metro Transit logos, and destination signs come to mind). Thanks to the high-floor design and the boxy build of the original bus, it should be easier to incorporate mechanisms into this model as opposed to my New Flyer XD60 model as New Flyer Xcelsiors are low-floor buses. The chassis can be reinforced much better (I could probably make it 5 studs high throughout the bus, same as the rear section of my XD60 model), and I may even be able to place all electronic components and mechanisms in the chassis without placing any (e.g. the doors mechanism) in the roof. The model will use Power Functions motors and will be controlled by SBrick. The tentative list of functions/features for this model is: Drive (with two XL motors; my XD60 model with one XL motor felt a little underpowered) Steering (with working steering wheel) Pneumatically opened doors (one of these per door) Cummins engine model (with new engine elements from 42170 Kawasaki set) Bike rack (removable) The design process starts out by using my New Flyer XD60 model as a base to determine the locations of various features (axles, bellows, etc). I plan to use 49.5x14mm tires for this model, as they offer better proportions than 49.5x20mm tires. The middle and rear axles with double wheels can also be spaced further apart, allowing me to use a 5.5L axle with stop and thus prevent the half shafts from pulling out from the differential under load, an issue experienced with my XD60 model. I still need to determine the seating layout of the original bus, which will make it much easier to design the chassis without needing to make adjustments later on for the passenger seats. I also plan to use the new engine elements from the 42170 Kawasaki set in the Cummins engine model, as the axles-and-bushes design is a bit noisy and I've found it to jam a few times too when using it in my previous bus models. Side note: I have found the new Kawasaki engine pistons to not "click" properly in place to a liftarm, stud or the crank disks in Stud.io - maybe this is just due to these parts being new and not having been really refined yet in Stud.io? Would love to hear any other experiences with this. There's still much to be done, but I'm looking forward to this MOC. I've already built an articulated bus model, and this one should be more straightforward with the high-floor and boxy design. I strive to add something new in every one of my bus models, and I'm curious to see how the pneumatic doors turn out (all my previous bus models used mini linear actuators or a worm gear for the door). If you guys have any suggestions for me, please let me know.
-
Metro Exodus - Aurora Steam Locomotive Hello to everyone, Metro Exodus, inspired by the novels of Dmitry Glukhovsky, is the first game to be fully established after the books, not between them or among them. Aurora is in the game, with the steam locomotive Lego design. The Aurora (Russian: Аврора) is a heavily modified steam locomotive, boarded by Artyom and Anna to find a new home far to the East in Metro Exodus. It serves as a mobile base for the player. Yermak is the Aurora's helmsman, while Miller serves as its crew's leader. The Aurora is a "duplex" locomotive, with two sets of driving wheels in what appears to be a 2-8-8-4 configuration, which means a forward pilot truck with two wheels, two sets of driving wheels with eight wheels each, and a rear trailing truck with four wheels. In Russian configuration, this would be a 1-4-4-2. The locomotive may be a heavily modified Russian P38 articulated locomotive which were the biggest and heaviest Soviet steam locomotives in existence. It might also be based on two Soviet IS20 locomotives (like IS20-317) combined into a single engine. Those were made from 1932 to 1942, and were used even all the way up until 1972. Most were scraped in the 1980's due to larger locomotives had taken there place on Soviet railroads. This is the first steam locomotive in the Metro series of games. The locomotive that was converted into the Aurora could have been taken from one of several Moscow's railway museums, where some steam locomotives are preserved in a fairly good shape, despite their age. Source: https://metrovideogame.fandom.com/wiki/Metro_Wiki specification: 6600 Parts 2-8-8-4 configuration wheels Full Interiror design Light bricks for engine room Old Railway snow base 9 Minifigs 1-Artyom - The player character and protagonist of the game, returning from previous instalments of the series. 2-Colonel Miller - The Sparta Order's leader, commander of the Aurora 3-Anna - Artyom's wife and best sniper of the Ranger Order 4-Yermak - Helmsman of the Aurora as well as the driving force behind all of its mechanisms, he used to work as personnel in the Moscow Metro before the war. 5-Idiot - One of the smartest men aboard the train, he is considered its resident philosopher. 6-Tokarev - The weapons expert of the armoured train's crew, responsible for creating many of the Order's weapons and modifications 7-Stepan - Specialising in heavy weapons as one of the strongest fighters aboard the train, he is taller than all members of the Aurora's crew. Even though he may appear intimidating, Stepan is a hopeless romantic and always wants to help those in need. 8-Katya - A trained nurse who initially survived with her daughter in the Southern Urals, she moved north towards the Volga River. They were both captured by the Church of the Water Tsar and its leader Silantius. 9-Nastya - Katya's daughter, was captured by the Church of the Water Tsar along with her mother. Particularly hated Silantius as he smashed her flashlight in his technophobic zeal. in-game dialogue: Idiot: "How about Aurora? The Roman goddess of dawn and a cruiser of, uh, you know what... Alyosha: "Not bad! I like it." Yermak: "a beautiful name..." Sam: "Sounds OK... but a cruiser of what?" Alyosha:"I'll tell you later..." Miller:"Looks like it's decided..." Miller:"Lets drink to AURORA!!!" TO THE AURORA!!! for to high resolution photos: https://www.flickr.com/photos/hasskabal/albums/72157712735244367 Thanks Everyone, hasskabal Hasan Kabalak
-
I've loved the 4554 Metro Train Station ever since I was little. It had always been "The ultimate train station" in my mind and something I wanted over any train station that was out while I was growing up. (4554 came out almost a decade before I was born if that gives some context). Anyway, I finally got it a few years ago and it's still very cool, though it does have the feature of an open back and a not deep interior for play. I recently got a full workstation for Lego building up and all my parts organized in drawers, so I thought I'd try and remedy that. However, I've modified old sets in the past, but for this one, I wanted to create a back without modifying the original set in the slightest. Here is the original 4554 set for reference. And here it is with my extension. I tried to essentially mirror any details over from one side to the other, such as the 1x1 round plates under the tiles or the 3 cones on the top. There were many different ways I could've gone for the back, but I decided to make it rather plain. I could do something in the center to try and get the columns and arches over the doorways to this side, but I only had one of those doors. Oh well. If it really bothers me, I can make some bricklink orders in the future, but for now, I'm happy. The rear section on it's own I hate leaving any of my builds without an interior, and I felt the 4554 was missing some more detail on the inside, so I added it here. Another bench on the left side mirror the original one to create a better waiting room. The white thing is a train schedule. The only issue is that it's a different print than the 4554 one. Maybe that'll be another order someday. On the right, I added some ticket machines and a small table. Upstairs is a switch control area. I don't know what they are actually called, but basically the thing to replace switch towers. I have no idea if they're typically in train stations, but I thought the space was cool to use it as such. Here you can get an idea of how the two sections key into each other. I've found the big issue with not modifying the original set is that since there are no actual locking mechanisms in place, the building can have a split or gap in certain places where it is flush in others. However, this should go away with attaching both parts to a baseplate on an even surface. Here are some closer photos of the interior, both with the building open and closed. After this project was done, I decided that I wanted another station, so I built a tiny station to compliment the main station. As you can see on the platform, there is another train schedule that is different than the other 2! Oh well. Like I mentioned before, I finished my ideal workstation and organization recently, so I have been building all the time now. As of writing this, I also have built a small bridge and have started work on an engine shed to replace my original set that I took apart as a not smart kid, but I'll save those for another post. Thanks for looking!
-
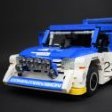 Hi! so, this is my first post on Eurobricks, I did actually make this model about a month ago, but I thought I might as well share it here too. MG Metro 6R4 by All.About.Lego, on Flickr So, here is a list of its functions: Front and rear independent suspension 4-wheel drive (RC) steering (RC) Working front and rear lights (RC) opening doors opening rear door/boot/bonnet (or whatever else you want to call it)... A detailed interior (with a roll-cage and seats) and loads of stickers... MG Metro 6R4 by All.About.Lego, on Flickr In total this model has 9 PF components: 2 L-motors, 2 pairs of lights, 1 servo motor, 2 AAA battery boxes, and 2 receivers/remotes. It was a bit of a struggle to cram all of them into such a small MOC, while still having independent suspension, and 4-wheel drive, but luckily I still managed to do it! This is the chassis I used for it: Lego Technic Compact 4-wheel drive chassis by All.About.Lego, on Flickr and of course, since I was doing the 6R4, I had no option but to make almost 40 stickers, just so I could recreate the iconic 'Computervision' livery which some of the 1980's group B rally cars had. MG Metro 6R4 by All.About.Lego, on Flickr that's pretty much everything, so I hope you like it, and any comments would be apprecited! Here is the YouTube video: Some more pictures: MG Metro 6R4 by All.About.Lego, on Flickr MG Metro 6R4 by All.About.Lego, on Flickr MG Metro 6R4 by All.About.Lego, on Flickr MG Metro 6R4 by All.About.Lego, on Flickr4 MG Metro 6R4 by All.About.Lego, on Flickr MG Metro 6R4 by All.About.Lego, on Flickr MG Metro 6R4 by All.About.Lego, on Flickr MG Metro 6R4 by All.About.Lego, on Flickr MG Metro 6R4 by All.About.Lego, on Flickr here are some pictures of the original car: MG Metro 6R4 - Original car by All.About.Lego, on Flickr MG Metro 6R4 - Original car by All.About.Lego, on Flickr MG Metro 6R4 - Original car by All.About.Lego, on Flickr
 -
Hello Eurobricks community, I would like to share my newest design that I've been working on for many months and now it is finally complete. Please take a moment to read the description and see all the photos for all the details of the set! https://ideas.lego.com/projects/100353 As train enthusiasts, I would love to hear your opinions and criticisms of my design. If you have any questions, I will be glad to provide more information.
-
http://www.mocpages.com/moc.php/399235 My LEGO Square..... I hope you guys enjoy
-
 Hi, At the recent Lego World 2013 in Copenhagen I displayed my model of Islands Brygge Metro Station including NXT controlled sliding platform doors. This model is the fourth in a line of trains with automatic sliding doors, that I have built over the last years (version 1, version 2, version 3). I have compiled a short video to show all the functionality including some "behind the scenes" footage: The NXT controls the following: Output 1: Running the train on the inner loop (9V) Output 2: Running the opening mechanism for the three sets of platform doors and three stes of train doors Output 3: Running the elevator Light sensor: Stopping the train at the platform (accuracy: 1 stud) Distance sensor: Detecting the lower position of the elevator (dynamically calibrating the elevator cycle) Touch sensor: Detecting the outer position of the opening mechanism (dynamically calibrating the cycle) In addition, there is a 9V metro train running on the outer loop and PF lights on the platform wall and over the platform door. Some images of the station, which was part of a bigger display of Islands Brygge, a central neighborhood in Copenhagen: After moderation, more pictures can be found here. The station is modelled very closely after my local metro station, though I have reduced the number of opening doors to three sets. Here are some reference pictures: I am looking forward to your comments. Esben