
Lipko
-
Posts
2,118 -
Joined
-
Last visited
Content Type
Profiles
Forums
Gallery
Everything posted by Lipko
-
 Lovely model!
 -
20. Backhoe Pneumatic features: -backhoe bucket curl -backhoe boom elevation -backhoe dipper/stick in-out -backhoe boom swing -stabilizers -loader boom elevation -loader bucket curl Other features: -four-wheel steering with Hand of God and working cockpit steering-wheel -pendular front axle -rotating seat -opening bonnet Video: Discussion topic:
-
[TC10] Backhoe
Lipko replied to Lipko's topic in LEGO Technic, Mindstorms, Model Team and Scale Modeling
Thanks for the replies! I added the video to the first post. -
[TC10] Concept Dozer
Lipko replied to Thirdwigg's topic in LEGO Technic, Mindstorms, Model Team and Scale Modeling
Nice concept and beautiful implementation. I wonder why real machines don't use that setup, it has much better for visibility. -
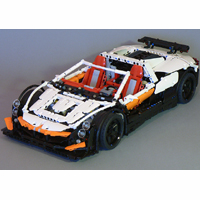
[MOC] Porsche 918 Spyder
Lipko replied to Jonfensu's topic in LEGO Technic, Mindstorms, Model Team and Scale Modeling
It's beautiful (though I agree that the color scheme should be improved/finalised). The building style reminds me of Crowkillers' latest cars, and I like this style the most. -
[TC10] Backhoe
Lipko replied to Lipko's topic in LEGO Technic, Mindstorms, Model Team and Scale Modeling
Thanks for the replies! Yes, there's a lot to be desired about the model, I didn't have enough time to polish the model. And yes, the both buckets are off scale. I had the idea of a pneumatic backhoe earlier than the contest, but I gave it up due to the scale issue. I picked it up only because the contest. Anyway, I'm getting to like machinery, maybe my next model will be better. -
Here's my entry to the Pneumatic Contest: The goal was to build a playable, sturdy model with a nice look. Pneumatic features: -backhoe bucket curl -backhoe boom elevation -backhoe dipper/stick in-out -backhoe boom swing -stabilizers -loader boom elevation -loader bucket curl Other features: -four-wheel steering with Hand of God and working cockpit steering-wheel -pendular front axle -rotating seat -opening bonnet The model is not based on a particular machine and it's made in the style that's more common in the USA than is Europe: the backhoe boom is centered and fixed (no sideways movement), but the stabilizers have wider base. Controlling: The pneumatic switches are placed on the sides of the model. They are easy to reach and to operate carefully, but hidden enough not to be visually distracting. There are two separate circuits on each sides, so two functions can be operated at a time with two hands without the functions affecting each other. The functions are grouped together in a convenient way for a right-handed person. Backhoe: left hand for swinging and dipper elevation, and right hand for boom elevation and bucket curl. Loader: left hand for boom elevation and right hand for bucket operation. The model is big enough to hide the tubes so the cockpit is not crammed with tubes. Pneumatic power source: A Power Functions medium motor driving two pumps for the two circuits. I decided to use a compressor instead of a manual pump for one main reason: Operation is much more convenient with two hands. But two hand operation requires two separate circuits because operating two cylinders with one circuit means that the cylinder with the higher load won't move until the cylinder with the smaller load moves to its extreme position. This means two manual pumps, which is not cheap/easy to get, and it's hard to find a place for them where they aren't visually distracting. Front axle and steering: The first axle is pendular: not a rigid axle as in real life, but an independent suspension with the two arms connected with a beam. The wheels stay more vertical and more away from other parts which is important as the things between the wheels are already as narrow as possible (the front loader arms, body panels and battery box are all there). Another advantage to a rigid axle is the stronger chassis and wheels support (the vertical space for reinforcing the chassis and supporting the axle from both sides is limited by the battery box). The wheels still touch parts when fully steered but there's no jamming or noticeable resistance: the front wheels can touch the arm elevator cylinders and the rear wheels can touch 1-1 rollers placed there deliberately to prevent the wheel from jamming into beams there (the extra rollers wouldn't be needed if the hub parts didn't have so much backslash). No lubrication was applied to the parts. You can find the brickshelf gallery here: http://www.brickshelf.com/cgi-bin/gallery.cgi?f=566673 Video:
-
It was already posted and it's using non-Lego parts for the most crucial things.
-
That's pretty clever! I'm waiting for a stepper with no relying on elastic parts at all
-
It's great that you are continuing the project. Do you have something for the contest also?
-
Grum's Shed
Lipko replied to grum64's topic in LEGO Technic, Mindstorms, Model Team and Scale Modeling
Actually I hope the PwPH stay as they are. They are a nightmare to put in in many scenarios (sometimes I had to disassemble a model party, even if the place to insert was not hard to get to), but I relied on the strength of this contact in my latest models... -
[MOC] Mecalac MTX
Lipko replied to proran's topic in LEGO Technic, Mindstorms, Model Team and Scale Modeling
Sorry for taking it even more off, but I think it's just a matter of discipline and focus. You have to make compromises either way you chose, and the TLG standard is no exception. They make reliable and legal builds but sacrifice complexity, functions (sometimes even important/characteristic functions) and/or authenticity. And don't put them to pedestal, they solutions are anything but fool-proof and reliable-under-any-circumstances. Just take a look at the Porsche. Or the ingenious but very flimsy steering in the Claas. -
[MOC] Mecalac MTX
Lipko replied to proran's topic in LEGO Technic, Mindstorms, Model Team and Scale Modeling
The old 16t clutch gear with the toothed surface + the old half bush with teeth. -
[MOC] Mecalac MTX
Lipko replied to proran's topic in LEGO Technic, Mindstorms, Model Team and Scale Modeling
You are more "there" in terms of technical and overall skills than many of us. -
[MOC] Mecalac MTX
Lipko replied to proran's topic in LEGO Technic, Mindstorms, Model Team and Scale Modeling
I see some illegal connections there -
That is epic. Hungarian builders own.
-
That's party a reason why I don't build others' MOCs. I even felt little bad when I used Barman's linkage for the Telehandler steering (even though I credited him fine, I hope). Maybe it's a childish thing, but I feel unconfortable when I don't come up with the ideas in my models. Learnign from official sets is good enough to get ideas, I think. I agree with Paul, we even had a conversation about the issue. It's sad to see hyped models with most modules beign rip-offs of other models.
-
[MOC] Mecalac MTX
Lipko replied to proran's topic in LEGO Technic, Mindstorms, Model Team and Scale Modeling
That's mind-blowing! I'm a little sorry that the model is not really playable but it would be a joy to build such an engineering marvel. -
3/4 Versus 1/2 Pins
Lipko replied to nerdsforprez's topic in LEGO Technic, Mindstorms, Model Team and Scale Modeling
After my dark age, this was the very first part that I found to be broke. And I still don't know how or when it broke. So yep, I don't trust this part either, though I use it rarely-randomly for smaller loads. @Ludo VisserIt's perfectly understandable, and one have to pay attention to this issue (especially when making instructions) and in cases it's better to use the 3/4 pin instead, though I can't recall any cases at the moment... -
[MOC] Road Roller
Lipko replied to damjan97PL's topic in LEGO Technic, Mindstorms, Model Team and Scale Modeling
Sweet! -
I don't know much about shooting videos, but a common mistake I see with many videos and I also made this mistake several times: the camera shake compensation (or whatever it's called precisely) is turned on but the camera is fixed on a tripod. This produces very weird results and that the model will always "try" to stay in the middle of the picture.
-
I also built flagship models at the age of 7...9. EDIT: the age restriction may be due to the general attitude of smaller children. They can follow steps, but I'm not sure they would pay attention to make sure everything in every step runs smoothly. And in a model like Porsche, it's a crucial thing. I prefer few steps per step, because for me, finding all the places where parts are inserted is not a challenge but simply an annoying and tiresome procedure. Plus, I believe, it was more straightforward in the studded area when Technic models were made from bottom to top layer by layer so it was easy to follow (one step-one complete layer). Now with studless, when there's hardy anything left of these layers, you are not working on one layer at a time but on an arbitrary volume at a time usually with no specific borders and it would be very frustrating to follow if parts would be to be inserted at any place in the model, and these small volumes do require one-two parts per step. Any time I made pdf instructions, I usually find myself ending up with 1-2-3 steps per step. To be on topic, it doesn't matter for me since I don't collect booklets. I was afraid of single booklets, the biggest model I built from them was the 42053, and it worked well.
-
How to make good pictures ?
Lipko replied to Alex Ilea's topic in LEGO Technic, Mindstorms, Model Team and Scale Modeling
Also I have the habit lately to take preliminary photos (not caring about settings, lighting, background) only to find the good angles and composition. -
How to make good pictures ?
Lipko replied to Alex Ilea's topic in LEGO Technic, Mindstorms, Model Team and Scale Modeling
What the others already said. Plus I have the habit lately to use the timer function (the smallest possible) so that the small motion coming from from pushing the exposition button can also be ruled out, because even with a rigid tripod, this can be an issue. Another thing I learned that it's better to take pictures from a distance. With my camera it's at least 1.5-2 meters. This way the perspective distortion becomes smaller. Strong perspective might be a nice effect, but to show the shape, it's better to minimize it.