
Ts__
-
Posts
250 -
Joined
-
Last visited
Content Type
Profiles
Forums
Gallery
Everything posted by Ts__
-
TrixBrix introduces injection molded double straight track
Ts__ replied to legotownlinz's topic in LEGO Train Tech
I had hoped for an injection-molded R104 curve next, but I also spontaneously ordered the long straights. In the summer, as a bonus to the Bricktrain Award, I received the 1/2 straight in injection molding technology, they were perfect. So I have no doubts about good long straights. Thomas -
Beautiful. And really impressive. I particularly like the nose, which makes the locomotive stand out from the crowd. Lego model building at the highest level. And doing without R40 is not a loss at this size, it wouldn't look good anyway... Thomas
-
Edmonton Transit Siemens-Duewag U2 LRT Car
Ts__ replied to _citizen_dane_'s topic in LEGO Train Tech
I like it very much and the role model is already great. I like the windows in the front, nice solution. A suggestion from me: The doors could perhaps be moved slightly inwards, then they would stand out better and it would fit the real model even better. I have no idea whether this is feasible in terms of the construction technology inside. But it may be worth a try. I am thinking of the smallest possible offset, e.g. 1/2 plate. Example: Thomas -
My buffers are relatively low as I also used the Lego locomotives and wagons as a guide. As example the front puffer from my LMC Class 5 as stud.io file: LMC Class 5 front puffer beam at BrickSafe Thomas
-
At the exhibition "Bricking Bavaria 2019" in Fürth / Germany, Dirk showed a train with built couplings. I asked Dirk and am allowed to show this here: More pictures are available on Dirk's Flickr account, just click on the picture ... Thomas
-
+1, full ack Again, I'm not about keeping secrets. I'm not the master builder, I am still learning and like to tinker with things. I also like to watch others and also like to exchange ideas. I like to help and show how what is built. The only thing that is not usually available from me: entire models as a file. And that's only for the reason that I don't have to worry about dishonest people later. Unfortunately, the honest ones are unlucky. Thanks and I'll try to give something back... full ack again. Nothing it´s perfect. Oh yes. I think my strength is more of the look. I also have a lot to learn in the chassis. My machines run, but there are people who can do it MUCH better... On the subject of what is "easier": European or American locomotives: no ;-) There is no place among the Europeans. With the American, the chassis is certainly much more difficult. Everything after the chassis is just decoration and a few stones on top of each other ;-) With my LMS Class 5, the chassis is really simple: The red box behind the wheels shows the Lego PU Train Motor. For every Motor one HUB. The second connector at the HUBs is used for Lights. Thomas
-
That hits it pretty well. But I'm not really petrified. I also like to help, but people also have to do something themselves and not just build from a ready-made solution. The result of your own work also makes you more satisfied than if you just copy something. And for those who think they have no talent: There are free instructions, even for steam locomotives. There are also helpful books for beginners, for example Holger Matthes's book "Lego Railway" in Germany. As many contain explanations and instructions. And as I said: if some area doesn't work at all: just ask.
-
Thanks, but I don't usually share or sell 3D files. Sorry. But: I like to help with building and also provide additional pictures if desired. Just ask how any detail is built. hmm, valuable is the wrong word I think. The problem with files is that there are also people who simply resell it or pass it off as your work without naming the actual maker. I don't want to say this is what happens here! If someone wants to build something -> gladly. I watch and learn from others too. I also like to help, but not with complete 3D files. Questions like: how is this area built exactly, will be answered by me. Either with pictures or sometimes with a small 3D file. There are no secrets to hide. Thomas
-
I'm certainly not a master in chassis construction, I'm still learning myself and just trying it out. My current solution for the LMS Class 5 is the following: - two pivot points: red and blue - a connector: yellow Thanks. Thomas
-
When I built it, I didn't even think of a solution with a fixed buffer. Looking back, I see three reasons why a solid frame with the buffers won't work on this model: - I have no space to swivel right next to the wheels of the first axle - If you attach the lower front section with the buffers and the coupling directly to the frame under the boiler, this will not be a stable connection. And I needed the space under the frame for the inclined cylinders - Main reason: with a fixed buffer and coupling, I cannot couple a car at the front, even in R104 curves. with my solution: I can coupling the BR Mk. I coaches also at front: Simulation with a fix front frame: i can´t coupling my coaches at front: @all: Thank you for your praise and encouragement. Wow. ;-) Thomas
-
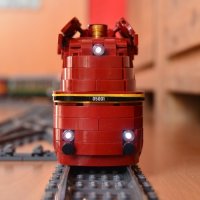
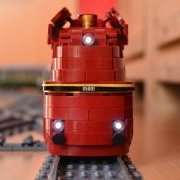
Hello everybody, my last construction project took me to Scotland. The Jacobite Steam Train still operates between Fort Willam and Maillag. Various steam locomotives are used for this train, e.g. the LNER class B1 No. 61264, the LNER class K1 No. 62005 (when I visited in 2005) or the LMS Class 5 "Black Five" No. 45231. They all serve as wagons of British Railroads Mk. I coaches. The classic British steam train passenger car par excellence. As a locomotive I chose the LMS Class 5 "45231". This promised a challenge as a Lego model: a conical boiler and angled cylinders. Exciting. The locomotive has 2 Lego PU motors as a drive. 1x in the locomotive on 2 of the 3 large main axles (BigBen XL wheels), 1x in the tender on 2 of the 3 tender axles (BigBen M wheels). Each engine has its own HUB. The locomotive is controlled via the Lego PU remote control. However, since the motors have to be operated with different power due to the different wheel diameters, a tablet / mobile phone with the Lego PowerUp APP is interposed between the remote control and the locomotive. The APP accepts the travel commands from the remote control and forwards them to the two HUBs in the locomotive. The lighting of the locomotive consists of self-soldered LEDs, connected to the Power UP HUB in the locomotive. A normal Lego Led for PowerUP is installed in the tender. The entire lighting is controlled via the handheld remote control and the APP. Forward travel: steady light at the front, optionally flashing light or off at the rear Reverse: front flashing light or off, rear continuous light The flashing is realized via the APP. Built from Lego parts with the following third-party parts: - BigBen wheels S, M, XL in new dark red - Linkage from the 3D printer - Lighting partly self-made - Self-made lettering / decoration But only a locomotive is no train.... The classic: British Railroads Mk. I passenger car. Built in the 50s in very large numbers and in many variants, these cars are still in use today on tourist trains and in collections / museums. The color "new dark red" was attractive and difficult at the same time. There aren't many windows and if you do you can't pay for them ... So I first looked for a solution for the windows: buildable, affordable and based on the model. In particular, the 4 small windows above are the mark I also found the variety of variants impressive and couldn't really decide which one to build. So I build all ;-) The cars are all built according to the same basic scheme and yet completely different. There are some with an open compartment (e.g. FO - First open) and some with individual compartments (e.g. SK - Second Corridor). I have 1st and 2nd class. 1st class has dark blue upholstery and a side table with a lamp. The 2nd class is more simply equipped. It was very interesting during the construction: the left / right sides of the car are often very different. E.g. In the case of the corridor cars, the doors are on the corridor side in line with a compartment door. In this way, in the event of war, the wounded could be pushed into the compartment on couches through the outer door. The bogies were of course important to me again: Model type Commonwealth: All cars are again equipped with ball bearings. The reason is simple: the cars are long and heavy, and weigh around 900-950 grams. Most cars can drive Lego R40 curves, only the two very long ones cannot. Since my locomotive also needs R104, I prefer to use the cars on large radii. The roof of all cars can be partially removed to insert figures. With the corridor car you need little fingers ^^ BR Mk. I 3093 Florence FO (First Open): An open 1st class car. 1st class cars typically had maiden names as proper names: BR Mk. I 4951 SO (Standard Open): An open 2nd class car with an open-plan compartment. In terms of construction, this car is longer for me than most of the others, this has to do with the spaces between the windows. All of the cars have the correct number of windows, but the wall between windows in 2nd class cars was smaller than in 1st class cars. It's hard to do with Lego. So I decided to use the length differences. BR Mk. I 1840 RMB (Restaurant Mini Buffet): A restaurant car with a small bar / kitchen for coffee / tea / snacks. In the fan area is the bar. To the left of the middle door is a small storage room. BR Mk. I 13320 FK (First Corridor) Anna: A 1st class carriage with a corridor and 7 individual compartments with 6 seats each. Ok, only 2 Lego figures per compartment because of excess width ... BR Mk. I 99035 BSK (Brake Second Corridor): A 2nd class carriage with a corridor and a brake / attendant compartment. It also serves as a luggage cart. This car belongs at the end of the train. In the case of "runaway" wagons (the wagons were torn off from the locomotive), the train attendant was able to recognize the situation via periscopes (the angles on the roof) and brake the wagons. This is why this car has the rear end for me. This is implemented as a flashing light and can be switched on inside. BR Mk. I 21266 CK (Composite Corridor): A corridor car with 1st and 2nd class. The car transitions are designed the same for all cars: The aim was: the smallest possible gaps when cornering: This is what the car transition looks like in an R104 curve: Enjoy: Thomas
-
It's very impressive. A really fat thing. I like it and look forward to videos for release. Thomas
-
A small video from my last "exhibition": Thomas / Ts__
-
Today I got a package from TrixBrix: It is noteworthy that the 1/2 straight lines do not come from the 3D printer, but are made like Lego parts with an injection mold. This means that the quality is significantly better, the parts shine like Lego rails and the color is almost 99% the same as Lego PF rails. The only difference is the shape and the logo on the knobs. Clamping force is also ++. Wow. I say thank you to: BrickTrainAward, Brick Model Railroader, LNUR for the organization and TrixBrix.Eu as sponsor. Thomas, very happy
-
Looks really good and i like the decals and details. I can´t wait to see this locomotive in a video. One thing: The big hole under the cap in the side view. Looks like too much free space. Thomas
-
Do you have build this monster with real bricks and test it? I am very concerned that this machine can turn corners. Unfortunately you only show digital pictures and only one shows how the complete front suspension swings out. What we can't see: Is the front undercarriage divided again or does it swivel only around a pivot point? How is the tender coupled to the locomotive? What does the locomotive with tender look like in a curve? Since you are installing motors. I assume that the locomotive should also be able to drive. And there are curves. For Lego Ideas, the locomotive should also be able to come through the small Lego R40 curves. And that's not easy with this size. As a pure display model, the curve discussion would not matter, but then you don't need motors. Please do not get this wrong: You have made the basis of the draft well, but the finishing and better pictures are missing, where we can see something. I like large steam locomotives and enjoy looking at them. Thomas
-
Hello Craig, this is a impressive machine. But I have big concerns about curves. I don't think, you can drive trough to a Lego R40 radius. Do you have build this monster with real bricks and test it? I think, it's impossible to create a big steam engine only digital without real tests. The pictures at Lego Ideas show the problems. Can you show here more pictures? Currently looks your posting only like a advertising for the Lego Ideas project. Sorry. The machine looks good but not finish and i think, you should go the way to finish this beast! Thomas
-
Hello Sergio, the windshield looks Great. Also the whole locomotive. The color issues are difficult for this prototype, I think, without painting nearly impossible for your model. The pictures are a little bit too Photoshoped for me. I wait for the building solution for the lights. ;-) Question: the 2x2 halfround tile below the windshield: how do you attach this part at this position? I have also searched a solution for the same problem in my coaches, but I don't found one. I hope, you can build this machine with real bricks. Thomas
-
Thank you. I was really surprised for win in the " Steam Engine Europe" category with my BR05-001. I'm happy. Thomas
-
And the BR03 are not so fast like the BR05 family. It´s the little sister. Thanks. It was my first exhibition where I was allowed to be there and it was a lot of fun. Play 4 days of railway on a large area ... And the community was great. The original BR05-001 can be viewed in Nuremberg. Unfortunately I haven't been there yet. But I would like to make up for this. Thanks @ all Thomas
-
It´s a solid architectural style, think about the weight. My big coaches have a weight of 750 - 1000 grams, with a "couple" of them something comes together. The roof looks "too" massive to me, saving weight where you can't see it and doesn't need stability. Too many small windows for my taste, but that can also be due to the model. Good and discreet integration for the motor. Well done. I don´t have see the motor. Thomas
-
Congratulations. With the rework a really good locomotive. I like it and the details. I have one suggestion for the conical expansion of the boilder. Instead of steps I have used hinge elements in my upcomming LMS Class 5 "Black Five": Ok, in my case is the step only one plate heigth but maybe is also two plates possible (or need a longer boiler) Thomas
-
Hello Cole, I like the many details and I think, its impossile to take the machine in a hand... (without falling parts^^) I also like to use the strings but I try to avoid modify parts (not solved alltimes). What kind of drive do you use? Train motor in the Tender? But I can´t see a motor... Thomas
-
I think, "Dark Red" is the normal color for restaurant coaches in older Germany (not current times with ICE). The company "Mitropa" used "Dark Red" as color for the restaurant coaches. It is certainly not historically correct, but "Dark Blue" is a noble color... ... and looks good. pictures? Thomas
-
Right. This metal rails are self-made from Dirk and fantastic. Thanks. The locomotive colors are from the real engine. I found the green coaches color scheme in the book "Lego Eisenbahn / Lego Trains" from @HoMa / Holger Matthes. The coaches are also dark green in reality, but the "gold" stripe are black. "Gold" looks better ;-) The "Mitropa" waggon are exist in reality: "Mitropa" restaurant waggon 1146 The dark blue coaches don´t have a idol. It was just boring to build only green cars... The location was a old steam locomotive depot and the Lego circuit are ca 90-100 meter long. Enough space for my long trains. ;-) Thanks. The front was realy hard work for me and you con only see the final result. After this: i have learned SNOT ;-) @all: thanks Thomas