
Ts__
-
Posts
269 -
Joined
-
Last visited
Content Type
Profiles
Forums
Gallery
Everything posted by Ts__
-
Hello Cole, I like the many details and I think, its impossile to take the machine in a hand... (without falling parts^^) I also like to use the strings but I try to avoid modify parts (not solved alltimes). What kind of drive do you use? Train motor in the Tender? But I can´t see a motor... Thomas
-
I think, "Dark Red" is the normal color for restaurant coaches in older Germany (not current times with ICE). The company "Mitropa" used "Dark Red" as color for the restaurant coaches. It is certainly not historically correct, but "Dark Blue" is a noble color... ... and looks good. pictures? Thomas
-
Right. This metal rails are self-made from Dirk and fantastic. Thanks. The locomotive colors are from the real engine. I found the green coaches color scheme in the book "Lego Eisenbahn / Lego Trains" from @HoMa / Holger Matthes. The coaches are also dark green in reality, but the "gold" stripe are black. "Gold" looks better ;-) The "Mitropa" waggon are exist in reality: "Mitropa" restaurant waggon 1146 The dark blue coaches don´t have a idol. It was just boring to build only green cars... The location was a old steam locomotive depot and the Lego circuit are ca 90-100 meter long. Enough space for my long trains. ;-) Thanks. The front was realy hard work for me and you con only see the final result. After this: i have learned SNOT ;-) @all: thanks Thomas
-
Deliberately not. I was just interested in the fully clad version. In my color scheme, the BR05-001 / 002 was used for a fast train between Berlin and Hamburg between 1937 and 1939. And that is exactly what the train is supposed to show. I also deliberately chose 1937 because that in this year the old "Deutsche Reichsbahn" logo was still used on the coaches without any questionable symbols. Your picture shows the locomotive during war time, ca. 1944. It´s a bad time for a train with colorful coaches... ... and i don´t like the color scheme and symbols. My templates / reference: BR05-001 at DBTrains.com BR05-001 in DB Museum Nürnberg Thanks! Thomas
-
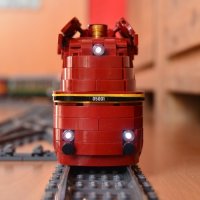
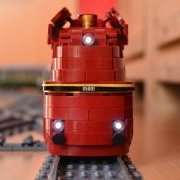
Hello everyone, today I would like to show my second locomotive built from Lego (the BR E18 047 was my 3rd) with 7 contemporary apron cars. The locomotive is a special steam locomotive: it is the fastest German steam locomotive. The sister locomotive BR05-002 holds the official speed record for German steam locomotives (200.4 km / h, 1936). But I chose the BR05-001 because this locomotive can still be viewed in the Nuremberg Transport Museum. For my Lego version, it quickly became clear: a steam locomotive chassis and streamlined cladding are not possible in 8w. And since you can't see the wheels anyway, I used normal Lego train motors for PowerUP and normal Lego train wheels. Since the BR05-001 is a express train locomotive and I also want to pull an entire train quickly, I spend 3 train motors and 3 PowerUP HUBs for the locomotive. Power full ... This left also enough connections for the lighting. BR05-001: - 1468 Lego parts, no custom parts, no clue - some 6er axis cut to 5,5 axis (for R40 curves). - Decals and the yellow stripe: self made - 3 PowerUP Hubs, connected to one PowerUP handheld - 3 PowerUP Train motors - 3 PowerUP LEDs Three working front lights: working rear lights: Fire (difficult to see in the sun ;-) ): Open roof for access to the HUBs: underside view, the blue brick is no intention... But a locomotive without coaches is not a train... Luggage cart: - 1203 Lego parts, no cutting, gluing and so one - decals selfmade, "Deutsche Reichsbahn"-Logo printed by "Steindrucker" two first class coaches: - 1182 Lego parts, no cutting, gluing and so one - decals selfmade, "Deutsche Reichsbahn"-Logo and class-numbers printed by "Steindrucker" all coaches are equipped with boggies from type "Görlitz III leicht": For place minifigs inside: all passengers coaches have a removable roof: my favorite: the "Mitropa" restaurant waggon: 1259 Lego parts, no cutting, gluing and so one - decals selfmade, "Speisewagen" and "Mitropa" printed by "Steindrucker" kitchen inside: two second class coaches: - 1134 Lego parts, no cutting, gluing and so one - decals selfmade, "Deutsche Reichsbahn"-Logo and class-numbers printed by "Steindrucker" last but not least: the first and second class final car: - 1198 Lego parts, no cutting, gluing and so one - decals selfmade, "Deutsche Reichsbahn"-Logo and class-numbers printed by "Steindrucker" - light self-made working lights: the lights can turn off/on at the underside (black 2x AAA batteriebox): overview: The complete train is nearly 3,5 meters long and I don´t have a big table for this... I hope you like the train as much as I do... In 2019 I was allowed to drive this train at two exhibitions in Germany: 2019 Bricking Bavaria Fürth: Video shows a collections of trains from the train layout Bricking Bavaria 2019. 2019 Deutsches Dampflok Museum / German steam locomotive museum "Tag der Modellbahn": Thomas
-
Nice and a massive build and i love some details. For the first, i have two suggestions: - use reddish brown windows instead red windows - for me: the 2x4 black tiles are too massive at the side. 1x4 tiles are too small. Maybe use 3-4 plates or 1 x brick with 1 tile above Questions: - do you will buiild this locomotive in real? What is your drive setup in this case? Thomas
-
As a silent reader, I have been following the construction of the 2 BR 42 in the German-language forum for some time. I hope you will find more of a train audience here. I like the locomotives very much, but I find the drive in an extra car unfortunate. There is never a shunting trip possible. Actually there should be enough space in the locomotive and / or in the tender for a drive? Please put more pictures in here (please also take detailed pictures). Gladly also a video, but please not upright, unfortunately you see almost nothing ... Thomas
-
Alternative train wheel set with ball bearings
Ts__ replied to German Luigi's topic in LEGO Train Tech
Hello Ludger, the strings are only decoration, no function in my modell look at the real "Görlitz III leicht" boggie, this have such small elements at the underside: Germen boggie Görlitz III leicht I use also cheap china ball bearings for cost reasons. I need 8 ball bearings per passanger car, i have 11 passagner cars finish and 7 todo. In case of 2 Euro per ball bearings -> too much money. What I like about your solution is that the ball bearings are further out than the solution from Legopold. At Legopold I think it's great that you don't have to machine the axle brackets. Both solutions works fine and have a big improvment for more coaches. Thomas -
Alternative train wheel set with ball bearings
Ts__ replied to German Luigi's topic in LEGO Train Tech
I love also ball bearings at my coaches but i don´t will cut the wheel holder. I have used @Legopold improved method with really good results: Sorry, the video text is in german but i think you can see the difference color code for the passenger cars: - passsenger car with "red" / "yellow" tile, weight 838 gramm: no ball bearings, no oil, pure Lego equipment, identical cars, test for equal cars - passanger car with "white" tile, weight 843 gramm: with ball bearings like improved method @Legopold - passanger car with "blue" tile, weight 792 gramm: no ball bearings, original Lego wheel holder with oil the result is simply: the ball bearings wins... Thomas -
Nice for the first view. Second view: - Why you use black parts for the pantograph? Part 48729 exist in red and i used this for my pantographs. I think, also the 4l bar exist as red part or hose. - the front windows in reality are wider than high, maybe you should try turn the window 90° degrees. Ok, is difficult in 6w. Only a idea and the same like your suggenstion, Overall really good. Thomas
-
Reminds me of my childhood, nice My parents had a Trabant. It was rather too small for me as the first own vehicle: I had problems getting my feet under (Trabant 1.1). Going on vacation for five peoble was also exciting (Trabant Combi). Did you know that the Trabant is the quietest car: When driving, you cover your ears with your knees ... Is it feasible to lower the bonnet one panel thickness? In the prototype, the upper edge of the bonnet is the same as the lower edge of the window. It's all in line. Or does that destroy the overall impression? Thomas
-
[MOC] Via Rail Canada - The Corridor (my other Via train)
Ts__ replied to NickLafreniere's topic in LEGO Train Tech
The Canadian trains look unusual. Yes, the locomotive is significantly higher than the cars, but the difference is too big for you. I would lower the locomotive slightly so that the start of the coaches roof is higher than the blue area of the locomotive. https://de.wikipedia.org/wiki/VIA_Rail_Canada#/media/Datei:VIA_Rail_Train_London_Ontario.jpg The proportion of the coaches looks ok for me, exept the wheels. Thomas -
Hello Dave, Sounds like a good explanation. Would also fit my model, even if the cords do not stabilize anything, but only decorate. The book sounds interesting. The book appears to be sold out in German and is only available in second hand. Thanks.
-
Yes, sounds good Yes, the strings don´t hit the axis. I don´t like additional friction... Thanks @Elysiumfountain and @baard Thomas
-
The bogies are covered bogies of the type "Görlitz III light" and this bogie has a thin wire in reality. I tried to emulate this with the strings. The function in the real bogie is unknown to me. https://de.wikipedia.org/wiki/Drehgestell_Bauart_Görlitz#/media/Datei:Drehgestell_Goerlitz_III_leicht.JPG Thomas
-
Ok, I don't run my trains in continuous operation for hours. The longest continuous drive was about 1h (battery test). The "Blauer Enzian" can only operate for approx. 1.5 - 2 hours with one battery charge (Varta accumulator). Then I have to insert new batteries. The exhibitions were shared facilities, so I don't drive all the time, but alternately with the other exhibitors. So far I came with a set of batteries without problems for 1-1.5 days. I haven't had a broken engine yet. Thomas
-
What kind of problems or issues should i have? This setup (1 PowerUP motor per HUB, both HUBs connect with one handheld) works fine for me and this is my currently standard setup for trains. I use In the red train from my profil picture 3 motor/HUB units with one handheld and have no problems, only power. The complete train is 3,5 meters long and i showed the red locomotive at two exhibitions in germany without problems. Thanks
-
I like historical locomotives, not just from Germany. And in Earth Green, the BR 194 is even more a dream. Thomas
-
The E18 047 is an active museum locomotive in Germany and I have found many good pictures and videos in the internet. That helps a lot and was the reason for the number 047. Originally I wanted to visit the museum with the 047 and my model in March and take photos of both. Then Coronna came ... So the pictures with the real engine have to wait. The next big help for me was Sven / @Tenderlok and his attention to details... Thomas
-
Every coaches are (over all) 56 - 58 studs. The middle coaches a little bit shorter as the pulpit choaches. The passenger cars can drive trough Lego R40 curves and switches. But longer is not possible for this design and Lego curves/switches. The rounded ends at the coaches helps ;-) And the car crossings are also outside the Lego grid so that cornering is possible. @all here Thank you for your warm words, this is music for me... Thomas
-
Hello Manuelle / @LEGO Train 12 Volts You looked right: my profile picture shows a BR05-001. There is a special story about this: I started building a locomotive with Lego in the fall of 2017: I only had 6 large railway wheels and was looking for a role model for inspiration and starting help. And the model was your BR05-003! No replica, just inspiration and first steps from me in locomotive construction. I also finished construction and showed "my" first locomotive in a German Lego forum. Of course with reference to your BR05-003. During photo research I always saw the BR05-001 or BR05-002. What an ugly locomotive .. Later I started to love the BR05-001 and wanted to build it in Lego. It was my first complete building without any template / inspiration from other Lego builders and it took me some time and multiple rebuilds until it was "finished". Now I am really happy with her and have donated 7 more coaches and show the BR05-001 as a complete train at exhibitions. If desired, I can also show the BR05-001 here at Eurobricks... Thomas
-
Many thanks... Creating a manual is a lot of work. I suggest: build what you like, if there are problems with details: I am happy to help. The locomotive is very complex to build, especially the front. If it is assembled, it will hold. But you like to swear during construction. The cars are much simpler, there are only two more difficult places: start / end and the bogies. The offset is 1/4 stud for better look. This needs a "little" space inside... Hello Holger, thanks. And I hope also for Schkeuditz! I have a landscape module for the exhibition under construction and of course hope that everything will go as planned. I am also happy to see you and the other railroad friends again. Thomas
-
Hello everyone, today I want to present the German electric locomotive E18 047 as complete train “Blauer Enzian” from 1954. The E18 047 was build 1939 by AEG/Berlin. After the WWII the “Deutsche Bahn” had using this locomotive for a special train between Munich and Hamburg. The train was called “Blauer Enzian” and operate between 1951 and 1965. The passenger cars were the old "Henschel-Wegmann-Train” coaches with a new colour scheme. The peculiarity of the “Blauer Enzian” was the pulpit at the begin and end of the train. In Bavaria uses the train the E18 machines, in other regions steam locomotives. My focus for the model: real windows: detailed roof and foldable pantographs: detailed chassis: The locomotive can´t drive trough Lego R40 curves and switches. The E18 needs R104 curves/switches. I use material from TrixBrix / Poland. E18 047: 1837 Lego parts, no use of gluing or cut parts 12 BigBenWheels: 4x S, 8x M with rubber for friction 2 PowerUP Hub 2 PowerUP train motor controlled via PowerUP handheld channel A Light: self-made, 2 circuit boards with 2x Duo-Led red/white, 1x Led white, controlled via PowerUP handheld channel B Lettering: self-made stickers building time: September 2019 - March 2020 Comparision between E18 047 and Lego 60198 locomotive: 1. Luggage / dining coaches removable roof: detailed and visible kitchen: 1249 Lego parts, no use of gluing or cut parts the 4 axles are equipped with ball bearings for better rolling ability, technique from Eurobricks / Legopold Lettering: self-made stickers and some custom printed parts 2-4. 2nd class passenger coaches removable roof and usable seats: a detailed undercarriage, type "Görlitz III leicht" was also important to me: The three coaches are only different in lettering (and bricks in this area) 1182-1286 Lego parts, no use of gluing or cut parts the 4 axles are equipped with ball bearings for better rolling ability, technique from Eurobricks / Legopold Lettering: self-made stickers and some custom printed parts 5. Pulpit car 1173 Lego parts, no use of gluing or cut parts the 4 axles are equipped with ball bearings for better rolling ability, technique from Eurobricks / Legopold Lettering: self-made stickers and some custom printed parts Light: self-made, 2x Led white with red tile for taillight, battery box under the floor, no control: only on/off Video: I hope the train likes it and you have a grin like me when you watch it, thanks. Thomas
-
Hello Eurobricks, my name is Thomas and I´m from Germany. I´m interesting in Lego Trains and I "build and play" in this topic a few years. Some users from Germany maybe know me from Doctor Brick Forum. I read here at Eurobricks more as 3 years and now is the time to be more active. Here at Eurobricks I want present my finished creations to a bigger audience. I will also see and commend MOCs from other User and learn more about building technique. I´m not a “fast” builder, don´t expect every day or week or month a new MOC. Thomas