

JLiu15
-
Posts
719 -
Joined
-
Last visited
Content Type
Profiles
Forums
Gallery
Everything posted by JLiu15
-

Disassembling a Set
JLiu15 replied to JLiu15's topic in LEGO Technic, Mindstorms, Model Team and Scale Modeling
Except it’s not possible here... -
I’m guessing you could incorporate something like a drive/reverse selector and only have the drive motor run in one direction or something like that. But anyways, nice gearbox!
-
Disassembling a Set
JLiu15 replied to JLiu15's topic in LEGO Technic, Mindstorms, Model Team and Scale Modeling
Nice, so you were able to take it apart! Gives me some confidence. What are some other assemblies in the set that gave you a hard time taking apart? It looks like pulling out the 3L pins holding the rear axle drive motor to the turntable might be difficult, but I suppose if all else fails I could just run a piece of floss through the hole on the side of the pin and pull it out (a trick I saw on YouTube). Lmao I was actually thinking of doing that, like waiting to put the dog bone frame on before inserting the 4L axle with stop. Looks like I should’ve in retrospect, because I tend to not keep my sets built for too long before taking them apart for pieces... You mean this piece? -
Not sure if this has been mentioned already, but it looks like the vehicle can pivot in some way though - notice in the picture that the rear section seems to be higher than the front as it’s navigating some sort of obstacle. Maybe the articulated joint allows the rear to pivot, and a rear suspension would make the model unstable. Just my guess though.
-
Disassembling a Set
JLiu15 replied to JLiu15's topic in LEGO Technic, Mindstorms, Model Team and Scale Modeling
My plan is also to use pliers, but your idea of wrapping the axle in cloth is genius lol - looks like that’ll prevent scratching/denting it. I’ll see how it goes when it comes time to disassemble it. Hopefully no parts are damaged in the process lol. -
I called it a 'walking beam' suspension at one point (think I saw it used to describe the suspension on the 8264). I actually used it to describe the suspension on one of my older MOCs (https://www.youtube.com/watch?v=dr1tOFJdT-s) but now I doubt that's what it's called.
-
Disassembling a Set
JLiu15 posted a topic in LEGO Technic, Mindstorms, Model Team and Scale Modeling
Hey guys, so I got the 42099 set and built it today. However, one of the steps (#154) involves pushing in a 4L axle with center stop into a frame assembly such that pulling it out is the only way to take apart the assembly (the other end's a 5.5L axle with stop so not possible to pull it out that way), and it's only exposed one stud out of the frame. To make matters worse, new Lego pieces are generally very tight-fitting, and the 4L axle goes through both a 12T gear and an axle joiner. I was hesitant to insert the 4L axle at first and tried to think of alternatives, but decided to go with what's on the instructions. I'm already stressed about taking it apart lol - looks like pulling out that 4L axle is gonna be a nightmare... So my question is, have any of you guys successfully disassembled the 42099 (or any assembly that's difficult to take apart like the aforementioned, for that matter) piece by piece while minimizing damage to the pieces? How did you do it? It looks like the only way I can get the 4L axle out is by pulling it out with pliers or something - it'll leave a mark on the piece, but that's better than cutting up the frame or the axle joiner or something. I'd hate to damage a brand new piece like that, but if it's what I gotta do then it's what I gotta do I guess...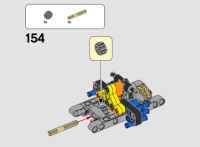
-
Yeah I’ve noticed that too. Moving the fork back a little seems doable - I’ll try to do that before the next update.
-
UPDATE 6/18/20 Lots of progress since the previous update. The fork module is complete with mast and all. The entire chassis is complete, and note that it's sitting on a modified chassis - I completely redesigned the chassis from scratch, making the overall construction of it more compact. All electronics are in place and, save for the LEDs, are connected to their respective functions. Here are some changes to the redesigned chassis: The L motor driving the compressor is now geared up. The compressor is also now placed vertically rather than longitudinally in the chassis. The pneumatic valve is placed at the front of the chassis, near the cylinders so that hoses going to them can be short. The rear of the chassis is now more reinforced - a 5x7 frame is used. At this point, the model is ready to move onto the bodywork. If you have any suggestions for me, please let me know. Photos:
-
UPDATE 6/13/20 Some more progress here. The fork attachment is done - it has a "kissing forks" function where the forks could be brought closer to each other, and they are manually controlled by linear actuators. The LAs are oriented similar to the hydraulics on the real-life counterpart. There are also minor changes to the chassis - the most noticeable being that I replaced the black panels on the sides of the engine with red ones. I wanted it to replicate a Cummins B6.7, which is red and is used on the real-life counterpart. I also added lights, and I attached an axle joiner to the speed dial on the 8878 battery to allow brightness to be adjusted (or to turn them off altogether). If you have any suggestions for me, please let me know. Photos:
-
No problem! :)
-
Okay, so considering it rotates 90 degrees at a time my setup in this MOC is perfect for you then - you can take a look at the Gearbox My Block to get a general idea on how it’s done. Thanks! I’m glad you like it :)
-
I believe it should work in theory. How many degrees does the shifting input have to rotate per gear? Just wondering since it's an eight-way and I'm assuming a full rotation goes through all the outputs. But regardless, you could still use the same principle - a lever attached to the shifting motor presses a touch sensor on one of the outputs, and for the other ones just program it to turn a certain number of degrees after hitting the touch sensor. Also that gearbox looks nice and complex - do you have a video of the MOC you used it in?
-
Here is the program for the MOC. Main Program: Drive My Block: Gearbox My Block:
-
UPDATE 6/12/20 Lots of progress yesterday. The entire chassis is now complete and all motors are installed save for the lifting motor which will be in the mast. I'm also planning on installing PF LEDs for the headlights. As for the chassis setup, the battery is placed right in front of the compressor, and the valve motor sits transverse right below the battery (note the valve visible on the right side). I also installed a mini inline-6 engine connected to the drivetrain which will be accessible by tilting the cab in the finished model. If you have any suggestions for me, please let me know. Photos:
-
Nice, I’m glad you like it. I’ll be sure to check out yours too!
-
Glad you like it. More updates coming soon.
-
Hey guys, here's a new project I'm starting. It is a model of a Kalmar forklift. It will be controlled by SBrick, and it will feature drive, steering, pneumatically tilted mast and lifting fork. The wheels will be Unimog wheels (94.3x38 tires). https://www.kalmarusa.com/4ae438/globalassets/equipment/forklift-trucks/kalmar-forklifts-1852-ton-capacity/kalmar-dcg180-330-forklift-brochure-en-us.pdf So far I have the front axle and the rear portion of the chassis completed. The front axle is driven and is very compact - most of the gear reduction is done in the portal hubs so the drive motor is attached directly behind the frame holding the differential. As for the rear portion, it contains the steered rear axle. Note that the longitudinal beam supporting the chassis is only 3 studs wide directly below the rear axle - the steering lock is very large to ensure a minimal turning radius, and this avoids the wheels from rubbing the chassis when turning while also keeping the chassis sufficiently robust. I also have the compressor (driven by a PF L motor) and the SBrick installed. Note the vertical placement of the motors - I'm trying to make the model as compact as possible, and this avoids using too much longitudinal space. I was concerned that the servo motor might not have enough torque this way as it's driving the steering linkages directly rather than with rack and pinion (it will be limited to 45 degrees of rotation in the SBrick profile designer), but I've seen MOCs that use the servo like this and they work fine. If you have any suggestions for me, please let me know. Photos:
-
Motorized model of a crawler crane with Mindstorms EV3. Features driven tracks, and superstructure functions controlled by an automated distribution gearbox. Functions/features: Driven tracks Boom elevation Boom extension Winch Superstructure rotation Ever since TLG released the rotary catch pieces from the Bugatti set I sought to incorporate it in a distribution gearbox so that I could control 4 functions with 2 motors. However, I did not want the play experience to be constantly interrupted by shifting the gearbox. For instance, if I used PF and installed a stepper mechanism to control the gearbox, I'd constantly have to count how many "shifts" I've done to ensure the right function is engaged. With that in mind, I realized Mindstorms EV3 is the perfect solution to this - by simply utilizing a touch sensor, the mechanism can detect how far the shifting motor has rotated thus automatically selecting the right function. The gearbox, which sits at the heart of the superstructure, features a cam attached to the shifting motor to hit a touch sensor. When a command is received from the remote, the shifting motor rotates until the touch sensor is pressed, then the EV3 tells the shifting motor to rotate a certain number of degrees to select the corresponding function. This utilizes a switch/case for the remote, and because it features up to 11 button combinations all superstructure functions are controlled from the same channel (channel 2 on the remote). This gives controlling the model a very natural feel, and sometimes I even forgot that I was controlling a distribution gearbox because the EV3 shifts it so seamlessly. As for driving, it too uses a switch/case for the remote. Because it's just a simple tank drive, the commands for this are much more straightforward compared to the gearbox functions. Driving is controlled from channel 1 on the remote. Additionally, there are sound effects that play while operating the crane. Pressing the left two buttons together in the 1st channel starts the engine (thus starting the program), and pressing the right two together stops it (thus ending the program). Because the PF IR remote uses levers instead of buttons, this effectively makes the model inoperable with only a PF remote. The EV3 remote feels more natural for controlling this model too, as some superstructure functions (boom elevation and superstructure rotation) involves pressing two buttons simultaneously. In the end, I'm pretty satisfied with how this model turned out. I was initially worried that this gearbox I had in mind won't work as smoothly as I imagined, but it turned out to work flawlessly. It often made me forget that I was even controlling a gearbox as the EV3 does the shifting for me. Of course, there's still areas that could be improved - for instance, the boom extension and winch operate pretty slowly. Not using a worm gear in those mechanisms probably would've helped, but that would mean the mechanism becomes "unlocked" as soon as the gearbox disengages it. Occasionally the gearbox would jam, making me restart the program, but overall the finished model met my expectations. Video: Photos:
-
[HELP] Generic Building Help Topic
JLiu15 replied to Jim's topic in LEGO Technic, Mindstorms, Model Team and Scale Modeling
Interesting, this kinda explains how terms like "adder" and "subtractor" in the context of Lego Technic originated. Thanks for sharing. -
[HELP] Generic Building Help Topic
JLiu15 replied to Jim's topic in LEGO Technic, Mindstorms, Model Team and Scale Modeling
Hmm, I wonder how the term "subtractor" in this context surfaced then. I used to think that these terms in their respective context were more widely used in Europe (like a regional English dialect) as it appeared to me that most Lego Technic AFOLs are from Europe, but I doubt that's the case (I live in the US). Speaking of which, it also seems that the term "mudguard" as used within the Lego Technic community usually refers to the wheel well. For instance, the Bricklink listing for part 46882 (Land Rover wheel arch panel) refers to it as a 'mudguard', but Google image results for 'mudguard' seem to suggest otherwise (it's a piece behind the wheel, not the wheel well itself). -
2020 Mindstorms set
JLiu15 replied to Coder Shah's topic in LEGO Technic, Mindstorms, Model Team and Scale Modeling
It is in fact June: I'm guessing maybe the set enters the market at different times in different parts of the world? Like maybe it's already been introduced in China. For instance the 42107 set - in most countries it's released in June but in the US it's released August. I also remember in 2014 that most of the 1H Technic sets weren't released here in the US until May or August - it was pretty annoying considering it was my first full year of building Lego Technic. I could be wrong, though.
-
2020 Mindstorms set
JLiu15 replied to Coder Shah's topic in LEGO Technic, Mindstorms, Model Team and Scale Modeling
Nice, so more than 31313! -
[HELP] Generic Building Help Topic
JLiu15 replied to Jim's topic in LEGO Technic, Mindstorms, Model Team and Scale Modeling
Hey guys, not sure if this is the right place to post this (this is the most suitable thread I found). I've been building Lego Technic for years, but I've always felt like I'm out of the loop on key Lego Technic terminology. For instance, the definition of a 'pendular suspension'. A google search brings up pretty much exclusively Lego pendular suspensions. I've heard other definitions for this type of suspension such as solid axle or oscillating axle, but I've never seen the term 'pendular suspension' applied outside Lego suspensions. Another such definition is the subtractor. A google search for 'subtractor tank' brings up only Lego subtractor tanks. Like with pendular suspensions, I don't think I've ever seen the term 'subtractor' being applied to such a mechanism outside Lego Technic. My question is, did these terms just spontaneously arise within the Lego Technic community? It's baffled me ever since I started building Lego Technic, because I feel that I should have seen this terminology used outside Lego Technic by now, but I haven't. -
2020 Mindstorms set
JLiu15 replied to Coder Shah's topic in LEGO Technic, Mindstorms, Model Team and Scale Modeling
The Chinese text translates to "new to market, June". In Chinese the character for 'moon' also means month, thus "6th month" or "June". Tbh I like the concept but I feel that it's just a glorified SPIKE prime. The loud colors are just swapped for more neutral colors, although I'm really not a fan of the teal. Another shade of blue (e.g. dark blue or dark azure) would work better imo. The wheels also look like SPIKE prime wheels - I'd prefer typical Technic wheels but again that's just my own opinion. Also it doesn't seem like the set has that many parts - looks less than 31313's piece count (unless those two robots only use a fraction of the pieces, ofc).