
All_About_Lego
-
Posts
67 -
Joined
-
Last visited
Content Type
Profiles
Forums
Gallery
Everything posted by All_About_Lego
-
 Very nice! I have a bit of a soft spot for any car with ‘Lotus’ in its name, and this looks great! Even though I am assuming it’s not the same in the real car, I do like how you’re able to open the curved panel to reveal the engine - it a nice touch!
 -
It doesn't hurt to just press 'print' and see what happens! There is some tuning that can be done - but as you said previously, its still pretty hard to master it!
-
You're right - as I said retraction alone is unlikely to give a 'seamless print', coasting was developed to solve this by simply moving the print head by X amount without actually pushing any more filament through the extruder. The build up of pressure is enough to force excess filament out onto the print. However, I'm not sure if you've experienced the same, but I've never really had much luck with coasting - I found it to be unreliable and it caused too many issues elsewhere in prints to justify using it.
-
This is actually one of the reasons retraction is used, the extruder motor pulls back some of the filament out of the nozzle, hence reducing the pressure inside the nozzle, but it is still pretty tricky to get a ‘seamless’ print, especially as you don’t want too much retraction which will likely give you other printing problems! Good luck! And have fun experimenting
-
The best way to reduce seams is to play around with retraction settings when performing a layer change (i.e. the speed and distance of a retraction move), the 'blobs' which cause the seams are due to a pressure build up inside the nozzle caused from the extruder pushing out filament during printing, which then forces excess plastic out of the nozzle each layer change (as the print head is not moving this plastic has no where else to go). By changing these settings, you can minimise seams - but it is pretty hard to completely remove them, so I would still suggest that the best thing to do is ensure that the seam is positioned somewhere else on the part so that it doesn't effect any axle holes - there is usually a setting in your slicing software called 'seam position' which should help. Your chart idea sounds like a good plan by the way! And yes, that's what I was going to say - there is no point printing non-custom parts O
-
To answer one of your questions, I have successfully 3D printed my own Lego wheel designs multiple times - many of which have axle holes. However, It is a pretty tricky process to get a perfect sized axle hole. You mentioned that you have experience using CAD, so I assume your familiar with tolerances and making designs slightly larger than they actually need to be. The hardest part however is due to the nature of 3D printing, firstly, depending on the accuracy of the printer there is obviously a limit to how accurate your prints can be, it is also worth thinking about things like the thermal expansion - it is highly unlikely that the object you’ve printed is going to be the exact same size as the one you designed, as depending on the filament you’ve used the plastic will contract a certain amount when cooled - which usually means an axle won’t fit as you’d expect it too. Thermal expansion percentages can be calculated, but I usually print a ‘test axle hole’ (just a cylinder with an axle hole in it) a few times, adjusting the size of the design slightly every time it is printed until an axle fits perfectly. Another thing to consider is seams - when the printer moves up a layer it often leaves a small ‘blob’ of filament visible from the outside of the print, these are known as seams. Seams can be a nightmare on the inside of axle holes as it will block an axle from sliding in, so make sure these are reduced or located elsewhere on the part if possible. There is a lot of trial and error involved, but once you’ve perfected it you can definitely successfully (and repeatedly) print axle holes! Also, are you planning on printing custom parts, or just copies of existing ones?
-
This is very cool! And it’s even nicer to see something a little different and out of the ordinary - great job!
-
This is simply Incredible - I love it! The functions are great, and nice job on the engine and interior details too, it looks so clean!
-
Very nice video - it shows off your creation perfectly! That gearbox seems to function great - and I love how rigid the whole thing seems to be! Great work!
-
very cool build! - it's even more impressive considering it's an alternative model! And I love that adjustable suspension too.
-
Wow! What a fantastic build! It looks great, and judging by the outside of the car I’m guessing it works pretty well on the inside too - can’t wait to see the video!
-
Incredible build - so many functions! It may sound odd but one of my favourite functions that you have managed to squeeze into this beauty is actually the very compact door locking mechanism - I love the use of those rubber Technic parts!
-
Maybe your right, I’ve even wondered if it’s the opposite - with ‘normal life’ becoming something different, i.e doing the same routine things every day, which can get quite monotonous... I also tried reorganising - which definitely helped for a few days, although building existing MOC’s is a good idea which I had not thought of - I suppose it may help me to become inspired by other builds and get my ‘creative juices’ flowing again!
-
I started the first month or so of lockdown surprised by how much free time I now had (Suddenly not having to go to college, do college work, or revise/sit exams), which I decided to spend making some progress on the MOC’s that I hadn’t had much time to work on over the year. but at some point during my time off from my studies, and I’m still not sure what caused this (lockdown or something else?), my ability to build stuff as I was doing at the start of lockdown seemed to vanish, and every time I sat down at my desk with the intention of grabbing a few pieces and makIng some progress on my MOC’s, I just couldn’t, it sounds odd but I found myself just sitting starring at my half-completed builds, not really doing anything. Annoyingly for me, this has carried on for a while now, and I’m still doing it - the weirdest part for me to get my head around is that I still enjoy Lego, and I always sit down at my desk with the intention of building stuff, but it’s almost like I’m finding it hard to think of solutions to problems and my mind just goes blank, hence the starring. Essay over, to sum up I’m not sure whether or not it’s the world’s current situation that’s affected my building, but I don’t think it’s made it any better.
-
‘Clunky’ or not. It’s still a very clever idea! - I would love to see this concept improved upon over time as it looks like a great solution
-
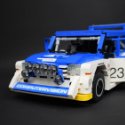
Very nice! - It’s great to see your own take on a touring car, we definitely need more touring cars In general in the Technic world! I also love that you have used stickers from a range of sets to create a livery - it looks spot on and is a great way to reuse some of those old, stickered-up panels. The only thing I think I would change is those wheels, I’m not a huge fan of the Defender rims alongside your bodywork, but I do still appreciate the unique use of these rim designs! Great job - keep up the good work!
-
As other have said - I love your clever usage of those small bionic legs pieces, you’ve also proven (alongside the Sian set of course) that those large frames seem to be perfect for gearboxes - I think I need to get my hands onto some for myself! As you also touched upon in your post - I’m imagining that it would be pretty simple to fit this into any MOC as there is an abundance of pin-holes to choose from! Great work!
-
WOW! this looks absolutely stunning - both with and without stickers! And I love those wide wheel arches too - great job!
-
You've done a great job with this build! It looks great and there are so many amazing functions that you have crammed into it too!
-
[WIP] Audi R8
All_About_Lego replied to Jeroen Ottens's topic in LEGO Technic, Mindstorms, Model Team and Scale Modeling
It looks great! - and wow that's a lot of functions - I also especially like the headlights you've created too! Great job! -
Congratulations to the winners! A well deserved victory for each of you. And as many others have mentioned - there are so many other incredible entries in this competition (and not just in the top 10!) so we’ll done everyone
-
This looks great! - and some of the features you’ve managed to insert into it are very nice!
-
Hi! A few people have been interested in seeing more of the 'mechanical side' of my model - so I have taken some photos which you can see below. Underside by All.About.Lego, on Flickr Inner Workings by All.About.Lego, on Flickr Steering Close-up by All.About.Lego, on Flickr Rear Suspension close-up by All.About.Lego, on Flickr Rear Suspension close-up by All.About.Lego, on Flickr The main idea is as follows: It's front wheel drive, so there is a differential connected to the front wheels which transfers the power to the 2-speed gearbox located in-between the rear axle, that gearbox then has an output axle which connects up to a mini V4 engine up front via a few universal joints. From the photos you can also see extra things like the steering mechanism, the suspension, and the gear change mechanism (allowing you to change gear from either the inside of the car using a gear stick or a selector located in the boot of the car for easy access!)
-
Ferrari F1 SF90 1:8
All_About_Lego replied to Mane's topic in LEGO Technic, Mindstorms, Model Team and Scale Modeling
Wow this looks great! You’ve definitely nailed the shape! -
Thank you very much for your comment, and I definitely agree with you about the Technic/system features of any model - and describing my build as ‘close to perfect’ means a lot to me! Thank you!!