
All_About_Lego
-
Posts
67 -
Joined
-
Last visited
Content Type
Profiles
Forums
Gallery
Everything posted by All_About_Lego
-

[TC18] Porsche 911/964 AWD
All_About_Lego replied to Limga's topic in LEGO Technic, Mindstorms, Model Team and Scale Modeling
It looks great so far - it’s a shame you couldn’t finish it in time but don’t let that stop you - continue to work on it in your own time and I look forward to seeing the result, even if you won’t be able to enter! -
I really do like this build - mainly just because it looks really cool!
-
[TC18] Porsche 911/964 AWD
All_About_Lego replied to Limga's topic in LEGO Technic, Mindstorms, Model Team and Scale Modeling
This already looks perfect! So if you do get the chance to finish it I am sure the final result will be amazing! -
It's Finished! (at least until I decide to start tweaking it again!) Thanks a lot everyone for all of your comments and help so far! Here are some photos: Lancia Fulvia 1.6 HF Rally Car [TC18] by All.About.Lego, on Flickr Lancia Fulvia 1.6 HF Rally Car [TC18] by All.About.Lego, on Flickr Lego Lancia Fulvia 1.6 HF Rally Car by All.About.Lego, on Flickr
-
57. Lancia Fulvia 1.6 HF Rally Car A creation inspired by the 1972 Rallye Monte-Carlo winner. Features: Two speed gearbox - can be controlled from a selector in the boot or a gear stick in the cabin HOG steering Rear leaf-spring suspension Opening bonnet, boot and doors Working mini V4 engine Detailed interior YouTube Video: See the discussion topic below for work in progress details and photos:
-
Thank you! And I completely agree with you about those ‘stairs’, but I couldn’t really do much else with Technic pieces, and yes, it is also a shame about those gold rims!
-
The stickers are on! - The majority of the livery matches up to the one used on S.Munari and M.Mannucci's Lancia Fulvia Rally car in the 1972 Rallye Monte-Carlo. I say 'majority' because I have added my own touch here and there. Lancia Fulvia - with a rally livery! by All.About.Lego, on Flickr Lancia Fulvia - with a rally livery! by All.About.Lego, on Flickr Lancia Fulvia - with a rally livery! by All.About.Lego, on Flickr Lancia Fulvia - with a rally livery! by All.About.Lego, on Flickr Now I just need to add to the interior and fix a few mechanical issues, and it will be done!
-
Haha - Don't worry, those sausages won't be going anywhere! My BrickLink order arrived earlier today - so I have finally had the chance to build my Fulvia in all of the correct colours! Correctly-Coloured Lancia Fulvia by All.About.Lego, on Flickr Correctly-Coloured Lancia Fulvia by All.About.Lego, on Flickr Correctly-Coloured Lancia Fulvia by All.About.Lego, on Flickr - Now I just need to add some stickers and some small finishing touches before the deadline!
-
I'm glad you've seen my videos! - And it means a lot to hear that - I appreciate it! Thank you very much! Haha - I guess that's why It's the perfect car to build!
-
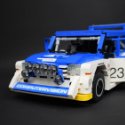
So, as many of you have pointed out - my build may use a little to many system parts for this competition, to tackle this problem, I have redesigned the boot lid and made it completely out of Technic, as well as some other parts on the rear of the car - as shown by the photos below: Boot lid by All.About.Lego, on Flickr Boot lid by All.About.Lego, on Flickr The only part of the car which is now made entirely out of system parts is the bonnet (as Technic beams and panels are simply too thick to use here), the doors, sides, arches, roof, boot, chassis etc... use mostly Technic parts, with a few system ones placed here and there! What do you think now?
-
I can understand that, and yeah, to be honest I would say myself that the rear is the worst part of the car
-
I see where you are coming from - however I have chosen to use system pieces in those areas for specific reasons, for example - I can't really make the bonnet out of Technic pieces as all of the panels and beams are too thick, so they can't really avoid the engine and steering. I will admit that the boot of the car could probably be made out of Technic if I tried - so I may give it a go to make sure that my build complies with this competions rules. And I agree with you about entries like that F40 - they do look great with minimal use of system bricks, but there are also entires, such as the Tatra T87 'streamline' which use quite a few system bricks and achieve a great look too. Anyway - thank you for your advice and I will see what I can do over the next few days - hopefully I can figure out a way of using a few more Technic elements on my build! That's great to hear! I have seen so many new and creative solutions to problems from other entrants - so I'm glad you feel the same about parts of my build. And they nearly provide enough spring - above each of the 'leaf springs' I have also used a 1x2 rubber piece to stiffen the suspension slightly. I'm glad you think there is enough Technic - although just to be safe I think I might have a play around with some more Technic pieces soon and see what I can do!
-
Thank you! and I'm glad you think so - I guess you're right about the Mack Anthem set too!
-
I quite like it myself, but I do also understand why others may find it ugly. And thank you very much - have you got any photos of your 1:8 scale one anywhere?
-
I think I agree to be honest - but as you say, it is quite a challenge which is the main reason I chose it! And thank you!
-
That's good to hear! Thank you Great to hear that! 3D printing wheels is definitely a great addition to any MOC. I actually made the case myself fairly recently- using a shelf in my IKEA wardrobe (this makes up the back and sides of the case), I then made a small filament spool holder out of some metal brackets, and 3D printed some 'tracks' which I could slide some perspex sheets into. I also added a hinged front door made out of perspex and sealed it all with some silicone sealant. I'm glad to hear it - and thank you very much
-
I suppose it isn't exactly the most beautiful of cars, but thank you! The floating diff is actually pretty solid - that's because the whole diff, along with the bevel gear is still inside the usual 5x7 Technic frame - this can be seen in one of the steering photos if you look really closely - basically, the whole frame moves with the gear and differential inside rather than just the diff itself, if that makes sense? thank you! Yeah, I guess it's not the best looking of vehicles - but thanks!
-
You have a good point there! - I guess we all have our own ideas on what Technic should and should not be, which are both fine
-
Hello! I'm relatively new to Eurobricks - I have had an account for a while but have never really used it that much - over the last few weeks however, mainly whilst viewing some of the incredible entries for TC18, I have been wondering why on earth I haven't used this great website more?! So, as I would like to begin to use Eurobricks more often, I have decided to use it to document the building process of one of my current MOCs - a Honda Civic Type R (FK8), I have actually been working on this for quite some time, and some of you may have possibly seen my 'behind the build' videos already on my YouTube channel where I have also documented most stages of the building process. Before the photos begin, I will quickly explain my goal when I started this project: I wanted to have a go at creating a version of the Type R out of Lego which looks as close as possible to the real thing, as well as being functional and robust. Another important part of this build for me personally was that I wanted it to be the best thing I had ever built - I have seen many incredible MOCs created by others and I guess they inspired me to want to have a go myself, hence why this MOC has been in 'production' for so long so far (I wouldn't particularly describe myself as a quick builder...) Oh, and one quick thing - this build will be multicoloured until it is finished, I will get all of the correct-coloured pieces delivered once its ready! So, over a year ago I started with the rear independent suspension - this has remained pretty much exactly the same ever since: Rear suspension by All.About.Lego, on Flickr The middle section of the chassis was then built off of that rear suspension - along with a space for the battery box in the rear of the car: Start of Chassis by All.About.Lego, on Flickr To finish the chassis, I then figured out where the m-motor for steering would go, along with the L-motor to power the front wheel drive. The steering system you can see in the following photo was also added - although this was changed at a later stage for various reasons as you will soon see. Complete Chassis by All.About.Lego, on Flickr The bodywork was my next focus - I started with the rear of the car, in particular focusing on the rear grilles, exhausts and other details - one of my favourite non-Technic pieces has to be the 3L and 4L bars - so I had to use them somewhere! Rear Vents by All.About.Lego, on Flickr Rear Details by All.About.Lego, on Flickr I then rushed ahead and tackled some other areas of the bodywork as you can see in the photo below - this was a mistake however, because pretty much none of it is still on the car in its current state! The start of some bodywork by All.About.Lego, on Flickr The rear lights came next - I haven't touched these since, but I am aware that they need a little bit of tweaking to get them right! Progress on the rear by All.About.Lego, on Flickr Rear Lights by All.About.Lego, on Flickr The rear of the car by All.About.Lego, on Flickr As I mentioned earlier - the original steering wasn't quite up-to-scratch, so I decided to have another go - this time I wanted to make a front wheel drive steering system which was both compact and had a virtual pivot point - two things which the original version lacked! It took me a few attempts to get this system right (the hardest part was figuring out a way to actually link the steering to the motor), but I was pretty happy with the result. The steering system uses a 'floating' diff held in with my favourite pieces (bars) to keep it nice and compact: Steering idea by All.About.Lego, on Flickr Steering idea by All.About.Lego, on Flickr Steering solution by All.About.Lego, on Flickr Steering in the car by All.About.Lego, on Flickr Then I moved on to one of the most tricky parts of this build so far - the front - I mean, just look at it, there are different angles everywhere! However, It is probably also my favourite part of this build so far. Working on the front by All.About.Lego, on Flickr The final front part of the car by All.About.Lego, on Flickr My car was looking lonely without its doors - so I had a go at recreating them next, the front doors are made up of multiple different angles - I still need to work on the strength of them a bit, but I like them - I also really wanted to integrate that large panel into the door to get a bit more Technic into this build! Testing front door fitment by All.About.Lego, on Flickr Front door - External by All.About.Lego, on Flickr Front door - internal by All.About.Lego, on Flickr Front door by All.About.Lego, on Flickr As a break from the doors, I moved onto the engine bay - sadly there isn't really room for a working engine in here, so I have decided to just build a fake one instead: Engine Bay by All.About.Lego, on Flickr AAAANNNDDDD back to the doors - but the rear ones this time, they are built in a similar way to the front ones - just a bit more compact, however I may need to change these a bit to ensure that they can actually open and close (I was stupid enough to completely forget about the purpose of a door when I was building these!) Rear Door - internal by All.About.Lego, on Flickr Rear + Front door by All.About.Lego, on Flickr Rear + Front door by All.About.Lego, on Flickr Rear + Front door by All.About.Lego, on Flickr Parts of the interior came next - including these seats - the design has been slightly updated since however - I also tried to include a slight hint of Technic into these as I have done with the doors. Front Seats by All.About.Lego, on Flickr Front Seats by All.About.Lego, on Flickr many MOCS feature cool 3D printed wheels to finish them off - and as I had experimented with this before I decided to design my own for the Type R - once I had given them a lick of paint they were good to go: Wheel Design by All.About.Lego, on Flickr 3D printed wheels by All.About.Lego, on Flickr Wheels on the car by All.About.Lego, on Flickr And that's roughly where I'm up to now - I have made a bit more progress since, including the dashboard and wheel arches, but I will give an update on these soon. If you have read and seen everything above, then thank you! and I hope I haven't just sent you all to sleep. Of course, If you are interested in this build then feel free to check out my 'Behind the Build' series on my YouTube channel: https://www.youtube.com/channel/UCQ77E25jCkPtCT1SqolFfbg?view_as=subscriber Please let me know what you think so far - constructive criticism is welcome! I will keep you all updated when I make some more progress!
-
Thank you! - I was wondering that myself to be honest, although when compared to some of the other cars in the competition mine actually uses a similar amount of system pieces - only the bonnet and boot are made completely out of system pieces and there are a few more here and there. I guess there's only one way to find out
-
The rules state that "Custom stickers are allowed" - and this is a rally car - so it needs a livery right? - I made these this morning and I am looking forward to putting them onto the car once it's been built in the correct colours! Lancia Fulvia Rally Stickers by All.About.Lego, on Flickr
-
Great! - glad they helped - and thank you very much! Thank you! - glad you do!
-
I know the feeling!
-
Yup - the joints are connected directly to the differential. Its not actually too bad - the differential is held in place between two gears to stop it from moving backwards and forwards, and there are pins either side of the universal joints to stop them from moving too - if this makes sense? The photos of it can probably do a better job at explaining than I can.
-
Thanks! It sounds like my solution is quite similar to yours - I have just replied to your earlier post with some pictures - but the general idea is that the universal joints are connected directly to the differential as you said, and I used some thinner pieces at the end of each axle which fit inside of the small wheels - allowing the width of the car to be shorter