
mtrkustoms
-
Posts
61 -
Joined
-
Last visited
Content Type
Profiles
Forums
Gallery
Everything posted by mtrkustoms
-

[MOC] RENFE Container vagons MMC & MMC and 20/40ft Containers
mtrkustoms replied to mtrkustoms's topic in LEGO Train Tech
Thanks for the kind words All containers are based in real ones. The standar and frigo had no comments we all know these type of containers Tank containers are based in real GNC tank containers with the limitation of 6wide its a good way to fit round pieces GENSET (Diesel Generator Set) is based in the big diesel generators user in the petrochemical complexs to generate electricity in emergency situations. -
Dear all Eurobricks Users, From MTRkustoms Railworks we have the honour of presenting the RENFE Container vagons MMC & MMMC for normalized Containers type Maersk and some 20ft and 40ft Normalized Containers. These vagons are part of the actual fleet of RENFE Cargo for the transport of normalized containers. As usual in me some technic parts are used. VAGONS MMC Lenght: 50 Studs Width: wide Weigth: 205g A bare comparation with a real "dirty" vagon Y21 Boguies with standar wheelsets The vagon and its 40ft Container And a animated gif to see all the posiblities with 20/40 containers MMMC Lenght: 68 Studs Width: wide Weigth: 275g A bare comparation with a real "dirty" vagon Y21 Boguies The vagon with its 20ft containers And a animated gif to see all the posiblities with 20/40 containers And the full composition with the RENFE 252 "Taxi" Full resolution pics in the Flickr Album CONTAINERS 20ft Standar Weight: 115g 20ft Tank Container Weight: 85g 40ft Frigo Container Weight: 220g 40ft GENSET Container Weight: 290g Full resolution Pics in Flickr Album Enjoy it
-
[MOD] LEGO 21108 Ghostbusters Custom SMD LEDS
mtrkustoms replied to mtrkustoms's topic in LEGO Licensed
thanks for the replies I just updated the first post with some pictures of the model and the SMD installation -
Hi all, Im so glad to present my MOD of the 21108 Ghostbuster car with custom SMD LEDs controlled by an ARDUINO UNO. In the process no Original set pieces was modified, but 10 vault pieces were modified and glued in order to fix the leds and pass the cables trought the model. And the best way to see it, a little demostration video. PS: The process of soldering the SMDs and cable routing was a nightmare, but the result deserves it. A small update with pictures Full model with a street display (arduino housing included) Detail of the instalation of the SMD leds, Front lights (modified round bricks and some kragel to fix it) Upper lights (plate with right holder modified and round plate kragelized) Upper principal lights (no kragel or modification, just the SMD led placed and fixed with 4 round plates below the cheese slopes) Some details of the cable routing Detail of the soldering plate with all cables and resistances soldered Arduino housing and cables for conect all lights Hope you enjoy it
-
Hi all, After a long time without posting anything here, Im so glad to present my first 32x16 Modular Building. This house was rounding my mind since I bought the 10228 Monster Fighters "Hounted house", this is a good set but with difficult integration in a modular city, but with a valuable vault of pieces. Without more presentation, the pictures The happy renters specially dressed for the occasion General views Some of the details Entrance Back courtyard Rain gutter with old technic parts Roof terrace Lower plant Upper plant "]Complete Gallery in FLICKR Enjoy it
-
[DIY] Custom Electric power pickups "Slot type"
mtrkustoms replied to mtrkustoms's topic in LEGO Train Tech
Not yet, i do not have any 9v switch to test the function, Testing the railcar with a PF switch works only in one way, only when it goes in the way 1 rail to 2 rails; when the railcar goes from the part of 2 rail to 1 rail, appear the problems The loco, works in both ways, except when comes by the exit rail to the main rail. Can be improved putting the pickups in the same line than the rail. -
Dear all, I just created a mini-tutorial to make custom and cheap electric power pickups to use 9v rails, and can be adapeted to everyone needs. The initial idea was to make a reliable and cheap alternative to 9v motors. My idea was to use the electrick pickups of the slot cars, a copper "cable". this solution is more simple and cheaper than the rairoad metal wheels. I am not responsible of any damages, burns, sticky fingers or lost of bricks.... Not do it without an adult supervision Electric power Pickups "Slot type" Material - Slot pickups - Electric cable - Soldering iron - Tin - Instant Glue - Electric clamps - 4 1N4001 Diodes - Welding Protoboard - Voltage regulator L780X - 4700uF Capacitor Total aprox 6€ / 7$ This can be cheaper without board, only using the diodes bridge. Diodes bridge This is a simple bridge with 4 diodes (1N4001 1Amp) and it is used to provide correct polarity to the system with any polarity of the rail. So no shortcircuit can be possible Voltage regulator L780X to prevent over voltage in the train, can be used 6v or 9v regulators. Capacitor 4700uF capacitor, as my experience i needed 2 of each capacitors to provide the necesary current to 20 high power leds in my 252 Locomotive + Bedcar with no turning off them in a 2 rails sections with no power (a lowering of the instensity is appreciated) or in the railcar to provide the necesary current to power the PF motor without stop the railcar in a rail section without power. Mount the components in the board according to the following scheme: Being patieng, mount the board, for me is the first board i solder, so everybody can do it, if all is ok, when we connect the board no white smoke appear Dissasemble the electric clamps, only a cutter is needed. Glue these clamps where we think is the better place, the optimus is to put them between 2 wheel axles, or near one wheel axle. Connect the Slot pickups to the electric clamp, and the input of the diodes bridge to the electric clamp I.E.: In 252 Loco, y put them after one axle In the railcar i put them directly to the PF motor between 2 wheel axles Put the board where possible Finally we have the final result: 252 Loco Railcar And now a couple of videos: Railcar, first it can be observed how it works with any polarity of the rails, there is a brown rail section in the right of the circuit with no electric power 252 Loco, first it can be observed how it works with any polarity of the rails, there is 2 brown rail sections in the leftof the circuit with no electric power Enjoy it
-
You can make a simple adaptor with ususal pieces, the only problem is that will be 1 stud more than the lego track, but the spacing between diferent rails is almost zero, and no weird pieces are used and no modification (cutting) is required,
-
very nice and a really good way to use PF and hide the motors in a house, i will use your idea in my next layout
-
some details of the light installation:
-
A little update of the model, custom led lights:
-
I am pleasant to present my EMT "Charleroi" Madrid Railcar This railcar was a typical railcar in the streets of madrid in the 40s This is the original: Datasheet: Lenght: 26 studs Wide: 7 studs Height: 9 bricks Pieces: 460 aprox, a bit more than expected in LDD File due to technical problems (i need more rigidity than i expected) Weight: 370g without battery PF powered with custom Li-Ion battery Detachable roof, for easy acces to battery Some pictures of the MOC: Detail of one rigidizer and the stairs: Detail of the boguie Detachable roof For more and bigger pics click here Pictures: Panasonic LX5
-
hi all, I present my latest locomotive, an ugly shunter for the TRENBRICK expo (19th-20th october, madrid) It is PF (2 channels) 1 for drive and the other for the uncoupling mechanismm, it is very simple, but works very good and makes it very playable. The uncoupling mechanism The function is ver simple, A M-motor with a worm reduction are connected to a gear that moves 2 racks connected to the yellow pullers. It is ugly but not very large (compared with the renfe 252 locomotive) A video of the shunter working http://www.flickr.co...06/10194516826/
-
hi, I present my new creation, an Spanish electric locomotive, the 252 series in taxi scheme. This is a commonly used locomotive in spain used for passengers principally and some times in double composition in transport. Specs: Lenght: 49 studs Width: 7 studs Height: 13 bricks with lowered pantograph and 16 bricks with elevated pantograph Pieces: aprox 850 Modified or not lego parts: 9 pieces (not include leds) PF ready with 1 or 2 motors and easily convertible to 9v custom led lights and power output to other wagons. The original: detachable lateral wall Complete composition with prevously presented wagons DDMA-9500 and beds 9600 All pictures in original size, here Test on standard curves video Test on smooth curves video
-
Custom Led lights for RENFE Bed-car 9600
mtrkustoms replied to mtrkustoms's topic in LEGO Train Tech
Hot glue its a very good way to fix, but 5mm leds do not need the extra fixation. The light leakage can be solved in different ways, paint tape inside or food metal sheet (I do not know the name in english in spain is "albal paper" is usually used to wrap food and sandwiches) I have to try the result. The life of the battery, I really do not know it, I am using a 4000mAh Li-Ion battery, the leds had very low comsumption, The idea for this train is a fixed composition with a PF locomotive (1 or 2 PF train motors) feeded with this 7.4 Li-Ion 4000Mah battery and connected by wire and 2 pole molex connectors to the bed car illumination -
Custom Led lights for RENFE Bed-car 9600
mtrkustoms replied to mtrkustoms's topic in LEGO Train Tech
These custom led lights are DIY, just High power leds (5mm diameter), resistances and some wire. 5mm leds fits inside headlight bricks and all axle bricks no glue or modification or parts needed For headlight bricks a 3mm leds can be used, this leds fits in the smaller hole of the brick. -
Hi all, A new modification for my RENFE Bed-Car 9600 is here: Custom Led lights: 5mm High power leds powered by 7.4 Lipo Battery Hope you enjoy.
-
Hi all, My train fever persist I am so glad to present my version of the RENFE Car-Transport wagon DDMA-9500 Series made with Technic Liftarms. The real wagon: My Creation: Boguies detail Details Doors/ramp function animation The wagon lean due the clearance of the connecting axle The composition with the Yellow Shunting Engine and RENFE Bed-car 9600 Series Note: This wagon do not work in lego curves, only work in smooth curves I hope you enjoy it
-
MOC: NS 1847 - Mainline Electric of the Dutch Railways
mtrkustoms replied to raised's topic in LEGO Train Tech
wow. it is simply amazing, very detailed and big The nose is simply fantastic, but seems a bit weak , or im wrong?? -
Jopiek, I charge the battery with a Rc-charger for Ni-mh, Ni-cd, Pb, LiPo and Li-Ion there is a lot of them for 35$ in Rc stores LEGO Train 12 Volts, lightingtiger, This Li-Ion cells comes from a damaged tool in my job, but you can find also in Rc stores in multiple formats, round, flat, etc... It is not a white brick, it is the PF receiver , but i cover the sides with some yellow bricks, and yes its a prototype, im working in a modification of the LDD of my Renfe 252 Engine with my detailed standard, and one weird experiment, a Car transport wagon with technic liftarms
-
Hi all, I present my second train creation in bricks here An invented shunting engine to power my RENFE Bed-car 9600 Series This is not a nice, or real shunting engine, but works well and have enought torque to move the cars without problem. and work in all Lego train curves The motor is a 88002, that have more power that I thought, the tip is to put weight on it to prevent slippage of the wheels. Is full PF with a custom Li-Ion battery (2500mAh in this case) Detail of the custom PF Li-Ion Battery Pulling the Bed-car The No-Conventional coupling A Conventional Old-magnets coupling I hope you enjoy it
-
thx for the replies Eurotrash, moreless looks like this:
-
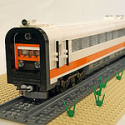
Hi all, I present my Bricks representation of a Spanish bed-car, 9600 series (bc10x-96xx) in "Renfe operadora" Scheme. This is a bed car created in 1984 for night train lines in Spain, nowadays it only one night line working in Spain the "Estrella Costa Brava" (Madrid-Barcelona) The real one: Characteristics: Total Lenght : 63 Studs (500mm) Width: 7 wide Height: 10 studs (from rail plate) Weight: 863g Pieces: aprox 900 Paint: CRC Acrylic RAL Primer + Tamiya TS-4 y Tamiya TS37 Note Only works in smooth curves General view: End of car, beds and door End of car Corridor and lower details Functional door Running in a smooth curve The clearance of the union axle from car to bogie allow the car to incline a little bit Detail of the beds (orange pillows are the beds where i travelled) Bogie Renfe CG-1 I hope you enjoy it Pictures: Olympus E-510 + 14-42 and Panasonic Lumix Lx3
-
I present my version of the RENFE 252 Locomotive in "Taxi" Scheme. The real one: And my LDD Version Rendered with POV-RAY: Here pulling 2 estrella bed cars and a little detail of the coupling: I hope you like and enjoy it
-
LDD MOC: RENFE ESTRELLA Bed-car 9600 Serie
mtrkustoms replied to mtrkustoms's topic in LEGO Train Tech
Thanks for the replies. For your information, this model is only to "display" use and i prefer to made more realistic, for me does not matter if it work or not in standard lego curves, but, it work in smooth lego curves made with only straight track.