
roppie11
-
Posts
226 -
Joined
-
Last visited
Content Type
Profiles
Forums
Gallery
Everything posted by roppie11
-
45 Degrees in technic
roppie11 replied to Alien's topic in LEGO Technic, Mindstorms, Model Team and Scale Modeling
Good time for me te become undormant as well. Wow nice find. I was immediately skeptical, so I did the math. You effectively created a triangle with sides 1, 2*sqrt(2) and hypotenues 3. Especially the double structure looks really elegant -
can't wait. This looks cool
-
Technic Pub
roppie11 replied to jantjeuh's topic in LEGO Technic, Mindstorms, Model Team and Scale Modeling
I saw a fun lego video http://www.dumpert.nl/mediabase/7142277/4606ed2e/porsche_van_300_euro_faalt_voor_crashtest.html It is from a dutch video-site with mostly humor video's. IT seems like none of the parts are broken so thumbs up to lego the most popular comment is: Even if the driver got out of his car without too much pain, he would probably be hurt anyway because he will step on a brick -
15: 10 23: 6 29: 4 22: 3 3: 2 13: 1
-
14. IRON-SLAMMER-ALPHA CAT B: PF-ir receiver Move: The slammer My robot has 2 functions, both use 2 motors: - Drive. It is track driven. Wheels didn't work well with my weight. One L-motor for left and one L-motor for right. - Hammer. A XL-motor is used for lifting the hammer, an M-motor is used to release a clutch. Thanks to the clutch, the hammer can fall under gravity. The hammer is very heavy because it has a filled battery box at the end. Discussion topic
-
[TC 11] Razor II
roppie11 replied to Burko-uk's topic in LEGO Technic, Mindstorms, Model Team and Scale Modeling
The bot is good looking but its slowness is a weakness. I read that its supposed to crush its opponent but you would probably not get the chance to come close to an opponent and get torn apart instead. The arm looks very cool though -
[TC11] IRON-SLAMMER-ALPHA
roppie11 replied to roppie11's topic in LEGO Technic, Mindstorms, Model Team and Scale Modeling
I present to you with proud: IRON-SLAMMER-ALPHA V2.0 my bot is finished and i'm working on the video. Check the first post in this topic for all the information. -
[TC11] Wimbledoom
roppie11 replied to Erik Leppen's topic in LEGO Technic, Mindstorms, Model Team and Scale Modeling
that is a very cool weapon. I also thought of a horizontal hammer with the help of rubber band. But i couldnt figure out a way to make it work so i went with a vertical hammer. Good luck it looks very promising. -
woops i gotta make that video fast. But first i need to finish my bot
-
[MOC] Aliens M577 APC
roppie11 replied to Sariel's topic in LEGO Technic, Mindstorms, Model Team and Scale Modeling
nice job paul! you should check the page though, there is a 'tiny' mistake -
that electromagnet seems funny. How strong can it be? is 9v not a little too low? you probably haven't connected it yet but
-
I say no to it. 45x45x45 is fine actually. if it is much bigger it's all gonna about the most powerfull weapon. If we leave the rules like this it forces us to use creativity. It also makes this contest a challenge. You have to think about what you are building and not put just a bunch of beams together. I would vote yes for keeping same cubic volume of 45^3=91125 cubic studs where you can have it as long/high as you want. I also think some people are not gonna like it because they already finished their bult and would have build something totally different if they had more space. I personally would be fine with it though.
-
[TC11] IRON-SLAMMER-ALPHA
roppie11 replied to roppie11's topic in LEGO Technic, Mindstorms, Model Team and Scale Modeling
no matter if it is upright, or facing backwards, bottom of the thing till the top is still 45 studs. and by putting it backwards i don't gain mor lengt. Maybe i can set it diagonal like this but thats for later.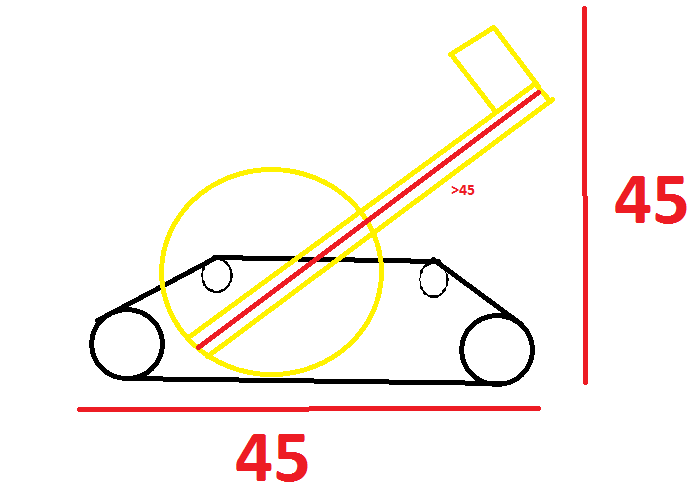
-
That is one very complex machine. I see you could use a challenge. I got one for ya: make some vehicle of your choice with at least 10 functions by using 6 motors. One for switching and 5 for the functions. Good luck!
-
Can you tell me more about why it was so hard? I built it but i had no problems. I always make sure to get my parts first before putting it together on each step.
-
42043 is a hard one. I think my hardest build was 8043 but maybe that was because it was one of my first builds. It has a really complex gearbox.
-
[TC11] IRON-SLAMMER-ALPHA
roppie11 replied to roppie11's topic in LEGO Technic, Mindstorms, Model Team and Scale Modeling
Update: i changed the hammer. It had to be shorter, but i want it as long as possible so i am going to place the ring pretty low. My plan is to give it 5 studs ground clearance and i have 2 studs thick structure under it so i will have 3 studs under the hammer. It is now 42 studs high (put it on 3l high blocks) so i can set it a little higher if needed Im gonna change the tracks for more stability. I am also gonna put all PF stuff in the back as counterweight. Sorry for another VVS pic but it fits better this way :) -
[TC11] The Bot with No Name
roppie11 replied to Alex Ilea's topic in LEGO Technic, Mindstorms, Model Team and Scale Modeling
Edit: i did an update post in wrong topic. -
[TC11] IRON-SLAMMER-ALPHA
roppie11 replied to roppie11's topic in LEGO Technic, Mindstorms, Model Team and Scale Modeling
N Well, its one big massive piece of machine. I cant 'just' put an LA in it. -
M.A.N TGX 18.400
roppie11 replied to KikoTube's topic in LEGO Technic, Mindstorms, Model Team and Scale Modeling
M-longer maybe said it i litttle harsh, but he has a point. The truck looks great and if your fine with it, thats great too but maybe you could add a little bit more details and change some minor things. I absolutely love your truck though. It is instantly recognisable. -
[TC11] IRON-SLAMMER-ALPHA
roppie11 replied to roppie11's topic in LEGO Technic, Mindstorms, Model Team and Scale Modeling
Thanks for answering. I will have to rebuilt the whole thing :( but its the rules and they also apply for me. For now enjoy this mighty beast because it will not be as mighty when it comes back -
[TC11] IRON-SLAMMER-ALPHA
roppie11 replied to roppie11's topic in LEGO Technic, Mindstorms, Model Team and Scale Modeling
Hmm i think you are right about the size thing. Lets see what @Jim says about it And you're right. I should have filmed horizontally. I planned on doing that for the final video but forgot it. Thanks for your useful feedback :) -
Hello people, I'm joining another contest. The idea seemed really nice to me, and it was doable with my skills. My robot is called IRON-SLAMMER-ALPHA!. Iron sounds cool, slammer because i have a hammer and alpha because im the alpha(= first, dominant) I should also mention that i'm in the PF-category and not in the S-brick category progress: IRON SLAMMER ALPHA V1 1. This is the hammer, it will become longer and i put a weight at the end for more impact. 2nd picture is bottom. I have a clutch so the hammer can fall under gravity. That gives bigger impact than the slow moving XL-motor. I geared it ofcourse down otherwise it cant lift the hammer. (I leave a lot of stuff out because it is not relevant anymore) This is the finished model: but it was wayy too big so i teared it down until i had only the hammer left and the gearbox. I then built the following model which i present with proud: IRON-SLAMMER-ALPHA V2.0!! in order to gain more length, i moved the gearbox+motors behind the hammer. The hammer is now 4 studs above the ground. I also put a battery box at the end. The impact is pretty serious right now. In the video i will show you how much. To visualise the impact i had to be quite creative. The tracks are redesigend. The old ones were 'modules' which i put on the side of the model. These tracks are part of the whole thing and can't be taken off. The tracks are not flat because i had to put them over a beam. I do like it so i did not take the effort to change anything. I put the motors, BB and IR-recievers at the back. This is a wheight which prevents the bot from falling foward. It works perfect because it does not tend to fall forward whatsoever. The BB is easy to remove. All it takes is to remove 2 red pins. I'm gonna show in the video how it works. After the tracks and the PF-stuff was done, i made some armor around the tracks. The end result is not very pretty.but it looks badass and works flawless. I am currenly working on a video so i won't show you how it works but you'll see in a few days. Here are the pics: this is the hammer. It is all i had left after tearing down v1. It is 42 studs here because it cannot be higher than 45 studs and i wanted to have some space left. This is the last picture in VVS mode (which is a relief for some people) but this one is VVS because it fit's better in the picture. Here you see the almost finished model. I forgot to take pictures between those moments. After this, i only put on the tracks armor. and This are pictures of the finished model. These are proofs that it fits in a 45x45x45. Here are some facts summed up for you: - weight: 1800 grams - dimensions: LxBxH = 44*35*45 PF components: - 2x L-motor for driving, I am amazed that the l-motors can power the bot because it is quite heavy. - 1x M-motor for clutch - 1x XL-motor for lifting the hammer. It can easily lift the hammer but i can not make it longer otherwise it will stick outside the imaginary box. - 2x Battery box, 1 to power it, and one as weight in the hammer. Thanks for reading this far. I hope you like it. feel free to critisise it because it is far from perfect and all moc's, no matter how good, have flaws.
-
[TC11] Fire Fighter
roppie11 replied to nick97's topic in LEGO Technic, Mindstorms, Model Team and Scale Modeling
That is one good looking robot. i see our robots have a few things in common - tracks, i first tried with wheels. 2 connected to a motor and 1 swivel wheel. But that didnt work so i have a chassis with tracks. - i had cages around the wheels and i'm ppb going to do that as well around my tracks. and maybe front&rear sides. It makes it look sturdy and i''m sure it protects the robot a lot. I hope we don't have the same signature move. -
idea for a new type of gear
roppie11 replied to Phantom59's topic in LEGO Technic, Mindstorms, Model Team and Scale Modeling
you have to keep lego a bit challenging. it's technic after all