
Sven J
-
Posts
789 -
Joined
-
Last visited
Content Type
Profiles
Forums
Gallery
Everything posted by Sven J
-
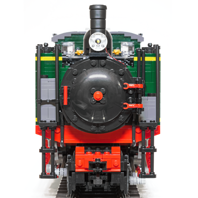
Seems I can only confirm what others already wrote – a very clean and well thought out model! It really puzzles me how you built that grey side vents. I wonder if you would mind to tell your secrets? As with some others of your MOCs, I have a special relationship to this locomotive, as it was stationed in my home town Oberhausen during its museum career (until last year, when the museum society – the same that operated 41 360 – went bankrupt. Don’t know where the two engines are now.). So I couldn’t help noticing that it’s lettered with „Yverdon“… The correct lettering can be seen here: http://static.panoramio.com/photos/original/9585309.jpg Sorry for nitpicking… Good luck with your steamer in OcTRAINber! (And I hope that little word „last“ sneaked in there erroneously…)
-
Very nice MOC! It must have been very hard to model these complex, rounded shapes, but you did it very well. Some inspiring building techniques, too!
-
What a neat little engine! And, despite of its simple appearance at first sight, so many fine details. You even modeled the sanding gear! Is that a sausage you used for the brake hose? Clever idea! (One issue that is constantly annoying me with my own MOCs is visible in the daylight photos in the garden: Why is LEGO seemingly unable to produce a constant colour quality? At least four different shades of dark green there... but that's not your fault, of course.)
-
As I build models of European trains, they have side buffers, so there needs to be some distance between the hooks. But of course, with shorter or no buffers, it should work with shorter liftarms, too. However, the shortest liftarm with round holes at the end seems to be this one.
-
I simply use plates with hook, connected by thin liftarms (the grey half pin is only necessary when you want a very rigid coupling): This solution works great even for heavy trains, and I think it will also work on slight grades. Only disadvantage is, vehicles don't couple automatically.
-
MOC: 1:33 Hohenzollern 0-6-0T v2.0 - UPDATE with new features
Sven J replied to Sven J's topic in LEGO Train Tech
Oh, you’re flattering me! Thank you very, very much for your kind words! But don’t put your own light under a bushel, your trains are so amazing in design, imagination, diversity and number! -
MOC: 1:33 Hohenzollern 0-6-0T v2.0 - UPDATE with new features
Sven J replied to Sven J's topic in LEGO Train Tech
The old FSO Warszawa 223 in the video is almost as beautiful as the locomotive… With regard to the 46, I fear it leads a bit far off topic in this thread. I hope you don’t mind if I’ll take the liberty of writing you a PM via the Eurobricks messenger service. -
MOC: 1:33 Hohenzollern 0-6-0T v2.0 - UPDATE with new features
Sven J replied to Sven J's topic in LEGO Train Tech
I’m afraid not… It will be a narrow gauge locomotive this time, in 1:22.5 scale: the Bulgarian „Mountain Queen“ 2-10-2T class 600.76. The designing work for this 3200-parts-model is finished, and I have already built the cylinders, the leading and trailing trucks and the main frame (57 studs long!); at the moment, I am gathering parts for the rest of the engine. I think it will take at least two or three months more until completion. As for the class 46, it is still on my list. But the wheel size question aside, there are serious difficulties to overcome. -
MOC: 1:33 Hohenzollern 0-6-0T v2.0 - UPDATE with new features
Sven J replied to Sven J's topic in LEGO Train Tech
Thank you very much for your kind feedback! It depends on your preferences. For my needs, BuWizz is just about ideal. I’m planning to convert all my locomotives to it. Pros: - Precise speed control makes BuWizz ideal for shunting. - Small size allows more details and a more rigid frame design. - BuWizz has pin holes, so it can be used as a stressed structural part, e.g. for preventing the rear end of locomotive frames from bending. - No separate receiver is needed. This is not only welcome as it saves space; I had to experience that the LEGO IR receiver’s sides are not exactly vertical, so it tends to stress and warp attached sections of the model. - Bluetooth connection instead of LEGO’s infrared technology allows to completely hide BuWizz inside the model. - Works in direct sunlight – IR receiver does not. - Considerably more power than LEGO rechargeable battery box, if needed (in „fast“ mode). Cons: - Not quite cheap. On the other hand, LEGO rechargeable battery box + IR receiver (only V2, as V1 is too weak for my models) are rather pricey, too. - Finger must remain on phone display to keep the train running, which can be quite annoying. As I wrote, I hope this will be fixed with one of the next app versions. - Initial firmware update is a nerve-racking disaster an effective method of training inner serenity and ease of mind… Bulgarian – yes. But not the engine I suppose you are thinking of… -
EDIT: Model's latest revision HERE! Dear train community, a while ago, I presented my model of a small industrial shunting engine (for information about the prototype, and to compare the pictures below with version 1.0, please see here). However, although it proved to be a strong and reliable little locomotive, I was never entirely happy with it: The roof turned out to be very flimsy, and the battery box and IR receiver were completely blocking the view through the cab. So when BuWizz was announced, and I realized that its height would be considerably lower than that of 84599, and it would need no additional receiver, I thought I should give it a try and rebuild my MOC (even though this meant that I had to get a smartphone… ). The revised model has been completed for a couple of weeks now, but it wasn’t until last week that a BuWizz app version was released which allowed to control two output channels via one slider, so I couldn’t let the engine run until then… (By the way: One more thing that I would really wish for would be an option to „lock“ the slider in a given position, so that you don’t have to keep your finger on the phone all the time when the engine is running. Maybe someone from BuWizz will read this… ) Following alterations have been implemented: - BuWizz replacing the rechargeable battery box - boiler diameter increased by one plate for better scale accuracy and a brawnier appearance - slightly larger, smoother side tanks - revised colour scheme without black striping (thus adding to the stouter look) - additional small windows in the cab front - completely redesigned cab roof with more prototypical profile and no longer needing transparent plates to support the door openings - handrails below the buffer beams for the shunting men - strings as sand pipes - improved shape of the cylinders - smaller headlights - (at least rudimentary) cab interior thanks to the reduced height of BuWizz But unfortunately, still no opening doors – sorry, Sergio! (I promise my next model will have them. And it will be a BIG model. REALLY big!) With BuWizz set to „slow“ mode, gentle and precise shunting becomes possible; something one couldn’t even dream about while using Lego’s IR remote control system. As always, you will find larger versions of the images in my Bricksafe folder. Comments are of course most welcome. Thanks for stopping by! Best regards, Sven EDIT: Model's latest revision HERE!
-
That's gorgeous! The undercarriage, the handrails - such carefully elaborated details. But the icing on the cake is the tilting mechanism - stunning! Would love to have a wagon like this for my industrial locomotives...
-
While I don't know much about modern EMU trains, this (virtual) MOC is very impressive! I can only assent to LT12V's words. It's also really nice to see a train model in full scale length! As for the gap between the front arches: Isn't the diameter of the pneumatic hose too small to fill the place? I have to admit that I can't think of a better solution at the moment, though.
-
I'm intending to use BuWizz for my train MOCs, as it should be more powerful and much easier to hide than battery box + IR receiver. For that purpose, it would be handy to have the option to lock the sliders, so that they don't return to centre when you let loose. Maybe this could be realized within one of the next app versions?
-
Another great Big Boy Model. Very well done! I'm looking forward to some more detail photos once you have moved to your new residence.
-
Not exactly what I would call the most handsome prototype, rather an austere beauty… But once again a magnificent MOC from your workshop, with lots of amazing details. I’m alway getting a bit envious when I see your skillful (Or drillful? Sorry, couldn’t miss that joke… ) wirings for the lights, that’s something I haven’t managed to achieve yet. Very well done! Waiting for your Swiss MOC!
-
Impressive work! Very well proportioned and amazing ideas for the details. I especially like the valve gear and the use of Technic chains for the ladders at the back of the tender.
-
How do you store your trains when not in use?
Sven J replied to kiwileaguefan's topic in LEGO Train Tech
I display my train MOCs in made-to-measure acrylic glass showcases from Sudu (some standard sizes are available on ebay, too). Yes, they're quite pricey, but quality is top-notch, and they offer both dust and UV protection. -
That's great news, thank you very, very much! Out of curiosity, I had already ordered a bunch of your XXL drivers and have to say they are great. The fit of axles and pins is very good, and not a single wheel shows the dye problem you mention in your Shapeways store. My only concern is how wear-resistant the material is, but that won't turn out until I have completed a matching MOC for the wheels...
-
So could I! That's a really great MOC. Congratulations! What's that part you used for the smokebox door?
-
Thanks a lot! As for the "wheels with springs" mentioned by @CrispyBassist: These are wheels for electric locos with quill drive (a more detailed description, though in German language, can be found here). Here's another picture:
-
Thank you so much for this effort! I've been waiting for larger steam locomotive wheels for so long... Can't believe this dream has become true. Unfortunately, I'm working on a couple of small-wheeled models at the moment, but I'll definitely try out your XXL wheels in the near future. And if I may add a wish: I'd love to see a version of your ML wheel without counterweight, so that it could be used for carriages or leading/trailing axles. That's a brilliant suggestion!
-
This is breathtaking!!! Absolutely unbelievable how you managed to build these streamlined shapes, not to speak of the brick-built colour scheme. Now I'm puzzling over the doors and how the three-studs wide section is fixed inside the white frames... And I've learned about two (beautiful) trains I had never heard of before. Thanks for that! Merry Christmas!
-
MOC: 1/33 Swedish 0-8-2T with three (!) working cylinders
Sven J replied to Sven J's topic in LEGO Train Tech
When I started MOCing some years ago, I actually thought it would be a rather inexpensive hobby… Errare humanum est. But of course, it very much depends on how many compromises you are willing to accept: The more details you want to have, the more expensive it gets. Rare parts or colours will drive the price further up. As for the comparison you asked for, it’s hard to tell exactly what one of my MOCs did cost, as I always buy ca. 10–20% more parts than I actually need. This is not only to have spare pieces in case that I have to change something, but also to be able to select the parts with the best possible colour match (colour variation is a very annoying issue, especially for green, red, dark bluish gray and dark blue!). Besides, part prices vary among BL stores and quite often I have to choose a more expensive seller because of minimum purchase conditions, number of available items etc. But I think the following figures should be quite valid for my MOCs, built (almost) entirely from new bricks: Open freight car: MOC (standard gauge, 1/33) ca. 200 EUR, LGB (narrow gauge, 1/22.5) 70–100 EUR German street price; 1 EUR ~ 1,45 CAD 2-axle passenger car: MOC ca. 350 EUR, LGB 50–150 EUR 4-axle passenger car: MOC ca. 650 EUR, LGB 150–300 EUR Locomotive: MOC 600–1000 EUR depending on size, LGB 300 (very simple model) –1000 EUR As you can see, especially the wagons are quite expensive compared to "conventional“ garden railway models. It’s possible to save a lot of money if you don’t mind buying used parts, though. And of course hand-made gauge 1 (1/32) brass models are a completely different thing, with locos and passenger wagons for up to several thousand EUR. Needless to say that these models are far, far out of my financial range... -
MOC: 1/33 Swedish 0-8-2T with three (!) working cylinders
Sven J replied to Sven J's topic in LEGO Train Tech
I’ve collected some drawings of tank cars, but have not yet made any actual attempt to design and build models of them. While I’d love to have more cars and run longer trains, it’s not only a matter of storage space, but also of time and costs – those big models take several weeks to build (not to mention the design process), and they are really expensive… The SJ Litt. F is definitely one of the most beautiful steam engines ever built. Unfortunately, its drive wheel diameter is way beyond anything that could be realised in 1/33 scale while using BBB wheels. Regarding the SJ D-series, it’s an interesting prototype indeed, but not suitable for my layout: There is no overhead line, for I use my tracks for narrow gauge garden railway models (1/22.5) as well, and I would find it a bit irritating to see a model of an electric loco running without wiring. -
[MOC] Canadian National X-10-a with Power Functions and 9v
Sven J replied to Commander Wolf's topic in LEGO Train Tech
Sometimes I use the saucepans for that purpose, e.g. for my steam engines' air compressor pumps. It's not always easy to connect them properly to other parts, though.