
Sven J
-
Posts
789 -
Joined
-
Last visited
Content Type
Profiles
Forums
Gallery
Everything posted by Sven J
-
MOC: 1:22.5 Bulgarian 2-10-2T narrow gauge steam engine (class 600.76)
Sven J replied to Sven J's topic in LEGO Train Tech
Thank you, macnavi and jamesed_1971! Yes, I know. My point was that the train isn’t really too heavy for the locomotive – I estimate it could pull 10-11 four-axle wagons. Just at that one position, the engine has difficulties to start the train. I’m happy to have inspired you! So I’m waiting for pictures of your improved Lady Anne! -
Ah, now I understand. To overcome this problem on my wooden passenger wagon, I just made the bogie's drawbar articulated: But again, I don't know if this simple solution works on your curve radius and with your quite rigid coupling. I suppose you'll need a kinematics like on your 2-axle car. Good luck with the bogies!
-
As you seem to be interested, another word on the Teflon spray: It’s almost impossible to apply it directly to the bearings without affecting the surrounding parts (when dried up, it leaves a white film). So I use to spray a good amount into an egg cup, and then apply it to my model with a cotton swab. As I explained in the thread on my Bulgarian loco, I don’t use standard LGB couplers, so I can’t say anything about them. But the link-and-pin-type (you can replace the standard coupling with them, but sometimes need to cut off the buffers) is a rather flexible connection, which allows the axles to steer at the correct angle. Take all this with a grain of salt, however, as I made these experiences with considerably larger curve radiuses. Don’t know if I understand your last sentence correctly – bogie wagons shouldn’t need this rubber band IMO, as the bogies stabilize themselves.
-
Hi Davide! Yes, that looks much more reliable than the chain drive. From my experience, I can confirm that most Lego gears are quite strong. The inglorious exception are the 12-teeth conical bevels, which are prone to tooth wear/loss under high torque. The 12z double conical gear wheel performs better. A greater problem is to keep the drivetrain bearings in place. Especially when you lubricate the drivetrain for less friction, lubricant may penetrate between the bricks and cause them to lose grip, to the extent that parts may fall off under load. As of late, I'm using Teflon spray instead of silicone oil to avoid that effect. That simple steering solution is found on many 2-axle LGB cars. It works well when being pulled, but the axles tend to cant within the rails when the car is pushed (btw: a piece of straight track between S-curves is also standard on real railways, so I don't consider that a "trick", but a tribute to the prototype... ). On my 2-axle Lego cars, I simply restricted the axles' steering angle, and it works fine both being pulled and pushed. Best regards, Sven
-
MOC: 1:22.5 Bulgarian 2-10-2T narrow gauge steam engine (class 600.76)
Sven J replied to Sven J's topic in LEGO Train Tech
Thanks baard! The pieces of music are: Tsvetan Radoslavov: “Mila Rodino” (national anthem of Bulgaria) Jacques Offenbach/Carl Binder: “Galop infernal” section (“Cancan”) from the overture to “Orpheus aux enfers” -
MOC: 1:22.5 Bulgarian 2-10-2T narrow gauge steam engine (class 600.76)
Sven J replied to Sven J's topic in LEGO Train Tech
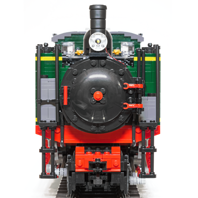
Thank you very much for your kind words, Paperinik77pk, Feuer Zug, Man with a hat and monai! I use flex cables – which are attached to the leading and trailing trucks – as coupling bars (the central buffer is only a fake). The old, black, rounded flex cable ends fit into the LGB link-and-pin coupler: In the future, I'm intending to replace them with black valve gear bars from zephyr1934. The flex cables fit into the couplers very tight, which sometimes causes problems when negotiating curves; zephyr's bars are thinner and should work better. Nothing spectacular about the prototype this time – just a humble 0-8-0T. I need an uncomplicated workhorse for my narrow gauge trains (putting the 606.76 on track, with its 7 axles, is already a task in itself...), so I chose locomotive no. 1 of the "Flensburger Kreisbahn", a former metre gauge railway in Northern Germany. Why this engine? Well, just because it once ran through my favourite holiday region. But don't be too disappointed, the model will have special features (albeit no opening doors, ahem)... Teaser: -
MOC: 1:22.5 Bulgarian 2-10-2T narrow gauge steam engine (class 600.76)
Sven J replied to Sven J's topic in LEGO Train Tech
Hi all, Finally, I managed to upload the long-promised video of my 606.76 on track! I hope you'll understand the reason for the delay: With its very long wheelbase and lacking any spring-suspended axles, the locomotive demands very smooth track. Besides, it's quite prone to tipping over due to its narrow gauge and large body. Of course I knew that from the beginning of the design phase, but unfortunately I was imprudent enough not to check my layout before doing a full-speed run. So the engine spectacularly derailed on a loose part of track and had to be largely rebuilt, which took quite a time... My next model, which is already in the works, will have a much lower COG to prevent accidents like this... You can see the engine's wheels slipping a bit when starting the train. Everywhere else on my layout, the locomotive pulls away the 7-wagon train with ease; but just at this one position, there's an ever so slight pit in the floor (didn't realize it before making the video - hard luck, grrr...). This means that a large portion of the engine's weight rests on the carrying axles, not on the drivers, thus reducing traction. The highest attainable speed with this quite heavy train (in BuWizz "fast" mode) is just over 0.6 m/s, which is equivalent to approx. 50 km/h in 1:1. The class 600.76 engines were allowed to run at 45 km/h, so I dare say that the model speed is really true-to-scale. Enjoy! Best regards, Sven -
This coupling kinematics is absolutely ingenious!
-
But two important things are missing: A comfortable deckchair at the end of the line and a freight car bringing cold drinks...
-
Very cute! How do you want to couple the wagons? I see coupling plates beneath the buffers, but with the locomotive on track, it seems almost impossible to access them...
-
Very clever idea!
-
Lovely as always! The wagon is very nice, too. Must have been quite a pain to cut out that cereal ear... What part did you use for the door handles?
-
That train is great!!!!!! Can't wait to see it in real bricks! The wooden carriages are so cute, and the NSB class 49 is an absolutely stunning prototype (when one of the Krupp-built engines was tested by German Reichsbahn engineers before delivery to the NSB, they were utterly amazed about its performance). It looks as if you've eliminated the half-stud offset problem. If that shouldn't be the case, this part can also be useful as a bearing for a Technic axle. With LEGO print on it, it's also part of keychains and sometimes used by Bricklink sellers as a free giveaway...
-
Hi Henrik, I'm sorry, but it won't work... You put the driven axle through a 1x2 Technic brick with 2 holes, where the holes are placed directly underneath the studs. The vertical axle, however, has a bearing between two studs, so you'll have half a stud offset between vertical and horizontal axles. Try this part as a bearing for the vertical axle instead. Apart from that, with the additional support you already mentioned, the principal drivetrain layout should work. The gear ratio should be fine; I found that the L-motors in my locomotives run with approx. 4 revolutions per second under load (at 7.4 V from the rechargeable battery box), which in 1:1 gearing leads to quite prototypical speeds. Best wishes, Sven
-
Hi Davide, This is really an interesting project! As I build MOCs for G-scale track, of course your double-gauge feature fascinates me most. I would love to see your locomotive run on LGB track. But the removable body is a great idea, too! However, I don’t really know whether it’s wise to use a chain drive. I once tried it on one of my engines – it was fine when the locomotive was running alone, but always ended up with a broken chain when the engine had to pull some load. Wagons in this scale can be quite heavy! Finally, I replaced the chain with a gear wheel transmission. Now I’m waiting for pictures from the "on-board camera“! Best regards, Sven P.S.: Completely off-topic - but at the sight of your nickname, I can't help asking... Have you seen this? (Says a lifetime Donald Duck fan )
-
Whatever color you like: https://www.brickstuff.com/store/p51/Pico_LED_Light_Board_2-Pack.html I use warm white LEDs for my steam engine. For modern locomotives, it's probably more appropriate to use cool white ones.
-
The Pico LEDs should actually be large enough to rest flat on the open stud, where you can fix them with a transparent plate (a tile won't work, as there's not enough space inside): (Sorry for the image quality - don't have access to a decent camera at the moment and had to take my tablet.)
-
Thank you very much for this information! The Cricut machines don't seem to be available here in Germany, but the Silhouette ones are. I'll certainly take a closer look at them.
-
Oh dear, I'm getting old... Neither my hands nor my eyes would allow me this... That is VERY interesting. Never heard of this technique before. Where did you get that thing? Is it expensive?
-
It's hard for me to believe that lack of weight is the reason for your problems. If all parts can rotate freely, a non-motorized locomotive should run just like a wagon. Have you checked if the rods can easily turn on the crank pins? Sometimes the holes are a little tight, a bit of sanding will help then. And did you ensure correct quartering (90° crank offset left vs. right side)?
-
What a cute little train! And a lovely railway crossing - simple, but effective. As usual, I have a few questions - forgive me... How did you paint the inner part of the rods so exactly, without also painting the rim? On my locos, I chose self-adhesive vinyl tape, as I thought it impossible to apply paint that accurately. And how did you make the "DR" lettering on the wagons? Doesn't look like stickers (I can't see any edges) - is it printed directly onto the bricks?
-
Never mind. In German literature, the 01.5 disc wheels are invariably labeled as "boxpok".
-
Thanks for the additional pictures! Really great work. I'm wondering which parts you used for the headlights? Do they work? The East German steel industry experienced great problems with casting the boxpok wheels accurately as specified in the design drawings. Many of these wheels were not properly balanced, and they seem to have been prone to cracking. So after a few years, they were generally replaced by normal spoked ones. According to Lucas/Schnabel, "Die Baureihe 01.5", 01 513 had boxpok wheels from 1963 (year of reconstruction) to "at least September 1970". However, the photo you've hinted to proves that she still had boxpok wheels nearly one year later - but she's already lost the side skirtings.
-
Very, very impressive! The skirting looks so smooth, and there are so many details. As you're asking for constructive feedback, I'd like to add two remarks: First, as previous posters said, we'd be able to appreciate your creation even more if you could show some more detailed photos. And second, the smoke deflectors seem a bit too big for me. Did you try to reduce their height by one row of studs? (Don't get me wrong - that's just nitpicking, your MOC is great. )
-
Problem fixed! Completely de- and then re-installing the app has helped, all controls are working again. Phew!