
Hod Carrier
-
Posts
1,007 -
Joined
-
Last visited
Content Type
Profiles
Forums
Gallery
Everything posted by Hod Carrier
-
WARNING: What follows is a personal opinion heavily influenced by my own prejudices concerning TLG's output. Those of a nervous disposition should look away now. It's just as I anticipated, and I'm not impressed. I decided I wouldn't hold my breath nor get excited about it, especially when the rumours started that it was a Winter Village train, and I feel justified in taking that approach. Unlike others I don't see this as a boost for train fans or the train theme as a whole. What it is is a Christmas decoration, and an expensive one at that. Moreover, it's not a move forwards for the trains theme, a nod to the more discerning AFOL with spending power, nor even a serious attempt at attracting new people to the theme. With the exception of the folk represented here (most of whom seem to see this set as the basis for MOD or a source of parts), the majority of people who will buy this set will be those who want a Christmas train to put under the tree, and even that has a limited appeal (it's not something that often gets done here in the UK at least). I confidently predict that there will be large numbers of these sets heavily discounted in the stores shortly after 1st January 2017. I understand that designing and creating your own MOCs is not necessarily going to be within everyone's budgets or abilities and, for these people, official sets are a good way to satisfy the need to build trains. However, given that LEGO offers almost unlimited scope for imagination and creating something truly unique, this reliance on TLG to provide decent, satisfying sets depresses me somewhat, especially when you consider the intervals between releases. I've long been an advocate for throwing the instruction sheet away and just using your imagination to come up with something good from the bricks that you have to hand, and the flowering of digital design tools takes this concept even further by providing an unlimited supply of bricks at no cost to the user together with the option to realise their designs in brick if they so choose. We don't need TLG to cater to our wishes. We can go away and create the trains and associated infrastructure for ourselves, as many here have already shown. I appreciate that I'm espousing a purely personal view that perhaps no-one will agree with, and I support anyone who wishes to argue that I'm talking pure hokum. We're a community after all, and we can't expect everyone to sign up to any particular view. You'll all be relieved to hear that I'm putting my soapbox away now. I've had my outburst and railed against the system, and now I'm at peace with myself. I wish TLG every success with this new release, but I shall not be buying it. Bah!! Humbug!!
-
Certainly. Any fine details are going to be compromised at this scale and I admit to having compromised myself on this and all my MOCs so far. For me the key is getting the proportions correct and trying to invoke rather than faithfully replicate details like bogies. In any case, few people would look too closely at things like that. But for the Thalys, as with other TGVs, it was important to get the air suspension tanks on the bogies because they are an obvious detail. Hope this helps.
-
Thank you. I will look that up.
-
May I ask, what model Dymo printer are you using?
-
Thank you very much. That's high praise indeed coming from such a talented LEGO artist as yourself. I've discovered that half the challenge is in selecting the right prototype, as some trains are easier to reproduce at this scale than others. Thanks also for the tip. I was aware of the Dymo range of label printers but I hadn't got around to looking at them in detail. Can you use them to print custom graphics from your computer?
-
I hope you'll forgive the topic bump for a little update. The Thalys has grown!! I've added a couple of centre coaches in the form of a bar car and a 2nd class coach. It's still 4 cars away from reaching it's full length but already it's too long for any of my tables. As indicated before, I have changed the stickers for self-adhesive vinyl. The transparent stuff is much better than the mailing labels I was using before because the film itself is much less visible when stuck on to the model. However, the white vinyl used on the power cars is not quite as thin as I'd hoped. That said, it's very easy to use and gives a nice, crisp finish.
-
Beautiful work there. You've definitely caught the shape and the imposing presence of the class. She's a whopper!! Great details too, especially on the bogies.
-
If you're prepared to stray from the path slightly and consider alternative means of powering your loco, you could always try using a Minizip cable and a 9V PP3 battery. This will still deliver enough voltage for the motor but might allow you to build a fully self-contained loco. I used this solution in my 4-wide TRAXX and it works well.
-
MOC: 1/33 Swedish 0-8-2T with three (!) working cylinders
Hod Carrier replied to Sven J's topic in LEGO Train Tech
Stop it. Just stop it. Your MOCs are so full of amazing details and great engineering touches as well as being incredibly faithful to the prototypes. I can't speak for anyone else, but I'm getting serious brick envy. -
NMRA National Train Show, July 6-10, 2016
Hod Carrier replied to zephyr1934's topic in LEGO Train Tech
Thanks guys. -
NMRA National Train Show, July 6-10, 2016
Hod Carrier replied to zephyr1934's topic in LEGO Train Tech
That looks like a great show. These club layouts always amaze me, but to see such huge entries from individuals is truly astounding. It's good to see that recognition was gained from the organisers too. Forgive the question, but I wondered if you could clarify the meaning of the word "interlocking" in this context. It's just that US railroad terminology differs somewhat from UK railway terminology, and depending on the usage I might be interested to learn more about Gerrit's work. Has Gerrit built a junction with signals and switches operated by levers in a tower, or has he gone a step further by interlocking the action of the levers to prevent collisions, etc? I've tried to search more online but the results I'm getting are inconclusive. Thanks. -
Just a thought, but have you considered reducing the width of the clerestory? If you reduced it to 2 studs rather than 4 you could use curved pieces for the roof section and do away with the cheese.
-
**Bumped for an update** After a bit of a wait for a BL order, I have finally brick'd my Streetbike. Here are a few pics. I hope you like it. Streetbike Upgrades.lxf
-
[WIP] Small 4x4 Vehicle
Hod Carrier replied to JJ2's topic in LEGO Technic, Mindstorms, Model Team and Scale Modeling
That shape is very reminiscent of the old Land Rover 101 Forward Control. As such, you could hide the oily bits under almost any body you like, from the basic canvas topped truck to an ambulance body. Well done for making such a tiny truck. -
Has Anyone tried doing an Operating Session in Lego?
Hod Carrier replied to xboxtravis7992's topic in LEGO Train Tech
I'm not sure that prototypical operation is beyond the abilities of children, but more that it's subtleties do not appeal so much to children. The best and most satisfying layouts are often those with the greatest variety of operations, and that often means lots of scenarios of the type Zephyr outlines above. But that generally means that there are lots of boring rules to follow (e.g. raw materials arrive in one sort of car while finished products leave in another sort), cars to shunt/switch and running orders to follow. While this is very close to prototype it doesn't suit the sort of free-form creative play that children seem to prefer. Prototypical operation is something more suited to adults who understand and appreciate the subtleties it brings. Any experienced model railroader from any scale should be able to get the same satisfaction from L gauge as from any other because the challenges and parameters are the same even though the medium may be different. -
As it turns out, it's an easy fix. It just needs a half bush each side to hold the sideframes on more securely (a crucial aspect of Space2310's design) and it all seems good. Weirdly the bogie is stable running in one direction but tears itself apart when running the opposite direction. Truthfully...?? I'm quietly hoping that ME Models will produce some narrow gauge (4-wide) curve geometries to complement their standard gauge (6-wide) ones. Plastic would be OK provided the surfaces are not serrated.
-
There's some wonderful retro goodness on this board at the moment, but this one is truly beautiful. Congratulations on your build.
-
Thanks for the clarification. I have just had a play with an old Technic set that just happens to have the necessary parts and can confirm that the 3/4 pin will hold the levers tightly enough to be poseable. The problem might be with the foot controls, though. LDD indicates that there isn't sufficient clearance over the lower panels to permit enough bushes to be slid onto the axle to hold the levers tightly enough. However, there may be sufficient flex on the model to allow for this. Vectormatic: Be my guest. **EDIT** Apologies to Appie. You're kind of right in what you said earlier. The 3/4 pin will grip the lever but not the cross block once the compression is released. However, the 1/2 pin will work because it would be held in compression inside the cross block.
-
Hi Appie. Yes, that's the part. Thanks for the tip. I'll have another look at how the levers are secured so that they stay where I want them.
-
This is my first post in this section, so forgive me if I've got the etiquette of this section wrong. I hope it's not wrong to post this. Although I'm mostly a train guy I'm also a biker, so I was drawn to the Streetbike set (PN: 42036). However, having read some of the criticisms that this set has drawn I thought I would have a quick look to see what improvements I would like to make before I actually build it. So I fired up LDD and see what I could do. And here is the result. In addition to all the well-documented problems, the biggest problem to me is that the model is neither one thing nor another. It is neither race bike (having lights and a kick-stand) nor road bike (lacking indicators and mirrors). As a road rider myself I decided I would follow the road bike route. But to begin with I would add some of the features missing from a real bike. Brakes, front... ...and rear. Radiator. Clutch and front brake levers, rearview mirrors and turn indicators. Footpegs on both sides with levers for the rear brake and gearchange. Improved tail light, turn indicators, registration plate bracket, twin exhausts and a proper seat. I've not yet added the tubes connecting the exhausts to the engine because I can't seem to master the Flex tool on LDD, but the idea is that they will go behind the black panel and attach to the engine at a point lower than normal for this model. The kit of parts necessary for the upgrades. I hope you like what you see. I shall be ordering up the necessary parts for the upgrades before I build my streetbike model. Some of them may not work as well in practice as they do in the make-believe world of LDD, but we shall see. I would have liked to add brake calipers and mudguards too, but I haven't yet worked out how to model these parts.
-
Huge train station MOC of 25.000 bricks
Hod Carrier replied to AlmightyArjen's topic in LEGO Train Tech
I've been working on a modular station in LDD as a way of staging my 4-wide trains, but nothing on that scale or complexity. Mine certainly won't have anything like moving escalators, automatic doors or any of the other many layers that yours has. Yours is simply amazing!! -
**Bumped for an update** I've had the crowbar out again and managed to squeeze in a little more power in the shape of an L-motor. Unfortunately the larger size of the motor has meant a few compromises have had to be made elsewhere. The reduction gearing has been lost and a what structural integrity the model had before has been reduced further. It really is only stable now with the roof and sides added. The motor, SBrick and, to an extent, the boat weight are now all integral parts of the loco's structure. However, there have been a couple of other very small changes made. The boat weight has been moved one stud closer to the driven bogie and the LEGO traction tyres have been changed for rubber O-rings. All the changes mean that the loco can now haul a reasonable weight, although the extra power from the L-motor does mean that the power bogie will need to be reinforced to prevent the motor tearing it apart. On a short test track it was capable of hauling the entire 4 car SLT model with only minimal wheelspin. This is a massive improvement in performance compared to the original M-motor version. Speed is little changed from the previous version in spite of losing the reduction gearing. I can only assume that the L-motor's internal gearing is lower than that of the M-motor which compensates and also contributes to the amount of grunt this thing can put out. Ideally I'll want to change to metal track instead of the serrated plastic stuff and add some more length and a few curves and see just what she's capable of.
-
Pride cometh before the blah blah blah EMD F7
Hod Carrier replied to ShrikeArghast's topic in LEGO Train Tech
Not really, no. I said that your work was original and innovative, and I meant that. I also meant my statement about skills and imagination genuinely. I'm glad that you like it and that you're happy with the outcome, even if it doesn't work so well to my eyes. What jars is your attitude. But I've already said what I felt I wanted to say earlier and am not going to comment further on it. I'm sorry if my earlier post is what inflamed the situation. It wasn't my intention to provoke such a strong reaction. -
Pride cometh before the blah blah blah EMD F7
Hod Carrier replied to ShrikeArghast's topic in LEGO Train Tech
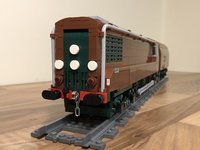
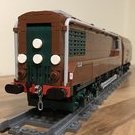
I think it might be fairer to say that you've come up with another solution to the cab front shape. It's certainly innovative and makes good use of some newer pieces that were not available before, but I wouldn't be so bold and make the sort of claims that you have. You've got some skills and imagination no doubt, but rubbishing the work of others who went before while "...casually flaunting the best F7 ever" is a little disrespectful. By all means showcase your work for appraisal, praise, criticism and comments, but your tone goes a little far for my taste. I'm actually wondering whose pride you are referring to. There are a couple of things to bear in mind. With LEGO there is rarely one solution or interpretation of a prototype. Your interpretation of the F7 may look better to you, but other people may prefer the other method. And that's fine. The other thing is that LEGO is awful at reproducing compound curves like those of the F7 bonnet. Therefore each designer will struggle to come up with the least worst solution that suits their eye best. As I say, it's an innovative and interesting design that you've come up with. I don't find it works to my eyes as well as Nate's but I appreciate the original thought and design. -
Basically yes. There are three generations of the TGV. The Horizon Express is based on the original TGV Sud-Est sets. The second generation is the TGV Reseau which keeps the iconic nose shape, while the third generation, the TGV POS, does away with it for a blander and less interesting shape with a single central windscreen. The Thalys PBA (Paris, Brussels, Amsterdam) is the one I've modelled and is a TGV Reseau. The "chubby" ones are Thalys PBKA (Paris, Brussels, Koln, Amsterdam) which are TGV POS. I'm not sure of the precise numbers without looking it up, but I'm fairly sure that there are more Thalys PBKA than Thalys PBA, which might be why you've not come across them before. Hope this helps.