
Hod Carrier
-
Posts
1,007 -
Joined
-
Last visited
Content Type
Profiles
Forums
Gallery
Everything posted by Hod Carrier
-
That's a very grand entrance. But then, as a train driver myself, I do sometimes wonder at the grand ornate nature of some of the tunnel entrances I drive through, even way out in the middle of nowhere. And no-one else gets to see them except for me and my colleagues. I do agree, however, that there needs to be some purpose for a tunnel mouth except for filling a gap between buildings. You won't see a tunnel mouth like that in such a setting. But the decision is ultimately yours.
-
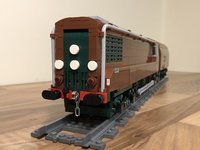
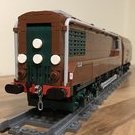 Splendid!!! What a beautiful coach packed full of wonderful details.
 -
[WIP] Signalbox Lever Frame with Interlocking
Hod Carrier replied to Hod Carrier's topic in LEGO Train Tech
Thanks guys. I'm still looking at it as a work in progress until such time that I can get the locking bars to work as designed. The shorter ones with fewer pegs work fine but some of the longer ones need a little push with a finger to make sure they go all the way across. Richard: Are you going to be at Bricklive at the NEC? It's very close to where I live and I'm thinking of getting along at some point. -
[WIP] Signalbox Lever Frame with Interlocking
Hod Carrier replied to Hod Carrier's topic in LEGO Train Tech
Thanks Archie. A few snaps as promised. [/url -
[WIP] Signalbox Lever Frame with Interlocking
Hod Carrier replied to Hod Carrier's topic in LEGO Train Tech
A little update. After tearing the frames down more than once and enduring a month of having parts strewn across my desk I have managed to get everything back together again and can report an improvement in reliability. The frame now sits on baseplates and has guide structures for some of the longer locking bars and individual lever bars. All of this, together with swapping out some parts, has helped to eliminate the flex in the frame and is helping to keep some of the key components accurately aligned which has helped to make the frame work better. However, there are still issues with the way that the locking bars are thrown by the sliding bars that requires attention, so it appears that I still have some work to do. While the frame was in bits I did attempt a different drive method but it actually worked less well than the original design so I've gone back to that. There are also some issues that I feel are inherent to using LEGO as a building medium and may have to accept that there is little I can do about it, but maybe I can work around the problems. We shall see. If I get a chance over the next few days I shall post up some photos of the revised design. -
Thanks but, er, it's not mine. It's a professional build commissioned by Bechtel who build the real things. It just happened to be on display so I grabbed a snap as I passed.
-
Not sure if this is the right place for this, but it's vaguely railway related and so I thought I'd pop it up here. As I walked across the concourse at Birmingham's New Street station I noticed a slightly desultory display relating to the future High Speed 2 (HS2) rail link between Birmingham and London. Part of this display was this mighty model of a tunnel boring machine made from LEGO. A quick internet search shows that this is a 1:20 scale model and is the work of Bright Bricks, a professional LEGO building company, on behalf of Bechtel. Not sure how long it's going to remain on display here, but if I get a chance I may try to get a few more snaps.
-
Er, well... When I say that I'm seeing the process for myself what I mean is that I'm seeing the structures going up. I've not seen the Factory Train itself along that stretch. It's like the fairies coming in the night and leaving signs of their visits. I agree that you can't realistically model the entire Factory Train and I think that you've selected the right sections. Wagons carrying masts, piles, register arms, crew mess facilities and other structures aren't especially interesting and modelling the concrete pouring stage is perhaps a bit tricky. It's a shame you opted not to include the piling unit though, but as you're not modelling the piles either I guess that's fair enough. At the risk of topic drift, the Great Western Mainline electrification is behind schedule. There are a number of reasons for this, but part of it is due to the piling unit. It simply isn't man enough to drive all the piles as far into the ground as needed and therefore the entire process cannot move as fast as planned. They should stand just a foot or two above the ground level so that the structures can be bolted onto them, but often you'll see them standing 12 or more feet proud meaning that Network Rail has to come back later with a more powerful piling unit to finish the job. Rumours suggest that the specification for diesel/electric hybrid Hitachi IEP trains that are intended to work this route has had to be altered with the train needing more diesel traction units than originally envisaged so that there is no delay for them entering service.
-
That's a really good scene you've made there. You've caught the essence of rail electrification really well. I'm seeing the process myself for real along the South Wales stretch between Severn Tunnel Junction and Cardiff. I just wish Network Rail could work as fast as your workforce. Ha ha!! Did you know that the real train in it's entirety is 23 vehicles long? As well as the processes you've modelled there are piling rigs for driving in the tubular steel foundation structures and onboard cement mixing facilities as well as wagons to carry all the stores and other necessities directly to site from the base in Swindon? You've still got a long way to go to model the entire process from beginning to end. By the way, is there space on your model to add the steel safety wall at the side of the train? This is there to protect the workforce from train movements on the opposite line and is quite an obvious feature of this train.
-
She's a good looking ship. You've done a fantastic job with the shapes, especially at the front end. Congratulations!!
-
Never say never. Whatever the body is doing the bogies will always remain flat and level. One possible solution would be the one employed by Hornby with their tilting APT model. They simply had a hole in the roof and the pantograph mounted to the top of the motor block. It's wasn't a particularly elegant solution I'll admit, but it was effective and admirably simple. Just out of interest, how are you tilting your model? I'm assuming that as the model turns it's driving up a wedge under one side of the body or the other causing the tilt.
-
The challenge now is to work out how to keep the pantograph level while the body of the car leans over in the bends.
-
Yes, I'm not sure I would have used that as a final design either, especially the black cab roof section, but if it was me I think I would have aimed for this much elevation on the roof details. However, it's not me. The important thing is that you're happy with the outcome and the design choices you made. I hope you don't think me presumptuous for my comments.
-
I hope you don't mind, but this was more the sort of thing I was thinking about for the roof. I don't know what you think, but it's up to you.
-
Yes a lot of it is flat, but some of it is curved. I think you could put a couple more plates of height onto the model without upsetting the size or proportion and take it from excellent to amazing. For example, the cab roof is quite domed before sloping back down again, the roof-mounted A/C modules (the curved shapes you mentioned) are larger and the angled side-fences are taller and more steeply raked than you've modelled them so far. But I have to say that you've pretty much nailed the rest of the train. I understand that the cab front is always a compromise, and I can tell that you've decided that the curves in the livery are more distinctive than the curves in the shape, but I think it looks great. I'm also impressed with the way you've built the shape of the bodyside. I had visualised something similar for another project that I've not really got the time for at the moment, but it's good to see someone else try it and show just how effective it is. If you'd like some photos please send me a private message so that I know where to send them and I'll try and get some sent to you during the course of the week.
-
Looking very nice indeed. You've really caught the shape of the Pendo very well. Only comment I'd make is that the roof detailing looks a bit flat. There's actually quite a lot going on up there that is visible from an elevated angle that is not apparent from the platform. I can get you a few reference shots if you'd like as I get a great view of these trains every day at work. Let me know.
-
[WIP] Signalbox Lever Frame with Interlocking
Hod Carrier replied to Hod Carrier's topic in LEGO Train Tech
You're welcome "Bricks". You might want to give me a chance to perfect the mechanism first before following my lead, but I'd be happy to help if needed. -
[WIP] Signalbox Lever Frame with Interlocking
Hod Carrier replied to Hod Carrier's topic in LEGO Train Tech
Happy to help. -
[WIP] Signalbox Lever Frame with Interlocking
Hod Carrier replied to Hod Carrier's topic in LEGO Train Tech
Thanks for the feedback, guys. Yes, the entire frame is built around conditional relationships between each lever and the locking bars have been designed to replicate these relationships. As I mentioned above, the frame is based on a specific location and is intended to be faithful in it's operation as well as capturing it's appearance. Using a track and signalling diagram that showed the type, number and location of the various assets under control from this signalbox as well as the order and function of the levers in the frame, I was able to work out the various interlocking relationships between the levers. I may not have got it 100% right, but I feel happy that the frame will work in a prototypically accurate way. Yes, that thought also crossed my mind, but there's a LOT more building to be done before I could be in a position to do that. There would certainly be vacancies for yard shunters to control the movement of trains in the yards as well as train drivers. It could be a great club activity. If you have a look at my Flickr feed you can see a few more photos which might help to explain it. I thought about using a crank, but I was never really happy. In the end I settled for an arrangement of sliding bars. It's a bit hard to explain in text and I don't currently have any photos of the relevant parts. However, I've done a bit of an LDD mash-up which I hope goes some way to answering your question. The T-beam drives both the trans-clear beam and the blue sliding bar. The sliding bar is located in the diagonal gaps in the subframe using a pair of pegs so that when it's driven backwards by the lever it moves sideways as well as backwards. The locking bar has a pair of prongs on the underside that sit either side of the sliding bar. As the sliding bar moves diagonally in the subframe this translates to sideways movement in the locking bar. This design may still turn out to be unsuitable even if I can deal with the flex and alignment issues. We shall see. -
Automated Rotary Railroad Dumper + Automated Conveyor Belt Loader
Hod Carrier replied to Sariel's topic in LEGO Train Tech
Damn those fare dodgers!! Mind you, if fare dodgers really were that cute I think I'd allow them to ride for free. Thanks for the hamster-eye-view tour of your home. You've got some great stuff there. Maybe more Technic guys should do trains, and perhaps some of us trains guys will attempt some Technic. -
I'm unsure whether or not I should be posting this in this list or on the Technic list, but I guess that it's more topic-specific here. There are a lot of vehicles over on the Technic list, and that's fine. Technic LEGO probably best lends itself to constructing vehicles of various types and there are many fine and talented exponents of that art over there. But I did start wondering what else might be made from LEGO Technic; something without wheels, motors, PF or remote control. After a bit of a brainstorm my mind settled on the good old-fashioned mechanical signalbox lever frame. There have been very few previous attempts at such a build (at least as far as I can tell from my research), so I thought it would be interesting to see if I could make some headway. I'm not terribly technically minded, but this was something that I do have a reasonable understanding of, and it's complicated enough to be challenging to design and build. The starting point was to make the model fully functional and as realistic as possible, which means that any notions of scaling correctly would go out of the window (luckily that's an approach I'm very comfortable with). Therefore I wanted not just to have the lever frame but the interlocking frame too. Sadly Technic does not lend itself well to the conventional tappet method of interlocking, so I would have to devise my own system that did suit the medium better using sliding bars with pegs engaging with holes. I also wanted to include the catch plate mechanism on each lever. Fortunately for my sanity I haven't kept a tally of the number of hours I spent brainstorming and then trying things out in LDD. As I said I'm not the most adept at technical matters, so this really has been a labour of love. However, I got there in the end and came up with a mechanism that looked good in digital form. Having done so I cast around for a prototype that I could recreate and settled upon Downham (the station is now called Downham Market, correctly reflecting the name of the town) between Ely and Kings Lynn in Norfolk as it was around 1974. It's a modest frame with 22 operational levers at this stage operating both points and signals. Downham at this time still had both an Up and Down yard as well as privately operated sidings, so it's an interesting location with lots of operational potential. This is the LDD render of the lever and interlocking frames without the locking bars. My poor little netbook couldn't cope with the whole thing in one file so each had to be designed separately. And this is the completed frame. It took a day and a half to assemble and, while 22 levers sounds quite modest (and is when compared to other locations on the network), the actual result is a bit of a monster. It looks more like a Wurlitzer organ than anything else. A close-up view of the interlocking system. You can see how it should work with the pegs engaging with holes to either lock or release levers in the frame. The idea behind interlocking is to prevent collisions and other mishaps on the railways by physically stopping the signalman from operating certain points or signals. This is the catch system on one of the levers. As is the case in a real signalbox, the lever must be released from the catch plate by operating the handle at the top of the lever before it can be pulled. A signalman would be familiar with the position and function of all the levers in his signalbox, but just in case each one is colour coded (as per British practice) and identified by a plate. There's more on my Flickr page. So, does it work? Well, yes and no. But mostly no. The catch plate system works brilliantly. Admittedly because it uses a rubber band it can be forced, but it's not easy to do so. But it's in the interlocking frame where things aren't so great. Part of this is because I designed the frame to be modular so that it can be expanded as required. A small prototype frame lead me to believe that the level of flex would be acceptable, but it turns out that at full size the flex is a significant problem. Luckily I designed the frame so that it could sit on baseplates which will almost completely eliminate flex altogether, and so I have some on order. But the biggest problem is that the various parts of the interlocking system need to stay perfectly aligned in order for it to work properly, but they simply refuse to do so. Levers that are meant to be locked can still be operated while others that are meant to be released remain steadfastly jammed because the locking bars do not move as they are designed to do. Part of this is because the friction in the system needs tuning (for which I have replacement parts on order) but mostly because I underestimated what would be needed to keep all the parts in correct alignment. Therefore I've had to design structures to add to the frame that I hope will keep the various parts in line. The locking bars themselves still require a redesign in order to work with these modifications, but that is next on my list. Hopefully these remedies will be enough to have the frame working smoothly. If these fail to address the problems the next area of attention will be the sliding bars that drive the interlocking frame. After that I'll be out of ideas. I hope you like it. I'm having a lot of fun with it and am proud of what is my largest MOC to date. There are more updates planned which I hope to reveal as time goes on.
-
[TC10] Classic Locomotive
Hod Carrier replied to Samer's topic in LEGO Technic, Mindstorms, Model Team and Scale Modeling
Flywheels are not necessary. Once the loco has forward motion it's momentum will provide the same function as a flywheel. The hardest part is to overcome it's initial inertia which is where maximum torque is required. Offsetting the pistons by 90 degrees, as real steam locos do, will, as has been already explained, prevent dead-spots in the power delivery no matter where in the stroke the loco is when starting. As for the feasibility of the idea... click. Good luck with your own model. -
Just beautiful!! You've got a good eye for detail and some great building skills too. It's so nice to see these wonderful, historic little trams rendered in brick. I get the impression that you've still more to show from some of Europe's other great cities.
-
What a lovely reproduction of a grand old lady. You've packed her full of lovely details.
-
Thanks guys. Glad you're liking it too. :o)