
Hod Carrier
-
Posts
1,007 -
Joined
-
Last visited
Content Type
Profiles
Forums
Gallery
Everything posted by Hod Carrier
-
Trainstation "Bricktopia" - my first trainstation MOC
Hod Carrier replied to Meisterschnorrer's topic in LEGO Train Tech
I think you can go back to blue and still feed yourself and your family. You have got waaaay too many supports in the first place so you can cut down on the number quite easily. In most cases, on a straight section of track, you can apply the general rule of thumb that the distance between supports is roughly two passenger vehicles (at least in the case of the real railways). Losing a few of these supports would also lend a better view of the sweeping lines of your wonderful station roof. -
Looks like a small industrial shunter, so almost any stock would fit. In fact, you get a lot more freedom to model something interesting than you might with a mainline loco. It all depends what sort of setting you want to place it into. It could be a foundry or steelworks, a heavy engineering firm, a coal mine or mineral works or whatever your imagination can conjure up. But I agree that a small loco like this one wouldn't be found hauling massive wagons or great big long trains either.
-
MOC NS mat '57 benelux inspired passenger train
Hod Carrier replied to Man with a hat's topic in LEGO Train Tech
That is a tricky shape to capture, but those aircraft parts do lend themselves very well in that scale. Most other Hondekop models seem to use a cascade of slopes in varying pitches but the result is very "pixelated" whereas yours is much smoother. A very good find and a novel application. Kudos to you, sir. I did have a tilt at a Mat 64 in my own preferred scale of 4-wide but just had to give up. I knew that the vital shape with any Hondekop was the front end and so I decided to start there knowing that I if I couldn't create something acceptable to my own eyes I would simply have to call it all off. After much head-scratching and many different configuration of parts I elected to consign it to the bin. However, you've stirred my curiosity again and I feel another attempt coming on. -
Yes, I admit I did see it on Flickr and took inspiration from it.
-
[MOC] Manchester Brickadilly Station
Hod Carrier replied to Paperballpark's topic in LEGO Train Tech
Holy moly!!! That's a seriously large commitment in time, money and bricks. If there's over 11500 panels in the roof I shudder to think how many parts there are in total (and the cost). Congratulations on construction of such a brilliant MOC. -
You'd need to have a heart of stone and a soul of custard not to love that. It's chuffing marvellous!! If I was in your LUG I would give up trying to compete. I couldn't conceive of anything more perfect than that.
-
Ah, OK. I understand. They were simpler days back then, when a kid could easily fill their day with little more than a box full of LEGO bricks and their imagination. *Sigh*
-
Yeah, I'm quite fond of it too. I never thought of it as a minikit. I'm giving some serious thought to gluing it and adding a keychain to keep it with me. But if it helps, it's being swapped for another English Electric design; their Type 3 Co-Co mainline loco in BR Green (BR Class 37). LT12V: There was a game like this before? I'd be very interested to know more about it if you can recall some of the details. I am only aware of these puzzles from the world of model railways.
-
Chaps, I've had a good look at the puzzle and discovered that the required tweaks are not to do with the length of the sidings but the size of the loco. An 0-6-0 shunter is too small to ensure that the formula for the classic Inglenook puzzle can be adhered to. So I'm just waiting for another batch of bricks to build a larger loco to test before releasing the LDD file. However, if anyone is interested in receiving a copy of the LDD file once it's ready, please send me your e-mail address by private message and I'll happily e-mail it to you.
-
I'll be able to give you a better part count once the LDD file is tidied up. The present version is not very well optimised because the original version had a problem that needed to be corrected. The changes I made were intended to re-use as many of the original batch of parts as possible in order to minimise the number of new parts required. However, the board itself is around 600 parts with the playing pieces and loading tower around another 600. You're right, the wagons and locos don't couple. I did briefly experiment with magnets which was not entirely successful. They tended to "catch" the last wagon at the end of the sidings as the train moves past. There isn't really any space inside the board for a mechanical coupling solution.
-
Legotom: Sorry, I think I might have misunderstood your question about loads. The coloured blocks are not the loads but the means of determining the order of wagons in the train. The colours on each block corresponds with a wagon on the board. You draw them out of a bag one at a time and place them in the indents on the frame starting from left to right which then gives you the order in which the wagons must be formed up. As I mentioned, the loads are 1x1 round tiles which are held inside the loading tower. Wagons are loaded using a slide mechanism which dispenses them one at a time. I'll try and post more photos tomorrow if I get a chance. The LDD version needs a little tidying up first, but I'd be happy to release this if you're interested.
-
The loads aren't shown in the photos, but they are just 1x1 round tiles so there is plenty of room in the wagons.
-
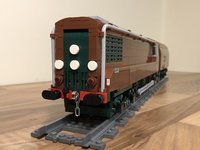
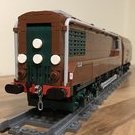
I've been fascinated with minimum space model railways for a few years and so I have been drawn to shunting puzzles such as the classic Inglenook puzzle (more information can be found here). However, I've taken the recipe and spiced it up a bit to create this LEGO microscale version. I'm calling it a Doublenook because there are effectively two Inglenook puzzles arranged back-to-back. This allows for different levels of complexity. Level 1 is the classic Inglenook puzzle where you marshal a train of five wagons from the eight on one side of the puzzle. Level 2 adds a level of complexity by having to marshal two trains of five wagons from the sixteen on the board. This may mean moving wagons from one side of the puzzle to the other using the runaround loop on the centre of the board. However, there is space only to run around one wagon at a time. Level 3 adds further complexity to level 2. Each wagon in the two trains must be loaded first by visiting the automatic loader. Every wagon that goes beneath the loading tower MUST be loaded whether or not that wagon is scheduled to be loaded or, indeed, if it has been loaded already. The loader only holds ten loads. Normal railway rules apply also in that the player may not leave any vehicle foul of the points/switches. Being British I have followed British prototypes. The shunting engine is an English Electric 350hp 0-6-0 diesel electric loco (later BR Class 08) in British Railways black while the wagons are 4 wheel 16 ton standard mineral wagons. The "automatic" loader is, unfortunately, not actually automatic. A few tweaks still need to be made, as some of the sidings need to be adjusted for length and I fear some bricks may require gluing to ensure they remain robust enough under play conditions.
-
Track is scaleable in much the same way as the trains themselves. The rails don't have to be 6 studs apart and could be any gauge you like, whether larger or smaller, to suit the size of trains you want to model. ...a bit like this. Some 4-wide track for staging my 4-wide models. But admittedly you won't have many curves or points/switches. Ha ha!! I subscribe to the Railbricks view stated by Engineermax above. Pick a scale/size/gauge that suits you, whether as an individual or group of modellers, and, as long as it looks right, it doesn't really matter how wide it is.
-
what's the limit on train wheel distance?
Hod Carrier replied to IronFish's topic in LEGO Train Tech
What you've tried so far is a form of floating axle. While that works well on the real railway because of the self-steering effect caused by the interaction of the profile of the wheel and railhead, LEGO axles do not interact with LEGO track in the same way. What you have to do is force the axle to steer. The easiest way to do this is to link each car to the next one, probably via the coupler, in much the same way as Mark Bellis illustrates above. Railway modellers use much the same solution to overcome the same problem. -
what's the limit on train wheel distance?
Hod Carrier replied to IronFish's topic in LEGO Train Tech
Woo!! Cool 'bago. Not sure those attachments at the front are road legal, though. -
I'll be honest and say that, at this scale, modelling the wires probably isn't necessary. Although it's still sitting on my computer, I have no plans to add anything more substantial than the structures themselves to my own 1-wide Dutch diorama. However, if you choose to add wires, you probably don't want to use anything heavier than cotton thread.
-
LEGO was a huge part of my childhood. There were never any LEGO trains, just a biscuit tin full of plain bricks, plates and a few automotive and architectural pieces, but I could always somehow manage to conjure up a bus, plane, train or whatever I fancied from among the limited parts I had available. My Mum said she always knew when I had woken up on the weekend because the first thing she heard was me emptying out the LEGO bricks onto my bedroom floor so that I could assemble that weekend's toy. This childhood link has meant that I've always had a soft spot for LEGO and, whenever I've happened to be in a toy shop, I have had always looked to see what the company was offering. However, I'm among the people who believe that LEGO sets are rather restrictive and don't really allow for the imagination of the player. For me, the challenge had always been in working out how to build the toy I wanted from the parts that I already possessed. So regrettably I have rejected the various trains that LEGO themselves offer and instead downloaded LDD to design trains for myself. Indeed, I feel as though I've turned my back on all the normal LEGO train scales and settled on 4-wide for my Dutch model EMUs and am currently tinkering with an as yet unrevealed microscale model with lots of play potential. As for why trains? Well, I work on the railways here in the UK as a driver, so I have more than just a passing interest in the industry. I've always thought about having a model railway but don't really have the aptitude for it. LEGO, on the other hand, is easier to manipulate. For me, it is a known medium and doesn't require expensive tools or the need to learn new skills. It's so much more easily accessible and, as I've been discovering through my own efforts and those of others, the level of realism and detail possible is almost unlimited. LEGO is so much more than square bricks.
-
Woo!! 1-wide. I do like that very much.
-
I was just idly thinking that perhaps LEGO could come up with a Kadee-alike knuckle coupler, but then I saw Dan-147's solution. It's certainly functional. Personally I would like to a coupling system that would permit remote uncoupling which would allow for shunting/switching, which is something that the current system of magnets does not permit. It wouldn't necessarily preclude them from being included in sets, although I admit that the hinged parts and springs necessary to make them work might make them less friendly to rough handling by small fingers. As AFOLs I guess it's up to us to decide how faithful we want to be to using authentic parts and legal construction methods to achieve the results we want or whether we want to add technologies from other areas such as model railways, whether that be control systems such as DCC, couplers, sound or smoke generators. Should LEGO cater to these needs? Perhaps. We are certainly one segment of their marketplace, even if only a small one, but the demands are likely to be low and therefore the costs high.
-
That's a very compact yard and inspiring when you consider how large LEGO trains can be. It's not unlike an "Inglenook" shunting puzzle and gives lots of operational interest in a very tight space. It's interesting to see capstan shunting using locos on adjacent lines. I was not aware of this method of working and thought it was restricted mainly to locations where locos could not operate (e.g. inside a goods station) using a stationary winding engine.
-
Sprinter Light Train (SLT) - LDD MOC WIP
Hod Carrier replied to Hod Carrier's topic in LEGO Train Tech
That's a thought. I hadn't even begun to consider parallels to other model railway scales and gauges, although I had worked out that motorising them using LEGO parts was going to be virtually impossible (although perhaps less so with other models at this size). -
The UK fire brigades won't come anywhere near an electrified railway line to fight a fire unless the juice is turned off first. For some reason, water and 25kV AC don't seem to get along too well. Ha ha!! Interesting to see a more relaxed approach. I'm assuming it's either a lower voltage or switched off altogether. However, I would have expected a diesel loco rather than an electric one under the circumstances. Great model as always. A very faithful representation. I wonder what the Russians use for motive power though.
-
Sprinter Light Train (SLT) - LDD MOC WIP
Hod Carrier replied to Hod Carrier's topic in LEGO Train Tech
Thank you, Zephyr. I'm enjoying the challenge of 4-wide design and am starting to find it quite a natural scale. I keep toying with the idea of building something bigger, but I actually find that a more daunting prospect. At the risk of deepening the Man with a Hat's depression further, I've been able to add some roof details at last. It's taken ages to find any source photos from an elevated angle to show the layout and shape of the roof-mounted equipment, but I managed in the end to get what I needed. -
Sprinter Light Train (SLT) - LDD MOC WIP
Hod Carrier replied to Hod Carrier's topic in LEGO Train Tech
For a larger working model, yes that's a good idea. However, mine is a static model so working lights aren't so crucial. Another option I'd considered were Technic bricks with holes in the side and the light bricks mounted behind that.