
Hod Carrier
-
Posts
1,007 -
Joined
-
Last visited
Content Type
Profiles
Forums
Gallery
Everything posted by Hod Carrier
-
[Digi=MOC] - Plasser & Theurer RM900-RT
Hod Carrier replied to Hod Carrier's topic in LEGO Train Tech
Ha ha!! Yes that's true, but then BMR wanted something that was going to look daft on standard R40 curves. If you have a look at my Flickr page I've bent the entire machine (legally) into a square. -
[Digi=MOC] - Plasser & Theurer RM900-RT
Hod Carrier replied to Hod Carrier's topic in LEGO Train Tech
What a brilliant little machine you built!! You've definitely got all the ingredients there with the conveyor arms and grader along with the control cab for the machine operator. In fact you've packaged it very well considering the overall size of the model and the fact that you've had to leave enough space for the PF elements also. As I'm sure you're aware there are single-unit ballast cleaners out there too. Yes, I started my model at one end and then worked my way back to the other end, adding each section as I went. The main reference I used for the general shape and proportions of the machine was a diagram of how the ballast cleaning system works and then looked at photos online to get the more precise shapes and details. For the excavator module I had to find some videos of the machine working, and luckily there's a short documentary on the Network Rail YouTube channel which shows most parts of the machine in operation, even if only fleetingly. I did discover in the course of my research that Network Rail own five of these machines and that each one appears to be slightly different. Therefore I fear my model is a bit of a chimera and not representative of any individual machine. -
[Digi=MOC] - Plasser & Theurer RM900-RT
Hod Carrier replied to Hod Carrier's topic in LEGO Train Tech
Thank you again. There is a digital category and I have entered it already. Although I do not yet consider this design to be "finished" I feel that I have done enough to capture the size, shape and general layout of the machine. But you're right, there is a LOT of detail still to add from the hydraulic and electrical lines you mention to the huge amount of worksite lighting these machines carry. Heck, I haven't even added any bogie footsteps yet!! Ha ha!! Part of the reason for this is that it's a digital build and many of the parts or techniques I might use can't be replicated in LDD. The other part is that these machines aren't generally very visible on the network (unless you happen to be near to one of their depots) so pictorial sources are not as plentiful as they would be if it was, say, a passenger train. However, I'm glad you like it. These track machines tend to get overlooked, but when BMR announced the details of their contest I knew immediately that this was what I was going to enter. -
You're most kind. Thank you. Sadly no, there are no motors in this model. As with most of my 4-wide creations it's a static model only. That said, it did cross my mind to knock up a couple of barrier wagons, add some graffiti on stickers to the FYRA, tie the TRAXX on at the front and have it as a unit slinking back to Italy quietly and under the cover of darkness, but I just couldn't bring myself to do it.
-
Announcing OcTRAINber, the first contest by Brick Model Railroader!
Hod Carrier replied to raised's topic in LEGO Train Tech
Just a quick question for the organisers. Are you intending to simply announce a winner in each category or will you be ranking all the entries? Just wondering... -
That's very kind. Thank you so much. Well, nothing has fallen off yet although the liftarm and pin arrangement of coupling is a bit fiddly when joining the cars. Ha ha!! I'm pleased I got most of the details correct, and I'm glad that these trains aren't still cluttering up Watergraafsmeer gathering dust and vandalism damage. I bet you're all pleased to see the back of them. Thanks for the update on the Alsthom sets, though. I wasn't aware that they were intended for wider use also. Thank you too. The vinyls took a while to get right and perhaps aren't quite as perfect close up as they appear in a wider view, which is why I haven't taken any close up photos. Ha ha!!
-
That's high praise indeed. Thank you so much. Wishing you and all our fellow competitors the very best of luck. I think I did make things easy for myself by making it a half-scale model. Trying to build this beastie in 8-wide would have been a lot more time consuming, expensive and the model really would have reached all the way down the hallway to the front door making it harder to photograph. Ha ha!!
-
Yeah, the entire FYRA affair was something of a train wreck and became a cause celebre in both Belgium and The Netherlands, with plenty of media and political coverage. The entire fleet was dumped in the yard at Watergraafsmeer(?) pending a buyer and I believe most of the trains are still there, although I understand that at least one has made it's way back to the former AnsaldoBreda plant in Italy. The operators then ran the service using TRAXX electric locos and conventional ICr rolling stock painted in a facsimile FYRA livery, but the brand had been fatally damaged and it was quickly decided to revert to the yellow and blue livery and brand the service Intercity Direct pending acquisition of a new fleet of trains from Alsthom. I think I've got most of that right, but I'm sure one of our friends from the Low Countries will be along shortly to correct my understanding. In the words of one wag... Would you accept a render of the bogies?
-
Announcing OcTRAINber, the first contest by Brick Model Railroader!
Hod Carrier replied to raised's topic in LEGO Train Tech
All done. I'm looking forward to getting my life back again. Ha ha!! It's been a very intense period of designing and building for me because I only had limited free time this month. I lost ten days out of the month anyway due to a pre-arranged holiday and other commitments involving family and friends, and then I still had to go to work, so I had to fit the contest around everything else as best as I could. Honestly, I've never been so organised and planned my time so tightly as I have this month. All that said, it has been enormous fun for me to take part and I must thank all of you over at BMR for giving us this opportunity and incentive to build. This has been my first contest and I really do feel that the quality of the entries is incredibly high, so I will be interested to see how my efforts compare. I look forward to the next contest. -
Spurred on by the guys over at BMR I have created something entirely inside a month, all in the name of competition. Sadly time and finances do not permit me to build this in time to enter it as a real model into the OcTRAINber contest, so at present it's just a virtual build. This is my rendering of the Plasser & Theurer RM900-RT High Output Ballast Cleaner, as used by UK rail infrastructure provider Network Rail. It is an articulated machine with four modules that mechanises the renewal of ballast under and around the track sleepers. It operates as part of Network Rail's High Output Ballast Cleaning System. I've abandoned my usual 4-wide scale and modelled this in 8-wide scale. The total length of the model is 266 studs. The heart of the machine are the excavating and screening modules. The excavating module clears ballast from around and beneath the sleepers and collects it using the two conveyor arms. An overhead conveyor belt passes the ballast forward to the screening module which then sorts any reusable ballast from the expired ballast (spoil). Ballast that can be reused is passed back to the excavator module via a lower conveyor belt and is returned to the track while the spoil continues forward along the machine via more overhead conveyor to the next machine in the train, the Spoil Handling Unit. The excavating module in working configuration. The central dolly grips and lifts the track slightly using hydraulic rams while an undercutting tool attached to the conveyor arms removes the ballast from underneath the track and sweeps it to the sides. Don't worry, I haven't forgotten to include the undercutting tool. When not working all the tools on the excavator module retract inboard so that the train can be moved between depot and worksite without exceeding the loading gauge. Reusable ballast sent from the screening module is returned to the track via the low level conveyor and pushed back into place. New ballast is also added, brought again by overhead conveyor from the rear of the train. It is added between the rails using a conveyor and also on the shoulders by two ballast shutes. The design allows for up to 90 degrees of articulation between modules, so taking an R40 curve should be OK(ish). Even the overlapping conveyors do not hinder this degree of movement. However, it would be difficult for this machine to ballast such a tight curve. The short timescale and the other time constraints I've had this month means that this model is far from finished. There is still a whole hill of details to be added but I simply haven't got the time if I'm to meet the OcTRAINber deadline. Therefore this model is a work in progress and something that I may return to in the future. I hope you like it as much as I do, although I welcome your thoughts and suggestions.
-
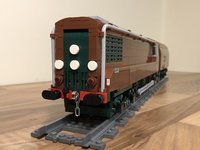
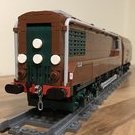
It was with a little dismay that I noticed that I haven't created any new builds since last year and that all I've shared with you guys are digital builds. There have been reasons for that, but one of them is that I've been struggling with this build for several months. However, the announcement of OcTRAINber over at BMR has given me the kick up the backside that I needed to finally push on and finally get this monkey off my back. The train is the greatly loved and much missed V250 Albatross which was operated jointly by the Dutch and Belgian railways to provide a high-speed service along the HSL Zuid line between Brussels and Amsterdam. Designed at least in part by Pininfarina ,built in Italy by AnsaldoBreda, branded FYRA and finished in a striking white, red and pink livery, the service was a huge success. No, wait. That's not right. Oh yes!! The trains were found to be poorly built, unreliable and prone to catching fire or shedding parts in service. The problem was so bad that it prompted a whole raft of legal action between the builder and the operators resulting in the total withdrawal and rejection of the fleet and the builder agreeing to refund the operators. All of this was too much for poor old AnsaldoBreda who were also suffering similar quality and reliablilty issues with the Danish IC4 fleet and the Sirio trams supplied to the Swedish city of Gothenburg. The company was sold in 2015 to Hitachi Rail. Anyway, on to the model. The train is built in my customary 4-wide scale but, as it's 8 cars in length, it is still something of a monster. Stud.io has it at 340 studs total length. This is my first attempt at using coloured vinyls to recreate a livery. Sadly there would have been no way to do justice to the train if I'd tried to build the livery using bricks, especially at this scale. However, it created another unforeseen problem that required two major redesigns and a lot of head scratching before coming up with a solution. The problem was how to go about applying the vinyl without it interfering with the windows. In the end I came up with a solution whereby the vinyl could be applied and the windows fixed later. Lessons learned there, I think. Headlights, door seals and logos are homemade stickers printed onto clear self-adhesive vinyl. Although the application of the vinyls was fiddly I'm actually happy with the overall effect, especially the oversize FYRA logo stretched across the two centre cars. I'm also happy with the new bogie design which is debuting here. It looks better and is much slimmer than previous designs meaning that they do not protrude past the body sides. OcTRAINber competitors may consider this cheating because I've staged the swoosh on 4-wide gauge curves rather than the standard R40 curves, but in my defence these are the standard curve in this scale. If I'd built this model at 8-wide scale it would have been twice as long and the swoosh would have been much more severe and pronounced on R40s. Anyway, I hope you like my model. Comments and criticisms are welcome as always.
-
Announcing OcTRAINber, the first contest by Brick Model Railroader!
Hod Carrier replied to raised's topic in LEGO Train Tech
Well, you have six axles per end which you could divide into three bogies. Pivot the centre bogie centrally to the body and use that as weight-bearing and then have a leading and trailing bogie pivoted the same way as trucks ahead or behind the drivers on a steam loco. With enough articulation it should then go through an R40 curve, although it might add a plate or two of height to the finished model. Not prototypical perhaps, but functional. -
Announcing OcTRAINber, the first contest by Brick Model Railroader!
Hod Carrier replied to raised's topic in LEGO Train Tech
Yes I'll be ready, but I've given up all of my spare time this month and then some to hit this deadline. I'm looking forward to 1st November so I can rest. My digital build is 98% complete for the contest, but it would still need a lot more work to get all the detailing right. My real world build has hit a small snag, but that should be ready in time too. Wishing everyone the very best of luck!! -
Announcing OcTRAINber, the first contest by Brick Model Railroader!
Hod Carrier replied to raised's topic in LEGO Train Tech
There's lots of potential UK prototypes you could use, some of which have already been mentioned. I could add to that list almost all multiple unit passenger trains and intermodal wagons that run in permanently coupled sets of three or more. If you prefer to take your inspiration from the era of steam, there are the LMS Beyer Garratt 2-6-0+0-6-2 locos plus any number of articulated passenger coach sets. I was looking forward to a building contest but I fear this has come at the wrong time for me. Unlike others, I don't have a design already waiting to go and a month isn't long to try and get something designed and built. I might see if I can get something ready for the digital category, but that might be as far as I can get. -
I'm with Tony on this one, sadly. I have said in a previous thread where this was discussed that I believe that LEGO Ideas is aimed at finding truly original ideas. Trains are simply derivative, especially as all the major types have already been covered. I guess the only faint ray of sunshine was the Caterham Seven, as that was also derivative. However, it was an iconic model done well. I wonder if there's any mileage in a train model similarly designed, with removable panels showing internal details, etc.
-
I've used the MiniZip and a PP3 for the TRAXX for the very same reason you've mentioned. It's much more compact than the official LEGO alternatives that simply couldn't have been squeezed in. There was no other way to get any power into the model. While I can't argue that the PP3 has less capacity than the official power sources I wouldn't necessarily go along with MAB's fairly bleak assessment. It's not useless for driving small trains, but you may have to be prepared to change the battery if you're planning on a long operating session.
-
So nice to see some more 4-wide scale. While I have a powered 4-wide scale TRAXX locomotive I used standard sized wheels. I know 4DBrix showcased some smaller 3D printed wheels, but they weren't suitable for the model because they would lower the height so much it wouldn't be possible to use any coupling bars. You might want to check them out. I'm not entirely sure how much success you would have using rubber bands, but it would be interesting to see. Maybe you should build one and find out. The alternative would be the Technic-based solution designed by Space2310, although it is rather bulky for the models you've produced. I'd be interested to see the internal arrangement of parts you've selected, particularly for power and control. I'm guessing that the grey panels are the sides of the standard LEGO battery box.
-
That's an interesting alternative system. I'm guessing that each remote is paired to an individual chip, so for two trains you'd need two remotes. I suppose the same control functionality could be had using an SBrick also. Simply connect the power pick-ups to the power input on the bottom of the SBrick and you're off and running. While you wouldn't get any sound from the SBrick you could control up to 16 individual trains from within one profile. And individual SBricks are currently selling for $59 at the moment, so there's a saving to be had too.
-
Agreed. You've done a fabulous job at capturing the originals in spite of a fairly restrictive scale. Wonderful!! Many congratulations.
-
SBrick General Discussion
Hod Carrier replied to Nofer89's topic in LEGO Technic, Mindstorms, Model Team and Scale Modeling
Thank you. -
SBrick General Discussion
Hod Carrier replied to Nofer89's topic in LEGO Technic, Mindstorms, Model Team and Scale Modeling
My apologies if this has been covered before, but is it possible to control more than one SBrick from within the same profile? Many thanks. -
@Ashi Valkoinen Don't worry about the time it takes to reply. I'm sure we're all busy with our real lives outside of the hobby. I'm sure you know from your own experiences that design is always a question of compromise. If you decide to accentuate one detail it usually means that you have to sacrifice some other detail, so you always have to decide which details are most important and which you can do without. For every prototype there will be many many different ways of interpretation. The cab design for this MOC is still evolving as it moves slowly towards completion. I hope you will be pleased with the changes I'm making. Other areas too are being updated and altered, either to improve the appearance or to account for the availability of parts. I intend to build this model for real but I don't want to make my usual mistake of changing the design after the first BL orders have been placed. I'm interested about the new trans-black wall panels you mention. Is there a new part number for these?
-
Lovely loco there. It could almost have been designed to be recreated in bricks. Nice too that it's just 6-wide. Great job on the stickers too.
-
Is there a good way to "reverse" PF Train motors?
Hod Carrier replied to Carefree_Dude's topic in LEGO Train Tech
The search facility can be a bit of a blunt tool if you don't use precisely the right search term. But thanks for reposting this thread. Maybe this is one (of many) that needs to be pinned for reference purposes. But to answer to OP's question, surely the easiest way to use a second motor without the expense of a polarity switch or modifying the motor itself would be to mount both motors facing the same way around so that they both run in the same direction. Admittedly it may mean you'll need an extension lead to make sure they both connect to the IR receiver, but that's cheaper and less bulky than the polarity switch. Also it may not be suitable if you're using one-piece train bases because of where the holes are for the cable runs, but if you're building your own base you can put the holes where you want them. -
@Ashi Valkoinen Thanks for the advice and pointers. I've provided one train motor at one end but it wouldn't be difficult to add a second one at the other end too to help it around. I was intending to use an SBrick that I've hidden inside the roof rather than an IR receiver which I think will deliver sufficient grunt. I didn't want to use window panels because, although slender, the Desiro ML does have black window frames, but I do take your point about the cost and availability of the parts I've used in the LDD file and will probably substitute them for something else. It may not appear so from the prototype photo I posted for comparison, but the front profile of the Desiro ML is curved rather than slanted and the SNCB/NMBS livery follows those curves up to the roof. There is meant to be a narrow pale grey strip between the black panel surrounding the cab window and the darker grey stripe that runs up to the roof, which is the part that's missing so far. I'm not very experienced with SNOT techniques so I might not be heading in the direction you were thinking, but I have revised the design around the cab slightly to deal with the gap. Not sure if this is any better.