
Ayrlego
-
Posts
3,000 -
Joined
-
Last visited
Content Type
Profiles
Forums
Gallery
Everything posted by Ayrlego
-
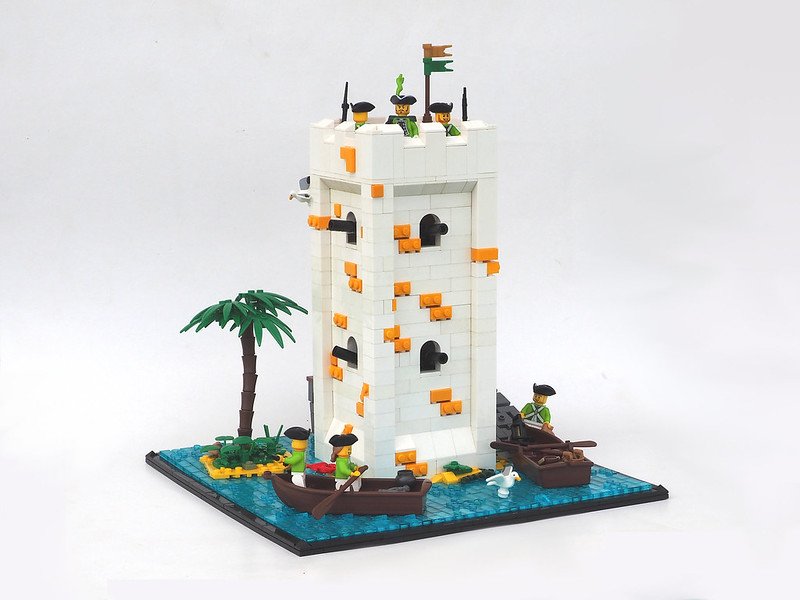
Eurobricks member and veteran MOC builder Kai NRG has created this bright and colourful modern take on the classic imperial watchtower in their latest MOC, Fort in Punto Sur. Check it and many more pirate-y builds out in the the Brethren of the Brick Seas forum now!
-
Looks absolutely fantastic Kai! and you used the excellent new turtle before I got to! The bright colours really make the whole thing pop and I think if you had used dark red instead of the bright light orange it would not have had the same effect.
-
Update 4 A delivery of reddish brown chairs arrived! The timber floor is down and the Tudor style upper level has began construction. The timber offshoot above the waterwheel has also been added. The tree looks very weird at this stage. It's based on this design here. Hopefully once the leaves start to go on it will improve. Otherwise I may need to rethink it. I need advice on the pathway. Originally I was going with the 1x1 round tiles, but I think I would prefer a more informal look. I was thinking of dark tan tiles and plates like I have tried inside and around the main door way... except is adding a third landscape colour too much??? Maybe I could do the same in MDF like the small trial patch just in front of the doorway? I suspect though that it will blend in too much with the rest of the landscape.... Any ideas?
-
Nice, you've made me serious consider destroying a wig piece now!
-
Hi Comrade_funny. I'm glad to hear my Flickr inspired you to give pirates a try! I think collection wise, where to start really depends on what direction you want to go in. I mainly build land based scenes, although I actually started in this forum when I found the tutorial Build a Frigate with Captain Green Hair. I'd always wanted a more realistic ship for my imperials so that got me started... BoBS launched shortly after that and I haven't stopped building in this genre since! With regards to collection, the good news is that a lot of pieces for land based pirate builds are relevant for any genre and so you will get good use out of them. When I started my collection was mostly classic parts from my childhood in the 80's and 90's, so I had to build the newer colours up from scratch. I'd probably divide parts up into two categories; landscape/vegetation and building. Below are some of the basic parts I find the most useful. Landscape/vegetation I find that dark tan and olive are probably my most utilised landscape colours. I use lots of plates, usually in the smaller sizes. I try and get bulk 1x2 plates in most colours and these can be used to build up landscapes as well as in some buildings. Vegetation pieces can be more expensive; however, my general rule is to cram as many as you can into a build. For the style of bases I like to make you'll need a lot of 1x1 modified bricks with the stud on the side to make the SNOT borders. Buildings For stone work I use a lot of 1x2 modified masonry bricks, 1x1, 1x2, 1x3 plates, headlight bricks and 1x2 modified plate with door rail. Mostly in bley, but you'll also want highlights in dark bley or dark tan. To achieve the 'classic' stucco look I use similar techniques but using white bricks, including all the old discolored and yellowed bricks I can get my hands on. Highlights for these builds can be tan, dark tan, dark orange, medium dark flesh/nougat etc. For the tudor sections, in the 'wooden' frame work I use a lot of reddish brown 1x1 bricks, plates and modified bricks with the stud on the side. I also have a lot of reddish brown tiles of all sizes. The panels are usually a mixture of tan, dark tan or sometimes white plates; including 1x1 round plates. Roof techniques depend on the style I'm building. I have stacks of 1x1 dark red, dark orange and reddish brown round bricks for the terracotta style. Other techniques use plates, mostly either black or dark tan/medium dark flesh. Hinge plates are useful for connecting the plates that form the base of these roofs to the rest of the building. Anyway, hopefully some of the above helps. Good luck and I look forward to seeing what you come up with!
-
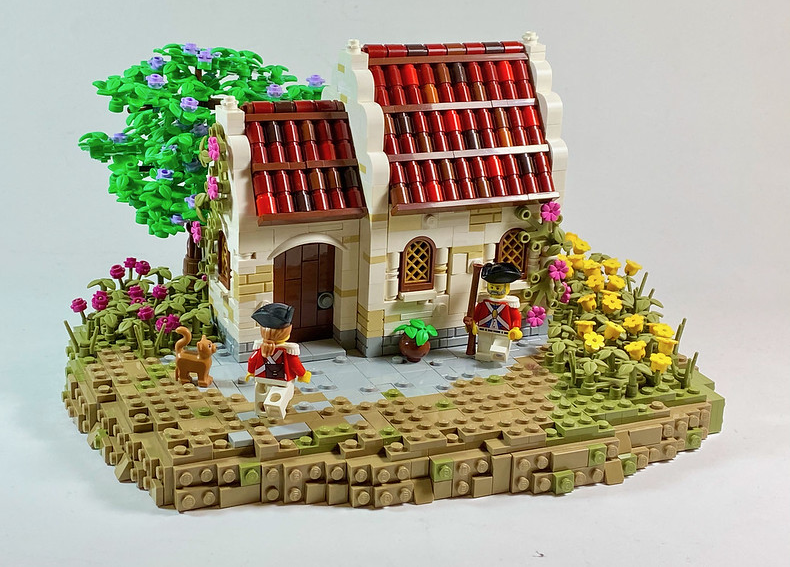
Life on the Brick Seas isn't all swashbuckling adventure! Sometimes good administration can be the key to success, as proven by the ever efficient Redcoats manning this Customs Office in Port Woodhouse by Eurobricks member Puvel. Enlist now for the faction of your choice in the Brethren of the Brick Seas forum!
-
Great tribute, the changes to the lyrics to fit the BoBS world and accompanying scenes were great!
-

[GOC-FB-COR] Hussar's Isle Semaphore
Ayrlego replied to evancelt's topic in Brethren of the Brick Seas
I was just looking at the Hussar's Isle thread on the weekend for this very task! Looks like you beat me too it and such a great, appropriate subject for the build as well. I like how you kept the harsh rocky coast look of Bregir's original Hussar's Isle MOC. The sprinkling of yellow flowers adds a subtle splash of colour that works quite well. form me for GoC! Should I license on behalf of the faction for you? -
It may be pure Corrie propaganda or it may be true, but I think it illustrates our honourable intentions towards victims of the harsh elements, regardless of our political differences! I like the beach scene and the little details like Captain Brickleton's uniform discarded on the beach really add to the scene. The broken reddish-brown tiles work exceptionally well here. I have the same problem and save all my broken ones as well! The only suggestion I have is that the beach itself looks a little flat. Maybe if you had the plates I'd suggest raising each level by a plate until the vegetation at the back was sitting at least one brick higher than the water level.
-
[OL-Troops] El Oleonda Ragamuffins
Ayrlego replied to Keymonus's topic in Brethren of the Brick Seas
Lovely group of militia Keymonus. The soldier with the poncho is my favourite. I like how the blue coats give them all a uniformity yet each soldier is uniquely individual. Great work! -
[GoC] Purser's Network 2: Customs Office in Port Woodhouse
Ayrlego replied to Puvel's topic in Brethren of the Brick Seas
As I commented on Flickr - this is brilliant work Puvel! I really like how you have added your own personal style to the Port Woodhouse style. The bright flower colours really influence the tone of the scene in a way I really like. The pot with the green leaves is also a simple addition that really lifts the scene. I'd love to see a close up of the tree at the back if that is possible? It looks like you've used a barrel to hold multiple flexi-tubes? It looks great and I'd love to attempt to mimic it! Lastly the way you have used tiles with a few plates to create the path outside the door is really effective. I am now considering changing all the 1x1 round tiles in my current MOC to this style of plates.....! So, yeah... definitely a GoC from me! -
Normally... (I'd say 9 times out of 10) I build the building, then do the base and landscape. So this one is a bit strange for me! Like in my answer to Kai, usually the landscaping comes last. Mainly because usually the trees are super fragile, so doing them early tends to result in much frustration and constant rebuilding! This one will be a bit different as you will see below! DAY 3 So today I (almost) finished off the stone work. I reworked the main door as I didn't like the brown tiles directly on the stone and wanted a fully 'wooden' frame. I also continued the path and landscaping. By this stage, evancelt's question about vegetation had me considering how many/what type of trees I was planning. I wanted to try something new and there really isn't a lot of room left on the base for a lot of trees. So I've decided to attempt a giant tree in the bottom corner of the build. I wanted the trunk to overlap the base, so I had to rework this part at this stage. Then as I was landscaping around the trunk, I decided that I didn't like the olive in the base, so I removed it and replaced with dark red. I'm not certain how it will look finished - but I'm going to give it a try! Finally I had been toying with the idea of adding a second base and a stone bridge connecting the two. So I've started the bridge at the end of the path behind the waterwheel. I have yet to start the second base - I was thinking it would just be more path and maybe another (smaller tree). Not sure yet! And that's a wrap for today!
-
This thought has crossed my mind... hopefully it won't look too odd. I could try using bigger wagon wheels, although I only have the larger size in dark grey, which may not blend in well. I'm enjoying using it as it's different, but I don't think it will replace my old favourite dark tan! Although IMHO olive green is the BEST landscaping colour!!! Thanks for all the encouragement. Here's day 2 progress. DAY 2 - Part One I stopped building at this point for a progress shot. Yellow chairs are temporary so that I can gauge the size of the completed wheel (I have temporarily run out of brown seats!). The main focus of this stage was working out the overhanging section. I plan for a wooden section to overhang the wheel with the rest of the upper story being Tudor style. I played around with a lot of different ways of insetting the 'wooden' supports into the stone work. I'm still not entirely convinced by the result, but it will do for now. It was important to get this part done so I knew how high to make the stairs at the front of the build. These will provide minifigs with access to the Tudor 'living' section of the mill. In the above image I've used simple light bley bricks to map out the stairs. Day 2 - Part Two The next part was mainly filling out the stone work. Large doors will provide workers access to the mill floor. Not sure whether I'll make the doors open (which will require sometype of interior). Also reworked some of the landscaping to incorporate some more dark orange. I'm not sure about the medium nougat/dark orange/olive green scheme at this stage. It worked well for the postmaster but I remain unconvinced it will work as well here. Good news is to change out the landscaping colours while painstaking, will be relatively easy if I do decide to go down that track. And that's a wrap for Day 2! The Day 3 instalment will likely be the product of several sessions over a number of days.
-
I started my second Otoño build today and thought I might share my progress here with you guys. It's not really something I've done a lot of before. Hopefully I might give some of you an insight into how I build and I may be able to pick up some tips from you guys - critiques and suggestions most welcome! So without further ado, here is my day 1 progress (pictures hosted on my new secondary account). I've started with my usual standard base design. You can see how the SNOT edges are attached. I decided on a factory for Otoño for parity reasons and a watermill seemed like a good idea for the idyllic autumn scenes I attempt with these builds. The paddle is the first place I started with my previous GoH watermill (which I noticed recently has been digitalised by some enterprising person and you can buy instructions for it.... some credit would have been nice but hey, I guess that's the internet!). So it seemed like a good place to start here. After examining a number of options I decided to simply copy Isaac Sydner's excellent design from his Holt Watermill. Check out the build log on his website for a look at how a real master builds! So I guess that's about it for day one! Enjoy and like I said, suggestions welcome or if there is something you want to see an explanation for etc, let me know. Update 2: here Update 3: here Update 4: here Update 5: here
-
An impressive display from the 26th Foot! For GoC: The build itself is fairly simplistic which works well for the immersive scene. It can be tricky to do, but for immersive shots, try and crop them in such a way so that no background is showing. A tip @Kingdomviewbricksonce shared with me for these kind of LEGO only scenes was to apply a 16:9 (widescreen) ratio. In this case I think it may have cut out the the base/table in the bottom left. If you had the bricks the continuation of the cobblestones under the minifigs would have been ideal as well. The SNOT medium blue works well for either sky or a building. Overall very small nit-picks. from me and congratulations on completing Task 1 "Redcoats Rule"!
-
Index on front page updated.
-
Nice dockside scene Brickwolf. I like the stone archway paired with the different building styles. It fits right in with the Arlinsport aesthetic I think. Interesting use of the Wolfpack torsos. Nice to see some re-enforcements for Arlinsport.
-
Myzectlan continues to become an important Corlander settlement in the Paradise Isles. The city of the Myzec is undergoing a period of revitalisation with Corlander assistance (OOC being recently elevated to Large Town status) and the chinampas are now producing a significant amount of maize to support the other Corlander settlements of the region. Until now, not much thought has been put into it's defence, with it's location deep in a hidden valley making it very difficult to access without knowledge of the Cascadian ranges. With hostilities now commencing; however, Colonial authorities in Port Woodhouse have dispatched a troop of ETTC Lancers to Myzectlan. The Nizami lancers are considered ideal for the job, as they are able to conduct long range patrols out of Myzectlan deep into the southern grasslands of Cascadia. Here large armies would not have to struggle through the thick jungles of northern Cascadia, so it is considered vital to patrol these areas. The grasslands are unlike the rest of Cascadia; famous for waterfalls and fast flowing rivers and streams, in that they only receive water during the wet season. It is through these dry grasslands, the lancers begin their patrols. A build to raise 30 troops in Myzectlan. I tried to be faithful to Elostirion's vision of the southern Cascadian grasslands as possible with this scene. The vulture is stolen from him and you can find instructions on his Flickr: lego_vulture_v2 by @Elostirion Also a bonus shot of the lancers for the Compendium.
-
Great representation of the Jameston style Brickwolf. It's nice to see some more ETTC troops!
-
Settlement, Myzectlan, Cascadia, Corrington
Ayrlego replied to Ayrlego's topic in Brethren of the Brick Seas
A tower to instruct novice priestesses in the arts of astronomy in the mountains above Myzectlan - Medium Education. -
High in the peaks that surround Myzectlan there is a Myzec educational facility know as the 'Moon Tower'. Here novice priestesses gain an education in the Myzec understanding of astrology. During this stage of a novice's training, they are expected to learn the Myzec names for all the constellations, the phases of the moon and other basics. Not all will go on to become specialists in astrology, but all Myzec priestesses must have an understanding of the basics. Here a Priestess gives instruction to a novice, while a second novice conducts chores at the base of the tower. Even at this altitude; where the vegetation is much sparser than in the jungles below, constant attention must be paid to keeping the building free of encroaching plants. Licensed as a medium education in Myzectlan, bringing the semi-autonomous native city to 'Large Town' level. In keeping with my last Myzec build, I'm trying to make the buildings more colourful, this time with a dark turquoise, bright light orange and red stripe.
-
[ESL - Troops] MCTC marching in Nova Terreli
Ayrlego replied to Elostirion's topic in Brethren of the Brick Seas
I have to agree with Captain Genaro, the colours work really well together; although I'm having difficulty telling if the building is lime green or light yellow? I suspect light yellow but the contrast looks a bit weird on my monitor. The vines and lower floor windows are great! -
Draft Aug-Oct Accounts sheet. As normal no MRCA upkeep or income yet. Any issues let me know. Some changes will continue to be made as both Oleon and Corrington reform their respective troop ownership.
-
[SR - FB] BirdBase - The Sereen Cay
Ayrlego replied to Fraunces's topic in Brethren of the Brick Seas
Lovely job Fraunces! I saw this on Flickr the other day and was instantly impressed. It's a great merging of the classic style with modern techniques and the way you have given the plain white walls texture really lifts the whole build. I especially like the use of the SNOT headlight bricks. I use them facing the other way all the time but have never considered using them with the bottom facing out as you have here. It gives a nice new texture that I haven't seen before. The accordian is great as well! -
[OL-FB] Strenghtening Acropolis's defense
Ayrlego replied to Bodi's topic in Brethren of the Brick Seas
I like the combination of the dark tan and light bley on the watchtower/blockhouse. The cart is also really nicely done. Overall great use of a small space to pack in a lot of nice details.