
Isamudyson
-
Posts
101 -
Joined
-
Last visited
Content Type
Profiles
Forums
Gallery
Everything posted by Isamudyson
-
 If i already have most of the parts and just want to learn from your techniques how will i be able to show proof? I learned some of the subframe structure from your previews but want to learn how the body panels connect as i'm learning techniques to apply to a car i'm trying to build.
 -
Oh Wow that is incredible. I've been wondering what happened to the modular build you were working on in sept
-
Looks Beautiful.
-
This is a beautiful B model. Definitely wish Lego would put something out like this for these sets.
-
[MOC] Aston Martin Vulcan
Isamudyson replied to mihao's topic in LEGO Technic, Mindstorms, Model Team and Scale Modeling
i went over the updated instructions and there are still one some areas that is hard to see. I'm still now sure how the seats fit in as where i assume where it fits is occupied by 2 more pieces, that i wasn't sure where they fit either, are currently located. Do you mind if i make some edits to the instructions and send it over to you via pm? might take a bit of time but may help? -
[MOC] Aston Martin Vulcan
Isamudyson replied to mihao's topic in LEGO Technic, Mindstorms, Model Team and Scale Modeling
you can export the studio io instructions as a pdf so you just have one file. Thats what i did. -
[MOC] Aston Martin Vulcan
Isamudyson replied to mihao's topic in LEGO Technic, Mindstorms, Model Team and Scale Modeling
I'm just making it digitally in LDD as haven't had time to actually sit down and do a physical build. Quicker and easier to learn lol -
[MOC] Aston Martin Vulcan
Isamudyson replied to mihao's topic in LEGO Technic, Mindstorms, Model Team and Scale Modeling
Car looks great. I've been building it digitally and noticed, as mentioned by lvdh, there are some issues with the instructions. Just to give you a idea i'm currently on around step 192 -194 and had to go forward a few steps to see how the pieces connect together. also the part on 192 would have been crazy to put in with the some parts already put in place. Would have had to tear apart the rear assembly to fit it in. I'm guessing you used Studio.io to build the instructions? -
Wont blame you for not making instructions or anyone else not making instructions. Its very despicable what they do.
-
I believe i have and can share what i have. I'm sure i made mistakes somewhere. https://bricksafe.com/pages/isamudyson/random
-
This is absolutely beautiful
-
Do you have a close up view of where the band is for the gear selector? curious how it is done as i'm building it LDD
-
42083 - Bugatti Chiron
Isamudyson replied to Jurss's topic in LEGO Technic, Mindstorms, Model Team and Scale Modeling
actually built this with LDD and it was fun. definitely saving up to get the actual set. Going to get the new gear elements first thou and play around with that. -
42083 - Bugatti Chiron
Isamudyson replied to Jurss's topic in LEGO Technic, Mindstorms, Model Team and Scale Modeling
Now definitely want to get at least one of this. I'm curious how big it is in comparison to 42056. I have the same front suspension issues as this with some of my builds that are a bit larger than the porsche and still wondering how to fix it. -
[MOC][WIP] Untitled Car
Isamudyson replied to Isamudyson's topic in LEGO Technic, Mindstorms, Model Team and Scale Modeling
I tried it last night and it does look like its too much. Gonna have to wonder how to make it half a stud. So far this is what i have. everything in red so far is how i think i can implement the motor function for the spoiler while making those links half a stud -
[MOC][WIP] Untitled Car
Isamudyson replied to Isamudyson's topic in LEGO Technic, Mindstorms, Model Team and Scale Modeling
I spaced them one stud over like so but i haven't tried it out yet. Currently trying to figure out how the motor and the spoiler will fit. -
[MOC][WIP] Untitled Car
Isamudyson replied to Isamudyson's topic in LEGO Technic, Mindstorms, Model Team and Scale Modeling
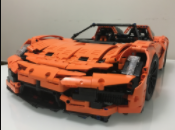
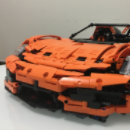
so after alot more tinkering when i have time to, I decided to just completely rebuild the chassis. I decided to just take out the 4 wheel steering as there was too much slack and don't have the ingenuity to do it different as of now. Also I forgot to also include the placement of the battery box. In place of the 4 wheel steering, i decided to add a motorized spoiler and also make it into awd. The first image is the old frame. In the new version, I moved the steering servo to the front so i can place the batter box behind the front wheels. Also with the change i could hide the sbrick in the center. With all the change the roof and rear panels will change a bit to accommodate the new length. Comments welcome -
I see no point in making it with springs other than what you picked. Otherwise it’s like getting a Lamborghini but using a Camry engine just to keep costs down. It’s great as is. Just have to budget
-
[MOC][WIP] Untitled Car
Isamudyson replied to Isamudyson's topic in LEGO Technic, Mindstorms, Model Team and Scale Modeling
so was finally able to do some work on this. Reworked the frame to lighten front along with finalizing some of the design. Currently trying to figure out how to do the dashboard, roof and windshield area and this is what i have so far using flex cables. There is a big gap under the rear of the front fender and i think i have an idea on how to fill it. There are a bit too many gaps in the front but i can't think of ways to fill them yet. Also never thought of where to put the battery so its going to be in the passenger seat. Another issue i have is with the way the rear steering works. There is too much slack with the way i have it setup so i may just abandon it -
Beautiful build. i will now have to invest in those springs and buwizz
-
[MOC][WIP] Untitled Car
Isamudyson replied to Isamudyson's topic in LEGO Technic, Mindstorms, Model Team and Scale Modeling
So i think i have something that i like with the rear portion of the car. i'm missing a few tiles to and parts to finish the physical build but will try with what i have to see how it all fits together. I'm currently stuck with the area where the Red panel is located and how the windshield will turn out. The way the door opens there seems to be not much room to line things up. -
That is beautiful!! Love how it performs and functions. I do hope one day i can do what you guys do with your sons with my daughter. It definitely makes it a incredible bonding experience solving/teaching techniques. Hopefully i can one day obtain all the parts (esp a buwizz) and try out this build
-
[MOC][WIP] Untitled Car
Isamudyson replied to Isamudyson's topic in LEGO Technic, Mindstorms, Model Team and Scale Modeling
Tried it out and looks better. will have to try it out during the physical build -
[MOC][WIP] Untitled Car
Isamudyson replied to Isamudyson's topic in LEGO Technic, Mindstorms, Model Team and Scale Modeling
How i did not try an think of that method is baffling. I will definitely try both options. Was able to do some body work this weekend. Redid the hood and front bumper. Also redid some connections on the sides. Started to play around with how the rear. Need to order some parts so i can get the w16 squared away. -
Telehandler (MOC)
Isamudyson replied to Aventador2004's topic in LEGO Technic, Mindstorms, Model Team and Scale Modeling
nice. will you be building more of these type of vehicles? it would be really nice to see them all next to each other in a diaorama. They are like bigger versions of the combinations that lego put out but smaller than the single set one. If their small builds were like this i would be more inclined to get them.