
Isamudyson
-
Posts
101 -
Joined
-
Last visited
Content Type
Profiles
Forums
Gallery
Everything posted by Isamudyson
-
 I wouldn't want to be the guy that maintains that engine
 -
[MOC] Porsche 918 Spyder
Isamudyson replied to Isamudyson's topic in LEGO Technic, Mindstorms, Model Team and Scale Modeling
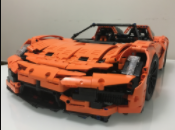
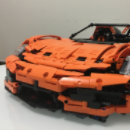
So I believe this is the final version of this build. I attempted to fix the ground clearance for the front of the car. The front axle was rebuilt using the shock configuration @Didumos69 created for the ultimate 42056. Also did some weight reduction. Was able to knock off almost 70 parts, most of it from the front end. It definitely helped as i was able to improve the ground clearance from 0 to almost 1/2 a stud LOL. now it can roll on the floor without scrapping the front. Part of the weight reduction i have also improved the windshield connection. Before it was weak and wasn't very fluid. Its now better integrated into the passenger body and allows me to remove the steering column with out affecting the windshield. I realized i don't have any video equipment other than my phone so i will just provide some clearer pictures. The rear spoiler Is manually operated Close up of the rebuilt windshield connection With the rear engine cover removed With all major panels removed and the front end removed. The frame with all the panels removed. I have to say this was a very enjoyable build as it being my first completed build ever. After spending almost a year on it i have grown attached and don't know if i'm willing to take it apart. I have event though of rebuilding the frame from module to a stronger/lighter frame or adding Power functions. -
Wow with that new front it now looks like a ramp you can just plow through opponents. It also looks small/ simple enough to even be a actual technic set kids would enjoy
-
[MOC] Porsche 918 Spyder
Isamudyson replied to Isamudyson's topic in LEGO Technic, Mindstorms, Model Team and Scale Modeling
Thanks for the info. I'm actually using 2 shocks per wheel in this as you can see in the picture below. Other than the different color springs I can only say the most likely issue is the configuration. There's a over abundance in parts as I have it set to easily take apart. Something I would show in a video when I get a chance. I suspect if I built just a solid chassis it would be better? As I have it set to be modular I may try and build a new front axle that has a torsion bar as well -
[MOC] Porsche 918 Spyder
Isamudyson replied to Isamudyson's topic in LEGO Technic, Mindstorms, Model Team and Scale Modeling
So I am basically done albeit some minor adjustments to the shaping. It's been a tiring frustrating ordeal but fun at the same time. There's a major issue with the front and I believe its due to weight/shock strength. Don't know if I'm ever going to solve in this configuration. Without the hood there was still some spring but once that went on splat, flat on the ground. The rear thou doesn't have the issues thou. The main difference is that I am using 4 red springs in the rear and 2 red/2yellow in the front. I don't believe the red and yellow has any difference in spring strength so it most likely has to do with the placement. The hood connections could also be better but I can't seem to figure out how to improve it while keeping its shape. While I fret over theses details, Here some photos for you to enjoy until I get to settling down and learn how to make a quick video. Any suggestions on how to fix the front suspension would be great. The "easiest" fix would be to just rebuild the entire underbody as one chassis instead of modular -
[MOC] Porsche 918 Spyder
Isamudyson replied to Isamudyson's topic in LEGO Technic, Mindstorms, Model Team and Scale Modeling
Thanks! Thanks! I would love to see this finished as well. It's closing in on a year since I started the planning on this project Thanks! Your Aston build has provided me with a lot of techniques and solutions to this build -
[MOC] Porsche 918 Spyder
Isamudyson replied to Isamudyson's topic in LEGO Technic, Mindstorms, Model Team and Scale Modeling
Parts came in and after some time assembly, I realize I need even more parts since I made modifications on the LDD file after I put the order in lol with what I got I was able to finish the front end sans the headlights. The hood is off because I made the front axles wider and there is a berm that's now one stud too high so the hood is hitting it. Will make the changes soon so it fits smoothly i think other than the headlights, engine cover paneling and rebuilding one of the doors, I will be finished. Then I can concentrate on the PF modules and maybe rebuild it (leaving the paneling connections) and making it into a sturdy non modular car -
[MOC] Porsche 918 Spyder
Isamudyson replied to Isamudyson's topic in LEGO Technic, Mindstorms, Model Team and Scale Modeling
While i await for parts to arrive, i decided to start on the PF modules. It was tricky putting in the motor into the same space where the gear box used to be. I also don't think i will be able to fit a fake engine in there as well. I have 2 L motors and 2 XL motors but can only choose one setup as i don't have enough parts to build both modules. Probably going to have to swap the 2 L motors for 2 XL instead as i believe due to the weight the L motor will be too weak. hopefully i can setup the frame to easily change the motors out. -
It looks even better physically built compared with the renders
-
[MOC] Porsche 918 Spyder
Isamudyson replied to Isamudyson's topic in LEGO Technic, Mindstorms, Model Team and Scale Modeling
Yes i know the headlights are too round. There is a very limited options on replicating them. There is only 1 part that i can possibly use but i don't have it and have not found any alternate options as of yet. -
[MOC] Porsche 918 Spyder
Isamudyson replied to Isamudyson's topic in LEGO Technic, Mindstorms, Model Team and Scale Modeling
was able to do a practical build of the hood with what parts i had and realized 2 things. the Front axles are 1 stud too short on each side and the inside wheel arc panel hits the wheels when the hood opens. :( when not open it looks great thou. I have to now redo how the that inside arc will be. -
[MOC] Porsche 918 Spyder
Isamudyson replied to Isamudyson's topic in LEGO Technic, Mindstorms, Model Team and Scale Modeling
That is true. I'm also missing a number of parts now that i have come up with what i hope will be the hood. Will have to make a order for them. -
When i looked at the 2 images of the lights really quick it looks like as if the lights can move between the top and bottom. I like the lower lights as well.
-
[MOC] Porsche 918 Spyder
Isamudyson replied to Isamudyson's topic in LEGO Technic, Mindstorms, Model Team and Scale Modeling
I haven't had time to sit down and do any building so started testing out front end shaping through LDD. So far its not really looking like the 918 but looks like a front end the 42056 should've had. -
Wow just wow. Your builds are so quick yet so detailed
-
[MOC] Porsche 918 Spyder
Isamudyson replied to Isamudyson's topic in LEGO Technic, Mindstorms, Model Team and Scale Modeling
A quick little picture update on the paneling. Haven't had much time to work on it. I don't really like how the hood looks and getting the curve down from the fenders are troubling me -
Wow this is incredible. I think this would be one of the approved Lego items my wife would gladly let me put in the living room.
-
[MOC] Porsche 918 Spyder
Isamudyson replied to Isamudyson's topic in LEGO Technic, Mindstorms, Model Team and Scale Modeling
I think as long as they are in orange which i would need to get some to try out -
[MOC] Porsche 918 Spyder
Isamudyson replied to Isamudyson's topic in LEGO Technic, Mindstorms, Model Team and Scale Modeling
I've tried a number of combinations to get the correct curve. Since i'm keeping the entire rear bumper as one assembly there is a limited amount of connection point combinations. There are only 3 connection points between the bumper and the main frame. I Will probably try and use soft axles as long as it keeps the gaps to a minimum. I wish there were shorter soft axles in orange. shortest one seems to be 12L. I may try to use them. @Didumos69Thanks. Surprisingly i can still use a slightly modified version of your rear axle since i based the majority of the connection points on it. -
[MOC] Porsche 918 Spyder
Isamudyson replied to Isamudyson's topic in LEGO Technic, Mindstorms, Model Team and Scale Modeling
Did some updates to the rear panels. Here's a comparison to 42056. I'm finding the hardest part right now is with how the hood is going to look like. -
Semi dump truck
Isamudyson replied to steph77's topic in LEGO Technic, Mindstorms, Model Team and Scale Modeling
Wow the solutions are ingenious. -
[MOC] Porsche 918 Spyder
Isamudyson replied to Isamudyson's topic in LEGO Technic, Mindstorms, Model Team and Scale Modeling
So was able to get the rear end shaped out a bit along with the placement of the spoiler. I am going to run into a issue with how to make it liftable. Here's a picture with the engine cover off. I only have realistically 4 stud length of space between the end of the rear axle and the bumper. This is with a different module that i would use for a PF function version. The regular module included the shift for D N R. I put it in the rear instead of the passenger compartment since the the car only has it electronic. I was able to come up with a solution with the non shift module but i am not sure how i can do it with the other one. Here's a shot of how the 2 modules looks like. I can always just leave out the shifter but would like to have it built with a choice to choose one or the other with out major modifications to the bumper or the spoiler section. -
[MOC] Porsche 918 Spyder
Isamudyson replied to Isamudyson's topic in LEGO Technic, Mindstorms, Model Team and Scale Modeling
Yeah which is why i would like to have everything in one color but lots of the parts don't come in the same color like the fenders. Yeah i've seen it in life as well. When i was a consultant one of my clients was a porsche dealership. put together their IT infrastructure when they had a brand new shop built by porsche. It was a beautiful car. -
[MOC] Porsche 918 Spyder
Isamudyson replied to Isamudyson's topic in LEGO Technic, Mindstorms, Model Team and Scale Modeling
Thanks. The liftarms are black due to not having the color in orange. They are on order thou. i thought it would be interesting to have it as part of the paint scheme since the the long fairing doesn't come in orange yet. A quick progress shot. With the major panels in place, I seperated the rear and passanger body to make it easier to rotate it around while building. -
[MOC] Porsche 918 Spyder
Isamudyson replied to Isamudyson's topic in LEGO Technic, Mindstorms, Model Team and Scale Modeling
Was able to get in some build time to see how the panels fit. With what i have on right now the weight is of the whole thing seems to already equal to the 43056 set. I apologize for the quality of the pictures as i don't have much space right now. Any tips would be greatly appreciated