


ord
-
Posts
236 -
Joined
-
Last visited
Content Type
Profiles
Forums
Gallery
Everything posted by ord
-

General Part Discussion
ord replied to Polo-Freak's topic in LEGO Technic, Mindstorms, Model Team and Scale Modeling
Ah, good observation. Then it should probably work, at least under light loads. Thanks for testing! -
General Part Discussion
ord replied to Polo-Freak's topic in LEGO Technic, Mindstorms, Model Team and Scale Modeling
Technic fans are getting spoilt with new parts lately! I wasn't sure about the introduction of gears with teeth not multiples of 4 at first, but in reality it probably doesn't matter so much... Looking at the 14z gear, could a combination with an 8z open up the elusive 1 stud horizontal 1 stud vertical offset? By my calculations it would be about 0.3mm loose... Maybe ok under light loads? -
General Part Discussion
ord replied to Polo-Freak's topic in LEGO Technic, Mindstorms, Model Team and Scale Modeling
Yes it's smooth according to Sariel's video, thankfully (in a previous video it looked like it wasn't). -
General Part Discussion
ord replied to Polo-Freak's topic in LEGO Technic, Mindstorms, Model Team and Scale Modeling
To be clear, I am supporting previous reports that the links are 11L each (i.e. 10L centre to centre of pin holes). So it should be relatively easy to connect gear racks to the rims using 2L or 2L thin liftarms, with 4 of 12 connections being with axle holes to make it a rigid connection. -
General Part Discussion
ord replied to Polo-Freak's topic in LEGO Technic, Mindstorms, Model Team and Scale Modeling
I had a closer look at the images and it appears that the pin holes on the rim are 11L from the centre, which would mean (if I'm seeing this correctly) the large 'banana' gear racks would fit snugly inside them, with 12 equispaced holes aligning to all of the holes on the rim but 1L 'in'. Interesting! -
General Part Discussion
ord replied to Polo-Freak's topic in LEGO Technic, Mindstorms, Model Team and Scale Modeling
This is good news. Can now replace 60-tooth turntables coupled with 12-tooth gears at the (4.2) grid point with these for a ratio increase from 5:1 to 8:1. I don't mind the offset because it makes it easy to make parallel gear trains to reduce backlash. Some nice new parts in this set. Looking forward to what other bike styles people will make from them. The ratchet gear looks particularly useful, though its friction seems quite high based on the video on lego.com where he stops spinning the pedals and the wheel stops almost immediately. -
It's great to see new and innovative GBC modules like this. Nice work! I wonder what the different behaviour of different ball types might be...
-
Pneumatics General Discussion
ord replied to 9v system's topic in LEGO Technic, Mindstorms, Model Team and Scale Modeling
Yeah they do. I stop them at 2bar (~30psi) though and haven't tested much higher. -
Pneumatics General Discussion
ord replied to 9v system's topic in LEGO Technic, Mindstorms, Model Team and Scale Modeling
I guess it could be, but they are brand new from Lego. I'm hesitant to use silicone because of discussion in this thread. Have you had success with it? I do wonder what the original grease in Lego pneumatics is made from... -
[WIP] Mindstorms 51515 Plotter
ord replied to ord's topic in LEGO Technic, Mindstorms, Model Team and Scale Modeling
@OLivier1234 please see my reply to Carsten back on page 1 of this thread. The code is in a hidden comment there. Good luck! -
I think I bought this exact pack of 5. They work well, just the plugs were a bit tight so I filed them down. I bought some 50cm ones a few years ago and those plugs are fine. This is frustrating and I think goes against what Lego is all about, which is backwards compatibility. Technic I buy today is compatible with Technic from the 1980s, but electronics I buy today are not compatible with electronics from 5 years ago. It's a shame that, for example, the two Power Functions XL motors I have (which were so useful) now sit in my drawer as effective paperweights.
-
Also agreed. For me, Lego remote control has never been better than it is now with Pybricks and an Xbox controller.
-
Pneumatics General Discussion
ord replied to 9v system's topic in LEGO Technic, Mindstorms, Model Team and Scale Modeling
They're all similar (and similar to my other cylinders). It's the 5.5L pumps that seem to be the odd ones out - moving them is almost effortless. -
Pneumatics General Discussion
ord replied to 9v system's topic in LEGO Technic, Mindstorms, Model Team and Scale Modeling
I think the volume is the same since they both have a 2L stroke. The new ones (for me anyway) are noticeably harder to push/pull, and I think when doing this hundreds of times per minute this becomes an issue. -
Pneumatics General Discussion
ord replied to 9v system's topic in LEGO Technic, Mindstorms, Model Team and Scale Modeling
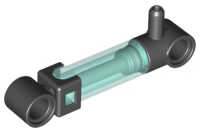
Has anyone noticed much higher friction in the 6L pumps compared to the old 5.5L pumps? I ordered some 6L pumps from Pick A Brick for my compressor but the motors struggle to pump them (even with extra down-gearing), making compression slow and the batteries drain fast.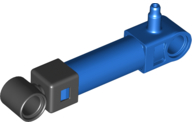
-
Zero's workshop
ord replied to Zerobricks's topic in LEGO Technic, Mindstorms, Model Team and Scale Modeling
That is something I'd love to get my hands on. I still reference Sariel's Technic Builder's Guide but it's 13 years old now. Will your book be hard copy or digital? -
It's so satisfying watching this come together. Looking great and with all the playable features you are fitting in there... Simply brilliant!
-
Technic Parts We Would Find Useful
ord replied to gyenesvi's topic in LEGO Technic, Mindstorms, Model Team and Scale Modeling
A pneumatic elbow fitting, something like this: -
[MOC] Cartesian Parallel Robot
ord replied to ord's topic in LEGO Technic, Mindstorms, Model Team and Scale Modeling
Hi, the code is written in pybricks, so if you want to use it you have to install pybricks on your hub from https://pybricks.com/. Specifics of what each line means can be found in the documentation at https://docs.pybricks.com/en/latest/. -
Looks good - infinite rotation on joints 4 & 6 and with all Lego parts . I've found a duty limit of around 40% to be the sweet spot most of the time. As long as the end stops are properly braced there are no problems. I don't detect in the program when they're out of sync. I save motor angles to be able to quickly test/use the robot in a reasonably accurate position without having to home it. Exactly - compensating for absolute position changes should make this more accurate, as long as the motors haven't moved by +/-180 degrees or more. This is probably worth trying :).
-
. The unfortunate truth. I too would go with the tap water. I guess there are a few places it could be placed - my thinking was to place it between joint 5 and joint 6 and determine the orientation error at that point. That is a great idea. Do you have any idea which camera and/or software you might use? For me, using the relative positions of the drive motors works very well to determine joint angles (and I think is more precise than direct joint encoders would be, because of the gearing down). I just save the motor positions to the hub every time I shut it down, and if they ever get out of sync with the joints I re-home the joints to the end-stops.
-
@Glaysche I was thinking of doing the same thing with the spike essentials hub on my robot arm (but decided not to mostly because the hub was too expensive). I think it's a good idea and not too heavy if you use the small motors (or just one motor and pass two functions through the turntable with a differential). The essentials hub would also give you orientation data for the end effector, which could be useful if you end up doing inverse kinematics. By the way, thanks for sharing the updates. That remote control setup is really nice!
-
[MOC] Cartesian Parallel Robot
ord replied to ord's topic in LEGO Technic, Mindstorms, Model Team and Scale Modeling
Here's the code. Note that it's raw and a bit messy - I never intended to publish it. from pybricks.hubs import TechnicHub from pybricks.pupdevices import Motor from pybricks.parameters import Port, Stop, Color, Direction from pybricks.tools import wait from math import sin, pi, fabs, sqrt print("START") # Initialize the hub hub = TechnicHub() # Initialize the motors motor_x = Motor(Port.A, Direction.COUNTERCLOCKWISE, [20, 75]) motor_y = Motor(Port.B, Direction.COUNTERCLOCKWISE, [20, 75]) motor_z = Motor(Port.C, Direction.COUNTERCLOCKWISE, [20, 75]) #motor_suction = Motor(Port.D, Direction.CLOCKWISE, [12, 36]) # Initialize variables old_x = 0.0 old_y = 0.0 old_z = 0.0 # Flash light def flash(): hub.light.on(Color.GREEN) wait(100) hub.light.off() # Find zero def reset_motors(): print("Finding origin...") motor_x.run_until_stalled(-100, duty_limit=30) print("x zero set.") #flash() motor_y.run_until_stalled(-100, duty_limit=30) print("y zero set.") #flash() motor_z.run_until_stalled(-100, duty_limit=30) print("z zero set.") #flash() motor_x.reset_angle(0) motor_y.reset_angle(0) motor_z.reset_angle(0) #motor_suction.reset_angle(0) # Move end effector def move(x, y, z, speed): global old_x global old_y global old_z rel_x = x - old_x rel_y = y - old_y rel_z = z - old_z segment_length = sqrt(pow(rel_x,2) + pow(rel_y,2) + pow(rel_z,2)) time = segment_length / speed if time == 0: time = 0.01 x_speed = fabs(rel_x) / time y_speed = fabs(rel_y) / time z_speed = fabs(rel_z) / time #print("Time = " + str(time) + "; Segment length = " + str(segment_length) + "; Speed = " + str(x_speed) + ", " + str(y_speed) + ", " + str(z_speed) + "; Move to " + str(x) + ", " + str(y) + ", " + str(z)) if x_speed > 1: motor_x.run_target(x_speed, x*10, then=Stop.COAST, wait=False) if y_speed > 1: motor_y.run_target(y_speed, y*10, then=Stop.COAST, wait=False) if z_speed > 1: motor_z.run_target(z_speed, z*10, then=Stop.COAST, wait=False) wait(time * 12000) old_x = x old_y = y old_z = z # Move each axis +/- def axes_demo(speed): move(7,7,0,speed) move(0,7,0,speed) move(0,0,0,speed) move(0,7,0,speed) move(0,7,5,speed) move(0,7,0,speed) # Circle (diagonal) def circle(speed): move(6.0,5.3,4.3,speed) move(4.9,6.5,3.5,speed) move(3.7,7.0,2.5,speed) move(2.1,6.5,1.5,speed) move(1.0,5.3,0.7,speed) move(0.7,3.5,0.5,speed) move(1.0,1.7,0.7,speed) move(2.1,0.5,1.5,speed) move(3.5,0.0,2.5,speed) move(4.9,0.5,3.5,speed) move(6.0,1.8,4.3,speed) move(6.3,3.5,4.5,speed) # Circle (diagonal reverse) def circle2(speed): move(6.0,1.8,4.3,speed) move(4.9,0.5,3.5,speed) move(3.7,0.0,2.5,speed) move(2.1,0.5,1.5,speed) move(1.0,1.7,0.7,speed) move(0.7,3.5,0.5,speed) move(1.0,5.3,0.7,speed) move(2.1,6.5,1.5,speed) move(3.5,7.0,2.5,speed) move(4.9,6.5,3.5,speed) move(6.0,5.3,4.3,speed) move(6.3,3.5,4.5,speed) # Circle (diagonal reverse raised) def circle3(speed): move(6.7,1.8,4.8,speed) move(5.6,0.5,4.0,speed) move(4.2,0.0,3.0,speed) move(2.8,0.5,2.0,speed) move(1.7,1.7,1.2,speed) move(1.4,3.5,1.0,speed) move(1.7,5.3,1.2,speed) move(2.8,6.5,2.0,speed) move(4.2,7.0,3.0,speed) move(5.6,6.5,4.0,speed) move(6.7,5.3,4.8,speed) move(7.0,3.5,5.0,speed) # Circle (top plane) def circle4(speed): move(7,3.5,5,speed) move(6.96,4,5,speed) move(6.85,4.5,5,speed) move(6.66,5,5,speed) move(6.37,5.5,5,speed) move(5.95,6,5,speed) move(5.46,6.4,5,speed) move(4.92,6.7,5,speed) move(4.33,6.9,5,speed) move(3.5,7,5,speed) move(2.67,6.9,5,speed) move(2.08,6.7,5,speed) move(1.54,6.4,5,speed) move(1.05,6,5,speed) move(0.63,5.5,5,speed) move(0.34,5,5,speed) move(0.15,4.5,5,speed) move(0.04,4,5,speed) move(0,3.5,5,speed) move(0.04,3,5,speed) move(0.15,2.5,5,speed) move(0.34,2,5,speed) move(0.63,1.5,5,speed) move(1.05,1,5,speed) move(1.54,0.6,5,speed) move(2.08,0.3,5,speed) move(2.67,0.1,5,speed) move(3.5,0,5,speed) move(4.33,0.1,5,speed) move(4.92,0.3,5,speed) move(5.46,0.6,5,speed) move(5.95,1,5,speed) move(6.37,1.5,5,speed) move(6.66,2,5,speed) move(6.85,2.5,5,speed) move(6.96,3,5,speed) move(7,3.5,5,speed) # Suction movement def suction_move(x,y,z): move(6.8,1.2,5,100) #wait(500) move(6.8,1.2,z,100) wait(200) # Suction on motor_suction.run_target(500, 180, then=Stop.BRAKE, wait=False) wait(1000) move(6.8,1.2,5.3,100) #wait(500) move(x,y,5.3,150) #wait(500) move(x,y,1.5,150) #wait(500) # Suction off motor_suction.run_target(500, 0, then=Stop.BRAKE, wait=True) wait(100) # Video part 1a def part_1a(): # Bottom square move(0,7,0,60) wait(500) move(7,7,0,60) wait(500) move(7,0,0,60) wait(500) move(0,0,0,60) wait(1000) # Move z move(0,0,5,300) wait(500) #move(0,0,5,300) #wait(500) #move(7,0,0,300) #wait(500) #move(0,7,5,300) #wait(500) #move(0,7,0,300) #wait(500) move(7,0,5,300) wait(1000) # Two circles then home move(6.3,3.5,4.5,250) circle(140) circle(140) wait(500) move(0,0,0,100) # Video part 1b def part_1b(): move(0,7,0,100) wait(3000) axes_demo(70) wait(1000) # Top circle move(7,0,5,100) wait(1000) circle4(100) wait(2000) move(6.3,3.5,4.5,100) circle(130) circle(130) wait(600) move(0,0,0,140) # Video part 2 def part_2(): move(0,0,5,300) wait(500) suction_move(0,2.8,3.0) move(0,2.8,5,150) suction_move(3,2.8,2.0) move(3,2.8,5,150) suction_move(0,4.8,1.0) move(0,4.8,5,150) suction_move(3,4.8,0.0) # Push tray wait(1000) move(1.5,7,1.5,80) move(1.5,7,0,80) move(1.5,0,0,50) wait(200) # Back right top corner move(7,7,5,400) wait(500) # PROGRAM HERE reset_motors() hub.light.on(Color.WHITE * 0.8) wait(5000) part_1b() #part_1b or part_2 here print("END") -
Robust looking switching - it seems to lock into positions nicely. Can't wait to see the full video.
-
[TC28] Pendulum Clock
ord replied to Berthil's topic in LEGO Technic, Mindstorms, Model Team and Scale Modeling
Nice work! Congratulations on getting it so accurate.