

Lasse D
-
Posts
1,423 -
Joined
-
Last visited
Content Type
Profiles
Forums
Gallery
Everything posted by Lasse D
-
 Today I'm celebrating 10 years here at Eurobricks, and I'm doing so by posting MOCs that I have not had time to present when they were finished. These two aircrafts were given to Billund Air Center to celebrate their 25 year anniversary last year. They train pilots for both helicopters and airplanes, so it was natural to give them a model of each. The helicopter is a Bell Long Ranger: It is decorated similarly to how they have decorated their own Long Ranger at BAC: The little airplane is a Piper Tamahawk. Their own (OY-RPG) was sold this year, but the model still stands: Brickshelf folders with more images: http://www.brickshelf.com/cgi-bin/gallery.cgi?f=555649 http://www.brickshelf.com/cgi-bin/gallery.cgi?f=555647
 -
I'm glad that you are not holding back with this criticism. It is exactly what I was looking for. Otherwise this would be a "finished showroom" rather than a "construction yard". I will be back the second week of January where I will take pictures or make an LDraw mock up of the front of the DAF so that it can be placed side by side with the photo of the original. Hopefully we can find out what causes this uncanny valley problem.
-
Thanks. When I found out that I would not be able to finish a full version of the Volvo this year, I turned my attention to updating the DAF. It needed the following changes: - The Roof should be more stable (it had a lot of single stud connections) - The width of the front axle has been removed from 13 to 11 just like on the Volvo. The 13 wide stance looks nice and powerful, but to have it 11 wide is more realistic since the whole truck is only supposed to be 12 wide. - The cowling has been changed. It is slightly wider, but now it allows for the battery box to be removed without destroying the truck. - The automatic coupling mechanism has been removed. It works much better when the trailer is in charge of decoupling. - This left a lot of space to add realistic details for the rear, such as fuel tanks, air tank, better wheel wells, and panels to walk on. - The center and rear have been slimmed from 13 to 12 studs. The truck was essentially 13 studs wide, which made it look bad together with the trailer. The trailer? Yep: The light orange parts come mostly from one set, and since Buy 'n Large is the megacorp of that universe, it was a natural choice for decorating the trailer. I still have to change the trailer to include automatic decoupling. I expect to get time for this in the beginning of next year.
-
Thanks a lot of the kind words. All of you. >Dafgek81. My first intention is to make this single variant. However. Should I get enough time, then it should be a relatively easy job to make multiple variants. As it is right now, time is extremely limited, but you never know. Great to hear! I hope the instructions didn't cause too much frustration. Feel free to come with ideas for improvements if you have any :) Yes. I will most definitely make building instructions once the models are good enough. I want to improve the models as much as possible before others get to try them out. It is frustrating when it isn't easy to change the battery box, when the functions fail and so on. Meanwhile. I have started a small 3rd project, which will be put on hold until next year. I had to take on the challenge of the FM 11 version of the Volvo. After a lot of prototyping with the lower front: I have tried to make it into a full design while incorporating colors from a certain airlines company: I don't like how straight the angles are at the center of the front, and the sides of the lower front might turn a bit too much. Now I have until next year to look into it :) Here is the collage for the full truck so you can see how it's supposed to look:
-
The green Volvo is just a prototype for now. I'm intending on changing it into a Volvo FH 750 6x4. For building instructions it is not much more than a frame of a Scania: http://c-mt.dk/instructions/models_truck-ScaniaHighline2.htm with the cabin of the Volvo: http://c-mt.dk/instructions/models_truck-VolvoContainer.htm Simultaneously with the update of the Volvo, I want to present the other truck that I am working on. It is a 2016 DAF XF Euro 6 4x2 (FT) Space Cab. First I researched pictures and made a Griddy outline for the front: The frame should be the usual one for the Scania as linked to above. With the frame built, it was time to make a 1 hour session for constructing a prototype/mock up of the front: 50 minutes later: Here is a better picture with only the truck: After this starts the small sprints where one area of the truck is built or refined at a time. First comes new sides: The lower grill is updated: I had a chrome 1 x 6 tile lying around and hoped it could be useful for the front: That is unfortunately a bit too slim (see the reference photos), so it had to be replaced: Doors and sides of cab were added: Time for a ceiling: And finishing it all up: For the first real prototype I refined some details of the cab and redid the roof: Here is a shot of the rear: I have also built a trailer for it, but I need to buy a larger canvas so that you can see it. At a workshop last month I found that the mechanism from the black Scania is superior to this system, so I'm am going to give this truck a major overhaul for the next iteration. The same will happen for the Volvo which is under construction.
-
Technic 2017 Set Discussion
Lasse D replied to CM4Sci's topic in LEGO Technic, Mindstorms, Model Team and Scale Modeling
Is anyone aware of how LEGO handles early releases of pictures? Now that the box art has been revealed, is LEGO likely to lift any embargoes on reviews? -
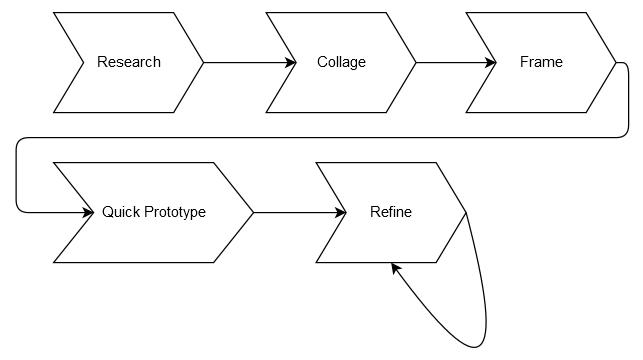
Thanks for the replies. And Lucio. You are completely right. I intend on changing it to a Volvo FH 750 6x4. I have started a new approach to designing these trucks by following a plan (see attached diagram). The first step is to do research by finding a lot of pictures and information (ahem, Wikipedia): Second step is to create a collage with a "griddyfied" frontal picture as well as the types of images that I use the most: Step 3 will be to make a frame. For this I need to gut the green truck and rebuild it to a 6x4 version. To be continued.
-
Two years ago I got a new job which took so much time that I couldn't keep on building Model Team trucks. Now I have a new job, which means it's time to pick up the slack. The Tractor version of the Volvo was finished 2 years ago, but I have first had time to take a picture of it now. This is the first version. It is covered in dust, and some parts have fallen off. I will compare it with reference photos to find areas of improvements. This includes seeing if the whole truck can be updated to the latest version by Volvo. BTW. I have just gone through all my old posts in this thread to re-insert the missing pictures. Please tell me if I missed any.
-
I have just read the following saddening message from Megan Rothrock (Author of the The LEGO Adventure Books) on facebook: "Sadly a digital builders era has come to an end with the recent decision by LEGO to stop supporting the most brilliant LEGO Digital Designer Program. It has been such a great LEGO building tool. Portable LEGO bricks for on-the-fly design has been priceless! Thank you to all of the brilliant LDD Team for all of their hard work and ingenuity over the years. From LEGO Factory, LEGO Universe Development, to Design by Me, this tool has been wonderful to work with, and I'm very glad to have been involved in some of that. If only there were a way to keep it alive.... Long live LDD!" Are there any updates on this? Is there a possibility for the source to be released?
-
I paid special attention to this part of the film because I had plans of building my own shuttle. I think it depicted a normal sliding action, then cut to a frame where you could see the parts of the wing appear flush. Lego should be able to better mimic this now that they have the actual source material to work from. I'm bothered by the color theme, and the windscreen especially. This toy is much better at depicting the red part: I agree that black is a color better suited than dark gray from the LEGO color palette. Overall I would have been quite disappointed had I paid full price for the set. On the positive side. The sculpturing of the bulkhead is very nicely done.
-
Thank you for the reply Søren Eilers. The post has been corrected with the correct links and I am currently working on the full paper. I have chosen to ignore the material qualities of stretching the bricks and rounding the corners of bricks; The bricks are assumed to be rectangles with the dimensions from the original patent (15.8mm wide and 31.8mm long) The software does not use exact calculations, which is why it outputs cases that have to be checked manually when it is in doubt. The website can be used to verify the 1144 models of 4 bricks. Unfortunately the website is not currently good for convincing the reader that there are no models which the software might have missed. Both the website, software and paper are thus a work in progress.
-
I have improved both the theory and software. I have made a quick introduction to the results here, while giving more details here. I have found out that if you use 4 bricks, then you can construct 1144 previously uncounted models. For 5 bricks this number is at least 213.221, and for 6 bricks there are at least 26.417.316 new models. I am still working on improving my algorithm to find all models with 5 and 6 bricks. The current method is too slow and gives too many cases where a person has to do the math. I am currently working on writing the paper which gives all the details, and I am trying to find a faster and more precise algorithm to find models. You can see all the models that have been found here.
-
I have good news to anyone who wants to print my building instructions. I have added a print function to the details sites of all instructions. If you want any building instruction as PDF, simply print to a PDF writer such as CutePDF or the built in "print to PDF" if you browser/OS supports it. Warning: The printed instructions are huge! I have been working on some software projects, but expect me to present some work on the Volvo in my next update.
-
Thanks Blakbird. It means a lot that people appreciate the instructions and models. And great news. I have just finished the building instructions for the Volvo. I am also re-rendering the instructions for the MAN. I have some additional space on my server which I can use for larger instructions images.
-
Yep. The instructions are right here.
-
Thanks Richie. Making the truck in red is no problem when doing it digitally :D Your local fire department poses a much larger challenge for me because it only has one set of front wheels. I need the additional space under the cab for the lifting mechanism that is offered when using dual axis steering. Solving that problem is a challenge for whoever wants to take it :)
-
Thanks, but the tractor will have to wait until I have rebuild it again. I am not at all satisfied with the current result. I will post a picture once I am done with the container transport. Whoa! That's quite a visual upgrade. I will see if it is possible to upgrade the looks of the new green truck to this design. It is the one that I'm currently not satisfied with.
-
After half a year of rigorous testing... or rather... being busy at work. I have updated the blue Volvo. It is now time to start making some building instructions! I will update this post with my progress after each hour of virtual building. Update after 1 hour of virtual building In one hour I can... begin slowly with the container. Update after 2 hours of virtual building Another hour and the container is done! Time to start on the frame. Update after 3 hours of virtual building The frame is roughly 25% done. Update after 4 hours of virtual building The frame is now approximately 40% done. Update after 5 hours of virtual building Frame completion: 60%. Update after 6 hours of virtual building Frame completion: 85%. Update after 7 hours of virtual building Frame Done. Time for some fittings. Update after 8 hours of virtual building Fitting added. Now it's time for the cab. Update after 9 hours of virtual building Construction of the cab has started out nicely. The front with the grille is up next. It consists of 14 individual sub-assemblies, so I doubt it can be finished in just one hour. Update after 10 hours of virtual building The grille was finished in only one hour! That must be a new record. Now for the lower grille. Update after 11 hours of virtual building The lower grille is done. Now it's time for the ceiling. Update after 12 hours of virtual building The only parts missing now are the doors and windscreen. Update after 13 hours of virtual building The LDraw model is complete. Now I just have to make the building instructions, assisting images, etc. etc. This will take some days. A new thread will be created once done.
-
I'm currently trying to generate all models by connecting bricks at "extreme" angles: When two bricks are connected at corners, then the connection is turned as much as possible to the two sides. Here is a zip file with LDR-files showing what is supposedly all unique ways 4 bricks can be connected like this while not being axis aligned. There are 552 of these models distributed in 127 LDR files. This is only a preliminary result. It is my guess that most new models can be found by connecting bricks at extreme angles, so finding these will give insight into how many new models we can expect to find. Right now I'm running a program searching for all models of size 6 - it has currently found a little more than 19 million new models, so it's far off from the 915 million "rectilinear" models of the original result.
-
Thanks for the review. It was quite a fun read through. As for alternate models in Creator sets, I think we should expect a quality higher than "meh". I fully expect the good people a Rebrickable to make something great out of it - there is already a fun looking polar bear!
-
[REVIEW] 42039 - 24 Hours Race Car
Lasse D replied to Jim's topic in LEGO Technic, Mindstorms, Model Team and Scale Modeling
Great review with fantastic pictures. As for the model, I'm glad that they chose to make it less pretty - real Le Mans prototypes are rarely a sight to behold. It is function and aerodynamics over form. I would, however, have preferred more realism for the sake of learning: - The front shouldn't open like that - instead it should be easy to remove the whole front cover, leaving the suspension easy to work on. - The aero seems to be realistic, except for the rear end where there's no indication of a venturi channel. This should have been easy to include. - There is no fuel tank, nor fixed fuel connector right behind the cabin. - There are no air jacks! Seriously!? This is one of the most unique features of a race car like this... and LEGO forgot about them. Instead they automated two functions which are manual on a real race car. - The top cars at Le Mans are hybrids with ingenious systems. I would have loved to see the front wheels connected to some kind of spinning apparatus indicating a kinetic energy recovery system. If I get this set... I'm going to make some modifications. -
Serious piracy problem and its consequences
Lasse D replied to Sariel's topic in General LEGO Discussion
"The problem is, for some people this dislike alone is a perfect excuse to commit piracy." You could save a person from a burning house and he would still pirate your book. This is the reality we live in today. Don't go out of your way to be nice to others - you can not expect them to be nice to you too. The only good reason for being nice on Youtube is that it makes LEGO more willing to continue giving you sets for reviews. The work you do for a set, however, is worth much more than the set. I'm glad we have people like you who are willing to spend so many resources on this hobby. As for pirating. How are people pirating your books? If they use torrents, then chances are they are too lazy to use proxies and VPN, which means that you can read their IP's. If you want to, you can log a lot of this traffic and if you have the resources, go after the people from your own country who pirate this way. Zentropa, a tiny company in Denmark, is very successful at this and I once heard they get half of their profits by making settlements with pirates. -
The "check all" box works just like the old one did, so hopefully it will make you not miss the old one. Now the fields are not locked, so hopefully there is some kind of improvement for most types of users. We will see. I can't see any good solution for this. LDraw.xml might fall behind, Rebrickable might update the format of their list, Peeron hasn't updated since 2011, and the Rebrickable API only gives the Rebrickable/LDraw connection. I am tempted to start my own colors site where people can suggest changes, while also supporting uddates from LDraw.xml and Rebrickable. Perhaps I should start a new thread for this - get some input with pros, cons and design hints.
-
MLCad question on rotation/turn
Lasse D replied to Chinyin's topic in Digital LEGO: Tools, Techniques, and Projects
An alternate way (how I prefer it since my own software can't handle rotation points): 1) Create a new sub model with the part you want rotated. This sub model rotates around 0,0,0 when used in other models. 2) Move the part in the sub model so that the stud you want as the center is at 0,0,0. 3) Add the sub model to the model you want and rotate it as explained in other posts of this thread. -
It is good with a little dilemma. On one hand I have a user who is completely confused by multiple-state buttons - on the other hand I want to mimic expected behaviour so that it doesn't feel strange to more tech-savvy users like you. I have made some changes which hopefully captures both ideas - If you press a button twice, it changes the selection back to what it was before pressing. That is strange. My LDD is happy to open models with the dark flesh color. From the LDraw.xml I have the line: <Material ldraw="86" lego="312" /> This matches the line from colors.txt, that is, from Rebrickable: 86|Dark Flesh|#7c503a|209|24|2004|2014|BROWN|86|91|DkFlesh|312 My LDD, and hence LDraw.xml claims to be updated to the latest version. You can try to import your own LDraw.xml to see if this helps, but I doubt it.