Graydingo Posted February 3, 2015 Posted February 3, 2015 (edited) Hi all, This is one of my first MOC's after a dark age. I'm really excited about the sbrick, and though it looks like serious competition, I thought I would still enter and complete my project as a personal goal. We have a 1966 Chevy C-10 Truck on air ride suspension. Loosely based on a real 'rat rod' truck. The model is 'bagged' on air ride pneumatic suspension. 4 motor functions: 1. L for Drive 2. M for Steering 3. M for Air Pump 4. M for Ride height via air switch. I worked really hard on trying to get fancy with a transmission, but they are either too big for the limited space I have or just aren't robust enough. In my pictures you can see that I tried various setups based on some notable Technic builder's models. Ultimately, they just didn't function as smoothly as I had hoped. I did have fun building them though. :-) With the frame on the ground, and it being a short cab, I didn't have room to implement the transmission with PTO to control the air pump (as originally planned) so I'm scrapping the transmission and just simplifying so I can make the deadline. First Transmission 4 speed, using a small LA to shift And here is the LA installed on top: The shifting was rough and the resulting transfer to the wheels was sketchy at best. I tried a two speed robust from Sariel and also one of Sheepo's 4 speed compact transmissions that uses rubber band tension. Sheepo's transmission is really clever. I tweaked it and had modest success but overall it was too complicated for my model.The real truck was supposed to be a '3 on the tree' so i might work that in after the competition. Here we have slfroden's linear gearbox. It uses a large LA and works very well. It's just huge. It can fit sideways in my model behind the cab, but the height is 4 studs too tall. Also getting it transferred to the drive train seemed overly complicated considering the placement. I think in a future moc, i'll start with the transmission and build the car around it. The LA is under the M motor. It's a WIP at the moment so keep that in mind. I do have a servo motor, but I JUST built lucio switch's awesome white 4WD truck. It used up my two XL motors also so I planned to use the L motor I have to drive this moc. It's probably not enough, but being as it is a 'cruiser' with air ride suspension, it certainly isn't built for performance. Stay tuned for more body work and a video. Thank you for any suggestions or comments. Edited February 3, 2015 by Graydingo Quote
Nazgarot Posted February 3, 2015 Posted February 3, 2015 Wow, thats large!! Can the drive motor handle the weight? Could you explain some more about the "gearbox" on the pictures? Is it a manual gearbox, or am I far off and it not being a gearbox after all? -ED- Quote
Graydingo Posted February 3, 2015 Author Posted February 3, 2015 Wow, thats large!! Can the drive motor handle the weight? Could you explain some more about the "gearbox" on the pictures? Is it a manual gearbox, or am I far off and it not being a gearbox after all? -ED- I'd say the L motor can handle it, but it is not ideal. I do have XL motors, but I used them both in another moc that i recently built and I'm not about to tear it down. :-D I added more info about my gearbox journey above in the post. It's been both frustrating and rewarding because i spent a LOT of time building them only to have them all fail. The bottom line is, the moc will not have a transmission for the contest, just a direct drive to the drive shaft with a gear driving the fake v8. I'm focusing on fitting in the air control mechanisms. Quote
jono rocky Posted February 3, 2015 Posted February 3, 2015 Awesome choice . Cant wait ti see it finished. Quote
Graydingo Posted February 4, 2015 Author Posted February 4, 2015 (edited) Got the powertrain in today as well as the battery box and pneumatic pump. Battery Box behind rear axle. Top of the air bags Two L motors for drive. Which I believe falls into the 'exception #1 ruling' for TC6. Also decided to mount the IR receivers in the cab. Good mid chassis area for my available cables. Edited February 4, 2015 by Graydingo Quote
Graydingo Posted February 4, 2015 Author Posted February 4, 2015 Ran into a major hurdle. Some of you may be amused by my lack of foresight so I thought I'd share. The front small pneumatic cylinder's are simply too weak to lift the weight of the front end. Though they tuck nicely in the front, they just can't lift they weight. I can 'finger assist' and it will stay up, but I still have to add all the weight of the front end so... I did add a spring to try to compensate and help, but it doesn't work very well. The good news is the back end large cylinders work very well and lift the heavy rear end with no issues. I did add the final two motors. Both M motors, 1 for the pneumatic pump. and 2. for the air switch. Don't mind the switch mechinism, it's not mounted so I could temporarily install the pneumatic lines to test. The system works pretty good and with all this in the chassis, it's a wonder where I would have placed everything with a transmission. You really have to admire builders who can cram all those awesome motors and functions into a moc. Well it's off to bricklink to buy another 2 larger cylinders for the front end. Should be interesting to see if I get'em in time. Quote
DamonMM2000 Posted February 5, 2015 Posted February 5, 2015 Wow! I know this'll be impressive when finished. Quote
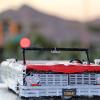
Graydingo Posted February 5, 2015 Author Posted February 5, 2015 Body work is coming along. I made and mounted the doors. They open manually. I had to rework the seats to make room for the air switch and tubing behind the passenger. Also mounted the steering wheel. It has the wrong ratio, so it spins quite quick when the wheels steer. I might try to gear it down later. I guess I could have picked a more complex body design. Modeling it in Technic has been interesting. A lot will come down to the grill and cab. Let's hope I have some pieces left by then. The tonneau cover fits within the bed and at the right level. I built a first draft hood. The real hood seems to have more curves than a Kardashian. Is it weird that I'm excited to build some big ol' clunky side-view mirrors? haha. That will be last. Spent some time tucking all the air lines and motor cables in the bed safely away. I reinforced the pump motor as it was getting kicked around a bit. Next up is the front fenders and maybe the grill. Thanks for all the nice comments. I really appreciate them. Quote
Sylvian Posted February 5, 2015 Posted February 5, 2015 0o,.. really awesome so far, always been a sucker for trucks as these. Keep it up! Quote
erix Posted February 5, 2015 Posted February 5, 2015 I love this build! I had a 66 SWB for a few years that was stupid low - without bags - and I miss it very much. You picked a hard body to model! I bagged the Unimog a while ago: http://www.eurobricks.com/forum/index.php?showtopic=57543&st=1500#entry1738577 Quote
Graydingo Posted February 5, 2015 Author Posted February 5, 2015 I remember your bagged Unimog! Clever to flip the portal axles. I also briefly entertained a central body mounted piston. Have you seen Doc's Lincoln Continental? Quote
erix Posted February 5, 2015 Posted February 5, 2015 The center cylinder worked well but there was a lot of stress on the liftarms and axle that was connected to the shocks. They both would bend an small but unsettling amount! I'm surprised two small cylinders weren't able to lift your front end, a single one was able to move the whole Unimog, cab and all, up and down, even without mechanical advantage. I did see Do'c - too cool! Wish he'd show the guts.... Quote
Graydingo Posted February 6, 2015 Author Posted February 6, 2015 I'm surprised two small cylinders weren't able to lift your front end, a single one was able to move the whole Unimog, cab and all, up and down, even without mechanical advantage. This is..surprising too. Maybe my cylinders are bad. The one off the unimog crane actually had trouble opening the claw. The other is off the green 24-7 tow truck. I'll have to test them out. Quote
erix Posted February 6, 2015 Posted February 6, 2015 Oops! I misspoke! I did use one fat cylinder on each end, not the skinny cylinder. Looks like the difference in diameter of the bore radically changes the delivered force, check this online calculator: http://www.engineeringtoolbox.com/pneumatic-cylinder-force-d_1273.html Doubling the diameter of the piston quadruples the force! Quote
Graydingo Posted February 7, 2015 Author Posted February 7, 2015 Two steps backward and two step forward since my last update. I was unhappy with the performance so I decided to rip the guts out and try a transmission with more torque. here's my 'new' transmission (not really a transmission, just the dual motor drive setup. It's a tricky setup requiring the smaller drive gears to be mounted .5 stud off. Which means the axle is now .5 longer (i reinforced it in the center with the red piece) Which means a motor wont direct mount to it properly. So I had to build this complicated offset rig. Then everything that mounts on and around it was more difficult to mount. And here it is partially installed. It ended up being too much torque and would wreak havoc on my transfer case. Gears would pop out and the angle on the drive shaft was fully stupid. So ...ripped it all out and went back to my old 4 prong gear drive. The backlash is actually helpful in this setup to help absorb some of the weight when the vehicle stops. Many hours later, I have a completely new internal guts setup. This is probably my 5th or 6th full build on the inside. It's definitely the cleanest and most functional yet. I've learned a lot during the build and next time I'll start with the right motors. Got the bed mounted properly and reworked the interior to be cleaner. Pretty happy with that. Next up is the front fenders. Rough mockup below. Quote
Lipko Posted February 7, 2015 Posted February 7, 2015 Thank you for writing this detailed development log. It's a pretty good read Quote
LeocornoProductions Posted February 7, 2015 Posted February 7, 2015 This is great progress, and I can see all the hard work you have put into this great model, huge size as well. That gearbox issue is similar to mine, because ALL my gearboxes want to tear up my transfer case, and I normally have strengthen it again around 8 times minimum. And some times the XL motor actually twisted the gearbox. Yours is a much higher quality than mine, and probably much more well thought out. Good luck with the completion of your entry, it looks very promising! Will we see a video soon? Quote
Graydingo Posted February 7, 2015 Author Posted February 7, 2015 Thanks Leocorno! I've been following the Lambo thread too. A supercar is in my build future for sure. The Hurrican is great and could almost be a c model as I think you primarily used the loader as a donor am I right? Quote
Tommy Styrvoky Posted February 7, 2015 Posted February 7, 2015 You may want to use something else besides the universal joints for transferring power to the front wheels, it will break or come apart. Quote
Graydingo Posted February 7, 2015 Author Posted February 7, 2015 Thanks Tommy. its RWD only. The picture above is from a failed setup. The final has much better angle and runs to the cab that drives the rear wheels. It has to go to the center because of the long trailing arms for the rear end. ill upload a pic of the bottom soon and you can see what I mean. Here's the bottom so far. Along with my "buddy" that helps me with hard to get to spots. Here's the universal angle for Tommy Not bad. It holds up so far for testing. And here's my morning rear bumper project. Quote
Tommy Styrvoky Posted February 7, 2015 Posted February 7, 2015 That's much better, good luck, you have 9 days left . Quote
Recommended Posts
Join the conversation
You can post now and register later. If you have an account, sign in now to post with your account.