Sign in to follow this  

Recommended Posts

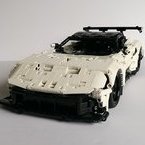
Hi, this is a new MOC I built recently - 1:8 Ford GT.

2.JPG

4.JPG

8.JPG

d.JPG

Functions include 1) Independent suspension on all 4 wheels 2) working steering wheel with HOG 3) extendable rear wing 4)butterfly doors 5) 2-speed gear box 6)V6 engine 7) openable front hood and bonnet. This can be built in either manual or RC. For the RC version: 2xL motor for propulsion; 1 x servro for steering; 2 x PF lights for front/back lights.

More pictures can be found in my bricksafe folder: https://bricksafe.com/pages/legobee/ford-gt

I'd like to hear comments from you guys. Thanks in advance!


Update #1:

Here is the improved version:

800x450.jpg

More pictures can be found https://bricksafe.com/pages/legobee/ford-gt/v3

Update #2:

Instructions is available at https://rebrickable.com/mocs/MOC-149456/Lego__Bee/18-lego-technic-ford-gt now.


Edited by mihao
add info about the improved version

Share this post


Link to post
Share on other sites

Everythings really good, but something is missing around front lights.

Share this post


Link to post
Share on other sites
6 hours ago, scorpia said:

Wow, the proportions and shaping looks solid! Any chance for instructions?

Thanks! Instructions are being tested by my friends right now. If there is no company agree to produce it as a set, the instructions will be published in RB.

2 hours ago, Ethan0080 said:

Very promising !!

Thank you.

10 minutes ago, Jurss said:

Everythings really good, but something is missing around front lights.

Thank you. I am working on the headlights. The original GT headlight has two bulbs arranged like this:
375241fb36ba4aba92f78cd4bde3014c.jpg

I am still trying to find proper part to mimic that. Because I need to allow the lights to run through, I can only use clear LEGO parts, which applies a big restriction on it. Let me know if you have any suggestion.

Edited by mihao

Share this post


Link to post
Share on other sites

Yes, front proper front lights, especially with technic parts, will be almost impossible. Don't know, but as You are using red color, maybe somehow You could use windshiled from Ducati?

Share this post


Link to post
Share on other sites

That's fantastic!  Looking forward to the instructions.

What % of the parts would one have if starting with a 42143 Daytona?

Share this post


Link to post
Share on other sites
On 5/16/2023 at 11:24 PM, Jurss said:

Yes, front proper front lights, especially with technic parts, will be almost impossible. Don't know, but as You are using red color, maybe somehow You could use windshiled from Ducati?

Yes, that's a option. The current choice I want to make is between making the inner light bulb or the outer glass shell. I kinda lean toward the former, but for latter, the windshield from Ducati do have a shot.


8 hours ago, GirchyGirchy said:

That's fantastic!  Looking forward to the instructions.

What % of the parts would one have if starting with a 42143 Daytona?

Thanks for being interested. Instructions haven't been finalized, I think once I uploaded to RB, it should be possible to compare it with 42143, though I have never used that function yet.


1 hour ago, lmdesigner42 said:

Great work on the body shaping and doors! This train part might be helpful for the headlights.

Thanks for the compliments and suggestion! Yes, this train part does have some similarity to the light bulb, will try to see if they can fit.

On 5/17/2023 at 10:02 AM, damian_kane_iv said:

very well done, but yeah headlights could use work

Can't agree more. Working on it... Thanks!


29 minutes ago, astyanax said:

Or the trusty 1x2 tile or new part 1748 in trans-clear.

250x250p.jpg

Yes, I am currently trying to use 1x2 tile/plate to create the light bulb. Good to know the 1784 in clear, but it seems to be too curvy for that, isn't it?

Here is what I am trying to do to improve the headlight. Just in design now, will try to change my MOC to see how it looks.

newheadlight1.png


Share this post


Link to post
Share on other sites

looks good, fairly clean with minimal gaps. Where are the black wheels from may I ask?

Share this post


Link to post
Share on other sites

Here is what I end up with improving the headlight. Basically I tried to mimic the double bulbs, and given that only the bottom on has LED, I just added a clear part there. Here are the comparison before and now. What do you think?

Before:

800x450.JPG

Now:

800x450.jpg

Edited by mihao
Removed 4K pictures. As per rules, max allowed image size is 1024x1024.

Share this post


Link to post
Share on other sites
23 hours ago, allanp said:

looks good, fairly clean with minimal gaps. Where are the black wheels from may I ask?

Thanks. the wheel is some after-market product, the molding is same as the wheel of Official Lambo. I am just tired of the gold rim.

Share this post


Link to post
Share on other sites

New headlights look pretty good. Is there a way to get the characteristic white outline? Maybe with some system bars or tusk/tooth pieces? 

Share this post


Link to post
Share on other sites
6 hours ago, LvdH said:

New headlights look pretty good. Is there a way to get the characteristic white outline? Maybe with some system bars or tusk/tooth pieces? 

thought about that and tried, those white line is too thin to do with part, maybe sticker.

Share this post


Link to post
Share on other sites

Nice job again! One can clearly recognize what it is. Otherwise I´m sorry to say the pictures are missing some contrast. I would like to see the car from more different perspectives and the bellyshot. 

Did you use blueprints for this? The scaling is nowhere 1/8. If I calculate right, the width of the car is 27 studs which approximates to the 1:10 scale (29 studs in 1/8). Considering your wheel track is narrowed by additional 2 studs. Though I like the look when cars have enlarged wheels and rims with the exaggerated wheel/body ratio. Building bigger brings new challenges and advantages regarding functionality and detailing. Please try.

400x300.png

Edited by brunojj1

Share this post


Link to post
Share on other sites
46 minutes ago, brunojj1 said:

Nice job again! One can clearly recognize what it is. Otherwise I´m sorry to say the pictures are missing some contrast. I would like to see the car from more different perspectives and the bellyshot. 

Did you use blueprints for this? The scaling is nowhere 1/8. If I calculate right, the width of the car is 27 studs which approximates to the 1:10 scale (29 studs in 1/8). Considering your wheel track is narrowed by additional 2 studs. Though I like the look when cars have enlarged wheels and rims with the exaggerated wheel/body ratio. Building bigger brings new challenges and advantages regarding functionality and detailing. Please try.

400x300.png

I didn't pay too much attention on the actual scale, and the reason I mentioned it 1:8 is because I use the tire of LEGO Lamborghini, and all the scale starts from the width of the wheel arch opening, which in my case is 11. Here is my blueprint reference.

800x454.png


Just did my calculation. the width of the real car is 195cm, and the MOC is about 21cm width, so the scale is more like 1:9, so thanks for pointing this out! BTW, I used to build 1:12 cars, so I believe there are also specific challenges for smaller scale MOCs.


Share this post


Link to post
Share on other sites
On 5/20/2023 at 9:03 AM, mihao said:

Now:

You are still missing those DLR. You can use the same approach lego used, I think.

Share this post


Link to post
Share on other sites
11 hours ago, Jurss said:

You are still missing those DLR. You can use the same approach lego used, I think.

Feeling myself very ignorant now.:pir-look: Could you point me out what the LEGO approach for DLR is?

Edited by mihao

Share this post


Link to post
Share on other sites

Use some so called light saber part, or some tube like on ferrari daytona, or those tooth/claw parts in white


Share this post


Link to post
Share on other sites
14 minutes ago, Jurss said:

Use some so called light saber part, or some tube like on ferrari daytona, or those tooth/claw parts in white


Do you mean this by DLR?

800x532.jpg

Share this post


Link to post
Share on other sites

Create an account or sign in to comment

You need to be a member in order to leave a comment

Create an account

Sign up for a new account in our community. It's easy!

Register a new account

Sign in

Already have an account? Sign in here.

Sign In Now
Sign in to follow this  

  • Recently Browsing   0 members

    No registered users viewing this page.