
Hrafn
-
Posts
631 -
Joined
-
Last visited
Content Type
Profiles
Forums
Gallery
Everything posted by Hrafn
-

Hrafn's small builds
Hrafn replied to Hrafn's topic in LEGO Technic, Mindstorms, Model Team and Scale Modeling
Yes, my goal was to get the pivot point as close to the wheel as possible. This design might be a dead end for my current project since there are other designs that will probably work better, but I wanted to share it in case it was of use to anyone else. Your design is nice and compact, though you are probably right about its rigidity. -
Hrafn's small builds
Hrafn replied to Hrafn's topic in LEGO Technic, Mindstorms, Model Team and Scale Modeling
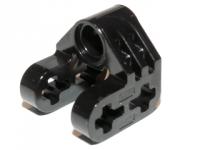
Here is a steered, driven hub for 49.5x20 tires, using a CV joint. -
General Part Discussion
Hrafn replied to Polo-Freak's topic in LEGO Technic, Mindstorms, Model Team and Scale Modeling
For what it’s worth, TLG just sent me an email apologizing for the delay with my B&P order and said it is taking 5-6 weeks from order to shipment. So only 1-2 weeks to go for me, hopefully. -
[MOC] Sweeper Truck
Hrafn replied to kodlovag's topic in LEGO Technic, Mindstorms, Model Team and Scale Modeling
This is wonderful! You should enter it into the “festival of mundanity” contest at thelegocarblog.com if you haven’t already - this is a great reproduction of an everyday but mechanically interesting vehicle that doesn’t often (ever?) get modeled in Technic. -
[HELP] Generic Building Help Topic
Hrafn replied to Jim's topic in LEGO Technic, Mindstorms, Model Team and Scale Modeling
Thanks! I will take a look at the rigid hoses, I have never used those. The a-pillars in the vehicle I am modeling are very straight and thin so that sounds like a good solution. -
[HELP] Generic Building Help Topic
Hrafn replied to Jim's topic in LEGO Technic, Mindstorms, Model Team and Scale Modeling
I am struggling with the a-pillars on my 15-wide car, as the length isn’t a multiple of a half stud, and the angles are not standard ones (divisible by 22.5 or 15 degrees.). Has anyone come up with good solutions besides those identified in this thread: I have experimented with “bar holder with clip” and “bar holder with handle” but nothing has quite worked. In my case I also am limited to white parts. -
[HELP] Generic Building Help Topic
Hrafn replied to Jim's topic in LEGO Technic, Mindstorms, Model Team and Scale Modeling
Thanks! I have a design I think will work now. I wish I had as much space to work with as in 8865. -
Axle Collection Thread
Hrafn replied to efferman's topic in LEGO Technic, Mindstorms, Model Team and Scale Modeling
@deehtha the Generic Building Help thread might be better for this, this thread is more for finished axles. Can you post some more photos of the axle on that other thread? It is hard to see how it is put together from this one photo. -
[MOC] Mini Snowgroomer
Hrafn replied to kodlovag's topic in LEGO Technic, Mindstorms, Model Team and Scale Modeling
This is great! It could easily be an official set. -
[MOC] Mack R series
Hrafn replied to LegoV94's topic in LEGO Technic, Mindstorms, Model Team and Scale Modeling
Extraordinary work! This is my favorite scale and I am blown away by what you have done. Like @gyenesvi I can’t quite make out how the rear truck axles work - can you show us what they look like from above? -
deleted
Hrafn replied to DavejspTechnicMOCs's topic in LEGO Technic, Mindstorms, Model Team and Scale Modeling
Sounds great! Looking forward to seeing what else you dream up. -
deleted
Hrafn replied to DavejspTechnicMOCs's topic in LEGO Technic, Mindstorms, Model Team and Scale Modeling
Nice to see the virtual pivot point steering - a much nicer implementation of steering than TLG generally manages! -
[MOC] Motorized Garbage Truck
Hrafn replied to mihao's topic in LEGO Technic, Mindstorms, Model Team and Scale Modeling
That arm is wonderful! Any chance you could share some more photos of how it is constructed? -
[HELP] Generic Building Help Topic
Hrafn replied to Jim's topic in LEGO Technic, Mindstorms, Model Team and Scale Modeling
I like what you did there with the System hinge, and that is much more robust than my design (admittedly a low bar 😂). I will have to iterate the design as I work on the grill and hood, to make sure everything fits and is solid, but I am very happy to have a path forward! -
[HELP] Generic Building Help Topic
Hrafn replied to Jim's topic in LEGO Technic, Mindstorms, Model Team and Scale Modeling
Here we go. This is a view of the top. The 4x10 plate is a placeholder for the front grill and bumper; I need to leave some room to attach it to the structure. The tan cranks are connected under the motor, and I put them in in the hopes that I could use them to link the headlights together. The hood will rest on the front edge of the motor, and angle up towards the windshield at the same slope as the 2x5 panel. The headlights should be just inboard of the 2x5 panel, so there is a one stud gap between the edge of the headlight and the liftarm part of the motor. And a 3/4 shot The wheels are low enough and far enough back that they should not interfere with any mechanisms forward of the dog bone frame and above the blue bent liftarm. Here is the underside, so you can see the structure more clearly. The car is extremely fast so robustness against crashes is very important. Not sure how I will keep the grill from coming off but that is a problem for a different day. Edited to add: here is a possible direction for a solution. Obviously it needs a redesign so it doesn’t fall apart, but the geometry seems good. -
[HELP] Generic Building Help Topic
Hrafn replied to Jim's topic in LEGO Technic, Mindstorms, Model Team and Scale Modeling
The hood rests directly on the drive motor. I will have to try to construct a “cutaway” version of the area in question; hopefully I can do that and post a picture tonight (US time). Thanks to all of you for the help! -
[HELP] Generic Building Help Topic
Hrafn replied to Jim's topic in LEGO Technic, Mindstorms, Model Team and Scale Modeling
@Gray Gear here is a sketch of the geometry I am going for - the assembly pivots near the top back edge. My current draft is here: The headlight pivots on the gray pin; the gray plate-with-pinhole would be what the actuating linkage would attach to. The geometry isn’t quite right yet but I am not sure how I can tweak it without making it too large - this is already as large as it should be. -
[MOC] Bell 206 Helicopter
Hrafn replied to paave's topic in LEGO Technic, Mindstorms, Model Team and Scale Modeling
For the tail rotor, maybe the smalles panel would be too long but it would be more rotor blade shaped: https://www.bricklink.com/v2/catalog/catalogitem.page?P=11946#T=C -
Check “cone” on Bricklink: https://www.bricklink.com/catalogList.asp?catType=P&catString=21 Or “brick, round”: https://www.bricklink.com/catalogList.asp?catType=P&catString=8 Or Cylinder (especially the hemispheres): https://www.bricklink.com/catalogList.asp?catType=P&catString=11
-
[HELP] Generic Building Help Topic
Hrafn replied to Jim's topic in LEGO Technic, Mindstorms, Model Team and Scale Modeling
Unfortunately there isn’t room for much. If I motorize it I will use a micromotor and take advantage of the linear clutch built in to the pulley wheel that comes with it. The issue I am having is more about geometry and part selection. I don’t want to show the WIP because the vehicle is 95% done and I don’t want to unveil it until it is done. I was hoping to find a few examples for inspiration, but most of the MOCs with flip up lights I have seen online don’t show the linkages used for the lights. The drive motor is in between the lights, blocking the path for an axle between them, but there is a more roundabout path to connect them with a linkage. If I can just get one light rotating the way I want I am sure I can link the two together. -
[HELP] Generic Building Help Topic
Hrafn replied to Jim's topic in LEGO Technic, Mindstorms, Model Team and Scale Modeling
Can anyone point me to some good examples of pop-up headlights in Technic? I am working on a 15-wide model so each of the headlights have to fit in a 2x2x2 space, and I haven’t been happy with any of the approaches I have taken. If I have to I will use click hinges but I would really prefer a Technic solution that enables the raising of the lights to be synchronized (and possibly motorized). Thanks! -
General Part Discussion
Hrafn replied to Polo-Freak's topic in LEGO Technic, Mindstorms, Model Team and Scale Modeling
Another twist: the axle hole has very poor clutch on an axle, so don’t expect the connection to stay intact in a collision. -
[HELP] Generic Building Help Topic
Hrafn replied to Jim's topic in LEGO Technic, Mindstorms, Model Team and Scale Modeling
@StudWorks instead of the pins-with-hole, try the piece I use as a profile pic - it can be locked to the 5x7 frame with 2L axles. -
General Part Discussion
Hrafn replied to Polo-Freak's topic in LEGO Technic, Mindstorms, Model Team and Scale Modeling
@arieben why does the axle need to go through any parts at all in that space? if you are concerned about it getting off center, how about using a 3L axle joiner to connect two shorter axles? The axle joiners provide a lot of stiffness. -
Fitst PF technic car [MOC]
Hrafn replied to Daniel-99's topic in LEGO Technic, Mindstorms, Model Team and Scale Modeling
With proper bracing, mating spur gears (especially double bevel ones as spur gears) should not introduce much friction. But bracing takes space, which you don't have much of in this small model!