
ScotNick
-
Posts
395 -
Joined
-
Last visited
Content Type
Profiles
Forums
Gallery
Everything posted by ScotNick
-
Ohh, now I forgot to answer the last comments, sorry guys!!! Hmm, cutting is the ideal way to get them But they're just a compromise until I get myself some 3d printed ones. Haha, yeah! But I'm still not sure if that livery ever existed I also wanted to note that I built my tank car - a British Railways 14 Ton Tank Wagon BR 14 Ton Tank Wagon by ScotNick1, on Flickr Now it's already starting to look like a real train, I sadly don't have a pic with all my trucks right now, but it will grow anyway so I'll update it when I have more trucks
-
Hmmm, I wonder if said Nether Train would be like the already existing maincraft railcar, or if it would even have the narrow gauge rails? Narrow gauge rails would be great to have again!
-
I think he's right. It seems like Lego's mold for the large train wheels includes 3 wheels - two flanged and one blind driver. Although I don't have an explanation for that and it seems weird, there's much evidence that this is the case. For example Lego included a red blind driver in the toy story train although the engine didn't need them. The instructions of the Emerald Night showed one set of those wheels (flanged - blind - flanged) disguised as one part (with one part number) as can be seen here: It seems as if Lego themselves doesn't know how to put it. Funnily enough the instructions of the Toy Story Train had just the flanged wheel shown as piece 4584104 (and it didn't include the blind driver in the instructions, although it was physically included) and the Constitution Train had the same pic shown in the instructions as the Emerald Night also with the same part number. I myself am happy to see a new train but I won't buy it. Although I don't like the design very much and the price/piece ratio isn't very good I'm sure it has a lot of playability and kids will love it. A good thing about the train is that it seems to be possible to add Power Functions - the normal train motor as the front bogie, the receiver in the cab and the battery box in the tender.
-
Great model you got there! I only saw that it had 9V motors when investigating your model, so great work on the covering for that!
-
German Baureihe 41-241 Polarstern in 1:38
ScotNick replied to Bricksonwheels's topic in LEGO Train Tech
Another great model by you! Really sad to hear you're already stopping to build more of this kind! I'll keep my fingers crossed that you come back to building engines one day -
MOC: 1/33 Swedish 0-8-2T with three (!) working cylinders
ScotNick replied to Sven J's topic in LEGO Train Tech
*joining the praise of the others* This is simply stunning! So many great details, It's hard to believe that this is really Lego. The small sign on the remote controller and the gray railway wheel are ingenious, well done! Now what I wonder is how fast are the batteries empty for such a huge model? What I wanted to know as well is the gauge - is that 5 bricks wide, right? How is traction with the wheels? Hope to see more builds from you soon, lovely what you already got there Cheers, Nick -
Thanks everyone for your kind comments, I'm really flattered Yes, the number 1 is surely a nice technique, took me about 2 years to get the idea to build it with cheese slopes, haha Haha, some people on other sites actually asked if the 13 long technic half beam was a new standard Lego piece I do have an old rendering of the engine in a brown colour scheme, but after looking it up again I think this isn't accurate. It's really hard to find out which livery they really used (other than black which is too "mainstream" for me ). But I found a pic - a previous version which had a much too short smokebox, I hope you fogive me for that LBSCR E2 by ScotNick1, on Flickr The smokebox door handles were the last change I did on the model. The half bushing was horrible to get. Only appeared in on set so I payed about Eur 3 for it - but ordered all of the half bushings in black the store had to have some more for future models The 'disc' below is the smallest train wheel Lego produces. It would fall off if the model is turned over, but thankfully the half bushing holds it on quite sturdy. I already went crazy with the stripes on my first model (as you might have seen) but there were still some gaps. Now I really like all those new parts introduced in the recent years, this model wouldn't have been possible without them. I hope he'd approve, haha And I know what you're talking about - Thomas is one of the first models I (probably) won't change anymore - all my other models have been in constant change which is good if you want to have a perfect model, but you never have any models to show Haha, for the brake van I took some inspiration from other modelers but added my own ideas as well (the small lookout for example - or does this have a special name?) Cheers, Nick
-
Hi everyone!!! Been some time since I last posted here. Well, I really don't have much time lately so I have a look on the forum from time to time but don't write very often. So now on to the model and it's creation. It's really hard to draw the line on where childhood is over, but I've changed in the recent years and so have my models. I really liked Thomas and Friends when I was smaller and still like it, but my approach towards railways and modelling has changed. I worked to make my models more detailed and tried to get the proportions truer to their original. So you have to see the following model not just as one model, but an evolution of models. Now some info about the model. This model is a model of Thomas the Tank Engine. I know many of you think of a small disproportionate and unrealistic tank engine for children when they hear about Thomas. But instead of modelling my Thomas after the TV series model everyone knows I took a look at the real engine Thomas is based on - an E2 class engine from the London, Brighton and South Coast Railway - and used it as my basis for Thomas. The only thing I added are the splashers (which the real engine didn't have) but apart from that the model is true to it's original. Before I start to post some pics of the model I want to show you the real engine: And here comes my model in the well known livery: LBSCR E2 by ScotNick1, on Flickr LBSCR E2 by ScotNick1, on Flickr Thomas by ScotNick1, on Flickr Thomas by ScotNick1, on Flickr Thomas by ScotNick1, on Flickr Thomas by ScotNick1, on Flickr I also made some rolling stock I want to show you LBSCR E2 with rolling stock by ScotNick1, on Flickr Here are the cars alone. First a British Railways Plank Wagon - in this case not 100% original as I used a 9v motor as a basis. This truck works as the motor wagon. Plank Wagon - motor wagon by ScotNick1, on Flickr Loaded with iron nails to increase the traction :) Plank Wagon - motor wagon by ScotNick1, on Flickr A British Railways 45 Ton Bogie Well Wagon BR 45 Ton Bogie Well Wagon by ScotNick1, on Flickr A British Railways 24 Ton Iron Ore Hopper Wagon BR 24 Ton Ore Hopper Wagon by ScotNick1, on Flickr And last a British Railwazs 20 Ton Brake Van BR 20 Ton Brake Van by ScotNick1, on Flickr Before I forget it - that was my first model of Thomas - I didn't want to show it at the beginning so you keep on reading instead closing the thread in disgust and awe Thanks for looking, comments and criticism always welcome More pics of the Engine can be found in the album: Flickr Album LBSCR E2 - Thomas the Tank Engine More pic of the rolling stock can be found here: Flickr Album Revised Rolling Stock
-
I like what you did with the wheelset, but I think many (including me) would need wheels that fit on a cross-axle. Maybe a pair of metal wheels that fit on a cross axle (spoked would look better IMO) and a 2x4 plate or similar that has the PF comnector and the power pick-ups to the wheels. I think a big problem wih the wheelset that you have right now is that only the flange is made out of metal which could cause some problems with connectivity as the flange doesn't always touch the tracks (the 9V-motor's flanges have a spring that presses the metal to the tracks.
-
Here's proof that there are new "Power Functions" elements: https://education.lego.com/en-us/elementary/shop/wedo-2 But this won't replace the PF system we have now, it's just a system that exists as well for education purposes.
-
Wow, another great steamer from your production line Nice to see something unusual regarding wheel arrangements! As always lovely details! I just wonder how much hauling power does the engine have? I always wondered if 2 m motors can do the work to haul a little bit longer train. Also nice to see the custom rods, I have to try them at some point as well
-
Hi Rail Co, sweet little engine you have there! It really does feel a little bit like the old 9v/12v engines. Regarding the buffers it really depends on you. If you want to stick to the old engines or have at least a similar looking one you should also use Lego's buffers, if possible even the red ones: http://www.bricklink.com/catalogItemIn.asp?P=4022&colorID=5&in=A If you want to get more realistic you should make brick-built buffers. I normally opt for brick built as I like a more realistic look rather than a toyish look, but in the end it all depends on you
-
I'm really looking forward to this! It looks very promising and I already like the wheel arrangement. The colour looks great as well as it is with most British steam engines! Now I don't exactly know the prototype, but I'm sure I've seen this engine on pictures before. I hope everything works out with the motor, you might want to check out Duq's BR 55 as it also has 8 driving wheels and uses an L motor. Link to his Album I'm eagerly awaiting updates! Cheers, Nick
-
Very nice moc andvery realistic!!! The balcony surely is nice, it makes the building stand out form other modulars which just have straight facades all the way to the top. Cool yellow is something we really needed from Lego, and it is what it is - cool
-
Great work, although it seems your tram needs an overhaul - the rotten plans really need to be replaced! No, jokes aside I really like that you used light and dark brown, gives the engine a nice effect. Your approach on the tram is really interesting, now I'm eager to see more! Cheers, Nick
-
Tony, I totally know what you mean, I've tried to advertise my project everywhere I can, but still the support leaves a lot to be desired. Also with limited time I know how much work it really is to advertise your project on many different sites - it's a pain! But still I think you're doing great, if I remember correctly my project had a little bit less supporters in the first days/weeks, or about the same as yours. What's great about your project is the possibility of power functions. One thing that brought me a lot of supporters was that it was a staff pick for a week or so. But my limited time doesn't allow me to write very much or advertise my project on every single site I know. One big problem about trains is that the appeal of one specific engine is different from continent to continent, let alone the different countries. Another problem is that the majority of steam engines in most countries were just black - not a very appealing colour for the normal Lego fan that is hunting for parts! Somehow we have to overcome all those problems with one project (but it should have more potential than a simple city train), but I don't know how we're gonna do that. I hope we can archive something like that someday. Cheers, Nick P.S.: Is the real engine still chugging somewhere in a museum or on a heritage railway? Maybe you could ask them to help you advertise the project if there is such (just in case you haven't already done that)?!
-
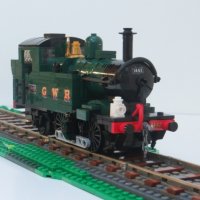
I hope there's no problem with advertising my own project, as this thread is about advertising train related projects. I think the biggest problem with train related projects is that most of them are too big for the Lego Ideas line. Looking at the Ideas sets Lego has approved, all of them were in the price range 30€-60€. Of course one can say that there's always a first time, but I wouldn't trust in that. So my thought was to create a somewhat appealing steam engine which doesn't have too many bricks. So here's my project: GWR 14xx class steam engine A criticism I once read on Brickset (not regarding any specific project) was, that people uploaded projects which they hadn't built in real life, and that was a reason for them to not support them. I think that's rubbish, but still want to show you I have a real version as well. I know my model has just 32 days left, but I never imagined it to get that far. My biggest problem is that I literally didn't have enough time to advertise my project properly. Also the two remaining engines of that class belong to some private person, so the railways they're operating on (I wrote them) weren't motivated to advertise it on their pages. I'm not quite sure, but I plan to upload my model again, this time with images of the real version though as that might get the project more support. So here's the model (not 100% finished though) GWR 14xx front by ScotNick1, on Flickr I hope I didn't go off-topic too much, but what I wrote are problems other train projects probably have to face as well.
-
I just hope they have some way to also include the tan train windows in this set!!
-
Well there are several solutions to this problem. For my shunter I made the axle swivel, but you could also make the motor wheelset rotate and have the first axle fixed, or make the first axle move sideways. These are the solutions I know of.
-
I already tried my hands on modularizing some sets, here are my tries. Redone Town Layout by ScotNick1, on Flickr
-
Well, here's what I have in store for you: A breakdown crane, which still is a WIP and is really hard to work on. Breakdown Crane Idea by ScotNick1, on Flickr A small PF shunter which I'll probably never build but looks cute:
-
Looking great!!!! I really love that colour, looks wonderful!
-
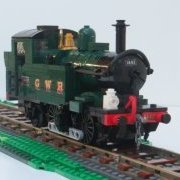
Well, I've been busy lately working on several projects. I figured that I've already posted some of my projects here (also models I'm already building), so can an admin pleas change the subject to "ScotNick's WIP thread [real bricks and LDD]" please? To start off I've nearly finished my 14xx, just waiting for the stickers and a gold piece for the whistle now GWR 14xx front by ScotNick1, on Flickr More pics in the album https://flic.kr/s/aHskcyXBG5 Also I've dedicated more of my time to real bricks, here the start of my ÖBB 1670 class engine BBÖ 1670 WIP by ScotNick1, on Flickr BBÖ 1670 WIP by ScotNick1, on Flickr For this engine I still need the black BBB medium wheels and some way to get more traction. The next engine I started work on is the ÖBB 4041 class electric railcar BBÖ 4041 WIP by ScotNick1, on Flickr BBÖ 4041 WIP by ScotNick1, on Flickr Only thing is I still have to find out which motor works best, here a testing setup. Here you can see an M motor but in the end I'll probably go with 2 small PF motors. BBÖ 4041 WIP by ScotNick1, on Flickr Also: Merry Christmas to you all!!! (I know I'm a bit late ) Merry Christmas!! by ScotNick1, on Flickr This is a K class Tramway from Vienna, where I live. The model is 6 wide and has room for all the PF components. Now I've started on my first rolling stock piece, a break van (that still is a little bit broken ) Brake Van WIP by ScotNick1, on Flickr Also I'm working on a certain engine you might remember from earlier times... I'm still missing some parts though, and the wheels will be replaced by BBB medium drivers. Now coming to the last engine I recently designed in LDD, this is actually a try to celebrate 50 years of Lego trains - my try on redoing the Emerald Night, based on the Flying Scotsman Like the Emerald Night, there is space for an XXL-motor in the cab, and this version has the same gearing as the Emerald Night. This engine has just about 30 more parts than the Emerald Night engine. I know Carl Greatrix and Michael Gale have already built tenders that would fit with this engine but I want to make an earlier non-corridor tender. Also as the motor is in the engine I will try to make a more accurate wheelset for the tender. Oh yes, all the parts are available and shouldn't be very hard to find, so to celebrate the anniversary I might publish building instructions if there is a demand I hope you like my models, any comments/suggestions are always appreciated
-
Your model really looks great and I'm in love with that ScotRail livery One problem you ave with the current bogies is that they are 8 wide and the engine is 7. Carl Greatrix had a different approach on a 3-axle bogie you might want to have a look at: Deltic Bogie by Carl Greatrix, on Flickr Another possible way would be a sliding middle axle like here: Class 66 bogie detail (underside) by Mike Pianta, on Flickr I hope this helps! Anyway: any plans on when you'll finish that engine?
-
Yes, I see what you mean now - looking at the black and white pic of the engine. The picture of the Marklin model somehow created the illusion of the curvature being different, but looking longer at the model I realised it was just an illusion nothing more. You didn't answer one question though: was thrre any specific reason you built the engine in 8 wide rather than the 7 you normally do?