
ScotNick
-
Posts
395 -
Joined
-
Last visited
Content Type
Profiles
Forums
Gallery
Everything posted by ScotNick
-
@kiwinewt Haha, had to get my hands on those brown fence pieces as soon as I saw them - I knew I'd put them to good use @Pdaitabird Thanks! I'll see how this will develop... @Roadmonkeytj Thanks, seems like I got the style right
-
Ohh, which ones!?
-
Thanks guys! @zephyr1934 @NotToScale Yes, agree with you about the sign! I do intend to make the platform modular with the signs on a different part of the platform. Here is a render from 2 years ago (can't believe I didn't post this) Bricksby Station by ScotNick1, on Flickr Interesting what you say about the colour of the signs though, never thought about making them black - will think about that. The bridge and a bit of the platform in the upper pic is already built on the way by ScotNick1, on Flickr But just recently redid the front of the station to have a larger canopy that makes some nice use of parts, created some new benches and planted some flowers to add some green Thoughts on the changes?
-
Really like this! The building fits perfectly in the layout and the style of the building itself is great too! Especially like what you've done to make it modular, similar to what I'm aiming eith my soon to be buult buildings.
-
Very nice design, really like it!
-
Not sure about those - while I really like the idea and am all for unusual part usages I can't but think they are a little bit too chunky. Right now I don't know of a better (and sturdy) way to build one though. Regarding overhead lines in general I did some try with the new zip lines from Lego some time ago which works with the pantograph actually touching the lines Have a look in thisvideo if you're interested: "working" overhead line by ScotNick1, on Flickr
-
Been some time since I last posted in this topic (can't believe it's been 4 years!) As I've now built my platform bridge some time ago I thought I'd finally give it a go and want to build that station building too. But before that, I made some changes and wanted to ask you what you think Changed the back door entrance to pop out a little bit more and make it less plain. Also added the 3 tall windows at the left and a rain gutter drainage (and LDD went crazy as I wanted to bend it at the bottom ). What do you think of the changes? Any suggestions?
-
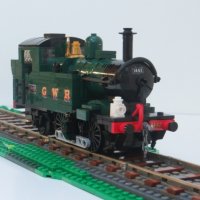
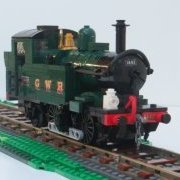
I could do that, the picture shown isn't very up-to-date though - my current version uses 3D-printed drivers and I'm not sure if that is allowed on Lego ideas. Does anyone know more about that or can check that out? I don't actually have a pic with the details I added recently, but here's how it looks with 3D-printed drivers: LBSCR E2 - finally done by ScotNick1, on Flickr
-
Can't say very much, only thing I heard is that some parts aren't produced every year - so sometimes designers have to stick to specific parts for their models and have to give up on others. So I assume that with Duplo it's the same, that they have one production run which can last for some time, and after that they stop. It's probable that they might do a 2nd run or more if it proofs to be a good runner in stores...
-
Really great work here, this definitely looks more like the prototype! Also like the that you labeled the 1st class coach. Any chance of seeing this built in the future? Are you going to redo the engine as well?
-
I myself don't have any experience with sculpeo.com but I did order Shupps wheels from shapeways some time ago. While the designs are great, the tolerances differ quite a bit: some axle holes are rather firm, while others slide off easily. As @Tenderlok shared his experience I thought this might be worth to give a shot. I have to admit that the price of the customs and postage has always held me off from buying your rods - even though I really would like to have them. What program do you use to design them? Not sure how much you're willing to give away, but if we can adjust the length of the rods digitally on our own this could also save you some time.
-
As @Tenderlok mentioned sculpteo.com - I don't have any experience with said site, but have a suggestion: I don't know how happy you would be with it, but would there be a way to make some files available so one could upload them and print them there? Not sure if you'd like that though!?
-
Looks like a very nice set, although a bit pricey. Some things I realized: I think this is the first time that Lego officially produced an 8 wide train! The last car has two red train doors (only two left ones though, rather than one left and right version) The two domes use 2 red technic train wheels The new wheelset uses red wheels: (images are courtesy of NewElementary, check out their review of the set) Also did anyone else find it strange in Lego's official statement, how much they highlighted, that the train comes with magnetic buffers? Like that's something special rather than how it should be...
-
Press Release: Creator Expert 10269 Harley-Davidson Fat Boy
ScotNick replied to Vilhelm22's topic in Special LEGO Themes
The fact that it says "Raumfahrt" in the product description, which means aerospace doesn't get my hopes very high for a train... -
Here's how I did the pantograph, maybe this helps: The same thing can be built in black and grey.
-
Hmm, not sure if you really wanna do those tender frames. I myself am still puzzled if the tender frame was the right way to go (I've been building a different engine with this tender frame). Although it does goes through switches and curves without any real problem, the downside is you can't power the engine with the "traditional" train motor AND it does cause a bit (meaning quite some bit) of friction. At least the way I have it right now (the 4 wheels are rigid, they only move sideways but won't turn in curves). Ohhh nooo. Not the Terrier! At least you have to build her in a livery she hasn't been built in!
-
Hmm, sadly I don't think there's anything slightly bigger than the 4x4 round dish for the smokebox door It might not be too easy to see, but I used plates with clips facing outwards held together by 2x2 tiles forming the outer wall.
-
Very lovely engine, the proportions and all the details look great! However I do think the front section is a bit too long. Really like the tender you chose, did try my hands on this tender as well, I used a different way to attach the grill tiles though. The powering seems great, the slipping really is top notch!
-
Hey everyone! Didn't want to create a new thread for this, but I tried my hands on a new "working" overhead line with the relatively new part 27965. Here's a video of the topic's railcar, proofing the concept idea "working" overhead line by ScotNick1, on Flickr The part's material is different from normal Lego, much softer. So it's easily bendable for curves and works well with the relatively sturdy pantograph design. At first I was worried about the distance between the masts being too short, so I made a middle section (even looking a bit prototypical) to connect two sections together.
-
I think a re-release is not as easy as it might seem. I think I remember some Lego staff stating somewhere that each year or so only some parts are produced - this is necessary to keep production cost as low as possible. Producing every part in every colour the whole time wouldn't be possible - even for Lego. There just is a limited amount of machines that fill the molds with plastic, changing the colour of a mold takes a long time so this has to be justified as well. This explains some odd colours in areas of models not seen from the outside. The parts and colours produced each year just changes, which makes re-releases quite expensive, if crucial parts of the model aren't produced for other sets as well
-
I did design a bogie about 2 years ago, this is what it looks like built (sorry, don't have a pic from a better angle right now) Teaser by ScotNick1, on Flickr However the bogie is built totally with snot. The shown coach is actually a power coach with an XL motor powering each bogie. I would've been much more happier with just using Lego's original motor, but it has so few attachment points to fix the details to, plus the bogie plate in the middle adds a plate in height. Hope this might help Cheers, Nick
-
Oh, what an interesting prototype you chose! Living in the city they drive around I see them everyday and have often ridden them. I think I've seen the wheels once (the tram had some kind of problem) and as far as I remember the engine was mounted upwards. Yes, the inner walls probably should be further apart, but the articulation on the prototype isn't very wide on the inside either... Looking forward to how this progresses. If you need any pictures I might be able to take some ;)
-
Actually just ordered at bricks'n'pieces and they are available in reddish brown for 11c/piece Just wanted to let you guys know. Cheers, Nick
-
Really lovely model there, especially the transmission through the coupling rods is a nice touch! Though you could've waited till your engines are full of dust before taking pictures, just to give them a more realistic look ...
-
Hmm, I just realized, would it be possible to use the colour sensor as a distance sensor as well? The idea would be to run more than one train on the same track in the same direction. Place the colour sensor in the cab of each engine and when the sensor "sees" an obstacle/train ahead it slows down or stops, depending on how dark it is (the closer the back engine to the front engine, the darker it is for the sensor). Or you could place the colour sensor pointing on the track and use differently coloured tiles as signals - that way it would be possible to run a whole layout with signals. You could also use the colour sensor to detect the engine and turn a switch accordingly... I don't know how feasible this is and if it makes sense, all just ideas that came into my head :)