Back in 1990, I received the fantastic 6375 Trans Air Carrier for my birthday, and as with all medium / large sets at the time, it came with the current Lego catalogue. Among all the wonderful sets in this (soon to be worn out) catalogue, was the awe inspiring 6396 International Jetport. However, little did I know at the time, the 6375 Trans Air carrier would be my last Lego set until 1999, when the SW license was announced, so I never ever got around to asking / begging / pleading for the airport.
My Lego purchases in the last 5 years have either been SW UCS or Modular buildings, and I have given little attention towards the 'system' sets or other themes, but this all changed last year when someone advertised a 6399 Airport Shuttle on the local New Zealand trading website. Cue nostalgia and the excited search through BL to see how feasible it would be to actually buy all of those sets that I missed out on when I was a young lad. Why had I not thought of this before??? Aside from a few sets (Im looking at you 6399!!!) It was actually looking quite feasible to get my grubby mitts on these nostalgic memories either MISB, or examples with broken seals that were still un-played with.
Anyway, Yesterday I received my 6396 International Jetport, after a very nice BL seller agreed to send it to New Zealand. Im finding that if a seller does not normally ship to your country, it always pays to ask if they will make an exception. In this case they did, and I got this MIB box for a great price! The seals were broken, but all parts were still sealed. As I fully intended to build this set, having broken seals was no issue.
So, lets get on with the pictorial review!
First up, here is the box. Its the classic yellow ‘Legoland’ style, with a very clear image on the front of the set, and a plain background. I love the tropical background, and view looking down the runway.
The rear of the box shows some alternative builds. I love the rock music stage, as it has nothing to do with an airport, and demonstrates the flexibility of the set.
One of the long box sides has the big bold title ‘International Jetport’. I could imagine a Lego shop, circa 1990 with all the classic Legoland sets on their sides, looking like a series of reference books.
One of the short sides has a elevation of the set. Its nice to get a side view on the side of the box. Great design TLG!
The box flap opens up, revealing a window to the parts, and another side of images, showing the play functions of the set, plus some more alternative builds. Lovely stuff.
This is the blurb written on the box interior. Very nice and honest.
Here is the reason why I only paid $200NZD for this set, as opposed to $440NZD for other new examples. Like I mentioned before, I always fully intended to build this set, so was not concerned with seals being broken, as long as the parts were all new..
Here is the interior blue box, with all the parts floating around in 2 compartments, with the plastic wrapped ‘special parts’ tray teasing the viewer with some of the lovely parts in this set.
The plastic tray on its own. Here we see 3 of the figs, a few printed bricks, and some of the other parts.
Close up of one of the minifigs. Han Solo eat your heart out! You may have been frozen in carbonite for 12 months, but this young lady has been sealed for 22 years! She will be my favourite decoration ho ho ho hooooooooooo.
Part bags. The bags are all un-numbered, and appear to be grouped according to brick size. They smell amazing:)
Here are the bricks that were floating around - The 2 large pale blue windows, 1 long white beam, 4 of the long green plates, and one large grey plate. Best of all are the FIVE baseplates included in this set. FIVE BASEPLATES!!!! 1 tarmac circle, 1 Intersection, 2 Straights, and 1 16x32 plate for the terminal. Sorry, once again - FIVE BASEPLATES!!!!! one thing I never really noticed before, is that these are essentially green plates with massive grey printing on them. They look amazing, and are sorely missed from modern airports. (I do however, think that the 4 wide planes look great on these plates, but anything wider (ie - all modern planes), would make them look a bit daft.)
Here is the paperwork and documentation. We have 2 sticker sheets, the manual, and a catalogue of the current Lego lineup. Its a little dissapointing to see the airport logo stickers, considering TLG were able to print this logo on the airplanes tail fin and the fig torsos. Oh well.
Hehehehe - this is on the back of the catalogue. Who remembers phone / mail order shop@home??? Better still, who would love to get 2 plates for $6.00, or 6 figs for $6.25??Im almost tempted to send an order in, but it does have an expiry date of 31 March 1992. Boo.
This is page 1 of the manual. No diagrams of ‘build on hard surfaces’, web addresses, yelling kids or other sets. Also there are no piece call outs or fancy backgrounds. Its all very simple and honest.
Lets get building!!!! First up are the minifigures. We get 8 of them in this set, including 3 Airport personnel, a chopper pilot, a jet captain, a security guard and 2 intrepid travelers. A very nice selection, and of course, all have the classic smiley head. Only the Pirates sets at this stage featured the newer heads with detailed facial expressions and features. Funny thing I noticed was that all heads were attached to their respective torsos already... Is this normal for classic sets?
Next up, we start buliding structures. First up is the wind sock at the end of the runway. A nice simple build with a great technique and printed parts. A good start!
Now, the radar. A simple build with a hinge and grille plates setting up a nicely detailed, and easily identifiable airport feature.
The first vehicle - The baggage tractor. This was a classic build, with a plate built chassis (not the one piece design seen on some of the classic town vehicles), and small panels to give lots of space for minifigure luggage.
The second vehicle is the baggage trailer for the tractor. It features a nice ball joint tow system, and more panels to fit more luggage. I love the black rollcage with the large light. Looks very authentic.
Both mini-vehicles together with the driver and some lost luggage.
Next up, we have the little yellow helicopter. Once again, nice simple construction, but some great details - especially the angled boom support, and the exhaust for the motor.
2 steps along, and the chopper controls are in, and the tail rotor supports are complete.
2 more steps, and we have a complete chopper. The trans blue canopy and the rotors look great, and our pilot makes this sub model look very sharp.
Next up, the main jet. The first step doesn't give much away - It looks like this could be a boat, a rocket, or even...... a plane.
The next step however, adds wings and some angled hull pieces. Looks like we have a plane in the making! We have seats, controls and some nice blue pin-striping. Take note of the headlight bricks at the rear, as they will come in very handy soon.
Like about now... A simple connection, but very tidy and convincing.
2 steps later, we have a hinged roof, windows down both sides and smooth tiles to ensure easy access for our travelers and pilot.
There is also a small baggage compartment for all the changes of torsos / clothes our figures need.
Next up, we put on the landing gear and light for the bottom of the fuselage. The front wheel is on a 2x2 turntable, while the rears are fixed.
Lastly, the rear fin and top wing goes on, along with a few lights on the wingtips. I love the print on the tail! Here we have our tarmac guide showing the newly completed jet where to park up.
Now we are on to the terminal itself. This is the only step in the manual that has a piece call out, and a top down view of the build as opposed to the normal isometric view. Its a great way to ensure the correct parts are in the right place.
And here is the bricked up version, 2 steps later.
The detail here is very nice - a small weigh in station for the luggage, and a conveyor belt / slide for all of our cargo. Funny that every item weighs 12.01kg though. You could flip the printed tile so items become 10.21kg.
2 steps later, and we have the metal detector built, storage lockers installed and the big red board for flight information.
Close up on the body scanner / metal detector. Beep beep!!!
Close up on the external side of the baggage slide.
Close up of the storage lockers and flight board. No stickers on yet!!!!
2 steps later, the roof goes on, and the big beautiful arches for the departure gates are in.
2 steps later, the structure is getting bigger, along with the start of the control tower and some seats on the observation deck. Note the small yellow lights on the side of the white upper structure - a very nice detail.
Next up, we start building the control tower - a glass bowl with access from the back for our controller to guide the busy airport traffic. I love the 8 different glass panels that form this shape. TLG could have used 1 big ugly mold, but they gave us 8 parts to enhance play value.
And detail from behind, sans the controllers seat.
Next, the enormous glass windows for the arrivals / departure lounge go in. These are BIG pieces, and look fantastic.
Next up, we mount the control tower, plant a massive palm tree and finish off the roof. I love the finishing touches such as the fences on the observation deck, the numbered gates and the flags on the roof.
Here are our travelers being escorted onto the tarmac by the security guard. perhaps they are important dignitaries or political figure heads?
Here is a close up of the windows, tree and small garden. Simple, elegant and very very nice.
Now for the weird part. This is where the manual ends. Yup. thats it. There is no instruction for baseplate layout, placement of the windsock or radar or placement of the runway lights.
The box gives you a fair idea of where they are ‘meant’ to go, but its entirely up to the builder. Im in 2 minds about this - On one hand it seems a bit weird that there is no guide to the overall layout, as it would be nice to build exactly what is on the box. On the other
hand, its Lego folks - put it where you want!
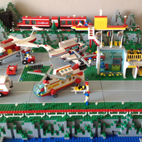
Here is an overview of the layout, according to what is on the front of the box. FIVE BASEPLATES PEOPLE!!!!
And here it is with all of our vehicles and structures, all completed.
Here are a few close up and in action shots, to give you an idea of the play values in this set. Here, the flight has just arrived, and the plane is being guided onto the tarmac apron.
Here, the Air Traffic Controller is looking pleased at a flight that has landed safely, while the security guard orders his lunch over the radio.
The plane is now being unloaded, and the passenger is ready to disembark.
20 minutes later, the plane is taking off! destination unknown......
Summary. This is a great set, and I loved every moment of putting this set together. The great parts variation, bright colours and high playability typify the golden age of Town Lego from the late 80s and early 90s. The fact that there are 5 baseplates, 3 vehicles and 8 minifigures with plenty of moving parts and detail ensure that this set has high playability and looks fantastic.
To be critical, I would have like to have seen more printing on the flags and tower column rather than stickers, and perhaps a stair vehicle so the figures could get in the plane easily. The fact that the instruction manual finished abruptly was a bit odd too. But honestly, Im nitpicking.
Final ratings,
Design and build - 8. Easily identifiable as an airport, with lots of function and playability. Not at all boring to put together, with multiple sub models keeping momentum high. Looks a little bare compared with modern sets though.
Parts - 9. Wheels, windows, wings, bricks, plates, plants. They are all there, and the ability to build almost anything out of the 470+ parts is high.
Figures - 9. A great selection of prints and colours, including 3 airport workers, pilots, and civilians. Prints are all classic town, and that classic smiley is timeless.
Playability - 10. A plane and chopper for swooshing, a tractor for broom-brooming, plenty of figs, lots of things to swivel and turn, and all those lovely baseplates for playing around with variations.
Value - 7. Back in the day this was $69USD, which put it at the higher end of the town series. I paid $200NZD for it last week, and to put that in perspective, the new 3182 Airport here was $200NZD last year. Hands down Id rather have this version, even though it has over 300 less pieces.
Call it nostalgia, call it baseplate envy, or call it my dislike for those large premolded plane parts, but I love the 6396 to pieces, and believe that this is one of the best sets TLG has ever produced.