
D3K
-
Posts
1,317 -
Joined
-
Last visited
Content Type
Profiles
Forums
Gallery
Everything posted by D3K
-
[MOC] Swingloader Mark Two
D3K replied to D3K's topic in LEGO Technic, Mindstorms, Model Team and Scale Modeling
Thank you very much Blakbird, they look great! :thumbup: If you don't mind. I'll use some of the pictures for the revamped instructions and the cover photo at Rebrickable! Also; would it be possible to make a ghosted image showing the functions, like you did with GuiliuG's wheeled excavator? Thanks for the feedback, I read your comment on Rebrickable, and am aware of some of the mistakes/shortcomings you pointed out Like I said there, I will try to fix the instructions as soon as possible, and replace the file in my dropbox I can say it here as well: 1. The geometry of the Z-link is not perfect, you have to use both controls when lifting and lowering to keep the bucket level, and prevent the assembly from "locking up." It could probably be done a little better. but keeping in mind how long I spent figuring it out in my last attept, I stuck with a design that worked satisfactory here. 2. Replacing the yellow knob gears in the rotating superstructure (transmission from vertical to horizontal rotation just before the LAs them selves) with a 12z bevel gear and two 20z double bevel gears, significantly reduces the strain, at the expense of speed. I will suggest this in the instructions. Also, to further reduce strain, one could probably change the last gears in the actual LA brackets to 12z bevel and 12z double bevel gears. Will try to have the updated instructions up before the end of the weekend Lastly; pictures would be very much appreciated, yes! -
[MOC] Swingloader Mark Two
D3K replied to D3K's topic in LEGO Technic, Mindstorms, Model Team and Scale Modeling
I have compiled all the LDraw files in a single RAR file that can be downloaded from my dropbox here. I have however since I started making the instructions, read some more about how to do it, and it might be a bit messy, as I don't think I used a .mpd file. So I'm not sure if it is readily viewable as a complete model...? At least I couldn't open it properly in SR3D builder.. If this is the case, is there a way to export the completed model as a whole, with the sub assemblies broken up in to pieces in the main model? Anyway, the complete assembly is the file called "Back lower" inside the zip file. On a different note, this is what it looks like broken down (sorry for bad picture, it was dark and I only have my phone): Even broken down and sorted like this, I didn't even get halfway through the instructions in more than 4 hours (And I created it!) So I guess anyone wanting to build it, will have many hours of fun ahead of them! Also, I noticed a couple of mistakes in the instructions (a clutch gear that should be an ordinary spur gear, and a sub step missing), and I will try too fix this as soon as possible! -
Favorite Technic Parts ?
D3K replied to DrJB's topic in LEGO Technic, Mindstorms, Model Team and Scale Modeling
I would have to say this one is pretty high on my list I would however love to see it in a 2 x 3 configuration as well as the 2 x 4 configuration -
[MOC] Swingloader Mark Two
D3K replied to D3K's topic in LEGO Technic, Mindstorms, Model Team and Scale Modeling
I truly appreciate all the kind words, hope the model lives up to the "hype" whenever someone gets around to building it, and that those who build it gets some enjoyment out of it!:-) @EyesOnly: the aaa bb isn't very expensive, I think it is mainly used in the train sets.. Also, the engine block parts are purely aesthetic, used to cover up some holes in the beams.. Could probably get a similar effect using tiles or something:-) @Blakbird: sure can do, would be honored to have one of your superb renders to showcase my MOC! Will have to wait till over the weekend though, as I am currently at sea, helping a friend bring a yacht home:-) off topic: it's freakin fantastic to be sailing again! -
[MOC] Swingloader Mark Two
D3K replied to D3K's topic in LEGO Technic, Mindstorms, Model Team and Scale Modeling
Submitted to rebrickable for review! Thanks, I wasn't sure how to explain things, but I think that the comments along the way are understandable When I made the instructions, it wasn't always easy to get the rotation steps to work as intended in LPub, so I had to use a lot of arrows from time to time Thank you! It's kind of difficult to say, but you can't go wrong with a lot of yellow and light bluish gray. 8043 will give you the needed LA's and a lot of yellow beams and panel, as well as the digger, while 8069 will give you even more yellow, along with the mini-LA's needed for steering. The 9398 will really only provide the two L-motors and the wheels/tyres, as well as some of the five needed 5x7 beams/frames. With very light modifications, you can easily swap the L-motors for M-motors I would imagine.. I think M-motors would be strong enough I don't think 8275 has very many parts in common with this, except for the yellow common parts.. But it should be up on Rebrickable in,.. well, I don't know how long they usually take, but hopefully within a couple of hours! Thank you! And not a bad idea to just drill a normal 24z gear instead of cutting the diff! will it be strong enough though? As for the AAA batterybox, I really recommend it! It opens up a whole lot of new possibilities, and is of course a whole lot cheaper than the 8878 rechargeable battery! Runs out a lot faster than the standard AA box though -
[MOC] Swingloader Mark Two
D3K replied to D3K's topic in LEGO Technic, Mindstorms, Model Team and Scale Modeling
Yeah, forgot to mention that.. will definitely do that once I have done a trial build and made sure everything is really OK Not now though, need to sleep! -
[MOC] Swingloader Mark Two
D3K replied to D3K's topic in LEGO Technic, Mindstorms, Model Team and Scale Modeling
Alright, here you go It's a total of 338 steps, spread over a 118 pages pdf document, in fairly good resolution, and measures in at just below 50 MB. I couldn't get the synthesized wires to show in LPub, so I deleted them, but they are fairly easy to route as there is a lot of room in the back, and I put in some text to try to explain some things that might not be immediately apparent.. Hope the instructions are satisfactory! I won't charge anything for the instructions, the only thing I ask is if you build it, please PLEASE return here to post a picture and your impressions of the instructions and of course the model itself -
[MOC] Swingloader Mark Two
D3K replied to D3K's topic in LEGO Technic, Mindstorms, Model Team and Scale Modeling
Thanks, but I think I'll just leave it with the Unimog tires, they looked better than expected Also, it's no problem changing them during the actual build Yeah, I had to do something to brace the IR receiver, as it was coming loose all the time! But now it's good, and looks better! -
[MOC] Swingloader Mark Two
D3K replied to D3K's topic in LEGO Technic, Mindstorms, Model Team and Scale Modeling
So, the hard part is done, the model is built and the steps and sub steps are placed! Now to get Lpub to play along with the rotation steps how I want it to be! Here is what it will look like on the final step though.. slightly changed the roof, yes! Also, couldn't find the crawler tires in MLcad....? -
The new pieces from the mindstorm sets actually are pretty close to what is used on real life armored vehicles, like tanks and IFVs.. Although they are there used mainly to protect the surface on which they drive, not for traction (weight and surface area is more than enough in most cases).. I just wish these new pieces came in black, not red:-)
-
[MOC] Swingloader Mark Two
D3K replied to D3K's topic in LEGO Technic, Mindstorms, Model Team and Scale Modeling
It is time consuming, but we're getting there! Main steps: 73 - total steps:281 ...so far But more than half way there now. These instructions will be a lott better than the ones I made for the tracked loader, with a lot of sub steps, and some arrows to indicate where things go. I am planning to export all the steps as images, and then make a proper .pdf using OpenOffice Impress. When I have made the instructions, I will disassemble the model, check the parts against the BOM, rebuild it using the instructions, and do the final adjustments necessary. Then I will add it to rebrickable, and you can have at it if you want to build it yourself! -
Looks awesome! Great work!! :thumbup:
-
Tunneler
D3K replied to KirTech LAB's topic in LEGO Technic, Mindstorms, Model Team and Scale Modeling
It's not very pretty, but then again neither is the real thing! Overall I absolutely like it! You have realized all the functions and then some, and created something truly unique! Great work! :thumbup: -
[MOC] Swingloader Mark Two
D3K replied to D3K's topic in LEGO Technic, Mindstorms, Model Team and Scale Modeling
Thank you all for the positive feedback, I really appreciate it! I note the things which are not too good, and will try to improve them (the cab that is). I already chopped it down two studs in LDD, and it does look better! But I think it might need some further redesigning as well! Also, to hear some of you would actually concider having the model in your collection, just gives me more energy to make proper instructions! Still learning MLCad, and especially the instruction making tools, and am slowly getting the hang of it. The instructions will be divided into modules (front, back, rear axle, transmission, cabin, front turntable setup and finally digger) So far I've completed the rear axle, and the front of the vehicle (the latter including some three sub modules), and this it what it looks like so far: and Minor mistake on the front I see, but will be fixed before the instructions are finalized Really have to finish this fast, as school starts next week!! -
[MOC] Swingloader Mark Two
D3K replied to D3K's topic in LEGO Technic, Mindstorms, Model Team and Scale Modeling
Thank you all for the kind words! Much appreciated! I too am a bit uncertain about the cabin, but mainly with the colours! would like some of it in white, but I have close to zero white parts! As for instructions; yes, I am currently building it in MLcad, and hope to get some sensible instructions out of that! Nothing would make me more happy than saomeone else building my MOC, and giving some feedback as to what it is like! For now, I have built it in LDD, it measures up to just over 1400 parts (not including the crane attachment), and here is the parts list (expected to be 99.9% close to the finished instructions. Quick notes: also needs either a AAA battery box OR a rechargeable LiPo battery, and two of the M motors should be replaced with L motors. You will also need a PF extention wire, and (optionally) two sets of PF lights. Also, some parts can be substituted (for example I didn't have the 5 x 0,5 black lever, so I used two 2 x 0,5 liftarms instead, and all the tiles and panels are of course purely decorative -
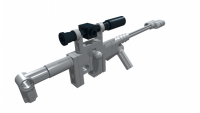
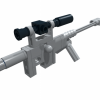
After I built my first big MOC construction vehicle, this attempt at a different kind of loader, some nine months ago (boy, time sure flies), I've been wanting to redesign it, implementing techniques and mechanisms I have learned since then, to make a better functioning, better looking, more professional build, without cutting so many corners as I did the last time. So without further ado, I present to you THE SWINGLOADER (mk II) Firstly, I had a pretty good idea in my head of how to make the setup with the PF motors, and stack the four functions I wanted on top of each other in as small a space as possible. This is the first try, which turned out okay, but neede some minor redesign during the course of the project: In the final version the top two motors are PF-L motors, that operate the lifting an tipping of the bucket (axles 2 and 3 from the top). The two lower motors are PF-M. One controls the two small LA's for turning the machine, and the other controls the turning of the digger (uppermost axle) The lowermost axle is of course the drive axle, driven by a PF-XL motor (not in this picture) Anyway, here is a couple of detailed model images and explanations: The first two shows pretty much every axle, gear, actuator and motor in the model (yes, the two top motors are IRL PF-L motors) This is the final setup I used, and as far as I can tell, is completely accurate to the final model. Here follows some pics of the individual functions First, the drivetrain and steering: The portal axle reduction gives it a nice and slow speed, but it can be increased both there, and from the motor and down to the axle. The twin small LA's gives it a nice and accurate steering (thanks again, jorgeopesi ), although I would have liked it a bit faster Also, I managed to implement a simple mechanism for a functional sttering wheel : It turns ~90 degrees to either side as the loader articulates Next up is a representation of all the three functions that go to the front: Swinging: Lifting: Tipping: And after all that was figured out, I just needed to build a shell around the thing and but on some wheels! So here it is as it stands today: TA-DAAAA: As you can see, I opted for a much smaller type loader, more akin to the ones you see on construction sites in the city and stuff, and maybe closer to the real SwingLoader brand of swinging loaders It might from the above picture seem like there is a lot of free space from the front of the loader to the bucket.. ...but this is why it has to be like that: This time around, finding a working linkage geometry didn't take nearly as long as last time (even though the entire digger is built from scratch). As you can see on the next picture, it really does tip nicely when on top The battery compartment opens like this, for easy battery replacement: And the doors open up like this, to reveal a IR-receiver/uncomfortable seat for the driver. Second to last, here is the mandatory under belly shot, nothing to fancy about it ...except for the fact that I now see I forgot to put in two 3L friction pins to attach the two yellow 3x5 L-shaped liftarms And maybe the setup for of the rear pendular suspension! I almost forgot about that Making it with two small turntables makes it extremely strong, both when it comes to supporting weight, and stress in the longitudinal direction! This is actually a key factor to the rigidity of the entire rear of the loader! :thumbup: And lastly (well almost, anyway), the tiny tiny tiny detail that makes me loose my sleep: The transmission of power to the lower axle here, as you can see, happens via a part that doesn't exist. That is the 24 tooth end of a 4L differential, that I had to sever from the rest of its body, to keep the lowermost gear from coming ever so slightly in contact with the small LA's when the loader is turning to either extreme. The setup works almost as smoothly with these replaced by 16 tooth gears, but just not quite... So to sum it all up: -Driven 4WD by PF-XL motor -Steered by PF-M motor, via two small LA's -Turning of the digger by PF-M motor, worm gear on turntable -Lifting by PF-L motor, via two LA's -Tipping by PF-L motor, via one LA -Sixth channel open for powered accessories (you can see the output in the last image) -Easy access battery box through openable engine cover -Strong pendular suspension on the rear axle -Four PF-LED lights -Openable doors to the operator's cabin -Adjustable mirrors -Unfortunately no PF-seatbelts for the driver this time All in all I am very pleased with the result, and will try to make a video as soon as possible to show off the functions! And as a final feature, I built a crane attachment, similar to the ones I've seen in pictures like this: Here it is, folded as compactly as possible: And here it is fully extended: As you can maybe spot from the above image, the crane and loader is ready to accept a powered winch somewhere, but I haven't gotten around to designing one that is easy on the eye. This is the reason I put the output from the sixth channel in the cabin, for future additions. And here it is lifting a sort of I-beam: Pheew There you have it! I think I covered most of it, but feel free to post questions, critisism, praise and suggestions on improvements! As I mentioned, I will do my best to make a video of it in action! Thanks!
-
Here is the compact transmission box to go from two vertically parallell horizontal axles, through a turntable. As you can see, it is only 5x5x4 studs, and very strong once it is properly braced (gears haven't slipped once in this iteration ), and that's what the axles are for. The base design can be modified quite a lot, when it comes to where to brace it (for example, you can switch the 2L axles for 3L axles and vice versa, and add pins and 3/4 pins in most pin holes). Anyhow, here is the .lxf of it if anyone would like to take a closer look
-
More or less done, both digitally and in real bricks Haven't gotten around to taking photos yet, but here is a teaser of the internals: Will make a full presentation when I have taken the pictures, and hopefully also made a video
-
Thanks boys! Just did this to get an idea of deimensions and freedom of movement: Of course it doesn't work at all, so I will try to implement the geometry from the Mk I.. Problem is I didn't make a proper LDD model of the old one! Oh well, many fun hours ahead!
-
SL Gabon: Studless Madness
D3K replied to Edwin Korstanje's topic in LEGO Technic, Mindstorms, Model Team and Scale Modeling
Also, to go from this: ...to this: ...in a mere couple of months (whilst working 60-80 hours a week) is as hard to wrap my head around as the actual size, weight and number of parts of your creation! I take my hat off to you! -
Small update on the Mk II loader: Firstly, I "had" to cut a brick to make this; As you might (correctly) say; "wouldn't 16 tooth gears do the exact same thing?" here is why it is like that: While the functions work just as good with the 8 and 24 tooth gears replaced by 16 tooth spur- and clutch gears respectively, the added diameter of the lowermost 16t spur gear will come ever so slightly in contact with the small LA when the loader is turned to either the left or right extreme. That's why Like I said, everything works with 16 t gears, and that's what I'll use in the .lxf and future instructions (if I get around to making some. As for the shape of things to come, I was concidering making a differently scaled loader, more akin to the smaller construction site loaders you see here and there. As you can see from the following picture, that gives it a completely different (maybe better ) appearance... As you can see, the most important thing is still missing.. Not sure wether to use a copy of the one from the last loader, or to make a new one..? Will probably go for a new one. Here it is turned max to the left: And here it is turned max to the right: I made a very easy to open rear end for the battery, while still maintaining a very rigid structure (much to do with the twin-mini-turntable setup of the rear pendular suspension. Not much of the body work is in it's finished state yet, as I am trying some different things.. Any input on the type of cabin / overall scale would be appreciated... I am really not sure on that at all... Anyway, it's off to build a digger apparatus to go with it, will probably be finished some time around christmas (megablocking z-link)
-
SL Gabon: Studless Madness
D3K replied to Edwin Korstanje's topic in LEGO Technic, Mindstorms, Model Team and Scale Modeling
How About a Small subsea installation, or hardware for a rig, or an ROV or a deep sea small submarine? the deck will surely fit pretty big stuff!:-) The model is absolutely mindblowing! -
simple lightweight rally car
D3K replied to nnamhcab's topic in LEGO Technic, Mindstorms, Model Team and Scale Modeling
The yellow one is driven by one pf-xl motor, and steered by one pf-m. When I built it, I managed to fit in a servo instead, without too heavy modifications. -
Thank you! After a small hiatus, school exams, moving to a new place and a small vacation, I'm now back at building a little.. Been wanting for a long time to make an updated and better version of my Swingloader, as I really liked the model, but it had a few serious flaws in the design. Firstly I designed a new transmission in LDD for the power to go from the motors in the back to the functions in the front: The old one used a lot of U-joints to centre the movement before the pivot point, thereby taking up an unecessary amount of space, and it looked messy. Then I continued building digitally to get an idea of the dimensions before starting to build IRL: I then tried to design a transmission for two axles to go from horizontal to vertical through a turntable in an as low as possible construction: And then I started building with real bricks: That is of course the back end, with two installed motors, and the transmission completed. Steering works very well (using the same geometry I got from JorgeOpesi), and all the axles spin like they should. All in all, a lot more compact than the first model, letting me design the entire vehicle smaller than the original, which is good!
-
Crawler Loader
D3K replied to legomuppet9's topic in LEGO Technic, Mindstorms, Model Team and Scale Modeling
Nonetheless I really like what you have done here!:-)