

Imanol
-
Posts
118 -
Joined
-
Last visited
Content Type
Profiles
Forums
Gallery
Everything posted by Imanol
-
Renfe 309 Shunting Locomotive powered with Circuit Cubes [WIP] [MOC]
Imanol replied to Imanol's topic in LEGO Train Tech
The powercar has a gearing mechanism connected to a standard PU train motor, I tested it with the gearing engaged and disengaged and the results were similar. Part of the problem might be due to the bogie connection to the frame being handled by the motor so it´s not very sturdy. The gearing on the powercar is 1:1. Thank you very much. I think is a somewhat obscure model due to only being 20 of them built and being retired quite early, I´m quite familiar with it as I lived close to one of the last ones that still survives with this livery. I still need to finish the livery angles with stickers to make it look perfect. The angles were quite complex, specially the way the rear surfaces are attached but I think it ended up quite good. I´m missing the cab side angles but it was almost impossible to do it without compromising the rest of the design. -
Renfe 309 Shunting Locomotive powered with Circuit Cubes [WIP] [MOC]
Imanol replied to Imanol's topic in LEGO Train Tech
The gearing is the same as the final render that I posted here, to summarize it, it has a 1:1.67 gearing ratio and the model weights closer to 500g (with the battery). I also tried pulling one of the power cars and at some point it was able to pull it but I think the resistance from the motor inside of it was too much and the shunter was struggling. I´m planning at some point to make a test car and add some type of weights to make it resemble the load of one of my passenger car designs and test how it works with it. Something I noticed is that there is no real speed difference between a light movement (without load) and pulling all of the Talgo Cars, the only difference is when trying to start moving. -
Renfe 309 Shunting Locomotive powered with Circuit Cubes [WIP] [MOC]
Imanol replied to Imanol's topic in LEGO Train Tech
Thanks, thankfully this project has been very smooth Thanks, it's one of my favourite schemes. It was applied to a lot of trains by Renfe in the mid 80s, at some point I want to do something bigger but the LEGO pieces in those colors are still very limited/expensive Thanks, I was also very surprised, but the cars have metal axles and less wheels than a conventional train so that might help -
Renfe 309 Shunting Locomotive powered with Circuit Cubes [WIP] [MOC]
Imanol replied to Imanol's topic in LEGO Train Tech
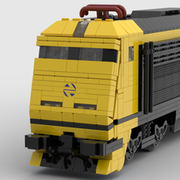
I´m very happy to announce that the locomotive is finished. It has been a very quick project but I enjoyed it quite a lot. It´s already equipped with the Circuit Cubes motors and I have checked that it moves fine. As always there were some problems with the design but thanks to all my previous mistakes I have the knowledge (and the parts) to solve them. I´m very impressed with the Circuit Cubes motor, I feel that is great for powering a shunting locomotive as they are not very fast but can pull quite a bit of load. It was quite a challenge building it in this scheme but I have to say that I love how good it looks. This is one of the main liveries that Renfe used during the 80s and was applied to mostly passenger equipment and in this case to the locomotive that was used to shunt around the passenger train cars inside the depots. I want to say thank you to you because at first I didn´t realize what was the issue you were pointing at, but then, while the designing the instructions I discovered that to remove the battery or motor I would have to remove the entire hood and cab. I redesigned it to make it possible to just remove the entire side of the hood without needing to touch the cab, only the front windshield needs to be removed. Right now, the only thing left to finish is to print the stickers (and finish designing them) and maybe in the future I will add lights to it. Here are some pictures and a video of it pulling some load: And here is the video, I´m really surprised it was able to pull all of the Talgo cars without much struggle, the only problem is caused by the guiding system of the end cars which requires them to be pulled and pushed at the same time: For now this is all I have, I might also think of building a small MOW wagon to pull around as it fits more than a full modern passenger train. Thanks, for the help Imanol -
Thanks, it was very crucial for me to make it work on R40 as right now I don´t have any room for a bigger curve radius. I imagine part of the reason that this train works is because is one stud thinner than yours so every single dimension has been scaled down. Even then, I feel this train is much more comfortable working on bigger curve radius, the overhangs when traversing a curve are quite noticeable. It was for sure not the correct choice for a first project but it gave me two important things, a lot of knowledge and a bin full of spare parts. The Rodal was entirely designed by @Hod Carrier, I just implemented it, but I´m amazed at well it works. I hope that will happen at some point, I think it will look impressive on a full size circuit. For now, I´m thinking of going to some events but only in Spain. Thanks, I need to share the merit with @Hod Carrier which was the one responsible for all of the running mechanism of the cars. With what he has shown me, I´m now able to work on other projects
-
Renfe 309 Shunting Locomotive powered with Circuit Cubes [WIP] [MOC]
Imanol replied to Imanol's topic in LEGO Train Tech
Since I thought about that I knew it was too easy to be true, and I have found why. The only place to put a gear that could engage the middle axle is the same place occupied by the 1x5 liftarm. And is not possible to add a bevel gear on that axle as it will collide with the 20 tooth gear on top. With this in mind I think I´m going to start working on a final design of the structure and preparing the instructions (I had several bad experiences with S-130 and floating sections). -
Renfe 309 Shunting Locomotive powered with Circuit Cubes [WIP] [MOC]
Imanol replied to Imanol's topic in LEGO Train Tech
I still have doubts about that, for now I will add extra gears to the order in case I really need to do it. Thanks for clearing that for me, I was just thinking about how it could be done for a real life mechanism so I didn´t have any real expectations about it working. For now I might start working on a final design as I don´t think the current one has any major concerns -
Renfe 309 Shunting Locomotive powered with Circuit Cubes [WIP] [MOC]
Imanol replied to Imanol's topic in LEGO Train Tech
It´s available through ldraw, then you would need to install it in Studio. I used Part Designer and I needed to modify the .dat files (is just text) to correct the path to the different dependencies and then add the connections. They are very useful and they don´t break the stability feature in Studio as many other custom parts do -
Renfe 309 Shunting Locomotive powered with Circuit Cubes [WIP] [MOC]
Imanol replied to Imanol's topic in LEGO Train Tech
I already thought of doing that but for what I´ve seen in my other train, a small misalignment of the gear can create a lot of trouble so I will leave as a last option in case the train is underpowered. I have also thought of maybe using some type of o-ring that could slide over a normal bushing but I don´t have any idea if the friction would be enough or if it will just slip forever -
Renfe 309 Shunting Locomotive powered with Circuit Cubes [WIP] [MOC]
Imanol replied to Imanol's topic in LEGO Train Tech
If I´m honest I don´t understand the need for blind wheels in this case (correct me if I´m wrong). I have already done a prototype of the wheel setup and I have confirmed that they work fine with a middle swivel axle. The only reason would be if that could allow for more traction but I don´t think it has any friction. At the same time, this train weighs like 0,5 kg so is on the heavier side and having a third full axle might help distributing the weight. The only issue I would love to solve is finding a way to power the middle swivel axle but at this point I think is almost impossible. Imanol -
Renfe 309 Shunting Locomotive powered with Circuit Cubes [WIP] [MOC]
Imanol replied to Imanol's topic in LEGO Train Tech
Yeah, the closest is size 5 so I see there is no option. The main problem with bigger wheels is that the support brics won't fit in the middle so I don't think is a good idea as it's going to require a full redesign. -
Renfe 309 Shunting Locomotive powered with Circuit Cubes [WIP] [MOC]
Imanol replied to Imanol's topic in LEGO Train Tech
I will just remove one of the walls, either the one that is attached to or the other one. I have a similar setup on my other train as is not a big issue, in fact it will be much easier to remove it. I might need to look at it. The 1st and 2nd axles are secured by liftarms so is not going to be a problem. Regarding the axle distance I don´t really now what to do as I want this train to work the same backwards and forwards so I don´t know if I want to take any chances, the main issue might be moving the motor forward as the battery is already attached only partially due to the front modified grill bricks. I´m aware of the strange axle size on the circuit cube, I have the Studio model with the same axle distance as the real one and it looks fine, in any case, I will look at it thoroughly. At this point I have conflicting ideas as if what @Shiva has mentioned about Blind Drivers of that size works I might want to keep the 5L axle and add another gear to power it. About filing axles, I have already made several 3.5L axles from 8L ones so I have experience on cutting and sanding. For now I will continue working on the design and hopefully getting it closer to a definite desing. Imanol -
Renfe 309 Shunting Locomotive powered with Circuit Cubes [WIP] [MOC]
Imanol replied to Imanol's topic in LEGO Train Tech
Okay, I´ve been working on the new design and fortunately it was very easy to implement into the previous frame. I was worried that moving the motor backwards would require to make room on the cab for the battery but I was able to just move it to the front: I was also able to found the correct ldraw file for the Bluetooth Battery although it really doesn´t matter. The biggest challenge with this design is making it able to attach to a odd number chassis but I think this solution is strong enough and allows me to keep the same attaching points: Lastly, this design contains a gear ratio of 1:1.67 (from 20 tooth to 12 tooth) which I think is more acceptable: I also overdid the connection for the 20 tooth gear using the 39793 technic connector as this was a big problem on my other train design. I would love if someone is able to spot any problems with the design to please tell me, although I think that this time I did my work. This is all I have for now. Imanol -
Renfe 309 Shunting Locomotive powered with Circuit Cubes [WIP] [MOC]
Imanol replied to Imanol's topic in LEGO Train Tech
I thought of that but apparently no one builds them for that size as they are usually used on Steam Locomotives which use bigger size wheels. After thinking carefully I decided to broad my search to include three axle bogies on locomotives and I found some promising leads. There is one design that can be easily adapted onto mine and that the only compromise that it has is that the middle axle is unpowered. It also has a gear reduction but is much more manageable: Bogie 3 axle - with floating mid-axle. From what I´ve seen this is one of the most used solution, usually combined with a 2x2 round plate or tile that acts as a blind driver, although I will prefer keeping a real wheel on the middle axle. I also thought about going back to a more realistic axle layout, but the main problem is that it needs to have the same footprint, as in the front and rear of the locomotive there are two tanks that are 1x2 so the wheels can´t be put behind them. To be honest, the main problem with that layout is that is not technic compatible as it has a wheel offset by 1/2 technic pin so it´s going to be a pain to make a strong frame for that. For now I will try and see how difficult is to implement a 2 axle powered design and see if it might be enough. Thanks, Imanol -
Renfe 309 Shunting Locomotive powered with Circuit Cubes [WIP] [MOC]
Imanol replied to Imanol's topic in LEGO Train Tech
I had already thought about using the correct wheel spacing of the real locomotive, but it doesn't work well with the technic frame. The Orient Express uses rods to transmit the power to the other wheels so even if the motor is only connected to one axle, the power is transmited to the other ones. There is ways of using a 1:1 gear ratio inside the frame, the main problem is getting the middle axle to swivel. In anycase, thank you very much for the ideas and the effort. Unfortunately I don't have access to Studio today so until tomorrow I can't test anything Imanol -
Renfe 309 Shunting Locomotive powered with Circuit Cubes [WIP] [MOC]
Imanol replied to Imanol's topic in LEGO Train Tech
The circuit cube is the only battery that is available in LDraw, in reality is supposed to be the bluetooth battery cube but it´s something that I don´t even mind as is just used to check the fitment. The 1x4 panel is put there to account for the cable connections as I don´t want to have any problems of bending the cable more than it should. I have already used the Sariel calculator but I didn´t realize that the worm gear was in there. I will need to look for a better design that will still allow for the swivel of the middle axle Imanol -
Renfe 309 Shunting Locomotive powered with Circuit Cubes [WIP] [MOC]
Imanol replied to Imanol's topic in LEGO Train Tech
Thanks, I didn´t think about the gearing on the worm gears, is there any exact formula to calculate it? I can change it for bevel gears but I feel the swivel axle is not going to work the same, I checked and it looks like it might require an entire redesign as the current design has the longitudinal axle over the main axles. Anyway, I will start looking for a better solution -
Renfe 309 Shunting Locomotive powered with Circuit Cubes [WIP] [MOC]
Imanol replied to Imanol's topic in LEGO Train Tech
I´ve been working more on the project and I have a better design that I think could work. I also decided to make renders instead of screenshots as they allow to see detail much better. With a small modification I´ve been able to fit the motor and the battery in the front hood: The motor needs to be sideways as that way I can connect it to the rest of the body without changing the gear ratio. At the same time the battery can´t be moved inside the cab due to the amount of brackets and supports that are required for each angled piece so there is no easy way of adding a second motor. I have also reworked the attachments from the technic frame to the body and now there is nothing that impedes the swivel of the middle axle: I´ve tested this design in real life and I´ve confirmed that it can run fine on R40 curves and that the couplers can also follow the same trajectory. At the same time I also took the opportunity to see if the tiles that cover the wheels had any issue with the swivel axle and I´ve confirmed that is also fine. For now, the mechanism is designed to be used with a 1:1 gear ratio of 16 tooths gears. In theory could me modified for 1:3 ratio but the 24 tooth gear doesn´t fit currently. So for now this is all the progress I´ve made, I´m still going to look how to maybe change the gear ratio as I might prefer something a little faster and I will also look at ways of improving the fitment and attachment of the components, specially the motor as right now is not very secured. I don´t mind doing something that is not pure LEGO in cases like this, but unfortunately the space inside the train is very limited and knowing how much effort took to fit the PU motor in my previous train even when that was much bigger, I don´t think is even possible to make room for all of this. As I´ve mentioned in this same post, the cab space is not available due to the brackets and supports of the curved pieces that form the rear and front with the same happening in the front of the hood. In any case, I might revisit some ideas like this as at some point I want to build some multiple units passenger trains, and as with all of my designs, I don´t want to remove any interior detail to make room for a full powered up hub. In fact, my (crazy) idea was to use circuit cubes for that, but knowing their limitations I think I might need another design. Thanks for all the help and ideas, Imanol -
Renfe 309 Shunting Locomotive powered with Circuit Cubes [WIP] [MOC]
Imanol replied to Imanol's topic in LEGO Train Tech
Wow, you are right. I added those thin liftarms brackets without realising that they were blocking the central axle movement. I will need to redesign the attachment to the main body. Thanks, I think I captured the real design quite well. Yeah, I already imagined that is going to be the problem. I´m hoping that maybe having three powered axles with friction bands might at least improve the pulling power. At the same time I saw someone using it to power the orient express with multiple coaches with just one motor. The slower speed I think I can take it, but I would like to have at least some pulling power. Imanol -
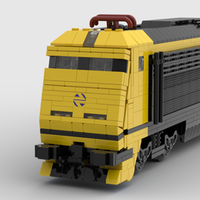
Hi, After just finishing the S-130 Project I´ve already decided to start a new one. In this case this is going to be the Renfe Class 309, a small 3 axle shunting locomotive from the 1980s. This quite a big contrast with the S-130 but I think is a perfect little project. This is the train in question: The main challenge on this project is how to power it, in this case I´m thinking about using Circuit Cubes to power the three axles. For the running gear design I decided to based it in the one made by @jtlan for his TP56 Switcher Locomotive as is one of the only examples of a 3 axle shunter that I found. Even with this base as a starting point is not easy to do this as my design is just 7 stud wide so I need to offset everything. This is a rough assembly that I have done for now: As it can be seen, the motor will be placed on the front and the battery is going to be right behind, the idea is to use them as counterweight for the heavier cab which is located on the rear just behind the last axle. And now it comes the part in which I ask for some help: Even though I have the design mostly figured out (I might need to make a prototype to see if it can work through R40 curves) my main concern is with the Circuit Cubes Motor and their power output and speed. This is a shunting locomotive so it´s not going to be as fast as the S-130 but even then, it seems that they are quite slow and might require a 1:2 gear ratio which can be simply added onto this design. My concern with this is that is going to become severly underpowered and wont be able to pull any load. I´m not expecting to pull something as massive as the S-130 cars but I would love for it to be able to maybe pull at least one of the passenger train cars that I´ve already designed (although I´m not planning on building them any time soon). This cars are massive with a weight of 1kg each, but those were the real load for this locomotive on the past. I´ve already tinkered with the idea of adding two motors but that will require a much complex redesign as I need to keep the middle axle powered through a worm screw to make it able to work through R40 curves. In this case I think there is enough interior space for me to not worry about it: I would like to know if anyone has done a proper test of the Circuit Cubes motors and knows their maximum load and speed. For now I´m going to continue working on the one motor design and make plans to order pieces for a small prototype. Imanol
-
Thank you very much, this has been a very long journey but I´ve learned many things throughout the process that I will be able to apply in future projects.
-
Thank you very much. The lenght of the train makes it look great but in this case is also necessary as the single-axle bogies need to be guided through the curves by the front power car, but without the rear power car they are so light that they will immediately jump the track. The design of the axles is the work of @Hod Carrier, to give you an idea on my knowledge about how they work, I only understood how they were supposed to move once I have then built in real life, it´s a very clever but complex design. Thanks Imanol
-
Thank you very much Oh, that´s for sure. I already mentioned that I´m waiting for the 1x3 or 1x4 chesse slopes to redo the door area, but who knows what else I will do. Imanol
-
Thanks, the trouble with the bogies is documented almost in it´s entirety on this thread, feel free to look at it, I can confirm it was one of the biggest headaches I had with the project. The roof of the engine and the doors were some of the latter additions to the train and I also think that they improved the look of the entire power car. Right now I´m waiting for LEGO to release the 1x3 or 1x4 cheese slope in white as that will allow me to redo the top of the door and make it sturdier.
-
Well, after almost 3 years since I started this project and more than 2 since I finish the first section, I can finally say that this project is complete (or almost). It has more than 5300 pieces, weights 4 kg and has a length of 2 m. I´m not going to lie, this was not the best project to choose as my first one but I think it has helped me learn quite a lot from all of the mistakes I have made during it. Since the last update in September I decided to ditch the transparent home printed stickers and go for something more professional ordering custom stickers, at the same time I decided to invest on rechargeable batteries as I went through two entire sets of AAA batteries just doing testing. Right now the train is able to move completely on it´s own on R40 tracks (I´m severely limited on the room available for the circuit) as it´s show on this video: The trainset is made up of 2 power cars (both of them motorized), an End Business Car, a PRM Business Car, a Cafe Car, an Economy Car and finally an End Economy Car. This was the only way of taking a picture of the entire train: The power car has suffered quite a lot of changes since I started the project, the main ones are the new bogie design (which is quite fragile) and the roof detailing: I also redesigned the end of the trailers as in real life they have a more rounded shape: The cafe car has some special characteristics, the most important one is that is the only trailer with two axles, which makes it possible to run the train. The second one is that the windows are much higher, in this case the are just below the roof assembly so the roof has less clutch power: The two new cars that were added since the last update are the Economy Cars. The End Economy Car is identical structurally to the End Business Car but the regular Economy Car has another set of windows on each side which makes it less strong (at least according to studio): All of the train has an interior, there is even a cab in the power cars. Below is the interior of the Cafe Car and the Economy Car, notice that in the second one the last row of seats camouflages the bracket assembly that acts as the interior structure of the car. I want to thank anyone that helped with this project, specially @Hod Carrier which is responsible (at least) for: the close coupling articulation, the entire internal structure of the cars and the design for the powered bogie. Right now there is only one other update planned for this project that is to include lighting as I think is a missed opportunity having a fully detailed interior that can only be seen through the darkness. I´ve looking at Light My Bricks as the design seems perfect to integrate without much thought but I will need to look further into the different offered components to see which might fit better into this design. At the same time I´m already planning a new build which is going to be the Shunting Tractor Renfe Class 309 that I also want to motorize. This is going to be another challenge due to the limited room available and the fact that is a rigid design with three axles so it´s going to require a swivel mechanism. I´m already thinking of making a small piece order to start testing on real life but I will leave more details for when (eventually) I made another thread for it. This is all for now, I´m hoping to make new updates sooner although I can´t promise anything. Imanol