Imanol
-
Posts
93 -
Joined
-
Last visited
Content Type
Profiles
Forums
Gallery
Everything posted by Imanol
-
Well, I ´ve trying to make it turn without moving the sideskirts but the problem is that as the turning point is offset it touches the bogie itself touches the front sideskirts, I tried moving the turning plate half a stud inward but then it touches both front and rear sideskirts. So the only way around is to find a way to attach the sideskirts to the bogie assembly and this implies dealing with the quarter plate problem, the only brick that covers this gap is the hinge brick without turning but is impossible to add it to the design so the only other way around is to change the bogie structure to be 3 studs wide which is the next thing I will try to do. If you have any other idea please feel free to talk about it. I´m now with studies so I don´t have a lot of time (and mental capacity) to deal with this problem but I want to have the prototype as soon as I finish but first I need to fix some problems like this.
-
That´s exactly what I´m trying to do, but the problem is that the stud conversion is not perfect so I may try to change the bogie structure to 3 studs instead of 2 as it might be easier to connect, nevertheless I will try your approach. May I suggest to try building the Talgo Avril, is the only High-Speed Talgo that no one has ever try to made and after seeing the Tfw Stadler that you built and your bogie mechanisms I think you might be able to pull it through
-
Well, I bring more bad news after solving the problem with the end car bogie rotation a new problem has appeared in the same area. The sideskirts and undercarriage of the moving part can´t be easily attached to the bogie assembly as they are displaced 0,5 studs in each direction so I need two jumper plates to connect it and the only part where I can is underneath. So for now all of that weight is supported by two jumper plates as is obvious that this will not work so I once again asking for help because this part is driving me mad. This is the structure of the bogie and car now: The maximum it can turn without moving the other parts is 9,03 degrees so is still very far from the 16 degrees that it needs Extremo Bogie independiente superior by Imanol, en Flickr Thanks for helping
-
Thanks, as you mentioned a 3 stud gap is not enough but I think this can be considered 4 stud gap (maybe even 5) as underneath the car there is space to turn. All of the pictures of Talgo cars that I´ve seen have the rodal in one side (underneath the car that is permanently attached to it) so I didn´t know about the S-112. The disc indicator i´ve seen it sometimes but I never imagine what it was.
-
Thanks, but I´m sorry to disappoint you but the upper link is not attached or at least not secure, the idea still is to look for a better attachment as it´s now attached to a technic brick and a headlight brick. Thanks, I will look into implementing it. I think here I´m going to keep the turntable but in the power car I´m going to go for the pin attachment as I think it can make it stronger
-
Thanks, all of you have helped a lot and all are essential to this project. I think in this photo it can be better appreciated, as you can see the side of the car covers part of the mechanism: Remolque Turista Renfe S-130 Prototipo Union Completo 2 by Imanol, en Flickr Well, I ´ve trying to improve the design of the individual bogie but I can´t make it turn more than 10 degrees and it´s driving me mad, If any one has any solutions please feel free to say it. The biggest problem is that the bogie assembly touches the static part of the undercarriage. The only way of making it work is removing part of the lower slopes as seen here: Bajo Extremo S-130 Bogie independiente by Imanol, en Flickr As for the turntable, it was in the original design, but I thought it was a weak link I will change it when I have a solution for the other problem.
-
Sure, Count me in!
-
Thanks for your help. I think I may have overreacted with the weight problem, for now the prototype will be built with Ferro-Friki´s design. This is how it looks with the two cars attached. Remolque Turista Renfe S-130 Prototipo Union Completo by Imanol, en Flickr As you can see the bogie is partially covered by one car but it doesn´t reduce the movement as is hollow. As for the intrusion of the link in the interior I´m trying to attach it on top, inside the roof but I don´t have a prototype yet. Talking about the end car bogie, how many degrees of movement (in each direction) will be needed for R56 or even R40 curves? my idea was to not sacrifice the aesthetic appearance. This is the current design of it, I don´t now if it will need to be improved Prototipo Bogie independiente by Imanol, en Flickr I will later take a look into that thread that you mentioned it looks very useful for the bogie of the Power car.
-
Thanks, the coupling system between power cars and the end cars is mostly finished but as I said the between car coupling is giving me nightmares as I don´t know if it will have the strength of supporting the cars with all the weight of the interior. I only have one thing clear it doesn´t matter if it ends being more expensive but the interior won´t move anywhere.
-
Well, I still don´t know how I´m going to do the car coupling but I think I have a solution for the end car coupling: LEGO Renfe S-130 Extremo Preferente Prototipo rodal by Imanol, en Flickr It can turn 4º but if I extend the coupling arm 0,5 studs it can have a turning radius of 7 degrees in each direction and still maintain the external appearance. Anyways, if anyone has any idea for the car coupling feel free to comment it.
-
Thanks for the pictures they will be useful, As for the question I mean if the weight of the car rests directly on the stand or if it simply hangs from it I think there will be problem with the extra weight. As for the links if you start making interiors I recommend you this other page: https://www.vagonweb.cz/fotogalerie/E/index_RENFE.php
-
Thanks, for the head and the coaches I used this two reference photos from Listadotren.com https://www.listadotren.es/galeria/verfoto.php?section=motor&id=5966 https://www.listadotren.es/galeria/verfoto.php?section=motor&id=6824 I´m noticing that everyone has problems with the rodal so I may try to find a new design or at least looking into alternatives. I have one question, your cars are directly in contact with the rodal? After making it in LEGO I can´t understand how it works so I may need help with that as it may help in looking for alternatives. As for the spacing i´m looking onto the possibility of making the end hollow in order to cover the space but I don´t know if it´s posible. The end of the car is worrying me but I don´t know how to make it swivel without creating a gap or having structural issues, as with everything I´m not able of having a prototype right now
-
Well, I have started making a prototype. I recreated the design of the rodal made by "Ferro-friki" and I have good and bad news. The good news is that it may work but there is a big problem (at least for me) the mechanism invades 5 studs of the car interior. This is a problem in the side with the door but is completely imposible to work around with in the other side as it covers a great part of the seating area. So my question is, will it work with only the lower link?. The lower link is integrated into the structure of the car. View of the upper link invading the interior: Prototipo Union Renfe S-130 by Imanol, en Flickr View of the lower link: Prototipo de unión vista inferior by Imanol, en Flickr If the lower link solution is not posible I think I will need another different solution. Thanks for all the help that I have already received.
-
Thanks, I´ve decided that I will make a prototype and then order pieces to make two cars. As for the power, the two powercars will be enough?, i´m also planning in making the set 5 cars long instead of 7 if that helps
-
Thanks, I know but I would need to order bricks and now I can´t so I´m trying to search for solutions
-
Thanks, as i said the ball joint is merely for aesthetical purposes. If I understand you correctly when you talk about problems with the length of the cars you refer to not being able to take normal radius curves?. I´ve seen other designs make the axles independent from the cars so I suppose thats why I checked other Lego Talgo builds but I didn´t find anything that could apparently support the wheight of the cars. My biggest problem is that I don´t have tracks or any rail pieces to test coupling or articulations. I think you are right about the issue with Stud.io stability checking feature as with some very basic tests it still shows a lot of stress.
-
Thanks, I´ve seen other mocs but my problem is that my cars weigh a lot due to the interior features and I don´t know if it could work the same way. Currently my only source for stability and structural integrity is the feature in the Studio program which may not be the best as coupling two cars instantly makes it think is super stressed
-
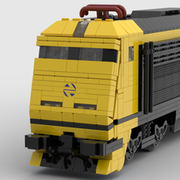
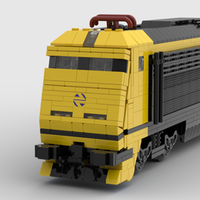
Hi everyone, I present to you my second version of the Renfe S-130 like Ferro-Friki did some time ago. I wanted to remake this train that I made first in 2018 with not the best result so I now made this version in 7 studs. LEGO Renfe S-130 DEF [MOC] by Imanol, en Flickr The set is heavily detailed even in the rear of the power cars and end cars LEGO Renfe S-130 Testeros Interiores [MOC] by Imanol, en Flickr I have made a reduced train set of only 7 cars instead of the 11 that has in real life but it has one of each of the different cars that form the real train with detailed interiors. First the "Preferente" end and "Preferente" LEGO Renfe S-130 Lateral Extremo Preferente [MOC] by Imanol, en Flickr LEGO Renfe S-130 Lateral Preferente [MOC] by Imanol, en Flickr The interiors of "Preferente" cars LEGO Renfe S-130 Interior Preferente [MOC] by Imanol, en Flickr The "Preferente" adapted car and it´s interior LEGO Renfe S-130 Lateral Preferente PMR [MOC] by Imanol, en Flickr LEGO Renfe S-130 Interior Preferente PMR [MOC] by Imanol, en Flickr The cafe car and it´s interior LEGO Renfe S-130 Lateral Cafeteria [MOC] by Imanol, en Flickr LEGO Renfe S-130 Interior cafeteria [MOC] by Imanol, en Flickr And the Turista cars which are the same as preferente but with 2+2 seating arrangement LEGO Renfe S-130 Lateral Remolques Turista [MOC] by Imanol, en Flickr LEGO Renfe S-130 Lateral Remolques Turista [MOC] by Imanol, en Flickr And now that I presented it I want to ask for help to build it as it will be my first lego train in real life. The car coupling mechanism that I have installed is only for aesthetical purposes and will not work in real life. Another problem is that i have seen many models in which all of the rear of the locomotive or power car pivots and I don´t know if it could be necesary to do in this case. Lastly I want to know how to motorize it, being so long I would suppose I would need the two power cars to provide power but I don´t know. Anyway, I hope you enjoy this project as much as I enjoyed designing it