

Timewhatistime
-
Posts
250 -
Joined
-
Last visited
Content Type
Profiles
Forums
Gallery
Everything posted by Timewhatistime
-
42147 Dump Truck
Timewhatistime replied to Ngoc Nguyen's topic in LEGO Technic, Mindstorms, Model Team and Scale Modeling
I'm pretty sure they added the 5L liftarm to avoid the "steering rack" (built of 3L axle and two connectors (with axle hole and pinhole)) from being pulled apart when playing heavily. Without the 5L liftarm these parts would losen or fall apart completely because they can only convey pushing; when being pulled, the connectors will move on the 3L axle, which will result in disfuntional steering. -
42148 Snow Groomer
Timewhatistime replied to Ngoc Nguyen's topic in LEGO Technic, Mindstorms, Model Team and Scale Modeling
So you are desiring some more functions...? Here you are! - I added a crane with winch (12 t gear on the crane boom) and a ratchet. Rotation is operated by the 12t gear behind the cabin (360 degrees). In order to drive the turntable by the 1L worm gear, a half-stud offset was necessary. - slightly modified the mechanism for the rear blade (with white 40 year jubilee liftarm) - had to change the mechanism for the front blade angling - now it is operated by a grey liftarm instead of 12t gear (like the two other original functions) - added a steering wheel (Do snow groomers have steering wheels? I don't know...) and some lights as well as a substitute (red driving ring shifters) for the cabin's doors (instead of new panel which is to be released in january 2023) - found another solution for the front blade due to lack of the black 3 L panel in the center Pictures will be available here soon (it takes some time on brickshelf): https://brickshelf.com/cgi-bin/gallery.cgi?f=585395 -
Rotating Paddles
Timewhatistime replied to Charbel's topic in LEGO Technic, Mindstorms, Model Team and Scale Modeling
Very great solution! There seems to be a small mistake/inconsistency in the pictures: The hole of the connector No. 2 in front of the device sometimes is orientated vertically (and holds a pin) and sometimes is orientated horizontally. The former orientation seems to be correct, imho. -
As I already stated in my topic about the 42093 C-model, this set is great for alternate builds. (Though it is annoying that there are so few gears for making technic functions.) My latest 42093 alternative is a vintage race car. While building it, I had in mind the famous "Silberpfeile" from the 1930s. I started with the front with its bent flex axle, and the other parts followed. I really like the new Panels (small wheel arches), especially when used for alternative purposes. The number of technic functions is limited due to the number of gears, but there is a working steering wheel and the V6 fake engine, a usual. The bonnet at the rear can be opened, and I created some accessories from the leftover parts: a movable car lifter, a flag (not checkered in white and black, but at least in black), a stop sign (with trans-red pieces), and a podium for the drivers who achieved the first three positions in the car race. Besides the working steering wheel, there are pedals (fake) and a racing seat with lateral pieces to hold the driver even in narrow curves. The car lifter has a simple locking mechanism to hold it in the upper position. The stop sign and the flag can be stored in a simple mount. It took me about nine hours to build this. There where some attempts to combine the car lifter with the stop sign, but they weren't successful. More pictures: http://www.brickshelf.com/cgi-bin/gallery.cgi?f=576963 Now heading for the E-model, the F-model, the G-model etc.... ;-) I appreciate your comments!
-
The other day there was a good offer in a shop nearby, so I bought the set 42093. I knew about the fact that it has barely any technic functions, but I really like the orange parts, espacially the new 3x11 panel. Besides that, I had the premonition that this set might be very suitable for some nice and compact c-models. The first attempt did not succeed, but after looking at the parts for another time, I created this Trike. More photos: http://www.brickshelf.com/cgi-bin/gallery.cgi?f=576819 Functions: - steering - fake V6-engine with that funny sound - detachable box, which can be placed above the engine. It can hold a picknick for example: Two balls for playing in the sun, some Bottles, two black chocolate-muffins and a weird blue donut ;-) (so the amount of technic functions is comparable to the original 42093 Corvette... ;-) ) It does not use all the parts of 42093, and even in that characteristic it reminds me of the 8842 c-model (Go-Kart -> Trike) which I once found in the great idea book 8890 many, many years ago... Please feel free to leave your comments!
-
Sorry, folks. I was wrong with my comment about the outriggers' movement in 42082. The way shown in the picture is correct, of course. Both outriggers will move simultanously. My fault - blame it on the early morning and my night shift. ;-) But I stick to my opinion about the idle gears feeding the large LAs... I'm curious about your comments and ideas.
-
Thanks for the great review just in time. We all have waited for the new 42082. I believe you made a small mistake in the outriggers shown on the Picture. the 12 T bevel gears should not be positioned symmetrically. In the way they are shown in the picture, one outrigger will be raised while the other one will be lowered. Just one addition to the interesting discussion about the big LAs which already was an issue in 8043. The axles feeding the LA don't have to be reversed. The 20T grey bevel gears are idlers. Their positions do not have any effect on the turning direction of the LA feed.
-
Z-bar linkage help
Timewhatistime replied to jorgeopesi's topic in LEGO Technic, Mindstorms, Model Team and Scale Modeling
When building my bucket-loaders/swingloaders (e.g. http://www.brickshelf.com/cgi-bin/gallery.cgi?f=566905), I had to deal with these issues, too. For me, it's the most annoying part of the whole model, and I solved it by a lot of trial and even more errors. The big disadvantage of the Z-linkage is the fact that the bucket is not balanced while moved vertically. So you always have to activate both (pairs of) cylinders (LAs, respectively) at the same time - otherwise the load will be dropped while being lowered. Does anyone here have a clue for this issue? The alternative for the Z-linkage ist the P-linkage (like in 8455 or 8862; the P-linkage provides the bucket's balance by itself (if constructed correctly). -
The first attempts included your steering mechanism, upgraded with suspended and driven axle - based on the big turntable (60 T). But I have to reduce it - this is too much. Maybe it's possible to include suspension - but a driven axle will cause too much Problems due to the angle an the momentum which occurs when steering is done.
-
Congratulations to Didumos for the "fire ant" and the instructive phase of invention and improvement I built it yesterday (with the great instructions) and am impressed by the very clever use of the angles. There are a lot of obvious and hidden triangles - I am not sure, if I already realized all of them. The rear part and the rear axis are the parts I like most. It is very stable, and the "dog bone"-parts (I did't like them until yet) are fixed and secured very well. Long live the pythagorean triangle! The use of the small panels is another higlight, especially the ones at the driver's cabin. The "fire ant" inspired me to work with this steering mechanism as well. Another very creative part is the use of the 13 L steering rack - not for steering purposes! ;-)
-
While working on another fire department truck, which I will present you soon, the idea for a neat small vehicle came to my mind. So I interrupted the other building process for ten minutes and created this fire department turntable ladder. http://www.brickshelf.com/cgi-bin/gallery.cgi?f=572608 I consists of 24 parts (26 parts with nozzle and "water" as shown on Picture above). Maybe we can renounce the mandatory video this time... The picture with the bottom view will reveal all the intricate mechanisms ;-)
-
Paul, could you allow us a glimpse into the interior of your shifting module?
-
@LvdH: Unfortunately, there is no frictionless axle pin among the spare parts.
-
Hi there, after thinking a while about a possible c-model I found one that needed just about two hours... the main idea was to build a smaller sized version of the dump truck which is included in the 42055 set (very similar to the 42035). The dump truck runs in a double wheel made of eight annular gear quarters. It is driven by the XL motor. The big wheel can rotate in both directions, so the little truck will drive either uphill or downhill - just like a hamster in his wheel. That's all. No gearbox, no gimmicks, no intricate mechanisms. Just for fun... might be a rate of about 3 % of the 3,900 parts... so there are enough spare parts for some more modifications and additions ;-) (maybe a gear box after all, or a more sophisticated array for the counterweight). http://www.brickshelf.com/cgi-bin/gallery.cgi?f=569964 (One of the biggest challenges in this c-model was the fact that there are only three tan-coloured axle pins - but the truck needs four wheels. So I used a dark red 3L axle with stop for the rear wheel on the right side (not visible on the pictures). ;-)
-
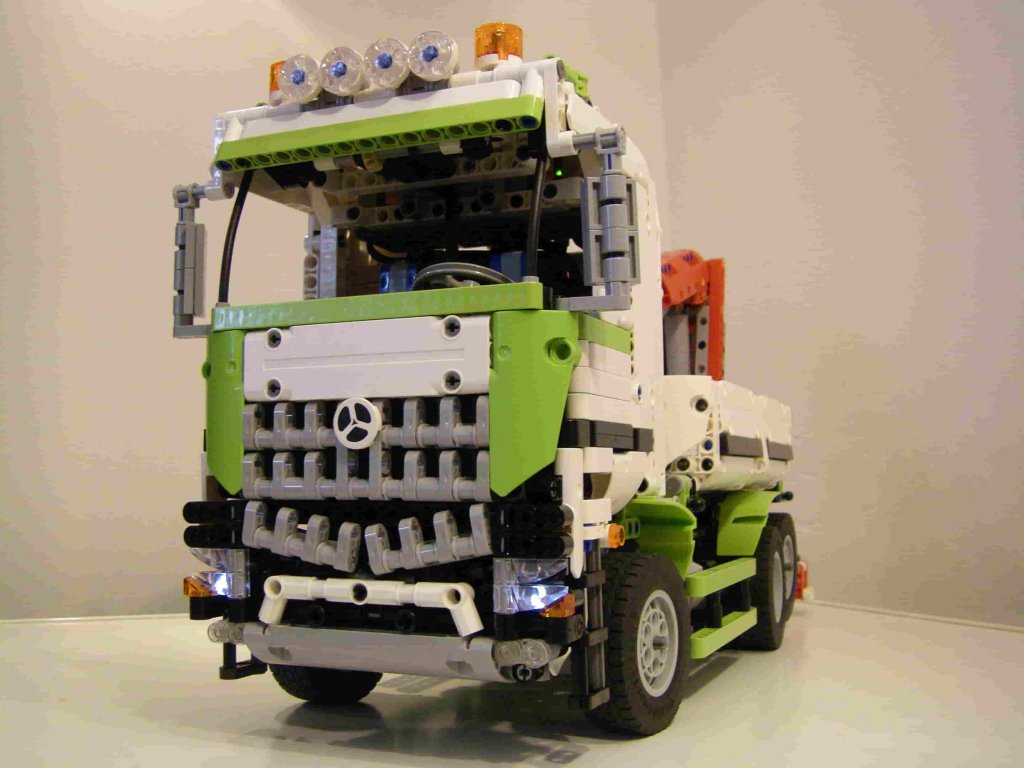
In the first two weeks of the new year I built an improved version of my Arocs with crane. The interior has been simplified, and I guess that the parts number has decreased. The functions are the same as in the predecessor. The Extension range of the stabilizers has increased due to the 14L gear racks from 42043 (the predecessor used the 13 L gear racks). The crane's base is the new turntable a much more rigid. The cabin has nearly been left untouched; the crane was improved a little bit. The colour scheme has stayed the same, obviously; I achieved to Mount more mud guards in my favourite colour ;-) The new brickshelf link will work in a few days (I hope): http://www.brickshelf.com/cgi-bin/gallery.cgi?f=569145 Sorry, there will be no video. Motorized functions in "driving mode": - Steering (M motor #1); the steering whel in the cabin moves when the truck is steered - Driving (XL motor); the two beacons on the cabin and the beacon on the rear bumper are turning when driving; there is a front PTO for further attachments) - Lifting of rear axle (M Motor #2) (it steers while being dropped; it's locked while being lifted) Motorized functions in "crane mode": - turning of crane (M motor #1) - Elevation of crane boom (XL motor) - Bending of crane boom (M Motor #2) Motorized functions in both modes: - front lights - Stabilizers (at first, they are pushed out; after that, they are lowered (controlled by rubber bands) (M motor #3); the stabilizers' drive is connected to control three driving rings (red) in the center of the truck that change between "driving mode" and "crane mode" (I adopted Pipasseyoyo's principle from his "Recovery truck with crane") - extending crane is possible in both modes, but makes sense in "crane mode", exclusively (M motor #4) Manually controlled functions: - tilting of cabin (easy accessible battery box) - tilting of cargo bay (left or right); locked by a simple mount - cargo bay's sides can be opened (both left and right) - cabin doors can be opened - seat at the crane boom can be detached All motorized functions are secured by a white 24t gear, except for the drinving. The crane's extension ist secured by a linear clutch which works very well. After having taken the Pictures I instantly followed the proposals: I used 4 L axles with stop for the steered wheels (both front axle and rear axle). On the Picture you see an 0.5L overlap. It is now hidden by grey 3x3 disks, which looks eben more realistic.
-
Once again @Erik Leppen: You asked for some description of the mechanism for steering and liftig of the rear axle. I just disassembled the Arocs and took some pictures for brickshelf that will illustrate the mechanisms. http://www.brickshelf.com/cgi-bin/gallery.cgi?f=566910 Before I took it apart I built a new and improved Arcos. The cabin is the old one - the rest is freshly constructed. I will take some pictures in the near future.
-
Once again @ Erik Leppen: You are right, there is no mechanism for raising the bed (see description above). You have to loosen the correct locks on the right side or on the left side, respectively. Than you can tilt the bed to the other side. There is a post that keeps the bed in tiltes Position (manually, as well). The middle axle is a Little bit wider, due to the double rims and due to the space I needed in implement all the mechanisms (espacially the liftin mechanism for the rear axle). I noticed the fact that is a little bit wider than the front axle and the rear axle - but I didn't mind as I realized that it corresponds to real trucks. They also often have an axle that is a little wider because of the double rims.
-
I like it a lot - and even more when I saw that it's a C-model of 42043. The buckets combined with the battery box and the creative usage of the two DBG gear racks in the boom are done very well. The fact that 42043 contains only two worm gears was quite a big challenge, we all can believe that. One question: There is a linear clutch beneath the boom to limit the torque a the final positions. But does it provide enough torque for complete boom extension?
-
@ Erik Leppen: Thank you for your Feedback, both positive and negative. I do not plan do disassemble the model, so it is still built up. Yes, the outriggers have a dual Motion driven by just one motorized function: The outrigger is pushed out by the 13 L liftarms with teeth. At a certain point the second liftarm at the bottom will lock, so it cannot be pushed any further. But the 13 L liftarm with teeth is pushed a little more, so it causes the L-shaped liftarm (5x3) to sink down the "foot" of the outrigger. A rubber band makes the correct order: First step: Pushing out - Second step: sink down. The function of the rear axle (lifting/steering) I have described in the original post. The lifting is achieved by two 2 L liftarm (+0) which are turned by about 90° by a motorized function. When turning, they lift the rear axle for about one stud in height. The steering is achieved by a knob wheel which is linked by some levers to the steering function. The knob wheel turns about 45° degrees left or right, respectively. By that, it makes a pin (see picture) travel, which is mounted on a conventional steering mechanism (see pictures on brickshelf). The pin fits pretty well between two knobs of the knob wheel. When the rear axle is lifted, the pin lifts from the gap between two knobs. So the pin won' be travelling any more, when the knob wheel makes it's turn.
-
Sorry, I'm not on YouTube. I wonder why a video seems to be so important. The truck can drive, steer, move the crane in the described way - just like the Pictures show... (And it makes the usual noise everybody who builds with powerfunctions knows.) The brickshelf link should be available in a few hours. Everybody who uses brickshelf knows that it will take some time and cannot be influenced by the user.
-
Hi there, some of you might like my recent project: By the 42043, Arocs seemed to be a MUST in Lego Technic. Since i criticize a lot of things in the buyable 42043 (too high; stabilizers at the wrong place and not fully motorized...), I decided to build a Thing I consider to be... maybe not better, but different. There are no pneumatics involved; everything is done by machanics and linear actuators. The Arocs-front is differently styled than the 42043. Motorized functions in "driving mode": - Steering (M motor #1); the steering whel in the cabin moves when the truck is steered - Driving (XL motor); the two beacons on the cabin and the beacon on the rear bumper are turning when driving; there is a front PTO for further attachments) - Lifting of rear axle (M Motor #2) (it steers while being dropped; it's locked while being lifted) Motorized functions in "crane mode": - turning of crane (M motor #1) - Elevation of crane boom (XL motor) - Bending of crane boom (M Motor #2) Motorized functions in both modes: - front lights - Stabilizers (at first, they are pushed out; after that, they are lowered (controlled by rubber bands) (M motor #3); the stabilizers' drive is connected to control three driving rings (red) in the center of the truck that change between "driving mode" and "crane mode" (I adopted Pipasseyoyo's principle from his "Recovery truck with crane") - extending crane is possible in both modes, but makes sense in "crane mode", exclusively (M motor #4) Manually controlled functions: - tilting of cabin (easy accessible battery box) - tilting of cargo bay (left or right) - cargo bay's sides can be opened (both left and right) - cabin doors can be opened - seat at the crane boom can be detached It took me 490 hours within 14 month to build it. The stabilizers were the first thing to be built; the other stuff was quite a long process with a lot of re-starts and improvements, espacially the crane, which has quite a bunch of precursors. To avoid malfunctions caused by mal-operations, every function is secured by white 24t gear which will slip in case of too high torque (or another construction with the same effect in case of boom extension), except for driving function. Now I'm very glad with it. After taking the photos, I re-designed the seat and the fake control elements at the crane boom, but I didn't take new photos for this marginal note. Brickshelf link: http://www.brickshelf.com/cgi-bin/gallery.cgi?f=566910 I appreciate your comments!
-
Sorry, at the moment I don't have the possibility to make a video to show the operation of my mechanism. But because of the simple construction without any external frame, it should be easy to build it and test it. I noticed that rubber bands get old over the years. And I don't like them - just like everybody here, as well. So I chosed the shock absorbers (brunojj1 will understand me). Yes, Didumos69, this is quite odd, I have to admit! :-) (But I don't have to hide in terms of oddity, when it comes to comparisons with the original 42056). brunojj1 asked what happens, when you make only half a shift: Due to the 90°-limiter, which I just adopted, there will be full shifting or no shifting, exclusively. The crucial point is approximately pushing the balls 1 stud (no pun intended!). When you push them less, there will be no shifting. If you push them beyond this point, the 90°-limiter will make a complete 90°-rotation, which will result in shifting one gear up or down, respectively. Didumos69 asked how far the Levers with balls will travel to make one shift: It's about 2 studs - quite comfortable for HoG-Shifting, I think. Obviously, it depends on the length of the yellow L-shaped liftarms. And: Yes, you have to push them. Of course, you can transform the pushing into pulling by some levers, if you like better. But for me, it appeared more comfortable to push when thinking of HoG-operation.
-
Hi Folks, I've seen the numerous threads on eurobricks.com which deal with improving the 42056 Porsche, which I really appreciate. I'm quite astonished how Lego could launch a set with so many obvious mistakes - but this way it's a big issue in modding. Maybe you and the other Lego constructors can use the following llittle idea on your way to the ultimate playable Prosche. I thought a bit about paddle shifting, and I don't like rubber bands, especially when they are visible. Furthermore, I intended to avoid any bulky mechanism and wanted to keep enough space for a steering wheel with inclined axle. It is very reliable and maybe could be improved for a HOG-application. Paddles can be attached easily – or everything you want. Also, it will be easy to mount a lever for backward-forward-motion or left-right-motion instead of the two paddles. http://www.brickshelf.com/cgi-bin/gallery.cgi?f=566384
