

cehnot
-
Posts
436 -
Joined
-
Last visited
Content Type
Profiles
Forums
Gallery
Everything posted by cehnot
-
Thanks for this video link. That sure is a nice model.
-
I have to admit this one makes mine look a bit dated. I see a lot of great solutions and I think I may fuse the two designs together for my next ship. Great job. I may need to build tour ship just to figure out how you solved that fuselage. The next thing I love is your solution to the bottom. I love the fact that you don't have to add or subtract parts to make the landing gear work. I simply gave up on my design.
-
Go through the whole thing. I offered a link as an update and plenty of instructions on mods done for this x-wing version through the 6 pages. Thanks. For those who may not understand it, are you able to take off the side panel and show them your inside view of it? I Did this for those confused by the instructions.
-
How stable is it? Is the bottom now a solid piece instead of those frame pieces lowering down to make the center seem taller? Looking at what Marshall did, the bottom appears solid. Looks like you are making it quite strong as well.
-
Would you please share your modifications to your side panels? I think I know what you did, but if you could do an exposed photo or a photo showing the parts from the inside or back of the side panel. Looks great. I didn't even think of those cannon ideas you did. Please feel free to do a tutorial for people in this thread. I went with a custom design with lots of custom parts, but I think this option will work best for purists. That is a great looking X-wing. I am excited for the new 2018 X-wing LEGO is doing. I cannot wait to use the stickers and parts on my version. I plan on doing a series of x-wings (rogue 1-5).
-
I pushed down the 2x2 gray plate away from front nose since it holds up, it gives it a bit of a gap, but the top aligns with the side better. The landing gear on the front just attaches to the white bottom plate. The back landing gear fits inside the engines. I would take the 1x1 gray cheese wedge out. You can make a 1x4 red tile fit there and it sorta keeps the sides on. Bottom Gear: Take off the half cylinder and attach the gear as follows. Should work just fine. Front landing gear is attached only using the hinges and white plate. I didn't put a lot of effort into placing the landing gear inside since it was for display only. The side 1x6 tiles are attached with a round hinge top. The side 1x4 tiles. I chose to change them in order to make it Red 5 style. I took the 1x6 red tile out and made it 2 1x4 tiles. What I may do about that gap on the nose you asked about, I may use the new 2x2 lego part 33909 plate 2x2 with reduced knobs, then use a cut down hinge to fill the gap.
-
Hope this helps... The nose, in question. I cut down a hinge to make the space filled. Same technique as what I did in the wings. Gears: I forgot to mention since my last update I did the following mod to the gears to make it work better: the 2 stud axle concept works if you take out the longer axle from image 2 and replace it with a shorter one. You need to use a shorter axle so the one on the right doesn't stick out so far. This will allow you to keep the original black 2 stud axle without cutting it. Th This is a cut down axle, you do not need to do this in my design. I did it as a placeholder for me when I decide to build a stand.
-
The gears offer 2 ways to make the thing work. I designed it to be one or the other. 1 way is to have the gear go to the back of the x wing and use the 2x2 round plate to open the wings. I also made the gear have the ability to switch to a vertical option where you can make it work with a stand or have the gear go to the top and turn from there. The gear box and s foils have to be put together at the same time. I used my lap to hold the wings together while placing the gears in correctly so that the lego parts line up correctly so the wings open properly. This too a few times to get right because the wings require both the top and bottom gear to line up perfectly. I am not sure what parts you need to glue. I can take a few photos of the middle to help you out.
-
Interesting take on the main hex shape.
-
LEGO stores (USA) have a double points program going on until Sunday. I just purchased my Millennium falcon and got 1600 points. This will not include any new LEGO purchase such as the new Y-Wing. But, considering they had 16 UCS Falcons in stock for the event, I could not pass this opportunity up. They also gave me a free Darth Vader mini bag kit. Now I need to think about how I want to spend that $80 in points next time.
-
Doesn't the LEGO team work with the original designers to develops the final project? Based on the video review it sure sounded like they went back and forth quite a bit in order to nail the design.
-
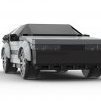
Those parts are transparent dishes with printing on them. The hollow part is the fact you see through the dish. They are using round plates. If you watch the teaser trailer you can tell how they made the wheels.
-
I am trying to figure out how they made the set 230 pieces. I looked the images and figured out the display base is 30 pieces each. The minfigs with accessories and hair are 22 bricks (if you do not count hands). That means the light cycles are 70 pieces each. I tried to duplicate the set in LDD and keep coming up with 144 pieces. Because the cycles have rotating wheels I used technic bricks and pins, with a 3 wide bar inside to hold the wheels together. Most of the set is visible so I am not sure how they got the light cycles from 81 pieces to 70. If I take the bar out, one side of the wheel falls off. My assumption is I am somehow using more parts that they are in the wheel design. I know it releases in a few days, I just thought it would be fun to figure out the build. You can see the LDD file I did on my account. Light Cycle LDD file
-
They did custom make a new helmet, offer several parts in new colors and best of all, still designed a display base for it. Appears to show the wheels do spin. I didn't expect that. For 230 pieces I would expect most sets to be fairly priced at $25. Considering all the design, new elements, new colors, and pad printed pieces I am happy to pay the extra $10. This set may inspire me to add to the theme with a 15 in tall Recognizer (LDD design in progress). I may do a grid base display to fit this as well. The nice part about the custom face prints is that you can take pre existing printed pants and torso pieces to make their real life outfits. Kevin Flynn can be made using old Luke parts.
-
It appears that the wheels to the light cycle are hollow. We may be able to use the curved tiles instead of the dish. The more images I see the better I like this set. I am happy to see that the set comes with a light trail. I cannot expect it to come with a display stand, unless they do something similar to the Ecto-1 set. I plan on building a nice display for it. Surely this set is going to release official images this week. We are two weeks away from launch.
-
 Thanks, I am famous now. I love doing this option every time I build a model to check myself. I get these questions a lot since I have done LDD models. I will share this link because ypu simplified it.
 -
The LEGO Facebook page posted a signing event for the Tron set for March 29 and the official set release on Saturday, March 31.
-
I am sure thy are using PUNS, but they did say Clu on their Facebook page. "We changed the algorithm on this one…need a Clu? Coming soon!" I would love this set sell really well beyond they expected like Ecto-1, enabling them to justify doing a companion set staring Flynn, Clu and Tron in Retro attire. That would be awesome and small enough for us to buy without breaking the bank.
-
I agree the new set actually makes it look skinnier. The design works and they might be adding a light trail using window panels. I wish they had a Clu and Flynn. I would spend an extra $10 just to have those added.
-
I wish they created new discs, but it looks like they are a 2x2 round tile. I plan on getting a few of these sets and modding it. Great figures, excited to see this in stores.
-
You beat me to it. I use that guide each time I upload. Some people uploaded the file to studio and was able to download a list. Not sure if studio has all the current parts, but it is also worth a shot.
-
I think you got the back done. I like this solution and glad you went and did this. The third option makes it look correct, yet the least distracting. All these mods are helping this model out tremendously. I look forward to seeing pwople tackle the bottom. I think I would somehow tackle the gun turrets and resize it.
-
I'm quite pleased with those pad printed pieces. I think I will buy some for those consoles. I wish we could buy them individually. I will be physically building corridors instead of using those panels. I would be more than happy to sell the corridor panels. I don't need them. I understand why you like the other. I appreciate trying the suggestion. I think I will use this as my preferred choice. Both look great.
-
All good points. I am taking a break from this project to finish several others. Maybe I will have better solutions later as I think about the cairns in the back of the base. I did go to Lego store to view the falcon, since I currently do not own one. I plan on using it for parts. I think I will take the falcon and combine it with Marshal's version. Both are within 4 bricks of each other so I cannot unseen the huge difference his version does and achieves. I think having the official printed cockpit and such will help mod Banana's version quite well. I would love to make it have a full interior, but frankly I care more about proportions and how it would look displayed in the hangar or on a shelf. I do plan on doing an LDD file with the conversion so everybody has a chance to build the ship I do. Whether I can physically build this huge base in the future, I will at least have the base built in LDD. I think it would be lovely to do every single room of the base and make the whole thing modular. This would be a great community project for a convention. I could imagine that 4 to 6 people could easily build the hangars, and some of the inner rooms. Based on my math Echo Base would need to be 35 x 30 + baseplates (48 stud plates) I could be wrong. The transport hangar along is about 3 times the size of Hangar 7. I wish somebody did a cargo transport to scale. That would need to be 6 to 8 feet long I think. Not sure of the size, never did the math. If only I won the lottery, I would invest in doing all of echo base myself and try to get it housed at a lego land or somewhere people could see it in public.
-
Personally I think the top left works best. I would fill the gap with a small cut blueish gray host in-between the LEGO part 92690 Shaft with Cored Knob. If you wanted to make it have a nice horizontal dimension, take a hose and use a hammer to flatten it in those area between the gaps. The fact it narrows only in-between the gap area may work out to your advantage. It will keep it raised from the blue round plates, but also maintain a 3d effect. If you want it to stay in place, I used a drill to make holes in my flattened hoses before the same size of a bar. That could allow you to slide a cut hose inside and create a ladder effect. I did this on my x-wing ion cannons and it holds up very well. All you need to do is flatten those areas out. the width of the flattened area is much larger than the width of a hose, so you should have no issue with making holes. This should hold the whole thing in place and look awesome for this great engine. I debated buying this, along with other printed sets from there. Can you share with us the quality of the printed pieces upon arrival? I worry it will be quite a bit different in quality than the official pad printed stuff.