

cehnot
-
Posts
436 -
Joined
-
Last visited
Content Type
Profiles
Forums
Gallery
Everything posted by cehnot
-
The Libyans VW 1973 medium blue bus was developed originally in November 2019. I just modified it. This vehicle was based on another VW and then altered about 30%. I need 6 parts to complete the physical build. This was an expensive vehicle since medium blue is not as easy to obtain on several parts.
-
The car doesn't fit inside the van shown above. Those wall panels are too thick to allow the car to slide into the vehicle. I did make an alternative version where the walls are made of tiles held in place with brackets. Ideally I wish they had a 6x16 tile without the studs. I did another version of vertical 1x6 tiles, but the last 8 studs do not connect to the bottom and would probably be too flimsy. Here are some photos of the model with a 6x16 modified tile. The only parts that doesn't fit inside the van are the rear view mirrors i did on the side of the car. They would need to be removed if you wanted a car that fits inside the van. You will notice I had to remove the plate rail details to make this work. Based on how I connected the tiles I know for a fact the 6x6 tiles would work as well, but they do not make any in white.
-
I am slowly buying parts. This is over 2000 bricks for just the garage.
-
What started out as a wall display for my new 2020 six-stud wide Time Machine, ended up being a whole parking lot with Burger King currently in production. This project keeps getting bigger each time I return to the file. For now, I present to you the finished Doc Brown's minified scale garage complete with opening garage doors. I may need to update the file since I last worked on it to modify the front gate, but overall the model looks fantastic with all the play features from the first film. In order to design this doc I used deleted scenes, screen stills, replayed and paused scenes, researched production stills and gathered as much info as I could from BTTF fans and collectors in order to properly scale this and get the final dimensions to work in LEGO. In order to recreate the parking lot I used google maps to properly promotion the Burger king and lot. I had a friend go and measure the actual garage in California, found blu prints with pre production nots on how the final set was changed to fit and match the actual garage. Hint: you never see the rear of the exterior so Doc Brown added on a bathroom in the back sometime in 1955. This model features a removable roof for access to the interior. The elements from 1985 in their proper location, a hinge in the shelves to blast Marty into the boxes and shelves and recreate the falling over effect. Anyways, onto the renders. The Exterior: I realized I may have selected the fence and accidentally slid it down too far on the left when placing it upside down. It should not be crashing into the bottom fence. As I keep expanding the location set I am reminded how difficult it will be doing the interior of the 1980s Burger King when there are no photos of it. So many similar design photos so I may just build the roof and call it done. Ideally I want to make it as accurate as possible and I'm sure I could try to find the franchise owner and ask if they could get the original blueprints for that era or photos and I am sure Burger King keeps all that. But, for this project, I wanted to make sure the movie favorite location was handled with proper care. The Beautiful interior: That shelf seems sturdy for now. Einstein.. where is he? That is Marty's bed. Rock and Roll baby! That model of Hill Valley looks quite familiar. The most difficult are to find reference photos. Doc Brown's bedroom from 1985. When his housee burnt down he began living in his garage. In the first 2 films we see the garage in 1955. This is part of his laboratory and we see plenty of photo and screen time with them playing with models and such from various camera angles. But 1985, we get one blurry out of focus background when Marty goes to the Jukebox while talking on the phone with Doc. BTW, The Juke box is at the bottom in brown with 2 brick arches. They don't make them in transparent colors...oh well. That bed was shown in a deleted scene and 1 production still of behind the scenes. The bathroom is partially visible in the film during the 1955 hill valley model scene when they discuss going back to the future. The door is open and the light is on. We see part of the sink and all the toilet. 1 production photo shows a tub out of focus on the left. A nice aerial shot showing how large this thing is. The trees and shrubs in the background are based on the actual garage. This took most my winter developing. I am quite proud of the garage and how much detail i was able to pull off inside and the subtle textures on the exterior as well. One last note: The model is based on a 1:35 scale like all my models.
-
I designed several versions since my thread "Back to the DeLorean" in 2016. I admit, I completely forgot to share the new files and images this past winter. So many incarnations have come from this iconic ride and I am sharing with you 2 versions: The Studio renders and my actual model created with custom colored parts made with a 3rd party chrome service. My original design in 2016 was based on a 7 stud wide car. I shrunk it down into a 6 stud wide car and feel that the parts introduced in 2019 gave me the opportunity to finally develop it. The great part about this set, the Part 1 and Part 2 rear can be swapped out pretty quickly to move from nuclear rod power to Mr Fusion. The car rolls just fine with the current hubcap layers. The wheels come off and easy slide down the cut hoses that fit into the bar clip/hover mode attachments. You never have to remove anything in the mudguard area, just add the hover attachments inside where I designed side wall spots it will go into. My new scale matches all my other vehicles and ships: approximately 1:35 scale. DMC-12: 1981 model. BTTF: Part 1 BTTF: Part 2 BTTF: Part 3 The Interior: Physical Custom Moc: Consists of 3rd party non-lego parts: Brickarm Customized parts using LEGO parts: 1. Windscreen: Custom cut windscreen I have another model that can open the gull wings, partially built. I did build my alternative version with a functioning gull wing. I sacrifice several things to accomplish this. But, that is why i designed the windscreen parts the way i did. I cut LEGO parts to make this screen. Now the 2020 champions have a similar screen that is way too long, but if they produce one with grey or silver edges I will try it on this model. Otherwise, the train top in black works perfectly for a more slender design. I like the hard edges on my windscreen since the DeLorean doesn't have curves. 2. Various hoses were cut to fit the model. Red hoses. Also cut down a teal bar and smoothed it off into 2 studs wide parts. 3. 4 2x2 hinge tops were smoothed down to just the flat plate part to make a neat texture for the bottom of the car. Its not totally necessary, helps hold lego cord with studs in place, but more a decoration element for my model. 4. A hammer was shorted in my 2016/2017 model and I used it in this model. You can easily use the regular hammer as is. I just never replaced it. I lost the orange headlight seen in the render and i just placed a 1x1 black plate in there. minified fits fine with headlight in my model. 5. White bar holder with clip. It was a perfect size for the Mr Fusion and I used it for my 2017 model. I added a sticker for it and looks fine to me. The renders above use a round brick. 6. Custom stickers for Mr Fusion and DMC logo on the front of the car I also introduced my Doc Brown Value Van in 2016 in the thread as well. This was a massive build, 10 studs wide and over 30 studs long. This vehicle does fit this car since the inside dimensions were 8 studs across. None of their 6stud wide panels come without the stud wide walls like older smaller panels did in the 90s. I gave up on th idea of a minified scale van would contain the car. I present to you the 8 stud wide Value van scaled down to match the car's scale. Doc Browns Value van is more difficult than it looks. The film used a P-50 chassis value van from the 1960s-70s, which looks way different than the replacement van P-30 and P-90 models. Finding reference was tougher than i wanted to deal with, but alas some company had an old P-50 value van converted into a food truck in Cleveland Ohio. I took a lot of photos of the engine, undercarriage and interior to get an idea what this thing looked like. The front shape was a more complex design to covert into LEGo so the SNOT techniques are a bit crazy when you take off the slopes in the engine hood. All the partial stud widths in the grill to the flipping plates and upside down parts was rattling my brain. For those interested in seeing my minified scale Doc's Garage build, check it out in my other thread: Doc Brown's 1985 Garage.
-
Before I answer these questions I will say that I do plan on offering a smaller design closer to the official model. I have various stages of the rear and front design I could quickly modify to match the official set center section. The bow and stern boat hulls are about 1 stud taller than the set. The issue would be converting it to a merchant ship like the official set. The narrower bode shapes I designed work well with my galleon center where the cones are replaced with slopes. The cabin section is the same length as the set, I just extended the roof to have a covered doorway. Returning to the same length would remove the Missen mast, move the wheel back to its original place and modify the roof to have an access panel for the cord to thread down into the cabin floor. I would probably place the entire wheel over the Missen area and use the hollow pole holes as the access point for the cord to run to the rudder room. Super easy, most effective idea and can be easily covered up as a book shelf or justified as a support beam. 1. I do plan on offering the MOD file like all my designs. I can no longer do them on the Stud.io gallery. If I did instructions I would charge money for the files, but like all my past designs I will offer the file for free to download and build at your discretion once I finish the masts. I will likely offer 2 ships in the file: One with official LEGO set mast designs and a ship with the proper rigging to fit those masts; and the other file will be my final design prepped for rigging. 2. I added 2 photos below. The half stud edges seem to be my biggest issue at the tile rail level. The shape of the half stud, to full stud doesn't bother me with those vertical black rails between each 4 stud wide walls. They seem to break up the stair step approach on the side of the ship. You only really notice the issue at the top where the tiles line up. The widest shape inside the boat is 12 studs across on the deck. That matches up to the 12 studs wide deck on the official set. What I like about my ship cabin and poop deck is how slender it feels. The cargo access area was shortened by 1 stud since the deck width changes. I am not sure how I would cover the main mast pole spot, maybe use brackets and plates so it gets closer to 2x2 instead of the current 2x3. The other minor fix i would need to solve is the stairs leading up to the wheel deck. One of the wedge places has a half stud gap on the wall side. I think the easiest solution would fill the gap with a bracket or use a modified brick and have a tile wedged there somehow. Its not a major concern. When I release my file I suggest stripping off parts or sections to help your mods. I think designing a new floor with cargo bay areas will help. Ian currently designing a smaller 3 center hull section option for the ship i did so you may easily swap out the entire section and go from there. I am trying to develop it within the same basic placement as the official set. I may also just do a simple deck floor and cargo bay file to swap with your official set to make that easier too. So basically, maybe what I will do is offer a file with the roof conversion for the wheel and a deck option with a removable cargo bay area so you can do simple mods that are easy to use. I may toss in a simple conversion for the front anchor idea. Im not trying to replace the set. I am designing a set for myself, and making conversion kits for people who want to just modify the set.
-
The Black Seas Barracuda was my first LEGOs pirate set I received on Christmas day in 1989. My parents purchased the entire collection and it was quite an amazing series. I have followed the various threads reporting the new set and was quite fond of reading this thread each time a person added or enhanced the new set. I was going to purchase the set at the store on day 1. I held off now that this pandemic changed everything. I was delighted to see the mods people did and also enhanced the shipwreck as well. I admit I have collected many pirate and adventure themed books and historical accounts over the years. I am not a nautical enthusiast, but I knew many different parts of a galleon, Callack, Frigate, etc. The original set advertised it as a 2 mast ship and never named it a galleon ship. Its between a Brig and a Galleon. The new design inspired me to extend the length of the whole ship and I have developed a ship with 5 and 6 center hull pieces. When I look at the length of it I keep fighting with the width. There have been several great mocs made using 14 studs wide for Galleon ships over the years. Their techniques are found in the forum. I follow them on flickr and enjoy going back to their custom rigging and working mechanisms. I also love the various ways to shape the hulls on the sides to make it fatter in the center. I will do a longer galleon ship based on the current wide of the front and captains cabin portion of the ship based my modified design incorporating old brown hull stern and bow parts. I think the way I developed my new walls will be easy to modify into a wider ship, but will need some attention to correctly shaping the hull so it gets fatter in the center and shorted in the back. As I began retooling the wider ship I began loving the silouhette more and more. The longer it got the more proportional to galleons it got, but it had to go 2 to 3 bricks taller to accommodate the overall shape and proportions seen in most of the galleon research. What I discovered during this time I could get a similar silhouette and shape if i narrowed the rear cabin and forecastle. When I did this, the ship became cleaner and less bulky. I still need to solve the foremast and mainmast. The rear mizzen mast is finished and will look great with a rigged setup. I plan on developing 3 sail mast for the foremast and main mast. I may develop a mizzen top sail as well, but I want to definitely do a flying jib sail and a jib sail. I think this ship will look great with all these options. I did include a spot for a spirit sail as well. I decided that since this is a medium sized galleon ship it should be built for speed. I also built an anchor based on several other past designs by fellow members in this forum. The most notable difference in my ship compared to the set is the conversion from a merchant sailing vessel to a small-sized galleon built for war. I raised the railing everywhere. I got rid of the cones and tiles for the cargo area and made it taller to accommodate slots for cannons. This whole approach raised the entire ship out two bricks taller. This was important because I wanted to extend the forecastle and expand the cabin design. I also lined up the swooping arch curves on the cabin with the tiles that held the read and center together. This whole ship does separate in the same spots and the official set. You can detach the rear cabin with the mid section as well as the front bow. That was always a must in developing this set. This is actually the most recent shot I took of the design before I began work on the cabin. I added a lot of features seen on old sailing vessels like anchor swing so you don't hit the side of the ship while dropping it. The front bow was altered when I realized the shape would not work as a sailing message because it didn't cut through the water bowing out. That shape would break off if it hit something hard. I straightened it, yet also added support beams with hoses and robot arms to keep sailors from falling overboard. The forecastle is now a full interior structure as well. Forecastles were other storage spaces or sleeping quarters for sailers who kept watch. It usually contains supplies for deck crews or small hammocks. The one item i struggled with was the capstan. I love how they incorporated into the main mast like The Black Pearl. This was not a common place to add it since it put so much pressure on a mast and could break the mast. That is why it was such a large item in Pirates of the Caribbean. The capstan needs to be wide enough to take any pressure off the mast. It was a great development and I still love the idea, but I didn't want such a long distance from the anchors to the machine. I also may bring it back if I return to a wider deck or have both options in the ship if i do a longer normal sized galleon. The 10 stud wide decks are way too narrow for it. You can also see the technic 1x1 stud brick between the hoses and soft axles. Those are the anchor exit holes for the rope. The poop deck and steering deck were developed as 2 options in the larger ship. The ship was another 2 bricks taller and allowed me to have both a captains quarters and navigation room above it. Imagine lowering this deck 2 to 3 bricks and only having a room 6 bricks long in the back where they yellow area is. The room below was lowered almost 2 bricks and allowed the cabin to still have a 6 brick heigh clearing while the navigation room had about a 5 brick height. I will probably return to this version when I develop the larger vessel. You can also see how I lowered the roof/deck 1 stud. I like having the 2 plate height of black at the bottom and keeps with the entire design in the cargo access deck. It feels right wen you place a minified on the deck and is about stomach level. I redesigned the steering wheel to accommodate rigging. I have a series of technic bricks hidden all over the ship to allow for the rudder to work with the wheel if strung up. I would love to have an access hatch indeed of that arched window leading to forecastle room. I had a 3x4 window in their but I would rather use shutters or if they had shutters that fit the new window pieces instead of the grid pattern. It looks better and the hatch would fit a mini figure better. Earlier in the design I had windows for the cabin. Though I like the idea, I scrapped them so I could have book shelves in the cabin. The cabin door swap. the frame i made will easily fit the new door. I like the old style doors. They work really well for saying ships. Plus, the fact they swing almost 170 degrees helps because you can keep the door completely open if you want. I placed all the items inside the cabin from the set. The desk is too large for the room and I got rid of the windows next to the door. I added cabinets on the sides of the room instead of tiny end tables I originally developed to fit under the windows. I kept the chair and bed. I redesigned the side desk into a drawer. You can see how the capstan connects to the next level like most ships with a deck. The technic connector in the gun deck level is the same height as the technic bricks leading to the anchor hole. Those exit between the soft yellow axles in the front. When the side wall is removed you can see the technic pin sticking out on the rear cabin section showing how it splits or a modular system. The modified 1x1 headlights are grouped together on the top deck and can be removed giving access to the below deck like a real cargo bay. I think i may look into the option it just resting g on top with plate rails holing it in place instead of the plates with studs. I drew a red line to indicate the path of the cords. I am using technic bricks, a modified brick with 1 stud in the wheel fully system since it has a hollow core. The cord runs parallel with the pole and splits again. I thinks a simple system that will work when tied to the wheel. The cargo grates have been redesigned since this photo was taken. They now use plate rails to hold them in place and can be lifted up. The top deck uses 2 square shaped grates to create the 4x8 cargo access area. I currently used those raised jumpers as placeholders for the cannons, but likely will be removed in the final ship design. As much as I love the spring-loaded cannons I may use the brick-built cannons everywhere. As you can see, when I made the deck walls higher using 3 stud height slopes the whole ship feels wider than it was. The slopes create a 10 stud wide interior not he main deck and the front profile looks so much more like a spanish galleon how it bows out n the sides and curves back to a narrow top. I prefer the shape of the front profile here. It curves into the deck. I like this shape. What I found was the natural shape i was making by using the stern hull screwed up the back when the cabin was wider. As much as I love the symmetry happening with the pattern above the windows I felt that I needed to narrow the shape. I think using the wedge plates on the sides to simulate what the original slop and inverted slope accomplished helped out a bit. My favorite part was using the wedge 43720 and 43721 to swoop back into the straight rear design. This shape really flows better in my opinion. The forecastle room is short. Every photo i found of cutaway models for this indicated it was never more than 2/3 the height of normal rooms unless you are in a man of war ship. They craw not the space so I figured it would work just fine for this small galleon ship. I have added gun ports in the forecastle since this render was made. The more I look at ship photos i see a lot of them have this in the front. Some of these photos were taken at earlier stages of the final design. The next photo showcases how i converted the merchant ship into a 28-gun galleon. 14 on the top deck. 2 in the rear on the gun deck, and 12 large spring-loaded cannons. Some of the cannons block the stairs so i made the last two steps removable from the rest. The forecastle stairs could be replaced with a ladder instead i suppose. The other idea was to keep the last step going to the wheel level a regular 1x3 plate instead of a wedge plate. This would keep the cannons from hitting the stairs or the idea we need to remove the steps. Either way. Its a work in progress. The additional ports under the stairs leading to the captains quarters were also added. I do have room to add 2 rear cannons next to the rudder. The room would need to have a raised floor for them but it is possible. My Question: Should I shift the center are with the white out 1 half stud or leave it alone? The photo uses some cheese slopes in the black bar area. This helps the curve out a bit. In order to make this work I will need to completely redesign the deck to be 11 studs wide in the center. The other option is to do a gradual shift with a half stud and then move to a full stud wider. I do not want to shift too far away from the original design. I am just trying to keep stuff together.
-
Are any of you thinking about alterations to the boat halls? I miss the tapering in the back leading to the rudder.
-
You could replace the arch windows with square window panels so it still let's the cannons come out.
-
THE PIRATE BAY IS GOING TO BE AN OFFICIAL LEGO SET!!!!
cehnot replied to Another Brick In The Wall's topic in LEGO Pirates
The original set in 1989 cost $180 and contained less pieces. I think the fact that this set contains parts less than 10 cents is incredible. -
I learned a hard lesson using that stand. My x-wing fell forward and crashed onto the floor. I didn't account for all the weight in the front of the ship. Either I need to use axles through the entire stand running into the ship or thicken the stand and add technic bricks with reinforced lift arms. I am redesigning the peg and stick portion of the stand to account for this mishap. The good news I found out how durable the vehicle is falling from a 4ft drop. The ion cannons flew off, 2 jet engines fell off and all 4 thrusters, the side panels broke where they connect to plates and the nose came off. The frame and side panels from the torpedo holes to the rear of the ship stayed together. The ship can be held in front of the windscreen. I have done thin plenty of times while building the model. I grabbed it from this area when doing the photography and repositioning it on its thrusters. The ship can be swooshed just fine. I tested it this. If you do recreate a turbulence effect then expect the ion cannons to fall off of my design in the photos. The old boxy ion cannons seen in my Studio file are solid and do not fall off as much.
-
Thanks. I modeled my car off the Sideshow Hot Toys car proportions. The real car fins only add 11.5 inches to the body above the rear tail light. When you lay the car over the lego model it actually doesn't go back as far as you may think. I understand what you are saying. I think the fact I am using a cheese slope for my third fin makes it stick out too far and the fins look shorter. The blueprints online are not accurate. They were heavily modified during production and The Hot Toys car is The only accurate model since they took the specs off the production car. If you had another solution to the fin I would gladly swap it out. Ideally I need a curved slope that is 1x6. Another solution I wish I could figure out is the rear wheel placement. In order to fit it inside those slopes I needed to keep it half a stud forward. If LEGO had those 1x3 curved slopes with a stair step stud I could move the wheel. The wedge plates work okay flipped the other way as well, but it was flipped because I wanted that circular design on top. If they had all the wedge plates as tiles I wouldn't even consider this idea. The smooth tile effect could work if people used modified tiles or flip the side wall to fit a 1x4 tile, but then you lose the inner angle. If you had another solution I would be glad to try it. If we also had more slope options I would try those. Lucas used curved slopes to solve this issue and I would have tried a similar solution had these parts been available in tiles or regular slopes. I chose the top view to help determine my shape and parts. That wedge plate fits perfectly on the side panel and connects to the right angle I needed. Other people have spent a lot of time doing this car. Lucas created the best 21 stud long model. He makes all his cars equal 1 stud to a foot. I like his collection a lot. He crams a bunch of stuff into those models. I just like my larger scale a bit since I worked on my Delorean. That model made me decide the larger scale since I couldn't figure out how to get the car smaller than 15.5 studs long. Once I figured out it was about 1:35 to 1:40 scale I decided to model every vehicle to that proportion.
-
Beautiful design. I am glad you decided to scale it larger than other models in your fleet. The slight size increase makes this set work well. You fit a ton of stuff inside the cockpit and add this to my collection.
-
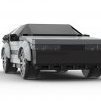
Tim Burton created one of the most beautiful set and vehicle designs on screen in this film. The challenge for me is coming up with a version much smaller than my first version. The idea was to have a more slender profile, while maintaining the shape in LEGO parts. My older design on rebrickable is based on a 12 wide design, and a second model based on a 10 wide design. So many people have approached this car and I didn't want to make it look any of their designs. Lucas makes some of best vehicles in his Batman collection and each one is scaled at 1:43 perfectly matching 1 stud to every foot. I am always amazed how he does this with each vehicle. I work in a bit larger scale, 1:35-1:40 range. This gives me more flexibility and still feels in scale to other models out there. Like most my other vehicles this car features an internal structure. This time, I have tried to recreate the turbine engine as well as the front cylinder engine. This car does fit 1 minifig and has plenty of places to add on other features such as a grappling hook, turntable, gun turrets, and the side wings. With this said, I present to you my newest version of the 1989 car. Batmobile 1989 by Chris Ehnot, on Flickr Batmobile 1989 by Chris Ehnot, on Flickr Batmobile 1989 by Chris Ehnot, on Flickr Batmobile 1989 by Chris Ehnot, on Flickr Batmobile 1989 by Chris Ehnot, on Flickr Batmobile 1989 by Chris Ehnot, on Flickr Batmobile 1989 by Chris Ehnot, on Flickr Batmobile 1989 by Chris Ehnot, on Flickr Batmobile 1989 by Chris Ehnot, on Flickr Batmobile 1989 by Chris Ehnot, on Flickr Batmobile 1989 by Chris Ehnot, on Flickr Batmobile 1989 by Chris Ehnot, on Flickr If you would like to build this model: Check out my Studio Page and Download Link
-
Batskiboat by Chris Ehnot, on Flickr Batskiboat by Chris Ehnot, on Flickr Batskiboat by Chris Ehnot, on Flickr Batskiboat by Chris Ehnot, on Flickr Batskiboat by Chris Ehnot, on Flickr Batskiboat by Chris Ehnot, on Flickr The Batskiboat is iconic, sleek and quite durable. This vehicle can hold a minifig and fits within my batman collection quite well. The shape and size of the vehicle is based on a 1:35-1:40 scale like all my vehicles. If you would like to download this file, feel free to see my Studio page https://www.bricklink.com/v3/studio/design.page?idModel=110367Batskiboat Studio Page and Download Link
-
Batwing 1989 by Chris Ehnot, on Flickr Batwing 1989 by Chris Ehnot, on Flickr Batwing 1989 by Chris Ehnot, on Flickr Batwing 1989 by Chris Ehnot, on Flickr Batwing 1989 by Chris Ehnot, on Flickr Batwing 1989 by Chris Ehnot, on Flickr Batwing 1989 by Chris Ehnot, on Flickr Batwing 1989 by Chris Ehnot, on Flickr If you want to see a few more photos, check out my flickr page. The cockpit fits 1 Batman minifig. I also built a simple turbine engine inside the main structure. The design is slightly larger than the bat mobile by 3 studs because I chose to make the ship as close to the movie as possible, focusing on the bat symbol. The vehicle should actually be 3 feet shorter than the batmobile.
-
Penguin's Duck Car by Chris Ehnot, on Flickr Penguin's Duck Car by Chris Ehnot, on Flickr Penguin's Duck Car by Chris Ehnot, on Flickr Penguin's Duck Car by Chris Ehnot, on Flickr Penguin's Duck Car by Chris Ehnot, on Flickr Batman Returns features 3 iconic vehicles: Batmissle, batskiboat, and this lovely duck car. The proportions and size are based on the fact it is suppose to be about 40% the size of the Batmobile. This vehicle features sliding duck wing doors.
-
Tron Legacy Display by Chris Ehnot, on Flickr Tron Legacy Display by Chris Ehnot, on Flickr Tron Legacy Display by Chris Ehnot, on Flickr Tron Legacy Display Base by Chris Ehnot, on Flickr Tron Legacy Light Cycle by Chris Ehnot, on Flickr Tron Legacy Light Cycle by Chris Ehnot, on Flickr Tron Legacy Light Cycle by Chris Ehnot, on Flickr Tron Legacy Light Cycle by Chris Ehnot, on Flickr Tron Legacy Light Cycle by Chris Ehnot, on Flickr Tron Legacy Light Cycle by Chris Ehnot, on Flickr Tron Legacy Display Base by Chris Ehnot, on Flickr Tron Legacy Display Base by Chris Ehnot, on Flickr Tron Legacy Display Base by Chris Ehnot, on Flickr Tron Legacy Display Base by Chris Ehnot, on Flickr Tron Legacy Display Base by Chris Ehnot, on Flickr Tron Legacy Display Base by Chris Ehnot, on Flickr Feel free to see all my other flicker images on my photostream. Tron Legacy Display Base and Light Cycles Each light cycle uses 74 parts to form the sleek design. The models feature the double circular engine, a quick release for the minifies and Tron sticks, and a smaller design contouring the body. The display base features a modular structure easy to swap out other elements or add your own. The basic structure gives you a base for the light cycles, the ability to convert it into a bus stop seen in the Tron Legacy video game, a removable "Tron" logo shaped loosely based on Clu's aircraft carrier seen at the end of the film, and a wall with he number "2" on it. There are a few studs on top to place Quorra. The Billboard display is designed to disconnect from the main frame and act as a bus terminal covering. Customizable parts, easy to expand this whole structure into a battle scene or Grid games. If you want to build your own, feel free to download the file: Check Out the Studio Gallery and Download Page!
-
I present my version 3 photography. T-65 Incom X-Wing Version 3 by Chris Ehnot, on Flickr T-65 Incom X-Wing Version 3 by Chris Ehnot, on Flickr T-65 Incom X-Wing Version 3 by Chris Ehnot, on Flickr T-65 Incom X-Wing Version 3 by Chris Ehnot, on Flickr T-65 Incom X-Wing Version 3 by Chris Ehnot, on Flickr T-65 Incom X-Wing Version 3 by Chris Ehnot, on Flickr T-65 Incom X-Wing Version 3 by Chris Ehnot, on Flickr T-65 Incom X-Wing Version 3 by Chris Ehnot, on Flickr T-65 Incom X-Wing Version 3 by Chris Ehnot, on Flickr T-65 Incom X-Wing Version 3 by Chris Ehnot, on Flickr T-65 Incom X-Wing Version 3 by Chris Ehnot, on Flickr T-65 Incom X-Wing Version 3 by Chris Ehnot, on Flickr T-65 Incom X-Wing Version 3 by Chris Ehnot, on Flickr T-65 Incom X-Wing Version 3 by Chris Ehnot, on Flickr T-65 Incom X-Wing Version 3 by Chris Ehnot, on Flickr
-
I realized Bricksafe needs a page to select. It should link to the page to download the file from now. DOWNLOAD VERSION 3 X-WING HERE ALSO, Visit my Studio Gallery if you cannot find the download page: My Studio X-Wing Version 3 Gallery
-
DOWNLOAD VERSION 3 FILE HERE I successfully rebuilt the x-wing. I plan on taking some photos soon. The Version 3 file has been updated. What does the new version fix? Stronger side panels Fixed connections I forgot to include to side panels (several ares did not connect to the ship at all) Reinforced cockpit Redesigned R2 Compartment area to connect the side panels tot he main structure. New reinforced nose connection Stronger frame and internal structure Finalized cutaway x-wing parts I admit, the area where the life support is probably one of my better solutions. By flipping the 1 stud hinge upside down and sticking a cut hose inside 2 reversed round plates with holes you get a strong hold, but also used 2 modified plates with clips on both sides. One set flipped upside down with the hinge plate. They are connected to two other clips via 1 stud long 3mm cut hoses. This whole new Cockpit and Astromech area keeps the high at the right height to connect to the side panels without forcing them downward like my last version. Right behind the seat you can see some clips (2 on each side). Add a 1 stud long 3mm hose to secure connection. Behind the seat you will find 4 1x1 round plates with holes flipped on top of each other. Add a 1 stud long 3mm hose inside them to keep them together. The photo below shows 4 red hoses to mark where you need to place the cut hose to secure the sections mentioned above.
-
I did extensive research on this in my hanger bay topic. The hanger is 3 bays long and the set was too. Falcon sits in front of one. best scene to see the bat is when chewy is on top of the falcon and Han yells at him while fixing stuff. They built everything and there are references from official schematics showing the bay is 3 short bays that are long, and 2 tall ceiling bays where they held the speeders. I Will admit the games over the years changed it a lot. I did a whole topic for people on Eurobricks about the hanger bay proportions and what George Lucas actually intended it to be for the film. Hope this helps you.
-
Boy does that move quickly. Before you fill the area in i suggest taking a bunch of photos and list out the parts for people.
-
I finished the wings and engines. Worked on the gearbox and rear body. The side panels need reworked. I realize now I need to fix things. At some point I deleted critical parts to attach the plates that fit in the panels. These plates had 2 connection points before I built an internal frame and I must have hid them to work on other areas. The frame inside the front side panels may need to go away in order to properly connect them. My file has been updated, but I am not going to release it until I am quite happy with the updates. The new wing structure works better than my original. I modified the gearbox to use a thicker gear because of loose parts shifting inside I only had to raise it 1 brick to get a fatter gear to fit. This did not affect the size or shape. I had plenty of space to make adjustments. I will share photos of the WIP later this week if I solve the side panels. still waiting for parts to complete the side panels. Made 9 different orders and missing 4. Fortunately I ordered things based on sections so I could build each area and modify it as I need. The file does contain new changes and solutions such as a more detailed internal engine area below and behind the r2 unit seen in the cutaway drawings.
-
Studio Gallery IP policy changes
cehnot replied to cehnot's topic in Digital LEGO: Tools, Techniques, and Projects
Both chrome dealers inventory were taken down today.