
motomatt
-
Posts
73 -
Joined
-
Last visited
Content Type
Profiles
Forums
Gallery
Everything posted by motomatt
-
[WIP]Mack B75
motomatt replied to Kit Fisto's topic in LEGO Technic, Mindstorms, Model Team and Scale Modeling
Nice classic truck. Look forward to seeing it done! -
The truck is powered by just one XL motor with 1:1 drive going to a 20 tooth gear spinning a 28 tooth differential. When I did the video it was using an old rechargable battery putting out around 8.4V, which made the motor run pretty weak. I've since made this thing, which makes the truck run significantly faster as it's putting out around 10V.... ofcourse standard 6 brand new AA batteries would do the trick too
-
Thanks, Ingmar. It was building your truck about a year ago which helped infect me with the AFOL virus and made me want to build more trucks of my own You're right, I didn't even realize I did the side windows a bit too small.
-
Close to a year ago I built a rocky mountain double flat-bed trailer with an attached forklift. To tow it I built a model of a lego Kenworth T-680 in red, blue, and white, with a ginormous cab. Since the model mostly sits on a shelf, I always wanted to build a fully enclosed trailer to match the truck's high cabin design for a better side profile look. Well, finally after a long time accumulating 8x16 tiles, I finished it, so thought I would share it here. This is a model of a 53 foot trailer with a built in reefer. It is about 114 studs long, 18 studs wide, and 28 studs high. The trailer contains three PF M-motors operated via remote control. 1. Raise and lower liftgate. 2. Extend and retract liftgate. 3. Raise and lower trailer legs. An electrical tail light connection comes from the main tractor and is operated by remote control on/off. This trailer is shown being pulled by my 1:18 model of a Kenworth T680 semi truck. Together the semi-truck and red reefer trailer are about 4 feet long. Overall, the trailer enclosure is pretty stable and not as fragile as I thought it would end up being. There's minimal flex in the frame and it looks pretty realistic. To make a boring trailer a bit unique I wanted to add a retractable liftgate similar to the one in Madoca's wing body truck. I took the same liftgate design from my earlier B-train flat-bed trailer and mounted it on a pair of steering racks to hide and extend it. But the up/down operation is not always as smooth as the original one because it sometimes tends to catch a bit against the edges of the rear fender. I think the way to fix this would end up detracting a bit from the aesthetics of the rear, so I left it as-is. Originally I was thinking to put the battery underneath the frame, but that would make it hard to turn it on or off while lifting up the trailer. So the battery sits as cargo inside the enclosed compartment and is easily reachable without moving the trailer off the ground. After making the video from a vantage point at ground level, I noticed that the wheels of both the trailer and truck were quite cambered due to all the weight. I later improved on this by changing the way the axles are attached to the frame in both the truck and the trailer. The instructions and parts list includes a better design than what was used in the video. More pics and full instructions are up on rebrickable http://rebrickable.c...i-truck-trailer and mocpages http://www.moc-pages.com/moc.php/423789
-
Thank you very much Brunojj for this latest addition to the collection I can tell you must have worked on this for many tireless hours and your hard work has payed off in a wonderful design. I plan to get SBrick some time soon and this will be the first candidate for it. As for now, I find that two XL motors on two separate V1 receivers off 1 battery works fine. Some minor differences: I found that "45590 Technic, Axle Connector Double Flexible (Rubber)" is pretty useful for connecting some of the flex axles at odd angles. I personally like using yellow Technic Liftarm 1 x 7 Thin instead of black ones above the headlights. If anyone else is building this from the LXF file: 1. Exporting to LDRAW is useless and will be missing or mis-orienting many important parts. 2. Decomposing the LXF file into sub-sections and building based on that was probably more fun then just building off instructions. 3. LDD -> Export BOM should give you an adequate parts list. I think you should be able to also build it in solid black/red/white. Panels 62531 and 64681 do not seem to be available in blue, so maybe you could combine a blue hood and roof with white sides. It would be cool to see renders in some different color combinations. Thanks to https://www.bricklin...e.asp?p=Aurimax for the chrome wheels.
-
[MOC] Galloping Horse
motomatt replied to touthomme's topic in LEGO Technic, Mindstorms, Model Team and Scale Modeling
I just couldn't resist trying to build it. The youtube video does a great job showing how it works and was enough to reconstruct it. Now to get the missing pieces. -
[MOC] Galloping Horse
motomatt replied to touthomme's topic in LEGO Technic, Mindstorms, Model Team and Scale Modeling
Wow, I haven't seen this until now, I wish I saw this last summer. This is so awesome, I think I too will try to build this from the video I think it's even cooler than Sisyphus. -
[MOC] Spirograph
motomatt replied to Nalyd997's topic in LEGO Technic, Mindstorms, Model Team and Scale Modeling
Great work! Awesome machine. I would love to view the LDD file and maybe try to build this some day. -
Other than building Jurgen's Ultimate 42009, another option is to build an even more upgraded version, the GMK6400. You can read about it here. http://www.eurobricks.com/forum/index.php?showtopic=99748
-
So, I just couldn't resist trying to build this awesome MOC from the LXF file. Here's my progress so far while I wait for some parts. Eventually, I think it would be nice to make this in BMW blue and white colors. I've only got one spare XL motor in it at the moment but after a short test drive, this thing is fast! It's also huge and feels almost like a real RC car. Some lessons learned... 1. Exporting LXF -> LDRAW is useless. 2. Brunojj1 has done an awesome job with this MOC!
-
It would be very hard to try to resist building this fantastic MOC given an LDraw file Can't wait!
-
To be honest, I'm a bit disappointed in how the forklift came out as it's not as playable as I originally envisioned. It's good enough to maneuver empty pallets off and on the flatbed. The biggest problem is that since there is not enough rear counterweight to it, the steering doesn't work quite well if you put much weight onto the forks. Also, to make it remotely attach and dismount onto the trailer would require making it quite bigger, with two separate worm screw driven axles, and I wanted to keep it as small as possible. I originally made the trailer with the elevator lift at the rear, but then I had the idea to add a forklift. I didn't want to ditch the idea of the lift, since it worked quite well! So with dual trailers, the only way I saw to keep everything was to move the lift off to the side. The lift's floor deck can actually manually swivel from horizontal to vertical when the truck is being set to be driven, so that it doesn't stick out to the side as much. I didn't show that functionality in the video though. Yes the truck is a 1:18 Kenworth T680 which I built sometime after the trailer. It's up on MOC pages http://www.mocpages.com/moc.php/413530 Maybe when I build an enclosed cargo trailer for it I'll post it on here.
-
If anyone is interested, full instructions are available to build the front trailer, jeep with fifth wheel, rear pup trailer, and attachable forklift. http://rebrickable.com/mocs/motomatt/b-train-rocky-mountain-double-flatbed-trailer-combination-wi
-
Since I'll probably be taking this apart soon, I thought I'd share this here. This was supposed to be a build of a simple flat bed trailer for a 1:18 scale big rig truck. After seeing alot of B-train combination trailers being towed on the show "Highway Thru Hell", I thought it would be cool to make this simple flat bed a bit longer. But then I saw that Ingmar (2LegoOrNot2Lego) had previously published a double combination flat bed, albeit with a different linkage geometry. Then one day I saw a truck go by on the road with a forklift attached to the rear... and so I thought it would be cool and a bit unique to add one too :-) And so, this thing was born. If I still have your attention then it's best to just view the youtube video which shows the trailer, it's powerfunctions, and the forklift in action. A view from the back showing the mini forklift. So the trailer combination is about 5 feet long. With the truck and forklift, it's just slightly under 6 feet. Ok, so driving it isn't that easy, at least if you have furniture around. Trying to park the truck and trailers in reverse is just too hard for me :-) The front trailer has a small battery box with 6 AAA batteries and two m-motors, one for raising the liftable axle, and one for raising and lowering the trailer legs. Here is a pic of the under-side of the front trailer. The rear "pup" trailer has two m-motors as well and gets it's power from the front-trailer, or the truck. One m-motor is used to run the elevator liftgtate, and the other raises and lowers the trailer legs. Here is the shorter rear "pup" under-side. All the tail lights are made to be switched on/off in unison from a remotely controlled pf-switch located in the towing truck. The whole thing is up on MOCpages http://www.mocpages.com/moc.php/412801 Some more pics can be found on bricksafe http://bricksafe.com.../Btrain_flatbed Youtube:
-
Thank you Ingmar (2LegoOrNot2Lego). I really liked your trucks and trailers and I guess it's the build of your US Truck Mk II v1 that got me started with this lego semi-truck fascination recently.
-
Just wanted to share mine. Madoca has become my favorite builder. The minions love him too! I just wish he keeps making more MOCs :- I tried to find the limit of the SUV MkII with the V2 receiver, and the car was able to make it up a 45 degree slope (guitar case) with a rechargable battery directly plugged in to an AC outlet at 8.5V . Would probably do even better with a 9V battery case and fresh AA batteries.
-
Thank you, coming from the master himself. So here's a quick video of the truck pulling the Volvo 42030 on a lowboy trailer. This is was first attempt at editing multiple video clips into one.
-
Thanks. So originally the truck was dual axle drive. Then in an effort to try to optimize away the drive friction, I removed the rearward drive going to the rear-most differential. But it's very easy to make the rear-most differential part of the drive train again. The simpler option of just using a Universal joint directly between the two differentials without adding additional axles required the wheels to be at least one stud further apart, and that took away from the look of the truck a bit. The truck uses 8 technic 6.5L springs. This is what the truck looks like from beneath
-
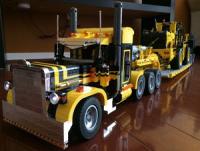
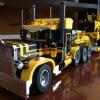
YAPT (Yet Another Peterbilt Truck :) After recently catching the AFOL bug I found myself spending alot of time admiring Bricksonwheels' creations and Sariel's road train. Then after building one of Ingmar's trucks, I felt compelled to build my own. So here it is. Since I already build a lowboy trailer very similar to Ingmar's detachable gooseneck design in yellow and black, I went with a yellow and black color scheme for the truck. The truck has 5 PF motors. 2 XL motors for drive. Servo for gear rack steering. M-motor attached to a PF switch allowing remote control on/off of all the lights. This design is very similiar to the one found in Madoca's wing-body truck. The truck has head lights, tail lights, roof lights, as well as a PF connector in the back allowing the trailer's lights to use the same remotely controlled switch. An M-motor is used to lift and lower the third axle. Originally I made the truck with a two speed gearbox very similar to the one Madoca used in his SUV Mk II. Since the gearing allowed the truck to be rather fast and zippy in the faster of the two gears I decided to use dual XL motors for the drive. But after finding a few too many false neutrals with the torque of dual XL motors, I've since removed the gearbox. Now it seems that two drive motors are a bit overkill unless you're pulling a heavy trailer uphill. To make it a bit unique I set out to give it a third axle which can be remotely lifted and lowered. All wheels utilize technic shock absorbers. The cabin can fit a full size battery or the smaller rechargable one. From the top, it's 59 studs long. The two PF connector's just ahead of the fifth wheel are or for continuous power to the trailer and remotely controlled trailer lights. Here it is pulling a heavy 42030 Volvo wheel loader. Yellow overload. So originally I had no plans to make instructions, but once I started playing around with LDraw and Bricksmith, I just couldn't stop :-) The full instructions are available on rebrickable http://rebrickable.c...ellow-and-black The truck is up on MOCpages http://www.mocpages.com/moc.php/411142 More pics are available on bricksafe http://bricksafe.com...o Peterbilt 379 Many thanks to Aurimax https://www.bricklin...e.asp?p=Aurimax for the Chrome pieces.
-
Ingmar, Some pics of the modified internals of the truck chassis and lowboy trailer can be found here: http://bricksafe.com/pages/motomatt/IngmarTruckMods Also, I recently started working on a flat bed trailer for the same truck, and want to build another truck with a different color scheme with a liftable 3rd axle using your most up-to-date cabin design. It will have the same chassis but probably slightly longer, using your wheel lifting mechanism found on the lowboy.
-
Hi Ingmar, I built the truck and lowboy a little while ago and I have to say your truck and trailer are great! The details of the cabin are most impressive. On first look the pics below look like both the original truck and trailer, but a closer look shows a completely different chassis design for both the truck and trailer. It all started when I just wasn't too excited about using rubber bands for suspension and it ended up with a complete rebuild of the chassis for both the truck and trailer from scratch. Notable mods listed here: - Remote control lights by using an m-motor joined to a pf switch mechanism similar to the one in Madoca's wing-body truck. This assembly replaces the fake-engine in the front compartment. - Two speed gear box. I haven't completed the remote shifting capability yet but most of the assembly is there and is based on the mechanism used by Madoca in his AWD SUV Mk2. The gearbox extends the space between the servo and XL-motor by 2 studs, and the length of the sleeper cab by 1 1/3 studs, still accommodating the standard non-rechargable PF battery case. - All rubber-band based suspension replaced with standard technic shock absorbers sitting inside the frame. - Frame widened by two studs (8L outer width / 6L inner width) )while maintaining the same vehicle width (19.5 studs wide between outer tire walls). Overall ride height is lowered giving a more authentic look-and-feel with the top of the rear tires rising slightly above the top of the rear frame. - The spacing between the two rear axles is decreased by one stud for a more realistic look. - Slightly narrower kingpin attachment mechanism which sits lower, fitting within the frame (instead of on-top) making possible a more realistic looking lower trailer attachment just slightly above the tires (deck height of any trailer can be overall lower). To accommodate this, the rear differential drive shaft is routed beneath the mid-rear differential to the gearbox. Lowered front ride-height and updated steering geometry, as well as used standard technic shock absorbers instead of rubber bands for suspension. Use of two ir-receivers (steering, drive, lights, gear shift which is not complete yet) I also ended up changing the lowboy and built a new one from scratch to try to make it a bit more realistic looking by both lowering the deck relative to the wheels, making the deck height appear thinner, cupping it slightly upwards in the middle, and using standard technic shock absorbers.
-
The minions really love Madoca's trucks! I have to admit - it's a pure joy to build Madoca's MOCs. I hope he comes up with more :-)