
ludov
-
Posts
686 -
Joined
-
Last visited
Content Type
Profiles
Forums
Gallery
Everything posted by ludov
-
[TC9] Watercraft
ludov replied to Erik Leppen's topic in LEGO Technic, Mindstorms, Model Team and Scale Modeling
Very original, I like both models a lot I'm not sold on the yellow+green color combination; for me they don't contrast (but then again, I'm a bit colourblind, so probably you shouldn't listen to me ). It would be nice if you can hide the small wheels inside somewhere; since you've states looks are the primary goal here, I think you should try to hide anything that doesn't belong. -
Preferred method of posting
ludov replied to nerdsforprez's topic in LEGO Technic, Mindstorms, Model Team and Scale Modeling
Indeed! I can understand the use for an "accumulation thread" for smaller builds though. Especially for very productive people like Efferman and ZBLJ this can be a way to share their smaller works. -
1. Combine Harvester / Hot Rod A-model: Combine Harvester Functions: Rotating header, driven by the front wheels via a differential Engage/disengage header rotation via switch on the side Raising and lowering of the header via knob wheel on the top HOG steering via knob wheel on the top Extendable unloading auger (manual function) Removable header The dimensions of the model are WxLxH = 30x25x13 = 9750 cubic studs and consists of 400 parts. B-model: Hot Rod Functions: Working V8 engine driven by rear wheels via differential HOG steering The dimensions of the model are WxHxL = 12x12x28 = 4032 cubic studs and it uses approximately 70% of the parts of the A-model. Here is a movie showing all the functions of both models and some additional photos: The discussion topic can be found here. High-resolution and additional photos can be found on my Bricksafe page.
-
Sure, I had them written down... somewhere I recall the discussion about the bounding box, and I did make a picture with it for the A-model, since that one was really pushing the limit. But I didn't make one for the B-model, and I don't want to risk getting disqualified over a missing photo (If I do find the time and if I can manage to rebuild the B-model from the photo's I have, I promise to make the photo ) Allright, time to write up an entry post then
-
You're kidding, right? There was no such rule before, so I didn't bother taking a picture for the B-model (especially since with only 4000 cubic studs I didn't expect there would be any discussion about the B-model's dimensions). The B-model has long since been disassembled and I don't know if I'll have time to reassemble it before the end of the week...
-
Considering your skill with small models, I was hoping that you'd be too distracted by your Batman Arkham Knight Batmobile to enter this contest This feels like a sniper attack Just kidding, very nicely done! I like the color scheme and the old wheels. I'm impressed how much functionality you managed to squeeze in the forklift. Especially the fact that you managed to get a engine in there is awesome. I'm not sure if I'd put the seat; it does look a bit awkward with the axle protruding the driver's sitting area and the small 8T gear grinding the crown jewels.
-
Add it as "bonus material". It seems that you'd have to decide early on if you want to include it, since it's under the tower. If you'd put it somewhere else, you can have it as an "add-on" and put the instructions for it at the end (like the steps for motorization of TLG models, those are also at the end of the booklet).
-
I feel your pain After I completed the B-model and took pictures, I quickly reassembled the A-model
-
I did my PhD in robotics, so I can help with that part. I don't have any EV3s, but I can help with the math. I think the possibilities with this arm in a GBC module are endless!
-
Cool! It looks very nice and I'm impressed that you got it to work in this scale. (I'm not a fan of custom parts, personally, but I guess you tried many solutions before resorting to the 3D printer.) The "level" part seems to work really well, except maybe a bit of height variation near the extreme up-position?
-
[TC9][WIP] roadster/hotrod?
ludov replied to muffinbrick's topic in LEGO Technic, Mindstorms, Model Team and Scale Modeling
Very nice! The hotrods are popular -
[TC9] Snowblower/Tractor
ludov replied to Thirdwigg's topic in LEGO Technic, Mindstorms, Model Team and Scale Modeling
That looks pretty good, although the ground-clearance at the front seems a bit small for a tractor. Or is it a blade for moving ground, like in the pictures you posted before? I can't see if it can be raised or not. Is the "box" supposed to be open? I guess you don't have parts left to close it in any case -
That looks awesome. The engine details give it a nice touch and also seeing everything in the "final" colouring makes it look a lot better. With the big front wheels it reminds me a bit of this one (from the ZZ Top music video for "I gotsta get paid"):
-
[TC9] Combine Harvester and Hot Rod
ludov replied to ludov's topic in LEGO Technic, Mindstorms, Model Team and Scale Modeling
I see what you mean. I saw pictures before where there was a "seam" at the area that they fold, but I couldn't find a picture of where they were actually folded. -
[TC9] Combine Harvester and Hot Rod
ludov replied to ludov's topic in LEGO Technic, Mindstorms, Model Team and Scale Modeling
I'm not sure how to get a nice folding mechanism at this scale... Also I couldn't find any examples -
[TC9] Combine Harvester and Hot Rod
ludov replied to ludov's topic in LEGO Technic, Mindstorms, Model Team and Scale Modeling
I know that now Fully sideways it extends 2 studs past the header. Probably not enough for a tractor to get under, but if I make it longer it extends behind the back of the vehicle and I exceed the 10000 cubic studs. Trade-off For the post-contest instructions I'll but a 15L beam (this is a 13M). -
[TC9] Combine Harvester and Hot Rod
ludov replied to ludov's topic in LEGO Technic, Mindstorms, Model Team and Scale Modeling
Photo's of the final models. I put the bigger unloading auger on the harvester. There's probably a ton of other small things I can improve, also on the hot rod, but I have to draw a line somewhere I'll try to make instructions for the harvester, maybe incorporate some improvements along the way. More images: http://bricksafe.com...mbine-harvester http://bricksafe.com...b-model-hot-rod Can one of the moderators change the topic title to "[TC9] Combine Harvester and Hot Rod"? -
Part Degradation over Time
ludov replied to nerdsforprez's topic in LEGO Technic, Mindstorms, Model Team and Scale Modeling
With the first motor, I've had a lot of problems. I got only one, with the Barcode truck, but it quickly got "stuck". LEGO sent me a new one, but that one is in the same state now. I don't know if it is a common problem, but 2 out of 2 is not a good sign for me. I don't think it can be fixed easily. The older ones are all still working (I have 5): One problem I have with the old 9V system is with the cables: the rubber outer cover deteriorates a bit and almost all of the cable I have have exposed metal wires near the connectors. It might be due to the way they were stored (maybe under strain) and it's a miracle that the short-circuits that undoubtedly occurred haven't caused damage. It's worth paying attention to when buying second hand. -
[TC9][WIP] roadster/hotrod?
ludov replied to muffinbrick's topic in LEGO Technic, Mindstorms, Model Team and Scale Modeling
That looks stunning -
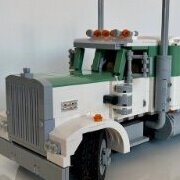
You can find the instructions here: http://www.jurgenstechniccorner.com/index.php/building-instructions/19-kenworth-w900-building-instructions
-
This hotrod has a lot of potential, I like it Much better than mine Is the double-bevel gear on the back for the steering? If yes, I would maybe consider moving it somewhere on the top for playability. Maybe on the "trunk" somewhere to not affect the looks too much.
-
[TC9] Sun Speeder/Sun Stinger
ludov replied to BusterHaus's topic in LEGO Technic, Mindstorms, Model Team and Scale Modeling
+1 I wouldn't have used the technique myself, but I liked the engineering that went into it under the assumption that the deformation of the axles was very limited. But this made me also cringe. However, to each his own. If BusterHaus is comfortable with this, then he should go ahead by all means, and not let others influence his opinion. It might cost him some votes in the contest, or he might gain some by all the attention his model is getting -
[TC9] Trophy Truck
ludov replied to deehtha's topic in LEGO Technic, Mindstorms, Model Team and Scale Modeling
Ah, I forgot about that thread. I guess the smoothness is from using the cam pieces, instead of the part I had to use (from the A-model): Anyway, keep going -
[TC9] Trophy Truck
ludov replied to deehtha's topic in LEGO Technic, Mindstorms, Model Team and Scale Modeling
This is pretty cool. I'm amazed it fits in the 10000 cs limit. The styling looks very good. I like the little details like the raised center of the hood. I'm curious about your v8, since I struggled quite a bit with it in my B-model