Search the Community
Showing results for tags 'friends'.
-
[Purist Custom Figures] Friends Minidolls to Minifigures
King_of_Lomadia posted a topic in LEGO Town
I've been getting a bit more into Lego Friends recently and I wanted to incorperate the characters into my other stuff. To that end I turned the main cast of Lego Friends The Next Chapter into minifigures. I struggled a bit with Olly's outfit, but I think this jean jacket does the job. Paisley is my favourite and this t-shirt and coat combo was just perfect. Don't worry I got her guitar too. For Autumn I knew I wanted to include her prosthesis. To go with that I recreated the wall climbing outfit. This face for Aliya was just right. I'm quite happy with this outfit too. Zac came out really well, the facial expression is spot on. Adding red arms to the hoodie worked out great. I feel like Leo's oufit could be better, but this jacket gives a sporty look. Liann's dungarees might not be coral coloured like in the show but I love them all the same. I'll be honest, Nova's outfit doesn't match at all. I just thought she needed a cool jacket. Here's another groupshot showing off some alternate faces. Who's your favourite character? Thanks for checking out my post :) -
Built for the Rebrick Best Friends contest. Best Friends on Vacation Whether those friends are two-legged or four-legged, everyone is having fun. Go out on the water or enjoy the beach, horseback riding along the sand and shopping on the promenade. A few more on my Flickr Album.
-
This moc is part of the FRIENDS Display (Theme Park) on the upcoming Build Your LEGO Christmas Event at 1 Utama Shopping Centre (at Malaysia) from 9th to 20th November 2016. It consists of 24pcs of 32x32 baseplate, which is my biggest solo moc up to now. This is definitely a very challenging task for myself, which I only have about 5weeks of time to complete this. (average 2-3hrs a day). One of the major attractions on this moc is this Friends Roller Coaster ride, which took up more than half of the size on this work. The most challenging part on this ride is the limited type of the blue track which is available. It only have 2 types of track, ramp up/down and a single size of curve track. In order to design a roller coaster ride which is looks “fun” and realistic, I’ve spent more than 3nights just to complete the draft structure of this track’s design out. Hopefully the outcome is not too awful. Besides on that, there is also an extended version of Ferris Wheel from the existing Friends set, Space shot, and also the Spinner ride which built by the great builder, Denil Oh. Below is the details photos. Comment and suggestion are welcome. Regards, WingYew (Malaysia) FULL ALBUM -> https://www.flickr.com/photos/wingyew29/albums/72157676402832066/with/30834413732/ IMG_6751_edited_Watermark by WingYew, on Flickr IMG_6763_edited_Watermark by WingYew, on Flickr IMG_6779_Edited_Watermark by WingYew, on Flickr IMG_6780_Edited_Watermark by WingYew, on Flickr IMG_6781_Edited_Watermark by WingYew, on Flickr IMG_6799_Watermark by WingYew, on Flickr IMG_6805_edited_Watermark by WingYew, on Flickr IMG_6813_edited_Watermark by WingYew, on Flickr IMG_6834_Edited_Watermark by WingYew, on Flickr
-
Hi all I would like to purchase my son the lego friend amusement park sets. However, i would like everyones thoughts. Is the lego friends amusement park sets just for girls? Whats your thoughts? Cheers
-
 This was a fun little build. Even though it was not totally custom as I used much of the architectural details of the Friends set, I still think it turned out nice. I always thought the orginal set was boring, but it still has some nice details that should be used in a set. So when the set went on sale, I bought two of them (it took quite a few additional bricks as well) and put this together. If I aqure some more windows, I make try to expand it, but for now, I like the size. It will fit into my city nice. So if you are interested here is a video and some pics. Any feedback is appreciated!
 -
Welcome to Julian's ~ A downtown FroYo Shop ReBuild of LEGO Friends 41320 -- using only those parts. Julian decided to move downtown when this sweet corner spot opened up. He got tired of cars parking in his drive-thru at the old location. This corner storefront has a glass tiled entry, bay window, room for a deck and roof expansion. As you can see on the table through the bay window, he lets customer add chocolate or strawberry sauce to their frozen yogurt. Julian is getting ready to open, so he checking the menu for the day, after checking the cold-counter up front that keeps his Strawberries and FroYo. Inside the one of the front curved window he displays the cherry danish and the chocolate bar rack is nearby. Getting ready for the day! After making sure he has cash, he knows he needs to check his refrigerator. Yep, a good supply of watermelon too! He keeps the cones handy by the frig. Julian is ready for customers after opening the back deck. Another reason he liked this spot downtown -- room in the back to expand. Oh, hey, there's a customer sitting on the deck ... or is it an 'old' Friend? Sure, it's Olivia! Julian is ringing up a vanilla for her. Olivia decided to wait for Julian in the alley break area that has a small canopy and Lemonade dispenser. Another reason he likes this spot. Julian also has a Festival booth, with so many downtown, such as the annual "Taste of Heartlake City" that he wouldn't want to miss. He preps his soft-serve equipment by getting Olivia a chocolate FroYo cone. She already bought his last Peppermint-chocolate cupcake. Here's an up-close of his equipment: Refrigerator, Menu, Rooftop Sign, and front Cooler Cabinet. The Frig's cold drawer slides out -- it's the clear shelf reversed onto the trans-blue windscreen which has bottom holes to clutch. I love the 2x3 grey brick with 4 studs on the side used for his menu! The rooftop sign is connected with a brown ink well element (same as nozzle on top of chocolate sauce container) that keeps a better fit for the purple dome piece than just with the white tile with stud. The cooler cabinet with Strawberries on display actually started out as Art/Signage above the front door like older shops in downtowns. Thanks for viewing!
-
An Alternate/ReBuild of 41319 Snow Resort Hot Chocolate Van. Amanda is deciding what to order while standing under the canopy, safe from sun and snowflakes. The cuppa hot cocoa sign is still on top and still rotates, because it's such a fun concept! Mia works at this cuppery too -- to raise money for a new Heartlake City animal shelter (because the Vet clinic is over-capacity with animals, and in violation of city code ... if I recall correctly from that episode). When I first saw images of set 41319, I immediately envisioned a canopy for that 'big' Azure piece! I made a point of *not* looking at the instructions when I opened the box; so I'm not even sure how similar my machines are to it. One aspect I wanted to do was get those new lovely magenta curved tiles out from under other bricks! They are the half-skid cart's back seat cushion top. Even though she didn't come in this set, Stephanie has come along and chats with Amanda at the table. There's a map printed on the center of the table, so it's always there for new customers. Both Stephanie and Amanda are placing an order. The table has a boot shelf with warmer under it, so they'll be warm while sitting. Amanda is thinking about another cookie ... while you can see inside the stand -- Mia is hard at work on the Hot Chocolate machine. Hot Chocolate machine -- view of it from inside and from front counter. Amanda decides on another cup and a cookie. Mia adds more chocolate to the machine and rings up the cash register. [the 1x1 brown tile is the chocolate, as the set didn't come with a printed chocolate bar :-( ] Amanda goes for the whipped cream dispenser ~ Mmmmm! Mia gets ready for the next customer by checking the machine, plus restocking cookies and donuts. While Stephanie asks Mia about after the stand closes, Amanda enjoys the view from the bench. My version of a half-skid cart, from the parts available in this set. Basically the other windscreen was way too big, and there wasn't a piece to tilt the smaller window -- so it's formed like a resort golf cart. It just has ski-skids up front for snow. While the set does have that silly small steering wheel (that no fig can grab) I finally removed it to move the windscreen back a row and down. Let's pretend it's a self-driving cart, Tesla knock-off ;-) I love that curved tile piece! Here is the core build of the stand with only the awning, without the canopy; the furniture and equipment: Table, Chair(s), Counter, Hot Chocolate Machine, and Bench. Not being a fan of stickers myself, the "banner" is attached with only a mere slice of backing cut off; this way I can remove it and save my green flag piece. Mia and Stephanie ride back to the Snow Resort together ... "Wait, is that the same sweater I'm wearing?" !! LOL Thanks for viewing!
-
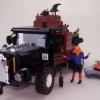
Hi guys. I've been meaning to do this for ages. Here's the Friends Hot Dog Van modded to work in a City layout. Pretty self explanatory. Eventually I want to make some furniture that can be stored on the roof and taken down once the van is in location but I'm running low on parts for that. Any feedback or suggestions would be great.
-
I was at LEGOLAND Florida yesterday and they were selling another Friends flower. Polybag 30408 is two tulips in a pot with a brick built bee. I usually see some polybag in January that I have a hard time finding later in the year.
-
Hello dear Lego fans, After having signed up here in the Eurobricks forums in 2011, I posted a new thread in the "Hello my name is..." section about my plans to create my own Lego City layout. Now almost 9 years later, I can finally show you some of the progress that has been made just at the beginning of the new decade :) Good things come to those who wait. Renovations on the attic are finally complete (apart from the lighting) and we now have around 110 m² to unleash our imagination. The current plans of the Lego city layout add up to around 60m² in size and they are, as you can see in the video, far from finished. However, I thought you might be interested in some of the things that my girlfriend and me were designing in the last couple of days. The name of the city is still unknown, but the overall design has started to take shape with a downtown area, which includes all the modulars, and shops, a residential area, an amusement park, a winter village, a train yard and a harbor/beach area. I would also like to add an airport to the city and some of the classic monorail tracks have been placed already. We are also getting into MOC a little bit and we will add our own creations to the layout as soon as they look nice! The commentary of the video is in German, but I am trying to add English subtitles into the system. Please let us know what you think here in the forums or in the comments section of YouTube. I will keep you posted on future updates if you like :) Note: All of the parts used in this layout are original Lego parts, except for some of the baseplates. I thought that lime green in the Hogwarts castle area might look cool, but I will probably exchange it for regular grass green baseplates in the near future. Thank you so much for taking a look! :) Christof
-
I recently got the Speed Champions Mini, and was surprised to learn that the mudguards also accomodate bigger wheels. After a lot of tinkering, I managed to fit a Friends figure and a steering wheel inside. (Friends cars often don't have steering wheels. This is unacceptable :p) There won't be any instructions, but hopefully this helps some people who want to build their own:
-
Hi EB, Figure I might share my Friends MOC on here. It was my main layout for the Brickworld Chicago 2k16 show! Battle of Heartlake BW16 by Chris Rozek, on Flickr Battle of Heartlake BW16 by Chris Rozek, on Flickr Battle of Heartlake BW16 by Chris Rozek, on Flickr Battle of Heartlake BW16 by Chris Rozek, on Flickr Battle of Heartlake BW16 by Chris Rozek, on Flickr Battle of Heartlake BW16 by Chris Rozek, on Flickr Battle of Heartlake BW16 by Chris Rozek, on Flickr Comments Welcome! Hope you enjoy my MOC!
-
To meet the increased military threat from Fabuland, and with the situation in Lego City escalating quickly, Heartlake City has decided to purchase the Archer artillery system to increase the defence capability of the Friends Army forces. "Nothing smells victory like burning white phosphorus stuck on the plastic of the enemy" -General Emma Archer the next-generation self-propelled gun, with barell exended to shell out peace and democracy. The "heart" of the system is a fully automated 115mm/L52 gun howitzer and a remote M151 Protector controlled weapon station (for any close encounters #metoo). All mounted on a modified 6x6 chassis of the Volvoo A30D, all-terrain articualated hauler painted in your favourite colour, The hauler features big rear mirrors for those pesky parallel parking situations when you need to stop quick for a ice cold strawberry vanilla sparkle milkshake. (Warning: Burning cities in rear view mirror may appear closer than they are.) Archer with friends, A reloading vehicle to extend the fun and a M1 Abrams for company..
-
Hi there! This is my new MOC - an alternative build of official set 21319: FRIENDS Central Perk. The inspiration behind is that displaying every set at home is so impossible for me (small flat i am living). When new sets come, old sets have to go. However, instead of putting the old sets back to their boxes, why not reducing it into an IKEA photo frame and then hang it on the wall! Then I can exhibit it with so minimal space and keep it free from dust too! I posted a short animated GIF in below link showing how to build it. I hope you will enjoy it :) https://rebrickable.com/mocs/MOC-33700/beewiks/lego-frame-friends-central-perk/
-
Hey guys! :) I got the LEGO Friends Central Perk for chistmas last year and started to moc it into a modular building. I already finished ground level with the café and need some more Bricklink orders before I can start with the first floor. I attached some pictures of my progress so far, I hope you like it:
-
My wife asked me to take apart set 40171 I gave her few years ago. When I did it I got idea to build something from it. And what is the best alternative model from any set? Helicopter! This one is even little bit special. It features opening windscreen, both rotors can freely spin and it still keeps appearence of original hedgehog - snout, thorns and four legs. So this is what you get when you crossbreed hedgehog and helicopter - Hedgecopter Building instructions are available at buildinst.cz And this is original model: Any comments are welcomed.
-
Old MOC in 2016.... The eighth addition to my amusement park. IMG_6250 by skcheung730, 於 Flickr IMG_3294 by skcheung730, 於 Flickr IMG_3289 by skcheung730, 於 Flickr IMG_6267 by skcheung730, 於 Flickr IMG_6257 by skcheung730, 於 Flickr Video:
-
Old MOC built in 2016. Hope you enjoy. IMG_6285 by skcheung730, 於 Flickr IMG_6299 by skcheung730, 於 Flickr IMG_6295 by skcheung730, 於 Flickr IMG_6293 by skcheung730, 於 Flickr IMG_6281 by skcheung730, 於 Flickr IMG_3324 by skcheung730, 於 Flickr IMG_3322 by skcheung730, 於 Flickr Video: https://www.facebook.com/skmoc/videos/950045705126688/
-
I wanted to created a Friends-themed diesel engine…. An early F7 style diesel locomotive that could be pulling a set of streamlined passenger coaches. There is plenty of commuter rail in the US still using old diesel workhorses like the fp40, so I figured a theoretical “Heartlake Express” Might be running something a bit older and more streamlined. I started off with Murdoch17’s EMD demonstrator (Here’s a link to version 3, but I modded an earlier version). I liked the 2 color livery design, and it seemed like it would be a pretty straightforward conversion to a “Heartlake Express” style livery. Given the existing parts and colors, Medium Lavender and white would be a good color scheme with some of the more functional bits (handgraps, vents on top and sides, etc. getting a light blue grey. I flirted with trying to make the trucks light blue grey, but I decided to keep them black so they would match a powered truck, as well as a custom unpowered one of the original design. I kept the 1x3 arch in the front nose Magenta, since the piece doesn’t exist in Lavender, and the extra splash of color at the nose feels fine. I could have made this piece white, but I wanted to break it up the white on the nose and continue the color from the sides...even if it was a different color. I Considered using Magenta for some other trim or accents… we will see. Maybe on the coaches. First thing I did was slightly redesign the nose. I wanted to hint at a streamline diesel design, rather than a heavy hauling switcher. I did keep the ability to light up the front headlight, from the original design by Murdock17…. There’s room to run a lego train light wire all the way to the powerbrick, undeneath the drivers compartment. Next Major thing I did was redisn the base plate so it had an opening for a powered truck cable. Given the placement of the wheels in the original design, I couldn’t use an existing train base plate, but given the double plate thickness of the original design, it wasn’t hard to keep it strong and functional. I also changed the color scheme on the undertanks below the center of the baseplate to match the rest of the “functional trim.” The cab windows were a challenge since there was no good window that looked good on the side of the cab in the correct color, so I built a frame and have open windows. Might be okay to ad a 1x1 Lavender brick and 1x1 see through brick, but I’ll leave em open for now. The ladder up between the hand grips didn’t have a 1x2x1 panel in the correct color, so I built out a slightly deeper solution for the lavender portion of the steps. Not perfect, but meh. I also think it's possible to build functional opening doors with the 1x4 swivel base, even though they don’t come in the right color, using tile plates… but that bit of detail along with the above “window” fix may be for the next version.. Since there aren’t any doors, I need to make this with a removable top to put the figures inside and to also allow easy access to the Power Brick. In order to do that, I had to move the side vents down 1 plate lower. I opted for a single removable top. With the new power functions receiver, it can be completely internal… No need for a line of sight IR transceiver. Just a 4x4x8 block internally. Next big thing was to create an interior driver’s compartment. I rejiggered some of the front interior, so I could simply place a built out cockpit block inside the body. This allows for replacing a mini-doll cockpit with a minfig cockpit. Most modern Lego city trains only have room for 1 operator, but I added a side facing control counsel, since there is so much room inside this. A bit out of spec for the prototype, as this driver area extends it back where the side venting is.. But again… I don’t care… It’s a nice balance between external visuals, and play value. I could add windows up there, and where the front top vent is, but that too is for a 2.0, I think. I could also then move the fans back to be above the theoretical placement of the diesel engines. With the driver’s compartment section and the power brick providing a bunch of stability, I removed all the crossbeams that ran through the interior of the original design, and created a base for the power brick that allows cables to run underneath it. If I was really being hardcore, I would make the front roof, and the back roof separately detachable. But all one piece probably provides a bit more stability. Also given the rear grab handles, I could possible make a visible Diesel engine in back section, but I’ll save that for version 2.0. There is probably an opportunity to use the fan hole as a place for the power on/power off switch. Again, something for 2.0, I think. I didn’t care for how the transparent dishes looked on the side of the original model, so I swapped them out form some round plates… The original prototype had windows under the vent, and that is what the dishes were modeling, but I decided for some external knobley/crunchy bits to break up the side panel. In real life these dieseals were constantly getting cutouts, and boxes welded onto the side, as engine and component upgrades demanded. I made the front round tile on the side a pre-printed piece from the lego elves set. This would be a nice spot for a custom printed Heart Lake Express logo…. A heart with Wings...
-
Your thoughts to improve upon this would be appreciated... for the sequel. More traffic, action, etc...
-
 Hello Everybody! I made this for the winter contest ( Friends bringing "Christmas Greetings" to Ms. Stevens ) - Just Love Lego Friends ( the colours, the nice faces the animals ) Just Great! Hope you like it! Happy Holidays and have a Great New Year! - Singing "Christmas Carols" to Ms. Stevens - the wood keeps dry enough to put in the fireplace - the water-pipe is not frozen yet - as a surprise for the girls, there is a present for everybody ( and donuts!!! ) More pictures here : http://www.brickshelf.com/cgi-bin/gallery.cgi?f=567380
 -
One of the first Friends buildings I bought for/with my daughter was the Heartlake Food Market, and when she lost interest in it, I started working on a Modular rebuild. I'd seen several 3 story versions that looked kind of generic, but I wanted something that incorporated the "attic loft" feel of the original model, maybe with some dormer windows in the roof line. Switching the entry to 2nd story studio to the back was critical, and I kind of like how that back stairwell/landing turned out, though I still need a couple of finishing details. I also wanted to elevate the height of the store, so adding a line of windows above the canopy, while keeping some of the purple stripe color detail from the original was a goal. I had it sitting around, mostly unfinished because I didn't have the right color bricks, but I finally just demo-ed a finish, mostly in white and whatever I had sitting around. I'm going back and forth on some of the window treatments, and I got rid of the brick top along the top of the second story after originally keeping it. I've got a lot more detailed work to do inside, and I'm not entirely happy with the columns on the back... need some pink trim, so they match the columns on the front balcony maybe, and maybe the shutters AND columns are too much on back, but the attic loft has room for small bedroom, and bathroom, separated by a full sized door/door frame. And I'm not entirely sold on some of the front trim details I've used though i do like my tile and cone railings on the balcony. Any thoughts or ideas for future versions/final colors are welcome. Here's a bunch of shots I couldn't upload. https://goo.gl/photos/ASQy6Dz3LPxhzdPT8 Kind of a mess/work in progress. but its MY mess!
-
.thumb.JPG.9c0e760daa3b93fff783c83e550e94bd.JPG) Let me know what you think of this short brick-film!
Let me know what you think of this short brick-film! -
Hi there, I would like to share my latest Friends Theme MOC Creation MOC Title : The Horsemen Townsquare (Friends’s Theme) LOM Builder : Denil Oh [Denil-MOC]-The-Horsemen-Townsquare---4 by denil oh, on Flickr (https://www.flickr.com/pho…/denil85/albums/72157672638294213) The Horsemen Townsquare finally completed! This is for the upcoming event in Malaysia, located in One Utama Shopping Mall. The LEGO Event “Build Your LEGO Christmas”. The Horsemen Townsquare will be display in Friends category. The overall built consist of 6 modulars size building, we have Cup Cake Shop Cafe, Supermarket, Fruits Shop, Musical Shop, Party Shop, and the last one is Flowers shop. The Centre of the Townsquare have a gold statue of a horseman with beautiful fountain surrounding to it. The town square connected the Horse Riding Camp, this is the place the historical horseman train up his riding skills, as a memory, the riding camp is well maintain until today :) Hope you enjoy the creation done by our local Malaysian's Builder - Denil Oh from LUG Of Malaysia (LOM) [Denil-MOC]-The-Horsemen-Townsquare---1 by denil oh, on Flickr [Denil-MOC]-The-Horsemen-Townsquare---2 by denil oh, on Flickr [Denil-MOC]-The-Horsemen-Townsquare---3 by denil oh, on Flickr [Denil-MOC]-The-Horsemen-Townsquare---5 by denil oh, on Flickr [Denil-MOC]-The-Horsemen-Townsquare---10 by denil oh, on Flickr [Denil-MOC]-The-Horsemen-Townsquare---7 by denil oh, on Flickr [Denil-MOC]-The-Horsemen-Townsquare---8 by denil oh, on Flickr [Denil-MOC]-The-Horsemen-Townsquare---9 by denil oh, on Flickr [Denil-MOC]-The-Horsemen-Townsquare---11 by denil oh, on Flickr [Denil-MOC]-The-Horsemen-Townsquare---16 by denil oh, on Flickr [Denil-MOC]-The-Horsemen-Townsquare---18 by denil oh, on Flickr [Denil-MOC]-The-Horsemen-Townsquare---19 by denil oh, on Flickr [Denil-MOC]-The-Horsemen-Townsquare---17 by denil oh, on Flickr [Denil-MOC]-The-Horsemen-Townsquare---20 by denil oh, on Flickr
-
INTRODUCTION This set is part of a new birthday party sub-theme in the Friends line consisting of 5 individual sets and is the second largest, and only one of two that come with a mini-doll. All five sets include animals, a gift box and a party invitation. Other sets in this theme are: 41110 Birthday Party 41112 Party Cakes 41113 Party Gift Shop 41114 Party Styling TECHNICAL: Set Name: Party Train Set Number: 41111 Number of Pieces: 104 Theme: Friends Designer: unknown Availability: retail Year Released: 2016 Price: $ 9.99 / € 9.99 Stickers: 0 New elements: 2 Exclusive minifigures: 1/1 Brickset entry Bricklink Inventory PARTS SELECTION: The set gives us a lot of recolored pieces and two new elements, the little chipmunks, or hamsters as bricklink refers to them, and some party hats. They are both obviously Friends style items, but I am sure fans of minifigures will find a use for them. The set comes in a box with two unnumbered bags. One of my favorite parts here is the new colored bike element in Bright light orange. We had a yellow bike in one single old set, so this is as close as it gets to that if you missed out on the one from the 90's. That's a new print on that 1x2 tile, and I assume it's an invitation for a birthday (or other) party - useful piece for generic use.The trans-clear round tile with pin isn't new as we got it last year, but if you missed it, you can get two of them here plus one extra. I am not exactly sure what they represent in the set, but they are useful pieces, so I am not complaining. The party hats are completely new elements and are held with pins like all the other Friends hair accessories and you get them in 3 different colors and an extra of each. The bright light orange 2x2 tile with bow print is in fact an inverted tile, it has studs on the bottom to fit snugly between panels of a box - these tiles aren't very common in general, and this might be the first printed one. MINIFIGURES: The little animals have holes in their heads so they can also hold accessories. I am not sure if these hamsters would be of use in a non-Friends environment, but if you find them too "cartoony" you can just pretend they are stuffed toys. Stephanie comes with an exclusive torso print for this set, and her hair is one of my favorite hairpieces for use on minifigures. It's her birthday, but she doesn't look a day older. BUILD: We start off with a gift box containing a bow and a little postbox so Stephanie can mail the invitations to her friends. Mind you she only has one, so I guess she doesn't want to attract a crowd. The next build is what looks like a park slide for kids, not sure exactly what all the pieces represent, there is something that looks like a soap dispenser attached to the slide, but just use your imagination, I suppose it's part of the venue where the party will be held. And then the actual train is powered by a push-bike connected to the carts. This may be the reason Stephanie only invited one friend, she only has room for one other person with all the gifts and pets. The first car has one of those panels to hold a mini-doll, the others are just 2x2 jumper plates. The bike element was designed long before mini-dolls so they aren't really adapted for them. She can loosely be seated on the seat, but her hands can't hold the handlebars which is a bit awkward. Maybe the friend she invited isn't a mini-doll. Leftover parts: CONCLUSION: The set is a great template for your own imaginative play and building. I don't think anything here is set very firmly to any particular story. Most of it doesn't make much sense from a grown-up point of view, but it's a great selection of parts with lots of variety and I think it can go very far for the low size and price. I am not going to estimate brick value here because there is more to it than that, This will be someones first LEGO set, any they'll always remember that funky, hamster-powered bike train. Just to get some AFOL perspective here, This set will probably be appealing to most of us for the bike. This is the 8th re-color of the bike element since 1985. The mold changed once for both the frame and the wheels, but the design remains unchanged. It works a bit better with classic minifigures though. Overall Design: 5/10 - Little brick goes a long way here, and just enough context is given to know what's going on, but I would have liked more accessibility which is partly due to restrictions of the mini-doll design. Parts selection: 8/10 – Considering the size and cost of this set, you get many new, and unique elements and no stickers. Play features: 8/10 – This set is all about play. Challenging build: 5/10 - I should look at this from a child's perspective, and I think it's just the right ratio between interesting and easy. Minifigures: n/a – I am no expert on mini-dolls, and I'm slightly biased when it comes to Stephanie because I like her hair piece. There's one figure, and it has unique printing, so that must be a win. You will have to get at least one other set to have someone to actually join the party though. Overall: 6/10


.thumb.jpg.9400eadc5ab2688d3f584793772fa5b9.jpg)