Search the Community
Showing results for tags 'Ferrari'.
Found 22 results
-
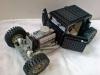
 Hello together, what is going on in this year´s supercar battle?? It seems to get quite intense and I really enjoy it to see so many posting outstanding MOCs here with a clearly visible improving standard requirements put on supercars. So let me give you some more: the LaFerrari. Not all people like Ferrari, some prefer non- PF supercars and some are tired of red supercars at all. But honestly - I don´t care ;-). Hopefully the Lambo fraction will like it anyway too;-). I think everyone knows the real car, if not – visit the homepage, so I don´t need to describe it. Its concept is different, innovative and unusual as my MOC was designed to be as well. The project started about 1 year ago. After the LaFerrari´s appearance at the Geneva Motor Show this mind blowing car was my next one to recreate. Not in 1 day of course. The goals for the final product were set high from the beginning. The main objectives were: - increase speed using 2 XL motors + 2 additional L motors, similar to the 2. engine in the real car - best possible functionality with full range PF equipment - “gapless” bodywork concept - a fair tribute to the real car by keeping a strict scale The resulting facts: – 1:10 scale; L62 x W30 x H15 studs (49 x 24,5 x 12 cm); 1-1,5 stud ground clearance – weight: 2,5 kg – parts amount: 2.000 + (including 52 Technic panels) – independent wheel suspension – RWD with 2 XL motors + 2 L motors – servo steering coupled to working steering wheel + working rear spoiler + rear diffusor winglets – remotely openable wing doors driven by 1 M motor – manual door selector (screenwiper) – self engeneered working 12 cylinder fake engine – flash lights mode - pole reverser coupled to engine – separate manual coupling for engine & pole reverser – manually openable rear hood – 6 pairs LED lights engaging by 2 different functions & circuits – control by 2 sets control units & IR V2 receivers – powered by 2 LiPo batteries with easy charge access The car is to 97% finished now and has some flaws, so another year left to finish it ;-). But this weekend I will try to make a YT video of it as it is to show the functions. There is also a small LDD file for the drivertrain available on my brickshelf account (folder not public today). I won´t make instructions for the car, maybe only complete the LDD for the chassis and the functions only. Enjoy! brunojj1
 -
Hi all, Back with my second MOC after some weeks of buying bricks, thinking, scetching, scratching my head, building and buying more bricks. Scorpion house is a modern hillside villa overlooking a lake. Partly built into a rocky terrain it features four levels. The house is designed with basically six boxes of different sizes in just black and white. I do like such designs a lot, so the second proper MOC had to be such a design as well. Initially I wanted to build something rather extreme in terms of technique, based on the design ideas in this house from swiss architect Andre Treina. http://www.schoener-...g-haus-am-hang. I saved that for later with all those angles and massive height. The idea which I finally kept, still stretching my design and lego capabilities, is a house built for a car lover (personally I'm not ;-)) on a hillside terrain and several boxes with concrete and glass. The glass front faces the lake and provides spectacular views, especially from second and third level. The back of the house includes much less windows as it faces a steeper hill. Scorpion house - modern hillside villa by Polar Stein, on Flickr Scorpion house - sketches & layout by Polar Stein, on Flickr The main entrance and big garage is at ground/street level. The owners had ordered the garage door in Ferrari red as they own an Italia GT2 model, which is driven mostly by the wife. The main entrance connects to the house with a six stud wide corridor or tunnel to the main building. The beloved car can be seen through large glas windows walking through the corridor (and also top windows next to the swimming pool). The garage provides a small service access for the pumps and pipes of the pool. At the end of the entrance corridor stairs lead up to the first level. Scorpion house - modern hillside villa by Polar Stein, on Flickr Scorpion house - modern hillside villa by Polar Stein, on Flickr Scorpion house - modern hillside villa by Polar Stein, on Flickr Pictures from above where done by the lady with the quadcopter. Scorpion house - modern hillside villa by Polar Stein, on Flickr At first level we face a small bathroom when leaving the stairs. Turning right either leads up to the second level or two steps down to the kitchen and eating area. Glas doors open to the swimming pool and (way too small!) front garden on top of the garage. Scorpion house - modern hillside villa by Polar Stein, on Flickr On the second level there is a large bathroom with a steam shower and access to the small sauna. The roof is with glas elements just over the bathroom area to provide natural light. Yes, the sauna provides stunning views through a large glas window over the lake. The owners are aware that they could be seen from the street. Those who prefer a different layout may turn the whole left box into staircases or assume the owners use their swimwear (what a sin). The second level also contains the living room, again with stunning views over the lake, the master bedroom and a room for the child. The master bedroom has a glass roof as well to watch the stairs while lying in bed. Access to the third top level is via spiral stairs. Scorpion house - modern hillside villa by Polar Stein, on Flickr Scorpion house - modern hillside villa by Polar Stein, on Flickr Scorpion house - modern hillside villa by Polar Stein, on Flickr Scorpion house - modern hillside villa by Polar Stein, on Flickr Scorpion house - modern hillside villa by Polar Stein, on Flickr The third floor just contains a studio with a working area for the architect owner. As a hommage to his favorite football/soccer club, the color scheme of the studio is again black and yellow. Scorpion house - modern hillside villa by Polar Stein, on Flickr In case you wonder about the name of the house, look again at the garage door handle. It's the wife's star sign. Scorpion house - modern hillside villa by Polar Stein, on Flickr More pictures on Flickr including some interiors (I'm not great with interiors). I'm reasonably pleased with the overall design and shape of the house itself, architecual effects with technic bricks are more reduced this time. I need to think of a way to improve the actual terrain and don't like that it looks a bit packed. I'm also not too happy with the rocks which I wanted to do a bit larger and with a stronger influence on the shape of the terrain, also extending behind the house on the left side, almost reaching into the pool etc. Maybe next time. I also find it difficult to do proper pictures. Comments and critique very welcome!
-
Hi everybody, new guy here! I'll admit, I've been reading and following Eurobricks for years, more years than I can count fingers on my hand. I officially signed up a couple months back, but have yet to post anything until now. I wanted to have something interesting to show you guys before I did, and now I do (hopefully). Allow me to present my custom LEGO Speed Champions MOC's! First of all, I love the Speed Champions sets. As a car guy and a LEGO fan, these are the best of both worlds. That being said, the designs leave a lot to be desired, which is also part of why I love them so much. I see an opportunity to exercise some creativity and do some hands-on building to make them as accurate to their real counterparts as possible. It starts with widening these models to 8-studs. That makes them too large for City-scale, but improves the look dramatically. Plus, with the added dimensions, you can put more detail into the models and get the proportions of auxiliary features (such as lights, exhaust, grille, etc.) correct. Truth be told, many of these had been in the works for almost a year, the first wave, that is. Most of the second wave is still in the works, though the Mustang and Corvette you see above are almost done. I've been constantly tweaking, retweaking, and fine-tuning my designs and I feel like I'm never fully satisfied with any of them. Some of the cars you see above haven't been fully completed. Some of the other Speed Champions are not shown in the photo because they're still half-built. In time, I will eventually show all of them. Today, I'll be showing one that has been completed to my liking: the Porsche 918 Spyder. With these models, I stick to a few rules that I set for myself: One, use as few of the stickers as possible. Stickers can only give so much depth; therefore, brick-built designs will look more authentic. Two, no custom parts or custom stickers. In the occasion that I do use stickers, I only use what's given on the sticker sheet. Three, no illegal building techniques. I want these to resemble a model that LEGO themselves would put out as a set. The common opinion is that the Porsche 918 is the dullest of the first wave of Speed Champions. I quite enjoyed tooling with this one, and it was actually easier than expected. I ditched the stickers for the front and rear intakes. I used stickers for the badges, fuel caps, and headlights. Technically, I could've gone with trans-clear cheese slopes for the headlights, but it didn't look quite right to me. I'm not a fan of the Speed Champions window/cockpit pieces for doing 8-wide builds. This is a Spyder, so it wasn't too hard to come up with a brick-built substitute. Without the window pieces, I'm now able to fit two minifigures side-by-side. It works because the construction of the sides is relatively simple and not very bulky. Being a convertible also helps too. I went with the brown leather plastic interior because I think it looks very classy. I try to recreate the interiors as accurately as possible. Side mirrors are an extra touch for added realism. This model also features a removable front trunk (frunk?) that can fit a couple of the suitcase pieces. You can see it in the short little video I have below! So, that's it for my first post! Let me know what you guys think! I'm always open to constructive criticism and if you have any alternate building techniques in mind, I'd love to hear about them! Also, please let me know if I'm doing something wrong with regards to posting and/or forum conduct. I'm still learning!
-
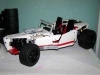
.thumb.png.a3b5e17a7221332a720aa1625db98c1f.png) Inspired by the work of Noah_L on Flickr, I've been working on an LDraw design for a 1:17(ish) scale 2016 Formula 1 car. I've tried to capture as much detail as possible, based on photos from the SF-16H launch photos. Comparison shots below. Any feedback would be appreciated before I finalize the design and begin ordering parts. UPDATE: I now have this built, so I've replaced the renders below with photographs. This came together really well, and I've only made a few minor tweaks from the original LDraw design. These included switching to a square air scoop above the cockpit, reversing the 1x3 wing angles above the sidepod air intakes, and adding a little more detail to the engine bay. As you can see below, the front and rear wings, engine cover, wheels, and even the V6 engine are all detachable. The front wheels also feature posable steering. Click here for the full Flickr album.
Inspired by the work of Noah_L on Flickr, I've been working on an LDraw design for a 1:17(ish) scale 2016 Formula 1 car. I've tried to capture as much detail as possible, based on photos from the SF-16H launch photos. Comparison shots below. Any feedback would be appreciated before I finalize the design and begin ordering parts. UPDATE: I now have this built, so I've replaced the renders below with photographs. This came together really well, and I've only made a few minor tweaks from the original LDraw design. These included switching to a square air scoop above the cockpit, reversing the 1x3 wing angles above the sidepod air intakes, and adding a little more detail to the engine bay. As you can see below, the front and rear wings, engine cover, wheels, and even the V6 engine are all detachable. The front wheels also feature posable steering. Click here for the full Flickr album. -
Initially posted here as LDraw renders, here are my completed city-scale McLaren F1 GTR and Ferrari 458 GT3. I started by heavily modifying Henrik Hoexbroe's McLaren model to fit a minifigure driver, and then modified the same base frame to produce the 458 Italia. The models feature Speed Champion rims on regular city wheels and fenders, and detachable engine covers and rear wings. Click through for the full Flickr album. As always, feedback is welcome.
-
 Hi all, + = This is my entry into the C model contest - a Ferrari 458 Spyder. I wasn't going to enter this contest (as I don't own any post-2005 small models) but when I checked rebrickable (thanks whoever suggested that!), I found I had around 75-80% of the above models in my collection, and that was enough to go. Functions: HOG steering - Doors Folding Roof (the HOG is on the bonnet for two reasons - one, it doesn't work with a folding roof, and two - the two models above don't really contain parts to construct a horizontal steering column. Given the functions are minimal, I tried to get the details and scale as close as I can - front splitter, headlights, rear tail lights, exhaust, with interior. It is my first non-studded MOC - it took quite a few attempts to the get the chassis stiff enough. Apologies for the ordinary photos, I will try to improve. [Edit: the pesky "illegal" pin has been replaced with axle and bush. Photos now updated.]
 -
Well that's the bar re-set! I think this is the first time I've ever felt compelled to start a topic about someone's MOC. More pictures here: http://thelegocarblo...icture-special/ Incredible stuff.
-
 Hi there, I guess what I'm about to share fits in this forum section.. I have made some great Lego models of my favourite supercars from the 80's. Tell me what you think of them. Porsche 959 https://www.flickr.c...in/photostream/ And here's the Ferrari 512 TR: https://www.flickr.com/photos/51947759@N04/13159148223/in/photostream/ And here's my own fantasy model of a supercar:
 -
There was already an american iconic muscle car and a classic roadster, now let me take you to the old continent, to the cradle of sports cars industry :). Here we go in Maranello, Italy, with one of the latest middle-engine cars - Ferrari 458 Italia Spyder. Of course, one look is enough to notice, that it isn't the exact recreation, rather a "heavily inspired" MOC. The original shapes are too tricky, especially at this scale, so I've decided to take different principles - the goal number one was not to make the squary front-end. I've failed to recreate the exact shape of the bonnet and front lights (the huge mudguards didn't help at all ;)), so I've decided to make the car just low-profiled and smooth. The rear part was tricky, too. The car's proportions forced me to make a half-stud offset - I've used over the dozen jumpers to make the rear (engine, axis and bumper) firmly fixed :). As most of my MOCs, it was revised early in 2014, including use of 2x1 curved slopes and new style wheels - the first car I like their look - I've tried it with Cobra too, but it looked just ugly. More photos on my flickr page. My other presentations:
-
Hey guys, is there any set you feel was ruined by its over abundance of stickers? Mine's the F430 Challenge
-
Hi, just got the last of these 3 cars finished so thought I'd post them up here: All 3 of them are modular, so all body pannels, spoilers, nosecones are removable, engine, gearbox, etc stripping down to the drivers tub. 1979 Ferrari 314T4 Link to full album with interior parts (and also a small sclae version): 1979 Renault RE20Turbo Link to full album: 1975 Brabham BT44B Link to full album: Hope you enjoy :)
-
[Edit, 12 October 2015] Note: This thread is discontinued. If you're interested in more cars of this sort please join me on Flickr. [/Edit] Hi all, after all the LCS and airport stuff it was time to build some new cars - or rebuild some older cars according to the actual scheme of widths. In this thread you'll find some actual sports cars (to be continued). List of cars in this thread #1 Ford Falcon (Mad Max Interceptor) #2 Ford Mustang Convertible #3 Ford Mustang Fastback #4 Dodge Charger #5 Aston Martin DB5 #6 Ferrari Daytona Spider "Miami Vice" #7 Ferrari 308 GTS (Magnum, P.I. edition) #8 Mustang Shelby GT 500 "Eleanor" #9 1970 Plymouth Hemi Cuda #1 Ford Falcon (Mad Max Interceptor) The old Mad Max Interceptor (which might be known to some people) didn't fit any more into the actual range of widths used in the town project. Thus the following aspects were changed: width reduced from 7w+ to 6w+ lower roof line (back of the fig must be slanted, but it works) exhausts are situated more under the body than before tanks dark grey instead of red some minor changes #2 Ford Mustang (classic version) 6w+. Fits one whole minifig (two are quite difficult with this setup). #3 Ford Mustang Fastback A sportier version. #4 Dodge Charger The Charger is based on derjoe's amazing design which is very well known (see www.flickr.com/photos/53163759@N04/8554110987), but with quite a few modifications. The main point here is that "behind-the-tile design" which allows some unusual slopes - a concept to be further developed, I guess. 6.8w (6w plus two tiles), fits one fig (two are quite difficult with this setting, something to improve). Some more pics on Flickr. Thanks for looking, c&c welcome as usual. To be continued.
-
Hi all, as I mainly visit the "train" section of Eurobricks, this "town" section is quite "alien" to me.....I'm not even sure if its the right place to post this, but nothing else seems to be suitable, so here goes: Flickr set / album: https://www.flickr.c...57644419561432/ I've always said to myself that I'd love to revisit this, as its a car that I loved back in its day, and I used to build it while watching the F1 with my Dad. Its not quite minifig scale, as the scale was dictated by the wheel / tyre proportions with front / rear, however, a minifig doesnt look out of place in it. Anyway, this was more of a "get re-aquainted with it" project, to set me up for a large scale version, which is well out of my comfort zone but something I've always wanted to do with this car. I was highly inspired by Tamiya catalogues back in the 70's, plus my cousin had some of the 1/12 scale F1 car models which blew me away when I saw all the fantastic working details in them, ................so this is something I aspire to now with the next build of this at a large scale, I hope to be able to cram all the detail that I "really" want to get into a larger scale model.
-
Here is a Ferrari LMP1 Car I recently completed, built in the Model Team/Creator Expert style. It is based on this fictional Ferrari LMP1 Concept design by Oriol Folch Garcia. The model contains just over 1,000 parts and features many detachable sections and lots of internal detail. The front section is removable and reveals (non-functional) steering and suspension detailing, and an electric motor on the front axle. The cockpit cover detaches to reveal a racing seat, pedals, adjustable steering column, fire extinguisher, and a water bottle. The engine cover also detaches, revealing a removable V6 hybrid engine within a detailed engine bay. The model was fully designed in LDraw. Instructions available at www.bm-mocs.com. Click through for the full gallery.
-
Inspired by the good old Ferrari Racers theme, I rearranged the design, created some stickers, and this was the result: Renault R26 Ferrari 248 F1 More cars here: http://bricksetforum...990-2006#latest
-
Ferrari La Traviata MOC based on Ferrari Rossa concept from 2000 and Ferrari F1 car: Photoshop'ed:
-
 I have decided to make a Ferrari 250 GTO and decided to bring it here for constructive criticism and the likes, so here it is. The first picture I took of it. Ferrari 250 GTO Wip by T.timman, on Flickr Left side view with my sig-fig on top. Ferrari 250 GTO Wip by T.timman, on Flickr Rudimentary rear axle for test purposes. Ferrari 250 GTO Wip by T.timman, on Flickr The bottom Ferrari 250 GTO Wip by T.timman, on Flickr The front, showing the front suspension (which at the time is the only suspension it has) Ferrari 250 GTO Wip by T.timman, on Flickr It currently is in a "see if it works" stage, I will be adjusting the rear to live axle soon. I look forward to sharing more of this with all of you when it starts take shape.
 -
 As an example of one of my earliest efforts of large-scale Technic projects, I thought I'd share this here - my (now dismantled) Ferrari FF. After scrapping my 599 Ferrari a couple of years ago, I long pondered about what I should rebuild it into. That is, until I found out about arguably the most unusual Ferrari of them all... the FF. I loved it. So, I had to build it. Ferrari FF by Octav_spot, on Flickr I have to say, the cable Technic parts came in handy to emulate the FF's curvy shape... I just wish I had more of them. FF Profile 3 by Octav_spot, on Flickr Since, y'know - it looks kinda naked... FF Headlamps by Octav_spot, on Flickr I'd spent hours on the FF's front-end - so, as a result, it was my favorite part of the whole car - If I stared hard enough at it, I could almost look past the gaps in the fenders and see the FF's sloping LEDs... FF Profile 2 by Octav_spot, on Flickr All in all, I was fairly pleased with this MOC. It had all-wheel-drive (albeit, via two separate XL motors, one in front, one in back) and despite its size, it was relatively light. And even though the FF is all but gone now, it was enough to get me thinking about possibly trying my hand at the stunningly-beautiful 458 Italia... Anyway, Enjoy! :D
 -
I'm looking for a set of four tires and rims from any of the following sets: 8458-Silver Champion 8461-Williams F1 8674-Ferrari F1 I'm not asking to get them for free. I will pay. Any offers PM me please. I would prefer a US seller for shipping reasons, but any offer will be considered. Thanks
-
 Here's something you don't see often -- a Lego racecar made with an onboard intelligent brick! Laurens Wuyts posted this YouTube video of his Lego Mindstorms NXT Ferrari 246 model. His Flickr photostream shows many of the details. He credited Sheepo for the suspension design. http://www.youtube.com/watch?v=mWHy3a-aSHU
 -
As originally published at Nom-mage Since I haven't been able to get the 30190, I'll review the minifig set of the Shell promo, the 30196 Ferrari Pit Crew. I must say, this promo set has the most value. Three minifigs for about 3 EUR at the most is a very, very good deal! The Polybag This set has 50 pieces, which is a lot considering this is a minifig set. Minifig parts Their accessories Instructions As expected from Lego Ferrari sets (and as seen in the minifig parts), this would require stickers on their torsos. Not using them would just make the minifigs "generic". Sticker sheet My favorite piece here would be this one. I forget what it's called (Erlenmeyer flask?) Reminds me of chemistry class Again, 3 EUR for 3 minifigs is a good deal. Of course you have to gas up at least 25 EUR of Shell fuel (Philippine mechanics) The minifigs Ferrari Race Mechanic with jack Ferrari Refuelling Engineer with refuelling machine Shell Track Scientist and her chemicals The refuelling machine was the most "complicated" build, but the chemicals were the most intriguing with all the transluscent pieces, and of course my favorite Erlenmeyer flask. After all was said and done, the set yielded 4 extra pieces. Seems like most Lego Ferrari sets that has minifigs would always include an extra visor. Extra pieces The whole gang Pinoy minifigs clowning around with the crew On to the ratings: Design: 4.5/5 - The race mechanic accessory was pretty straight forward, but the refueling equipment plus the chemicals had a great look in spite its size. Parts: 4/5 - lots of translucent round plates, perfect for Lego cars, plus that Erlenmeyer flask. They could've explored a different jack for the race mechanic though. And then there's the stickers :| Build: 3.5/5 - pretty straightforward. Nothing special. Stickers were a pain as usual. Playability: 4/5 - can be easily added to any Lego town or Lego Ferrari set. Price: 5/5 - can't say it enough. 3 minifigs for less than 3 EUR is a steal! Overall: 4.2/5 They say you gotta have an oil change for a chance to get this set. Then again, I got this set with a normal fill-up. Try asking your local Shell station, you might be lucky like me!
-
 http://www.ebay.com/...=item2c697f6e00 First off, if this is you skyliner then hats off to you! I have ranted a few times about how much I struggled to find an affordable version of 8145 and when I finally did I thought the model was rubbish. Now...well this version just looks fantastic and I would love to have it. Plus...thats like 12k (6 from what I can see) in 19L flex axles according to the Boratko Store Prices. Of course some people on here will drool over the possibility of purchasing the model only to part it out. Let it be written..."This model shall not be parted-out"