
Erik Leppen
-
Posts
2,179 -
Joined
-
Last visited
Content Type
Profiles
Forums
Gallery
Everything posted by Erik Leppen
-

[MOC] Motorized Cherry Picker
Erik Leppen replied to Anto's topic in LEGO Technic, Mindstorms, Model Team and Scale Modeling
Wow, nice model! I really like the modest size, and the colors work really well. Great job getting all those functions in. I like your solution for the gearbox, smart way of separating the direction and the functions. How strong is the part of the boom with the large panels? How is that connected at the top, to prevent bending? -
If I were to say it, TLC should release "color packs" with a variety of parts in a single color, for all main colors used in Technic. I wouldn't care if it was €0.20 per part. Problem: the scarcity of parts in a certain color is probably par of their business model... (for proof, see all rare-colored sets)
-
The rule is simple, but the judges aren't sticking to it, and disallow situations that seem fine to me (so, apparently, it's not simple for me - and I'm not dumb or whatever, but I am precise). When I have access to my home PC with MLCAD again, I will show some examples of what I mean.
-
Good work om the bot so far, but I personally am not a fan of the large size. This is mainly because of all the empty space in the middle. I like efficient space usage; compactness. Currently, all that's there could also be in a smaller bot. But you said you had some plans, so I'm looking forward to how you will be using all that space. I do personally prefer a single main weapon over multiple smaller ones by the way. Also there's some unused space between the L motors and the XL motors for the drive. You could save space by flipping the portal hub 180 degrees so the 12t gear is on the other side of the 20t, and theXL motor moves 4 studs towards the L motor and you get 4 studs of extra space between the front and back XL motors.
-
Good observation. I think the problem is not so much that there are fewer individual angle connectors in colors, but that it's a rare case that all six connectors exist in one single color. In my collection thd largest amounct of colored angle connectors is still the red ones from 8448. Even in a color as ubiquitous as yellow, I am still missing #2 and #4, and I only have a few #3 and #5. For white, #3 and #4 are missing and #5 and #6 rare. I often need to use grey or black connectors as placeholders. In many sers, panels and some beams are about thd only colored parts. (42064 has 24 dark blue parts: 5 beams and 19 panels. Zero connectors.) Connectors are now usually in a neutral color such as black or grey, with few large parts defining the color. I think it's a shame. I like panels, but I prefer a variety of parts in a single color in a set.
-
[TC11] Wimbledoom
Erik Leppen replied to Erik Leppen's topic in LEGO Technic, Mindstorms, Model Team and Scale Modeling
Strength and compactness. The connections have zero play ad are much stronger than pinned connections, because pins are hollow and studs are solid. The two 13L beams conndeted by 1x4 plates acts like a single 26L beam. As a consequence, the whole triangular frame acts as a single large piece. As long as theforce is perpemdicular to the direction of the studs, there's no problem. If it was connected by pinned beams, there would be more bending. Also, the large springs are slightly larger than 1 stud in diameter (which is why I normally never use them), so I needed a solution that was less than a stud wide in order to keep the whole unit as flat as possible. A fully studless solution would likely have become 9 studs high instead of 7 now (or 7.8 including the plates). -
I agree the rule shouldn't be changed now. But I hope discussions like this can be prevented by making the size rules simpler for upcoming contests.
-
REVIEW: Solomon R. Guggenheim Museum
Erik Leppen replied to Bob De Quatre's topic in Special LEGO Themes
Could you do a few picture drom other angles? The internet is full of front views, but I' m curious to see the side views and back view. -
I have to say the size rule is really badly thought out. I'm seeing various discussions in various discussion topics for the entries, and there's a lot of confusion sbout something that should be dead simple . Has to fit within 45L in any direction? Then it should fit in a 45-diameter circle. With 45 max height this is a cylinder of height 45 and diameter 45.. Has to fit in 45L in any direction in 3D? Then it has to fit in a 45-diameter sphere. I agree that's not practical, but right now the bounding box is a cube. It has to fit in the cube, so the top view has to fit in a 45x45 square, which is in agreement with what we see on battle bots TV show that have colored squares in the arena. But this square has a diagonal of just over 60. So, a 40x40 square bot is allowed, no matter the color scheme, so the diagonal stripe on top of it is allowed, which is 56L. But a diagonally placed weapon of the same size is apparently too long even if it's well within the box. Either change the bounding box to a circle, or accept that diagonal parts can be up to 60. As it stands now, the rule is just not consistent with itself, and therefore automatically arbitrary. Think this through better next time.
-
[TC11] Wimbledoom
Erik Leppen replied to Erik Leppen's topic in LEGO Technic, Mindstorms, Model Team and Scale Modeling
I moved one side of the trisngle out of the way to make space for a wheel. I wanted a fairly big wheel, but I don't have motorcycle wheels. The biggest wheel that fits is the good old truck wheel from 42043 and many other sets. Doubling the whole thing, and adding a simple drive system in between. The wheels are just far enough apart to have enough force for rotation and drive. I added a batter bos and receiver module in the back. This was more work than I expected because the original design didn't have room for the connectors for the receivers. So I had to change the whole shape of the BB holder. I'm not entirely happy with the bump in the back, which makes it 3 studs longer, but I wanted an easy-access on-off switch. Here's a bottom view. Also as you can see, I decided on a color scheme: lime with yellow, and the rest in greys. The BB module is easily removed by pulling the 8L stop axles. Also the drive motors (will be M motors) go on the brown 3L axles -
I guess it's time to share my works for TC11. To be honest, I started building almost on day 1, so this means I tried out a lot of things that didn't work, and that I won't show all. Anyhow. So, my first plan didn't work because it didn't fit the box (remember the diagonal question? It was a long thin design.) Secondly, I didn't want to do a spinner. A spinner seemed boring to me. I wanted to do something bit more technical. A lifter? A slammer? I built a lot of (non-functional) battlebots back in the studded age, when I was still a nerdy teen, but I don't have those photos anymore (which is a shame). A few bots I do still remember, so I chose a design from those that I always liked. The concept is this: So, it's a "horizontal dual hammer" bot. I think there are very few horizontal slammers, and I think it's cool. The original was named "Wimbledoom" because it had a flat top with some sort of a stadium with two figs and a tennis net (white fence) and some minifig audience. So let's use that as a working title for now (even though the tennis theme won't return) The idea is that there will be some sort of force built up and then released to slam the hammers forward into an enemy that's in between. The high speeds and sharp ends of the hammer will damage the enemy. Then, a slow return mechanism should bring the hammers back in their original positions. So, how to build up force? The frist thing I thought was "wprings are too weak, I want something better" and I was thinking about a flywheel approach, where a motor tries to let a wheel spin really fast and then somehow make a sudden connection with the weapon. This idea got quite far: The idea was that the orange axles move the gear racks so the green gears mesh with the red gears. If slid back, it meshes with the blue gears, which would be the return mechanism. It didn't work. It had far from enough force, and most energy was lost to the drive train anyway. I tried mechanisms with fewer gears (and using tires as gears) but they all didn't work. So I went back to the idea I originally rejected: Springs. These are all long springs I have except for some black ones from a motorbike set. As if it was meant, the dark-gray ones are half as strong as the other ones, which are about equal. Which means this is the perfect spring: As energy is distance times force, this spring, with a distance of 6 studs and a force of two 8466 springs, should store quite some energy (remember, this is the suspension from three large sets added together). So, now the hammer itself. Of course, this is a mock-up. It needs to be strengthened with plates and tiles, because, well... one particular piece didn't survive a test version... (it was already slightly damaged) OK, so I needed a mechanism to rotate the hammer about 180 degrees (preferably slightly more), and a frame to hold it. For the frame, I learned: if it needs to be strong, make it triangular. This is not exactly Pythagoras correct, because the straight sides are 7^2 + 24^2 = 625, where the diagonal is 25^2 + 1^2 = 626 (due to the 2x2 corner plates at the pointy end), but this difference is so small that noone will notice. To rotate the hammer more than 180 degrees, you can't just attach the spring to the hammer directly - you need a system of beams to amplify the motion in some way. This was a long puzzle and I eventually came up with (the red axle is where the spring will attach) The idea is that this is one half of the bot. It will eventually look like so: which gives plenty of space in the center for PF material and a drive system for some wheels. Doubling the frame gives which, as you can see, stays in place without me having to hold it, so it has an automatic locking mechanism due to the geometry of the beams (it locks over center). Moving the yellow part a little makes it blast away with quite some force. I'm happy! Dimensions of this unit so far: Width 17 (which is half, so width will be 35 or so) Depth 34 Height 8 Well within the limits. Next challenges are: fitting some drive mechanism, finding a way to trigger the mechanism, and maybe most importantly, building the return mechanism (which is where the 40t gears come in).
-
Non-Existent Parts
Erik Leppen replied to DrJB's topic in LEGO Technic, Mindstorms, Model Team and Scale Modeling
What I miss most is short half beams with round holes at the ends and axleholes in between. The 3x0.5 beam with pin comes closest, and the cam, but it's a bit limited in that regard. -
And that's exactly what I think the rule is. But it has never been made explicit. The bot should fit in a 45x45x45box with the front of the bot facing the side of that box. This is also in line with the actual BattleBots, where bots are placed on a colored square on the floor before the match starts.
-
Favorite Technic Part
Erik Leppen replied to Aventador2004's topic in LEGO Technic, Mindstorms, Model Team and Scale Modeling
I think because it does in one part where previous previous solutions always required at least 2 parts. Both the angle connector and the cross block require an additional pin or axle to mount. This part is pin and connector at once. Being a single part, there's less room needed, and less play. It's also my own favorite part. I use it most, after the normal pin, the 3L blue pin and the 2L red axle (another favorite). I have a 700 piece model with about 45 of those pins. Also, interestingly, this part allows a rotating axle directly along two sides of a beam, while the part that Mahjqa mentions allows a rotating axle along the other two sides of a beam :) Also, the fact that it has a stronger hold than other pins makes that you can sometimes leave away the bracing that would be required otherwise. At least, that's what I sometimes do. The pin holds together by itself much better than other pieces. This could also be a form of "cheating". Honorable mentions go out for Edit: below is an example of why the pin with pin hole is so great. Below is a frame for a four-function switchbox that I once used. Each pair of 5x7 beams is connected by 8 pins and 2 axles, and the middle beam has 6 pins to add holes in the right place. Total piece count in the image: 34, of which 22 of those pins. Technically it's not "braced" because it can theoretically be pulled apart just by pulling out 4 of the 8 pins between two beams. However, in practice, this will never happen because the pins hold so tight. So only minimal extra bracing is required, mostly to keep the square from deforming.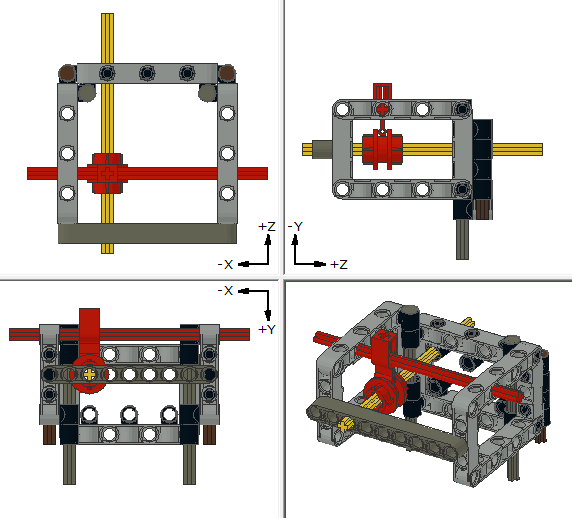
-
One of the things that help me most in getting a supercar chassis rigid, is to use the middle console (that contains the switch for the gearbox) and connect that to the front and back unit. That way, the chassis is effectively 5 or 6 studs tall, instead of the usual 3. In a rare case, another option that hasn't been mentioned is, use the roof as an actual cage, by constructing the sides of the windscreen with beams instead of axles. I apologize for the huge picture, but this is a perfect example: As you can see, even Blakbird's "never build the chassis only one stud thick" is not a holy rule ;) As an added bonus, the seats are also part of the structure. Similarly, when having the engine between the axles, running a single beam over the engine could also work wonders. This way, the chassis is not just below the engine, but around it. A few small other considerations that may not have been mentioned: - blue 3L pins are a bit stronger than normal black pins. Use those if you can. - if you can, studded beams connected with plates are very rigid. 8448 is the best example of this. - when vertically connecting beams that are 2L apart (3L total height) you might be tempted to connect them with 3x5 L beams, but I find that the new dog bone beams are a bit stronger. In general, 5x7 and 5x11 frames are your friend, but the dog bone is a wonderful piece to use as well. - the chassis usually needs to be thinner at the axles than in the center, because the gearbox needs room but the suspension also needs room at the outside. Don't make the difference in width too large. If the chassis is 5 wide at the axle and 13 wide at the gearbox, it's harder to make it strong than if the widths are 7 and 11. - At least as important as the section betwen the axles, is how you connect it to the axles. Have a beam run through the axle unit, instead of having to stop to make space for steering racks etc. - A straight construction is stronger than a bent or stepped construction. If you different sections are at different heights, you need more parts and more connections, which results in more play, and more bend.
-
Lovely, instantly recognizable (and I always liked the original set as well, so great choice). Too bad the suspension are non-official part usage. But I understand there are very little options there. The similarity with the original is very well done.
-
The wheels look way too small in comparison to the size of the frame. So what I'd like to know: how did you calculate the width and wheelbase in comparison to the wheel diameter? Can you show your calculations, or drawings or whatever you used to come up with these dimensions/measurements? I mean, I'm sure they're not just taken out of thin air, right?
-
Indeed. In my case, especially 36t and 40t gears. I rarely use those, but I needed all of them now :)
-
I didn't even think of asking this. I just assumed this to be possible/allowed.
-
Impossible LEGO
Erik Leppen replied to Boxerlego's topic in LEGO Technic, Mindstorms, Model Team and Scale Modeling
What if you connect one of the round plates on the center of a 2 x 2 plate? Can you then separate one round plate? The round plate can then be separated from the 2 x 2 plate using a brick seperator. -
General Part Discussion
Erik Leppen replied to Polo-Freak's topic in LEGO Technic, Mindstorms, Model Team and Scale Modeling
Lego sold more than 1 set of 42066. So it must have been multiplied/duplicated. I.e. copied. -
Wait, you can have more than one battery box? Not sure if I like that. But, well, rules are as they are...
-
Actually, why did you choose to go for a rectangular gate? The forces concentrate in the corners. Why not go for a semicircular gate? There is a reason many bridges have round arches. (I know bridge arches are not circular, but a circle is easier to build than a parabola.) Also, I think 16L links are perfect tension members, as they are very light.
-
This is just perfect. I always admire people who can build cement trucks, and this one is st a perfeft scale with so many details, and a nide color scheme. Great job, also how you managed to fit everything in!
-
I think motorcycle wheels would be best. Large, but without needing too much space. Problem: I sold mine... That's why real BattleBots have weight categories. But, as TC11 doen't have weight categories, I'll just pretend that all bots will be scaled to have the same weight. So larger bots would be scaled down to match the smaller ones. My bot will probably be large too...