
Tech-nick
-
Posts
52 -
Joined
-
Last visited
Content Type
Profiles
Forums
Gallery
Everything posted by Tech-nick
-
 Video added to end of the first post. Few more photos:
 -
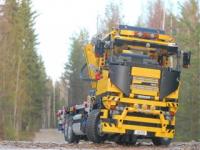
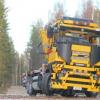
Logging Truck Triple Ok, here is my entry, got it finished this morning after all night build. My triple consist of truck, removable log crane and trailer. The truck and the crane work with remote PF. (except the outriggers on the crane are handled manually) The truck: The truck features forward/reverse (L-motor) and return to center steering by PF servo. In the truck are also located the cranes turntable and main boom motors (M&L). It uses maximum 500 parts, it was quite a challenge to do such large model with relatively small part count. I used LDD trough all the build, so it shouldn't exceed the max part count. I learned a LOT on optimizing and utilizing special technic parts. I'm quite happy with appearance of it, and I like the cabin very much. All tho I had to tape few panels black cause I hadn't enough of them :( But I think you hardly notice :) The crane: The crane features main boom, second boom, and fully operational claw. They work remotely. (one channel not used) Motors are M. It has also manual outriggers. Crane also uses all 500 parts. The claw rotates using small turntable and claw closing action is fed trough it. The claw is synchronized so turning the claw won't affect much to closing action. The synchronization is done in the superstructure with system of gears and differential. In short, when the turning motor is driven, it also turns the the claw gears trough the stationary differential in opposite direction so the claw is almost unaffected (It was not possible to exactly match the gear ratios with small turntable). When claw motor is driven, is the differential turning and closing/opening the claw. Claw turning is not affected at all. I'm quite pleased with this brainchild. It could be used with any other application when turntable is causing undesired action. Below is the crane with out battery case, so the system is visible: (It's a poor picture, I don't know can you make any sense of it) Finally the trailer: Nothing special there, other than it uses "only" 453 parts :) Finally, all working together: Short video clip: The Logging Truck -topic I planned to take photos outside but due the lack of time and snowing weather (and not much light here in northern finland this time of year), I was not able to make outdoor photo shoots, sorry. But hope you like my entry otherwise :)
-
Yes, I try to get video ready on youtube before posting this there :) And thanks!
-
Ok, here is my entry, got it finished this morning after all night build. My triple consist of truck, removable log crane and trailer. The truck and the crane work with remote PF. (except outriggers on crane are handled manually) The truck: The truck features forward/reverse (L-motor) and return to center steering by PF servo. In the truck are also located the cranes turntable and main boom motors (M&L). It uses maximum 500 parts, it was quite a challenge to do such large model with relativelly small part count. I used LDD trough all the build, so it shouldn't exceed the max part count. I learned a LOT on optimizing and utilizing special technic parts. I'm quite happy with appearance of it, and I like the cabin very much. All tho I had to tape few panels black cause I hadn't anough of them :( But I think you hardly notice :) The crane: The crane features main boom, second boom, and fully operational claw. They work remotely. (one channel not used) Motors are M. It has also manual outriggers. Crane also uses all 500 parts. The claw rotates using small turntable and claw closing action is fed trough it. The claw is synchronized so turning the claw won't affect much to closing action. The synchronization is done in the superstructure with system of gears and differential. In short, when the turning motor is driven, it also turns the the claw gears trough the stationary differential in opposite direction so the claw is almost unaffected (It was not possible to exactly match the gear ratios with small turntable). When claw motor is driven, is the differential turning and closing/opening the claw. Claw turning is not affected at all. I'm quite pleased with this brainchild. It could be used with any other application when turntable is causing undesired action. Below is the crane with out battery case, so the system is visible: (It's a poor picture, I don't know can you make any sense of it) The trailer: Nothing special there, other than it uses only 453 parts :) oh, and I'm also short of double angular beams in same color. All my Black and dark grey ones are in this triple. Finally, all working together: Short video clip: I think I will just copy this to entry topic. (Did it) Feel free to comment.
-
Thanks! Rest of the parts needed are on the way. From the set I'm buying I will get the missing XL motor and one pair of IR units. Then I'm only lack of lights but they'r not neccessary.
-
Hi Jurgen Could you add the 42009 ultimate to Rebrickable too? I'm not familiar with Brickstore Database. Thanks!
-
Thanks Erik @xandros, Thanks for you kind words. I never though in detail that how I achieve something I want. I'm not talking LEGO Technic alone, I'm thinking this generally. I'll try to tell you how I did this. This MOC was mostly result of inspiration. (I think inspiration is the most important thing needed, nothing can't be forced to happen) I was about to build 8258, but I was not happy with the amount of manual handling of the model. (Otherwise it's great model which I wish to own). So I decided to design my own one. I looked what parts I have/wanted to use, specially power function parts. I had plenty of LA's and some pneumatic parts. For precise control the pneumatics were out of question. I had two TX and two RX units so I knew amount of functions were limited. Manual mode change was necesary to increase number of functions but also to keep it simple. So then I knew I can get 2x4 functions in theory. But one motor had to attach to boom for the telescope function alone. So that makes it 2x3 + 1 functions. Then I desided what to do with them. Decision was of course easy: MODE1 for Steering, drive, outriggers and MODE2 for turntable, main boom, second boom. +telescope. So seems like little planning in advance is good. Then off building with real bricks, no LDD. Complex structures are easiest to comprehend in the most realistic 3D dimension, the reality . Much faster to build too. I started with the most important, the gearbox. Basic structure is simple but main work was to figure out how to get motion to destination where it is needed. And off course to manage it so that the order of functions to be logical on the Trasmitter end. So on the first motor driveshaft is for steering/turn table. second drive/main boom. Third for outriggers/second boom. So, I had to deside in advance how I wanted it to work, and kept goals in mind while building. I made so many prototypes necessary to achieve working but small and simple gearbox. I made a simple chassis, with tyres and turn table, were to mount the gear box. There I was able to see possible problems and to see were the gearbox should be. One thing I recall, the turntable was tricky to seat allmost on top of the gearbox, but still keep the hight in tolerance and lead drivetrains trough it. It took me maybe 6-8 versions until I was happy with it. The outriggers were challenging. I wanted them to work without manual imput. out-down <-> up in. But I had only one channel/gear to use for it. I roughly figured method to do it, and started making prototypes again. So the desinging method for me is: Build - see whats good, what is bad - distmantle - build it again, use good, redesign bad. Repeat until every things good. If I have enough of parts, I keep previus prototype next to new one. Its easier to build good things again and not to make the mistakes again! When I had the main functions ready, then I started to put them togethor. So I quess I used some kind of module- method. With each module, I had to keep in mind the module next to the module you are working with. I mean, make them easy to connect to each other and to chassis too. I really don't know that did I made any sense.. All in all, designing things is more like problem solving, you have to arrange elements in a way that makes things work the way you want. It is a skill which can be learned, you just have to start learning, other words just start messing with your technic legos!
-
I know, the instructions generated by the LDD are almost useless I wish I had 2 weeks spare time to make real instructions... But I try to help you in your build the best I can. Are you going to try different colors? (I hope you are, IMO the colors I HAD TO USE looked awful) And if you have lot of flat panels, build the cargo bed with them instead, might look better. I have lot of new parts in my collection now, I might make this again some day, with better looks.
-
Thanks for posting Rishab Below is image of the truck transmission. I made this illustration while back but didn't upload it then. But here it is now.
-
This was the first time. I normally use other (even cheaper priced) webshop located in Finland but the crane is not yet avaivable there. I wanted 42009 quicker and took my chances with Eurotoys. Site claims it will be shipped today (monday). I made the order yesterday. I Hope everything goes well..
-
Today I ordered my set from Eurotoys.fi (Finland), IMO, Price was very reasonable, 180€ including delivery. Check this out: Eurotoys Norway.
-
Yes that covers it. Waiting to see rest of the images. That must have taken hundreds of hours to desing and build. Wish I had time too.. (and skill + bricks)
-
One word: Beatiful. Would you open up the tehcnical features? BTW. Your brickshelf folder is not buplic, therefore not able to be seen.
-
Lancia Fulvia HF
Tech-nick replied to piterx's topic in LEGO Technic, Mindstorms, Model Team and Scale Modeling
Stunning... Add the side mirror to the drivers side, ---> Perfect. -
And: 1,5 offset
-
OK, now I must leave this behind, I now consider this model finished. No WIPping anymore. I took last photo shoot for the truck outside, before taking it apart. There are some small details added, like the panel on 2nd boom. (With big Technic logo on it, pretty neat eh..) I liked to build this a lot, but show must go on, if I want to discover something new, this must come apart. Building and problem solving is my main source of joy with Lego Technic. I have the LDD files for it, so If I ever revisit this, I won't have to start all over again. See pictures below, and links for the LDDs, if somebody wish to check this out, inside to outside. If somebody spots something he like or not, feel free to comment. I'm sure I still have lots to learn. Also you can report flaws in LDDs, I'm happy to correct and/or revise (slightly). I'm pretty sure there is missing a connector peg, or dozen. Or if you perhaps want to build this, Im happy to help. And really like to see your angle of approach to color theme! (My was limited to.. well, limited.) 1 of 3 Main chassis and crane assembly: http://www.brickshel...ass_cranev1.lxf 2 of 3 Front part of chassis: http://www.brickshel...rontchassv1.lxf 3 of 3 Cabin, payload space and the side panels with outriggers pads holders: http://www.brickshel...p_sidepanv1.lxf Notes for builders: There are parts off the truck in the LDDs, LDD would not let put them on. In real life they go without any problem. They are quite obvious. Also some parts are off because they cant be put there before putting assemblies together. Like no steering pinion gear to axle before main chassis fitted to front chassis. Use 4 pcs of rubber bands for the outriggers. they should be JUST and ONLY so tight that they can lift the legs up. See closely the pictures to see where they should be. Edit. Please use 24t friction gears on drive-transmission, I drew the double Z24 gears WHITE for note in LDD. And if you have a motor extension cable, please use it for the telescope boom. Wiring is wery tight if not leaded propely. http://www.brickshel..._out_of_way.jpg http://www.brickshel..._any_lenght.jpg http://www.brickshel...hind_engine.jpg
-
Some small updates, I did not like the looks of the rear, rebuild it + added some details. Also did not like the mode changer stick, some made push'n pull system.
-
I badly envy your massive amount of bricks.. I'm absolutely amazed for your skill and long term decication to your model. Keep up the good work mate!
-
Thanks, I tough this was clever too. Well, tripod would be much easier, but I wanted more motion to my video. For example if you need to follow the model while moving on bigger area, you are still able to keep the camera close to the model. But different methods to different needs. This is just one method. Best way would be to have your own cameraman tho. As posted on other topic already, here is demonstration to using the rig.
-
I Tough this was finished model, but seems that ideas and evolving does not stop until I run out of bricks... This update includes hatches were pads for outriggers can be stored. Hatches are on both sides. To do this, I changed the gearbox stick location to upwards. Its easier now to switch mode too. Sorry for the crappy photos.
-
Thanks guys. @ Paul B, What ideas did you get? BTW: What WIP stands for? (Lost with terminology) Off Topic killer:
-
U Asked 4 it, Video online. Hope you enjoy.
-
I Created this to have control to my model while making a video. Simple and very "handy". Its ugly, but does the job. Handles give a good grip to nose heavy rig. While shooting, you can place the rig on the table, if you need your hands to demonstrate model features. You can adjust the angle of the rig or the camera (or this case the phone) by putting beams (grey ones) to different locations. Hope any one finds this helpful. (Tried to search similar thread, but did not find one. If this a double thread, please remove)
-
Thanks for your comments. You'll have to keep waiting for the video, truck has been under construction (again). This time I added suspension to front and middle axles. To do this, I got rid of motor turning the engine pistons. It was bit annoying anyway because it made noise all the time when truck was powered. Also lifted the rear axle, it looks good and it would have been very difficult to add suspension on it. n
-
Thanks for your comment I will make video later. Hope at least the youtube works for me Have to think about alternative strorage for the images, brickshelf maybe for now. I would really like to get them visible on the post. Its much more representative and easy for viewers. Edit. Picture problem: SORTED.