
langko
-
Posts
374 -
Joined
-
Last visited
Content Type
Profiles
Forums
Gallery
Everything posted by langko
-
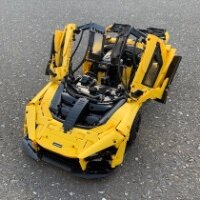
 Well I picked up this set for a decent discount around the Christmas period and I can't say I'm very impressed with it in person... A lot of talk about the front but there's a lot elsewhere that looks half done as well. The interior is shocking with half the bottom sides of the seats missing and gears chomping through the passenger seat as well. The rear spoiler looks terrible with the mix of LBO/LBG/BLACK and the surrounding parts of the clamshell look unfinished too. Some really interesting and random colours used as well... like the and in the rear clamshell. Why?? Especially when the blue one exists in LBO as well... Anyways... Can't do much about the interior without a lot of internal re-design, and I frankly can't be bothered playing around with the front. But here's my quick ideas at improving the rear... The wing and all pieces under it have been converted to black. Then the paneling around the large frame has been changed to fill it in more. On the plus side the spoiler mechanism works quite nicely and I love the doors. The gearbox was quite refreshing and interesting as well. But overall this will most likely go in the parts bin for MOC's.
 -
This looks amazing! IMO you make some of the best alternate models in the game. Your write ups are always a pleasure to read as well, and I appreciate the effort put into them. By chance I happened to see the 110 version of this car (dual cab version) whilst on the road yesterday. Same exact colour spec as well! I was looking at it whilst stuck at a red light and I’m blown away by how well you’ve managed to capture all the details and look of it. That curved slope section that runs through the side is spot on. Chassis and functions looks super interesting and well done as well 👍🏻
-
Isn’t that just a normal RC toy? As far as I can see that’s not ‘Lego’ (bricks/whatever you want to call it) at all. https://www.doubleeagle-group.com/double-e-toys/juventus-fc-radio-control-bus-e638
-
Never seen that piece before, great to know! I’m sure it’ll come in handy
-
Hmm I think I’ll have to wait till I see it out of real bricks to make a final judgement. But so far I would say that some is looking better and some is looking worse. Model really suffers from not having all those LBO panels available in red. Commendable effort to find work arounds but I’m not sure that red was the right choice here. Some of those missing pieces will come in the Ducati, but still won’t help with the rear mudguard panel areas.
-
I think this looks pretty shocking, headlights especially. Although I’m glad (surprised) they at least chose the black axles to join those trans clear panels together instead of the red ones.
-
Although I think this set and the Ferrari look a whole lot better than the previous Mercedes and especially the McLaren, I don’t think I’ll be getting this or the Ferrari as I don’t support either team… But super happy to see all the new recolored parts in dark blue. I’ve especially been wanting #71708 for a current MOC in dark blue, so that’s cool to see. The #17 & #18 panels in yellow is well overdue and a nice surprise as well!
-
No they will be connected by 2 x 18651 pin with 2l axles. Which would replace the current 2 x 43093 axle pins. Making it 3 pieces instead of 1, not 5.
-
Looks like I lot of similarities in building techniques to the Jesko I’m currently building. I think it looks nice though, all these new panels/pieces since the old orange one came out definitely makes a huge difference. I like the yellow a lot, hopefully get to see a larger yellow 1:10 or 1:8 scale car in the future.
-
Free vs Paid Instructions for MOCs
langko replied to Milan's topic in LEGO Technic, Mindstorms, Model Team and Scale Modeling
If we wanted it to be free, couldn’t I have just submitted it for free on my own account? Don’t see how rebrickable is against free MOCs in this scenario. I just see it as rebrickable being against giving out work/designs that are not originally your own (Whether free or paid). -
General Part Discussion
langko replied to Polo-Freak's topic in LEGO Technic, Mindstorms, Model Team and Scale Modeling
Maybe it’s partly because they struggle to match the colour of those parts? It’s safer to use black ones than repeat what happened with the Sian. The lime ones are still not the same shade and it’s been how many years? I know the problem isn’t limited to lime either, I have red ones that don’t match. Still doesn’t explain why they’ll randomally do it for a botanical set though, but just thought I’d throw that out there. -
Free vs Paid Instructions for MOCs
langko replied to Milan's topic in LEGO Technic, Mindstorms, Model Team and Scale Modeling
Well @astyanax managed to reverse build my 4500+ piece Huayra from some photos and a short YouTube video, so it is far from impossible. That said, someone else tried to do the exact same thing for mouldking and they screwed it all up. So you have to be an exceptional builder to be able to do it. -
42202 Ducati Panigale V4S
langko replied to Ngoc Nguyen's topic in LEGO Technic, Mindstorms, Model Team and Scale Modeling
I only see #3. Doesn’t look like there’s a #4 on the other side. It’s different because of the kickstand -
So after pushing this model at a wide variety of places (skate parks, mountain bike tracks, various hiking spots and even the beach) I finally dismantled the model to use the buwizz components for something else. The only bad thing after everything would be the rather exposed diffs (difficult to cover without compromising ground clearance) Blades of grass or the like would get tangled up there more than I would've liked, or a stick would some times jam it. Most of the times this would cause the buwizz unit to shut down and it's game over until you can plug it back into power. After pulling everything apart there is surprisingly very little damage to any of the parts. The only exception being the lower tow balls at the front hubs are quite worn (I'm guessing due to the tighter fit with the way the lower section is angled up a stud) Overall though this model was a great experience and I had a lot of fun/learnt a lot from it. Thanks again for sharing!
-
[MOC] '99 Opel Frontera B
langko replied to SpaceHopper's topic in LEGO Technic, Mindstorms, Model Team and Scale Modeling
The seat details are incredible! (Maybe not so much the front leg room) But this is a great looking model! You’ve blended the system elements and the technic ones together very well. -
[MOC] 1:8 Corvette C7
langko replied to mihao's topic in LEGO Technic, Mindstorms, Model Team and Scale Modeling
Ah now I understand! In that case that can easily be fixed by using the newer knob gear with the “x” in the shifting mechanism instead of the standard “+” one? That new part has been a game changer for me. -
[MOC] 1:8 Corvette C7
langko replied to mihao's topic in LEGO Technic, Mindstorms, Model Team and Scale Modeling
I always appreciate it when someone takes the time to make a V2 to make things better! The new model is a step up for sure, great improvements around the front end especially. As for MOC pricing I think no less than EUR 20 is fair and average for these scale MOC's on rebrickable. I also respect how you made it so those that bought V1 get this version for free. Also regarding your post at the start regarding the shifter: One of the things a really like about that rotating paddle design is that it's super easy to change the output direction. Just build the steering column in mirror image so that the connecting the paddles to the small linear actuator is on the left instead of the right. No need for more gearing further down the line. I've done this on a current MOC that I'm trying to incorporate it into. -
Great looking model! I do hope you get to make a video to show of more of the features, it looks very interesting. Great job blending the system pieces with the technic panels at the front, it flows really nicely. A+ part choice for the a-pillars as well!
-
General Part Discussion
langko replied to Polo-Freak's topic in LEGO Technic, Mindstorms, Model Team and Scale Modeling
I was actually thinking the other day that it would be nice to have that part in green for something I’d potentially like to make. So I’m glad to see it! I think it’s also interesting/annoying that in the case of the reddish orange version for the G-class, it’s so obvious that it should be reddish orange but isn’t. The P1 has 3-4 parts that should’ve been LBO but wasn’t. But looking at photos of that botanical set you hardly see the green pin connectors. Almost like when you could get away without recoloring it they do, and when you can’t they don’t… -
42172 - McLaren P1
langko replied to Ngoc Nguyen's topic in LEGO Technic, Mindstorms, Model Team and Scale Modeling
From what I can gather, if you scale the blueprints of the 2 cars to have the same front wheel diameter as the tyre LEGO uses.... then the SP3 is approx 1 stud longer. But I still think the biggest problem with the front of the P1 is that the front wheels are way too big. From what I could find the real P1 has 315/30R20 tyres on the back and 245/35R19 at the front. Using a tyre website that roughly equals 698mm and 654mm diameters respectively. Lego's tyre is 87.9mm. Divide the rear 698 tyre by 87.9 and you get 7.94 scale. Pretty good! But divide the front 654 tyre by 87.9 and you get 7.44 scale. Pretty decent difference. If you divide the front 654 tyre by the OG 81.6mm tyre the earlier supercars use you get 8.01 scale. Almost perfect size compared to the rear! So when the front wheels should really be the size of the old ones of course the whole front is going to look too short, even if the bodywork is in proportion to the rest of the car. Here's the blueprints for your above question. -
Free vs Paid Instructions for MOCs
langko replied to Milan's topic in LEGO Technic, Mindstorms, Model Team and Scale Modeling
This is my viewpoint as well. As long as someones not reselling someone else's work then I don't care if its free or paid. If you personally want to offer your models for free then I respect that. If you put a price on it I respect that as well. Obviously I'll still make a decision whether its worth me buying (just like any regular LEGO set), but it doesn't change the fact that you can sell it for whatever price you think is fair (just like when LEGO price an official set). Just because I might not think its worth that price doesn't mean I'm entitled for you to give it to me for free. There are lots of paid models on rebrickable that are just digital models without any photos of the real life build... Instead of complaining I just don't buy it and move on. There are also paid MOCs I've bought where I have been disappointed in the end result. Did I expect better in some cases? Yes, but I'm still grateful they offered the chance to buy the instructions instead of not having them at all. In all those cases I have still learnt something from the building experience and have often used the models as a launching pad for my own modifications. So in the end, for me it was still worth buying those instructions, and I'm happy to support designers for the enormous amount of work it can take to create instructions for such models. So everything that is either a hobby or offers joy should then be free? What a ridiculous thought... -
42159 Yamaha MT-10 SP
langko replied to Ngoc Nguyen's topic in LEGO Technic, Mindstorms, Model Team and Scale Modeling
Finally picked this set up over the weekend. First experience with the newer gearbox parts was great, can tell the whole thing runs smoother than the BMW. Actually like this even more in real life than the photos. I like the stripped back bodywork and the fact you can see more of the internals through the 'gills' (DBG panels) on the sides. I quite enjoy building these bikes, lot of interesting angles with the construction etc... I changed all the red/yellow/blue parts out to black/grey and it looks super clean. Minimal stickers is always appreciated as well. -
42172 - McLaren P1
langko replied to Ngoc Nguyen's topic in LEGO Technic, Mindstorms, Model Team and Scale Modeling
I just took the official images from LEGO and the MOC designer. They’re all from a side view so it’s still a decent comparison. That photo makes it looks better but I think it’s still noticeable that it’s too short on the LEGO one. I don’t have either model (and correct me if I’m wrong) but looking at photos from the underside both models have the same amount of studs from the middle of the front axle to the tip of the front splitter. But given the bigger scale due to the cartoonish wheels you mentioned the LEGO one should actually be longer. So as well as fixing the light position and the front curvature I also think you need to pull the front nose out by 1 or 2 studs as well. -
42172 - McLaren P1
langko replied to Ngoc Nguyen's topic in LEGO Technic, Mindstorms, Model Team and Scale Modeling
Cool to see the comparison shots from you guys that own Bruno's one as well. Thanks for sharing! Does this look the same to you? And for the record I think you could still get nice wheel arches and a sturdy bonnet whilst respecting the proportions... It just didn't happen here. -
I think a lot of B-models at this scale can suffer from the limited part selection, most of the time I think it’s obvious the designer had to make sacrifices in certain areas due to part availability. But this doesn’t give that vibe at all. Looks super clean and doesn’t look like you used a limited selection of parts at all. Even the interior looks quite nicely done. You somehow managed to keep the bodywork free of heaps of blue pins as well which is no easy feat and adds a lot to the look. If I had the SP3 I would definitely be giving this a build. After looking at the photos the only major improvement I would try to include is a way to keep the hood open. Did you try anything in that regard?