Berthil
-
Posts
1,151 -
Joined
-
Last visited
Content Type
Profiles
Forums
Gallery
Everything posted by Berthil
-
 That's what Eric is trying to do. With adding to bricklink I of course also meant breaking apart the models and store all parts categorized for selling. Otherwise no sense in adding to bricklink if you don't have the parts readily available for shipping. The financial value of a model lies in it's parts, the emotional value is in collecting parts and building and that cannot be monetized. I also see from Erics list he has sold off most of the Akiyuki GBC's (or keeps the rest) and he doesn't sell the RoscoPC F1 models. Nevertheless @Blakbird, I hope you succeed in 'liquidating' the assets you want to get rid off in an easy way.
 -
You are smart, you should know that most of the fun of your collection is the collecting and building itself. So selling of build models will be very hard, even in groups of models with discount. I'm afraid your best option to see some of the investments back is to add all separate parts to your/a Bricklink store. That's a huge amount of work but so is all communication with people that want your models at bottom price, most probably because they have knowledge about the parts that went into it and do the math. That's sad enough but that's how people tick.
-
Nice! :) May be heating up the Modulor tubes before bending may help, otherwise it's difficult to get a nice round shape. Also a round pot or similar with the right diameter might help. Good luck and have fun with building.
-
Please read the posts earlier made, also by me. For Europe there is a source in Germany which tubes have very good dimension but hard to bend.
-
I agree , nice clean build. When the splitter is in view a comment is visible stating 'Great Ball Pit' doesn't like GBC modules without balls so it's to keep balls in the module.
-
Rainbow Wave GBC
Berthil replied to Berthil's topic in LEGO Technic, Mindstorms, Model Team and Scale Modeling
Yes, it was a live broadcast so could have been a quick show or to be more precise, a no-show for me :) Luckily only the Invisible lift was moved but because I attached the ramp to the Rainbow Wave the chain was still intact. Thanks! I did but want to learn Spanish for next time :) -
Rainbow Wave GBC
Berthil replied to Berthil's topic in LEGO Technic, Mindstorms, Model Team and Scale Modeling
Meanwhile El Hormiguero 3.0 has put the clip with me, Eva Longoria and de GBC machines with Rainbow Wave on Youtube instead of only on their buggy website. I copied it without commercial, don't know how long ik will be available because I had to put a claim in: -
[GBC] Brickvention 2018
Berthil replied to RohanBeckett's topic in LEGO Technic, Mindstorms, Model Team and Scale Modeling
Good te hear :), thanks for the feedback :) That's a good trick, a plate will also do :) Sometimes tables are not level, at least the Lego World tables were not. So leveling with a bit of tilt is fine. One or twe balls sometimes get moving again when the 3rd ball ticks them forward, but more that that indeed not possible. -
[GBC] Brickvention 2018
Berthil replied to RohanBeckett's topic in LEGO Technic, Mindstorms, Model Team and Scale Modeling
Nice display. Brave to put the Ball Factory in. The Rainbow Wave seems to run not so smooth with the pistons moving is steps so balls bump against the next piston and stop. It is unclear to me why because mine runs smooth wit rarely a ball stopping, no balls bumping. -
Thanks! And thank you for the excellent building instructions, a lot of work! It's just that I don't like the Brabham fan car color scheme with the red and dark blue. I appreciate the cars history and quality of build by Luca but I have to make choices although it already has gotten out of hand :) This was my display at LEGO World in Utrecht 2016. Because of limited available space (everything is small and cramped in The Netherlands except average tallness of Dutch people) I kept them on their standard except one. Every day of the 7 day event I displayed a different car in the spotlights. It was a magnet for men with small boys as you also must have noticed during BrickCon 2012. Most asked question: ' where is Max verstappen?'. So if I display again I build Luca's last Ferrari in black, modify it a bit and put Redbull decals on it just to avoid that question a thousand times a day :)
-
That's right, I had 11 with me back then. Transport wasn't easy but I managed to fit all of this in a MINI :) Here 9 in custom made boxes. the two others I had in the front seat.
-
It's more precise than an estimate, I keep an Excel with all Bricklink orders and overhead costs like IKEA displays, LED lighting and model decals by Luca. So with display method and all lights and decals it's well over 500 Euro per model.
-
[MOC] KTM X-Bow
Berthil replied to Jurss's topic in LEGO Technic, Mindstorms, Model Team and Scale Modeling
That's what I mean, if I do that steering is reversed, the KTM tuns left when steering right with the HOG. -
[MOC] KTM X-Bow
Berthil replied to Jurss's topic in LEGO Technic, Mindstorms, Model Team and Scale Modeling
Can you remember what you did there with the HOG? I can't see an easy solution there other than reversing the steering. Thanks for the correction on the front panels. -
I think I have enough F1 models designed by RoscoPC or not? In the living room, LED lighting for lower models from LEGO: I know the wheels are hanging, inherent to the design and display solution. Otherwise not possible to have 12 in the living room. I will find a solution some day. I don't like the 3 missing models much, so that's why I did not build them. May be I will add Luca's next model but it has to be spectacular :)
-
[MOC] KTM X-Bow
Berthil replied to Jurss's topic in LEGO Technic, Mindstorms, Model Team and Scale Modeling
Finished the actual build after waiting a long time the stickers. I've added an extra lower rear diffusor on request of the X-Bow owner. It has been brought to my attention that the HOG steering is touching two pins with the lower 12 gear tooth bevel. In the original design of Jurss this gear was above the other 12 tooth but that resulted in steering the opposite way with HOG. I don't have a solution for it yet, there is little or no room for a solution there. Can't beat a photo of the real thing with a render :) -
[MOC] KTM X-Bow
Berthil replied to Jurss's topic in LEGO Technic, Mindstorms, Model Team and Scale Modeling
Building instruction finally finished, a LOT of work. my first one so probably not perfect but should be okay structurally. One or two viewing angles could have been better. Available here: http://www.r53.nl/data/KTM_X-Bow.pdf Bricklink parts list here: http://www.r53.nl/data/KTM_X-Bow_BL_parts.txt -
[MOC] KTM X-Bow
Berthil replied to Jurss's topic in LEGO Technic, Mindstorms, Model Team and Scale Modeling
Thank you for the excellent design! Only thing I detected was that HOG steering was reversed in the .lxf :) All in all it took more than 60 hours to digitize with your .lxf as starting point. Thanks! and solved. Here a blacked out version with custom stickers that are also on order for the build version. As said, wings are situated a bit too high in the digital model but fine in real life. -
[MOC] KTM X-Bow
Berthil replied to Jurss's topic in LEGO Technic, Mindstorms, Model Team and Scale Modeling
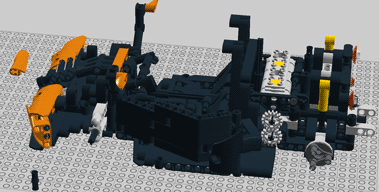
Full digitization done for the building instruction which has 183 steps and 658 parts in total. Also added radiators and filled up the rear with more diffusors. As said red axles and blue pins will be replaced by black in the build model. Orange big wings are a situated too high at the back but build model looks the same as from Jurss when build. Building instruction and pictures of the build model to follow soon. Rendering done in stud.io, no idea why it is floating. -
[MOC] KTM X-Bow
Berthil replied to Jurss's topic in LEGO Technic, Mindstorms, Model Team and Scale Modeling
@Jurss I think your efforts are admirable, disassembling the first try and starting all over, so very understandable that after 95% of the design you were happy and your focus went to other projects. I'm just trying to fill in the last 5% for my friend who likes your design very much and wants to have a LEGO X-Bow next to his real one. I expect we will take some pictures of both in spring. Most parts have arrived so the digital and real brick building continues. -
[MOC] KTM X-Bow
Berthil replied to Jurss's topic in LEGO Technic, Mindstorms, Model Team and Scale Modeling
Thanks, sometimes it gets late as it's a lot of work Corrected and picture replaced on Flickr. -
[MOC] KTM X-Bow
Berthil replied to Jurss's topic in LEGO Technic, Mindstorms, Model Team and Scale Modeling
Digitization of the design of Jurrs continues. Added front and rear license plate holders (will have X-Bow stickers), 3rd breaking light, rear diffusors, redesigned exhaust with elbow at the left and improved engine mount with integrated HOG steering guidance. The engine was hanging on two pins in the .lxf and I cannot see on Jurrs photos if he did something there to have more supportive engine mounts. The modifications are add-ons and can easily be left out as original structure has not been changed. I've used blue pins and red axles to improve the building instructions (same purpose as LEGO has introduced the 3L blue pins) but final build model will have black pins and axles. Now waiting for some parts to continue so everything is tested. -
Nice idea!
-
[MOC] KTM X-Bow
Berthil replied to Jurss's topic in LEGO Technic, Mindstorms, Model Team and Scale Modeling
Thanks. I'm half way creating the X-Bow in Stud.io with the goal to freely distribute the building instruction. Took me already 2 days to put all parts in the right order and in 70 steps that resemble building steps, probably the instruction will be around 300 steps when finished. I'm also building the model the same time so see if everything is in the right order to be able to build. -
[MOC] KTM X-Bow
Berthil replied to Jurss's topic in LEGO Technic, Mindstorms, Model Team and Scale Modeling
Understandable. I've already coloured it and will build it and while building complete the file and make a bricklink parts list. It will take some time but when ready I post files here if you are okay with it.