
Sven J
-
Posts
789 -
Joined
-
Last visited
Content Type
Profiles
Forums
Gallery
Everything posted by Sven J
-
 Thank you, @Nemo57 ! If you'd like to know something specific, I'll be happy to answer your questions!
 -
It's a common saying among museum railroaders round here that one hour of running requires two hours of repairing... Maybe that sentence actually originates from Chile...
-
Thank you very much, @Djdav46 and @Atilio ! P.S.: In the meantime, the model for which the Chevy was built as a decoration is online, too: https://www.eurobricks.com/forum/index.php?/forums/topic/172613-ferrocarril-de-taltal-chile-0-6-6-0t-kitson-meyer-in-1225-scale/
-
That's mightily impressive! Amazing how you translated the smooth, rounded shape into Lego.
-
Thanks all for your kind words and appreciation! I know what you mean, and I also know there are fantasticly done examples of weathered large-scale locos. Unfortunately, my only argument is - I don't like that look... Of course it's unrealistic to see a hard-working locomotive look that shiny and new (though, in the above-mentioned book about the FCT, there are photos from the early 20th century which show that - at least back then - the FCT engines were kept VERY clean.) That being said, finally it's like Emanuele ( @LEGO Train 12 Volts ) stated some time ago for his collection: My little railway is an ideal one, where well-maintained, beautifully cleaned vehicles from all over the world live together in peace and harmony...
-
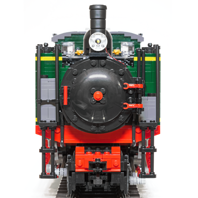
Dear trainheads, Finally, my new locomotive is ready! This time, I chose a prototype from quite a distant edge of the world - an articulated narrow-gauge (1067 mm) 0-6-6-0T "Kitson-Meyer" engine belonging to the Chilean "Ferrocarril de Taltal" (FCT; written as "Ferro Carril Taltal“ on locomotive number plates), or "Taltal Railway". Ten of these locomotives were delivered to the FCT by Kitson & Co. (Leeds, UK) between 1904 and 1907, and further eight engines later acquired second-hand. Over the years, several modifications were carried out: For example, all engines were converted to burn oil soon. Water and fuel capacity of some locomotives (including No. 50, the prototype for my model) were increased by adding welded enlargements on top of the side and rear tanks. "The Railway Magazine" gives a short description of the FCT (Vol. 90. No. 551, May-June, 1944, pp.158—159): More detailed information can be found in the books "The Taltal Railway" and "Kitson Meyer Articulated Locomotives", both by Donald Binns, which were my two principal sources. In general, very few technical information about the FCT locomotives can be traced. Despite searching for months, I wasn't able to find a detailed drawing. So I had to largely rely on taking measures from photos and on one single, distorted sketch on a data sheet describing the near-identical engines from the "Ferrocarril Tocopilla al Toco" - see below. (While there are numerous photos of the sole surviving FCT Kitson-Meyer, no. 59, nearly all of them were taken during the engine's last years in service, when it was already in a very poor state of maintenance, or since it has been on display as a monument. Because of that, it's difficult to conclude how it looked in better days. Nevertheless, I hope - and believe - that the model's overall impression comes close enough to the real locomotive's appearance.) The model is held in accurate 1/22.5 scale. It consists of quite exactly 3,000 parts and weighs in at 2.4 kg. The engine is powered by two L-motors (one mounted vertically in each bogie); each motor has its own BuWizz as a power supply and R/C unit (technically, one BuWizz would suffice, but this configuration allows for longer running times). The wheels come from BBB and the lighting equipment was purchased from Brickstuff, as usual, while the rods are 3D-printed parts of my own design. Enough said – enjoy the photos! Data sheet for the similar engines (though with different brake equipment and cab) of the "Ferrocarril Tocopilla al Toco": Detailed cab... ... and also smokebox interior, showing the exhaust nozzle, the base of the chimney and the boiler tubes: The cab roof is detachable. The ventilation flap really opens, you can see the lever for the steam whistle through the hole: The top of the Belpaire firebox is also detachable, giving access to the charging sockets and the power buttons: The lower part of the cab ladder is attached to the bogie and turns with it. Note also the chain which prevents the bogie from jackknifing in case of a derailment. Advanced lighting functions, controlled via two BuWizz channels: Before starting their daily trip into the Andes, engineer and fireman still have enough time to pose for a photo with their trusty old lady... ... while one of the brakemen uses the unexpected spare time in a different way. Well, but not for long. Soon "El Jefe" arrives in his flashy Chevrolet and critically watches his employees' activities... A few shots from the building phase, showing further details. First, the bogies with the motors. You can see the leaf springs underneath, as well as the brakes and (as on the real thing) only one single sanding pipe in front of the first wheel: The firebox once again: The main frame. The ashpan contains two weight bricks, which help to keep the centre of gravity low and thus to prevent the model from tipping over. And a view of the complete technical layout with batteries and motors. The multi-coloured bricks underneath are just the building stand. Full-resolution images can be found in my Bricksafe folder. At the moment, it’s too hot in my attic for filming, and I’ll go on holiday next week; but when I’m back, of course I'll shoot a video of the locomotive and its train, so stay tuned! Last but not least, I'd like to give my heartfelt thanks to all those AFOLs who attended the development of this model with their feedback and encouragement; and especially (though we've never met in person) to my dear "pen-friend" Sergio Monai @monai, whose multilingualism and commitment were an invaluable help during the research phase. Comments and criticism are of course most welcome! Thanks for stopping by! Best regards, Sven Edit: Video now available here!
-
Getting a bit more serious on G Scale trains
Sven J replied to Paperinik77pk's topic in LEGO Train Tech
@Paperinik77pk That is pretty darn clever!!! -
Getting a bit more serious on G Scale trains
Sven J replied to Paperinik77pk's topic in LEGO Train Tech
Well, why wait... Here's a sketch of my cylinder/crosshead solution: It uses the old Technic connector 3651, whose studs fit in just between the two crosshead guides. The "Minifig Neck Bracket with Technic Pin" is to attach the valve gear's union link, but of course this can be omitted without affecting the crosshead's function. The upper one of the red Technic cross axles goes deep into the cylinder and provides enough stability to hold the lower one as well. To understand this better, I uploaded the Stud.io file for the whole thing here. I already thought it would be an arrangement like that. While it's neat and easy to build, in my opinion it has one major disadvantage: The bogies can't swivel freely when the motors are not running, at least not without at the same time turning the wheels. Because of that, I chose another solution for powered bogies, with the motors mounted vertically directly on the bogies: This layout's drawback is of course that there must be plenty of space inside the locomotive body to allow the motor to turn with the bogie. -
Getting a bit more serious on G Scale trains
Sven J replied to Paperinik77pk's topic in LEGO Train Tech
This is BRILLIANT!!!! Would love to see them running on my layout... Regarding the rods of the "Stainz", I will propose a solution how to build an alligator crosshead with double guides when I present my next model (hopefully in a few days). Perhaps you can use this solution, too. How did you gear the Diesel locomotive's motors to the bogies? -
A tribute to Lego trains - MOC Lego 112 (and 113) XXL
Sven J replied to Paperinik77pk's topic in LEGO Train Tech
Hi Davide, Your Lego-G-scale approach is so radically different from mine, yet I love your creations nevertheless (or perhaps just because of that). Now that's another cutie! Have you thought about equipping your XXL trains with figures? I haven't measured it, but perhaps Technic or Homemaker figures would fit? (Envy!!!!!) Btw: The renders are impressively realistic! -
Thanks to all of you for your appreciation! You're all too kind! Oh yes, it does... but I chose to give those parts as an early birthday present to myself... Stay patient for a little while... but you can see a teaser in my signature.
-
Thank you, @Mister Phes ! Great honour to be front-paged with a completely different kind of model.
-
Thank you, Sergio! The engine is ready and waits to be photographed. It's quite difficult to find an adequate lighting setup for such a large model with many black areas. I hope to make it in the course of this week, but don't nail me down on that...
-
Hi all, For once I’d like to present no railroad model, but a car in rather exact 1/18 scale. A 1957 Chevrolet 210 „Sport Sedan“ 4-door hardtop, to be precise – the less costly, less glamorous version of the famed Bel Air. Well, actually, this model has a railroad background, too… For my upcoming locomotive model, I wanted to have some background decoration. So I searched the web and found this Chevy Bel Air on Mocpages. Ok, I thought, I’ll modify that one a little and it will do – well, not a bit of it! In the end, I revised the template to an extent that the two models have hardly a part in common. Not even the basic chassis, its wheelbase and length remained untouched. I used a lot of custom chrome parts, and I think they have a great effect; on the other hand, there are so many reflections that it’s almost impossible to take decent photos. I hope the essentials are recognizable, though. But judge for yourself: The „Blue Flame“ inline six-cylinder engine: The black, hubcap-less wheels are due to the fact that the mentioned locomotive operated in Chile’s Atacama region. Thus, the „decorating“ car shouldn’t look shiny and new as in the showroom, but wear some traces of its hard work out there. As there were no matching Lego tires, I built them myself: I used two pieces 4185 and one 2958 for the rim, and combined tires 89201 and 58090 to get a large one with 39 mm diameter. Feedback, praise, criticism are of course most welcome! Best regards, Sven
-
-
Thanks for showing this! Amazing. Only the passengers will complain about the roughness of the auto-coupling process - some pain and suffering claims threatening the railway, I fear...
-
Hi Davide, this is very, very cute! I'm astonished that one M motor is sufficient for pulling three G-scale cars. How fast does the train run? And can you explain how the self-coupling function works? Looking forward to see more of your G-scale stuff! Ciao Sven
-
Getting a bit more serious on G Scale trains
Sven J replied to Paperinik77pk's topic in LEGO Train Tech
Show it!!!!! -
From my experience, I can say that basically there is a small benefit (even though Shapeways' pricing is quite hefty) for buyers in Germany when parts come from the EU, as 19% Import VAT have also to be paid for orders from the US. But (and it is a big but) this is often more than compensated by the fact that you have to order more parts than needed to get a sufficient number of decently-looking ones: Color consistency for Shapeways' grey is abysmal. Especially longer parts like side rods are often almost black at one end and almost white at the opposite (a bit exaggerated, but you know what I mean). A 3D printing service that I'm quite happy with is Sculpteo.com from France. They have a nice, consistent light grey, and they also offer a "polishing" service for smoother surfaces. However, I don't know whether it's possible to sell one's designs there.
-
Getting a bit more serious on G Scale trains
Sven J replied to Paperinik77pk's topic in LEGO Train Tech
Hi Davide, thanks for the figures! It's actually much less extra weight than I had suspected; so perhaps trains won't really have to be that short. That's why my next locomotive (coming soon - sorry, couldn't miss the chance for self-promotion ) will feature two BuWizzes, one for each motor... -
Getting a bit more serious on G Scale trains
Sven J replied to Paperinik77pk's topic in LEGO Train Tech
Very, very promising! I would love to see that train running in reality! The only issue that might arise is that I suspect the G-scale Lego wagons to be considerably heavier than the LGB ones, so trains will have to be shorter. Can you tell us some figures about the wagons' calculated weight as shown in the Stud.io "Model Info" section? -
Getting a bit more serious on G Scale trains
Sven J replied to Paperinik77pk's topic in LEGO Train Tech
Wow, that's a pretty ingenious solution! Might want to copy that one day... Does it couple automatically? In my imagination, one would have to lift one coupler in order to get the "fishhook" Technic pin of the other one through. As for your layered render: Yes, that's exactly the workflow I had in mind. There's only one thing that I forgot to mention, which I noticed when looking at your picture: It might be a good idea to activate the "floor shadow" option in the dialog, otherwise it looks a bit "ghostly"... -
Getting a bit more serious on G Scale trains
Sven J replied to Paperinik77pk's topic in LEGO Train Tech
Ah, I see. I already thought you were using Stud.io - the renders look like it - but the purple background seemed unfamiliar. As for your problem: Once you have found a matching background, it's easy. Render your model in png format (jpg does not support the effect!) and choose "Background: Transparent" in the Stud.io render dialog. You can then use any decent image editing software to simply place the rendered picture as a second layer over your favourite background image. If you happen to understand German (but perhaps Google translator will do as well...), there's an extensive discussion thread about proper Stud.io render settings here. -
Getting a bit more serious on G Scale trains
Sven J replied to Paperinik77pk's topic in LEGO Train Tech
Hey Davide, the 7740XXL is spectacular! Brings back a lot of childhood memories... But surely it's alright to do one thing at a time, so for now I'm really looking forward to seeing the No. 29 in reality! Btw: Which program do you use for rendering? Sven -
Getting a bit more serious on G Scale trains
Sven J replied to Paperinik77pk's topic in LEGO Train Tech
@Paperinik77pk Davide, one more thing: A while ago you wrote about trying to equip your locomotive with sound. Did it work (especially regarding volume)? And do you possibly have a video to demonstrate the effect? I'm asking because I'm experimenting with sound myself, and at the moment this thing seems to be the easiest solution, but there may be better options.