
Hod Carrier
-
Posts
1,007 -
Joined
-
Last visited
Content Type
Profiles
Forums
Gallery
Everything posted by Hod Carrier
-
Thanks guys. I'm glad you're liking it too. I fear you may be right about the diameter of the hose, especially as there is a void inside the larger outer arch. I did wonder about threading Technic half bushes onto a flexible axle cut to length, but I guess I shall just have to experiment. It does strike me as slightly weird that there appears to be one size of arch missing from the sequence. Maybe someone somewhere has come up with a custom part to fill the void, if you'll forgive the pun.
-
Seems like there's an arch missing. How do I fill that gap? Is there no custom part?
-
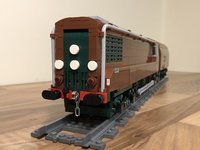
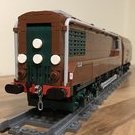
Well, I figure that using LDD is free so I'm not bankrupt yet. However, I have decided to dip a toe into the world of "proper" LEGO trains by knocking up this 8-wide rendering of an SNCB/NMBS AM08 Desiro passenger train. These EMU trains can be seen operating throughout Belgium on local and intercity services and are among the most modern passenger trains used by this operator. NMBS SNCB Desiro 08209 Zichem 01082016 by W Daelmans, on Flickr So far I've only got as far as designing the train in LDD but, unlike my earlier Desiro UK, this one is both buildable and intended to be powered. I wanted to make this model to scale, which is why it looks excessively long by LEGO train standards. I took the formula of 1 stud = 15 inches to arrive at a total length of 210 studs. I appreciate that this might make it difficult to operate on anything other than the widest of ME Models radii, but I'm taking looks over operation as my starting point. It would be possible to reduce the length somewhat if necessary, but I'm hoping to avoid that if at all possible. There is a gap between the black and dark bley arches at present because no brick exists that will fill that gap, or at least not on the LDD palette. The intention is to use a length of light bley pneumatic hose instead. Thoughts, comments and reactions are welcomed, especially as this will be my first venture into full-size LEGO train construction.
-
Cool model for a first effort. Instantly recognisable as a pannier. It's also nice to see another person trying out with 4-wide scale. I can't wait to see an auto-coach in the same scale to go with it.
-
Without wishing to delve too much further into comparative signalling methods, these lightly used lines don't have just two aspects. Each signal may only be capable of displaying two aspects but the signalling sequence still uses three aspects, as you will never get a red directly after a green under normal circumstances. Therefore the signals will be capable of displaying either yellow/green (distant signal) or red/green (stop signal) and will alternate along the line. That way you will always get a yellow to warn you that the next signal is red. I could go further and explain overlaps (which ensures the driver doesn't see the signal revert to red while it's still in his/her line of sight), blocking points (which protect the rear of the train by keeping the previous signal at red until it has completely passed the next signal) and different methods of signalling that a diverging route is set, but it occurs to me that McWaffel is building a fictional system that follows no existing practice, which makes sense to him and is easy to build and operate. Hod Carrier (UK train driver)
-
That's a very simple but effective system so far. I'm not up on the electronics, but it looks very good. As the system develops will you be adding caution (yellow) aspects between green and red?
-
Well, although the Stormtroopers are not armed they've clearly been drinking. I think I'd be giving them a wide berth. Fabulous builds!! You've captured the original really well. Congratulations!!
-
London Underground 'tube' MOC. (1996 stock)
Hod Carrier replied to Bricksmith's topic in LEGO Train Tech
Yes!! That's a fantastic model. The looks and proportions are very good indeed. Picking 1996TS as a prototype was a good move. Powering the model could be problematic, but not impossible. There is already a 9V Underground layout in existence running some deep tube as well as sub-surface models. The solution that builder, David Tabner, came up with was to use the small train wheels on all except the motor bogie. The motor itself unavoidably protruded into the body of the car, but David disguised it using skirts. Fitting the power and control functions may be your biggest challenge, but even that is not impossible. You could use the smaller SBrick for control linked to a 9V PP3 battery via a MiniZip cable and control the train by Bluetooth from your phone. -
I've had some success using a PP3 9V battery on a MiniZip cable in my tiny TRAXX loco. It has enough grunt to run an SBrick controlling an L-Motor although I've not had any chance to test it's longevity on a long run or with any sort of train though, but it's certainly possible in a 4-wide body or other compact applications. Check out my Flickr album or search here for some photos if you wish.
-
How well would power functions stand up to snow?
Hod Carrier replied to Carefree_Dude's topic in LEGO Train Tech
The problem would be snow ingress. That excavator keeps all it's PF high and away from the snow, but a PF train motor is a good bit lower. Clearly it's possible to run in the snow, but I would be careful about clearing the snow away from the tracks slightly or tamping it down a bit first just to try to reduce the likelihood of any loose snow being inadvertently hoovered up into the motor. -
Beast!!!
-
[MoC] British Railways Standard Class 2 2-6-2T
Hod Carrier replied to jtlan's topic in LEGO Train Tech
She's a lovely little thing. In common with a lot of BR's Standard Classes, these unsung workhorses were not the most aesthetically pleasing but you've captured it very well indeed. A packaging alternative that would allow the use of a larger motor would be to use a PP3 battery in place of the LEGO box. -
If I may be permitted to give a very personal and probably minority view, I actually think that those radii together with a gap of 6 studs looks fine. Admittedly I'm modelling primarily in 4-wide scale rather than 4-wide gauge, but even those who are not may not necessarily require a larger gap, as most narrow gauge stock is generally much smaller than mainline stock, both in terms of width and length, so a larger track spacing may not be necessary. Also, a gap of 6 studs will allow for more compact layout design. I expect that other people will have differing views. Maybe this topic should be opened up to more general debate.
-
I love a bit of pedantry and am not above indulging in it myself. I wasn't aware of the square option, though I'm not sure whether it would make a noticeable difference to traction whichever shape you choose. If the power output was higher I could be persuaded that one might grip the wheel better and resist slipping on the wheel itself. Happy to be proved wrong though.
-
That sounds good. I'm looking forward to trying some of these for myself. Do you have a release date in mind for these? I wasn't meaning rubber bands, but rubber O-rings like those used as seals in hydraulic or pneumatic systems. These have a round rather than flat cross-section, come in black and seem to work very nicely indeed at improving traction.
-
I think it looks very promising indeed. I may have to acquire a set to evaluate them. What's the clutch power like on a Technic axle through the cross hole? What material has been used for the traction tyre? The standard LEGO traction tyres on their train wheels are not that good and often get swapped for rubber O-rings which perform much better.
-
Future MOC-building contest - judges needed
Hod Carrier replied to Ashi Valkoinen's topic in LEGO Train Tech
Looking forward to an announcement about this. -
Reading his article it seems he went for cog drive, although he doesn't use the official 4-wide curves but rather makes his own using 9V(?) track which presumably makes it a little easier to lay the rack. You can clearly see in the photos that the rack extends the whole way around his layout. In the article he talks about making two illegal moves when building the loco, the first being to cut cross axle holes in the wheels and the second being to open out the teeth in the bevel gear wheel so that it engages with the rack. He admits that the second illegal move actuallly renders the first one redundant because the loco no longer needs to drive through the wheels as it now uses the cog instead. I hope you will post up your progress with building this little gem as I am interested to see how it goes, especially if you take the adhesion-only route.
-
That's an interesting little loco there. I'm assuming you're going to have a try at building this as a conventional adhesion loco rather than a cog driven loco as per the original. If I read the article correctly, driving this loco through the cog removed the need to modify the wheels as they were no longer needed to transmit the drive. Thanks for the extra information. The comparison in diameters of the various wheels and the 12T bevel gear is very illuminating. I take your point about the suitability of the small wheel on plain track only, but personally I would want the option to allow the train to clear points and would welcome the extra clearance necessary. On that basis I would give some thought to making the suggested adjustment to the dimensions of the medium wheel. Ideally it needs to be as small as possible and yet still provide enough clearance to carry the 12T bevel gear. However, given that the difference in diameter between this wheel and the gear is less than 0.5mm it's possible that the addition of a traction tyre would add enough additional diameter to give the desired clearance. As for traction tyres, don't worry about providing these. It's possible to buy rubber O-rings in just about any size. Once the diameter is known it will be possible to buy O-rings in an appropriate size.
-
Blimey!! You're a fast worker. I'm not sure I follow the logic for making the small train wheel with a cross hole. The only reason I can see is because you want to use it to transmit drive, but it's too small to fit a gear onto the same axle without risking it fouling the track itself. For rolling stock, the existing wheels run on snap axles seem adequate. Have I missed something? The intermediate sized wheel is of more interest though. I'd like to know how the tread diameter (not the flange) compares with the diameter of the 12T bevel gear. If it's a good match I might be in the market for several of these in black to try out on my 4-wide TRAXX. Will there be an option for a groove in the tread to accept a traction tyre of some sort?
-
This looks very promising. From nothing suddenly we have two separate projects developing 4-wide track. I'm very excited about this. When and where might it be possible to buy track? Have you any plans for wider radius curves and points/track switches?
-
Power Functions Train Motor Stops by itself
Hod Carrier replied to provoaggie's topic in LEGO Train Tech
Duracells are not poor quality. They simply don't seem to fit correctly inside LEGO battery boxes which affects power transmission. If that was the cause of the problem I doubt the train could simply be restarted with the remote. But to echo what Pyro says, have you tried running the train direct from the battery? It's possible that you may have a duff transmitter or receiver, and rather than speculating on the cause it would be better to actually try it out and see what happens. At the very least it will help to prove whether or not the remote control is working correctly and you can possibly move towards a solution. -
Very interesting. I wonder if there's sufficient demand for you to consider producing 4-wide "narrow gauge" track, including a modest selection of curves and switches. I know I'd be in the market for some as I model in 4-wide scale.
-
Very cute. But are you aware that your MOC has a full-size prototype...?
-
Fair play. That certainly does match your own model very well indeed.