
-Mini.jpg.22fd9f6228faf03e40c193dcf09aa9d0.jpg)
Andy Glascott
-
Content Count
342 -
Joined
-
Last visited
Posts posted by Andy Glascott
-
-
So, module 2 is complete and module 3 is underway. I have a deadline too, these 3 modules, the 4.5v part of this overall project are due to appear at Ashland Train Day with RVALUG on April 30th, so if you are in the greater Richmond, VA area, drop by. Here are the pics.
 Module 2 Complete by andyglascott, on Flickr
The full module, which should line up with the other one.... I'll test that when all 3 are ready.
 Billboard and a bit of story by andyglascott, on Flickr
Billboard with a little of the story behind the layout.
 Level Crossing on a curve by andyglascott, on Flickr
This was the biggest challenge on this module. All the track is ballasted, so raised up one plate, which means the regular level crossing slopes don't work. Add in the curve and it took a bit of engineering. Thankfully the new 1x2 plates with curved ends made it all possible.
 Picnic/Rest area by andyglascott, on Flickr
You might call this the feature of this module, a rest area for folks on the road. All my cars, trucks etc are boxed away for now but will appear on the 30th.
-
Like everyone else has said, that is one heck of a collection. I suspect it’s an urban myth, but it’s all edged an Irish sports commentator was rather surprised by a goal in a particular game and blurted out “____ me pink it’s a goal!” Kinda sums up my reaction, that’s some goal you scored with that lot!
-
So, module 1 is complete (apart from the addition of minifigs, that tub is still taped up, and oner piece I need to order. Here are a few pics.
 Module 1 by andyglascott, on Flickr
 Crops and sheep by andyglascott, on Flickr
 Taking a break in the fields by andyglascott, on Flickr
 Siding and loading deck by andyglascott, on Flickr
-
-
Thanks y'all. @Feuer Zug, the recent period builds were part of the inspiration. @zephyr1934, the small goals are a must! I've found over the years when I build a big layout all at ones I concentrate on the big picture to the detriment of details. Years ago I built a 4 module layout and spent time on each one adding the details that make a layout pop and am enjoying doing that on this first module, mentally designing some stickers while
having dinner with the familyputting the repetitive hills etc together and so on. -
(Click to skip to the post with the latest photos)
The Backstory:
For years I've wanted to be able to display my 12v collection at shows/exhibitions/libraries or wherever, but the wiring is a challenge - I reckon on my last full layout there was 250 to 300 feet (75-90 metres) of the stuff, which on a static layout is one thing, but one built in modules for transport is a challenge. Three or four months ago I came up with a solution (more on that below) and the dreaming started. After much playing in Bluebrick, and nostalgic posts appearing here about older era trains, I settled on a plan. I still had a bunch of my old blue track from the 4.5v era, but no motors. Off we go to Bricklink then!
The Layout
So, here's the plan. Ten years ago I had a small portable layout on 4 modules, each 3x5 baseplates, and over the years have simply added more of these. Following my Bricklink spree, I now have 2 working 4.5v motors, so rebuilt the loco from set 183 and I have the loco from 7720 in progress. These 2 will feature on the 4.5v loop below, which is 3 of those modules.

Next to the 4.5v loop will be the showpiece, the main 12v loops.
 12v Lower by andyglascott, on Flickr
And on the right of the layout will be the 9v loops. Unlike the other 2 eras, I will have 9v track left over, so this is likely to be expanded in due course, particularly as @michaelgale releases motors, power supply etc.
 9v Loops by andyglascott, on Flickr
Lastly, there will be another 12v loop, elevated, which will run across the back of all three eras.
 12v Upper by andyglascott, on Flickr
Putting all of those together looks like this (the white baseplates are roughly where the mountains, tunnels etc will be for the elevated sections. The green and grey sections are simply so I could keep track of where the 3x5 modules were to try and avoid having curves/points on more than one module. When it all comes together, in most likely a couple of years, I'll be able to run 6 trains at a time.
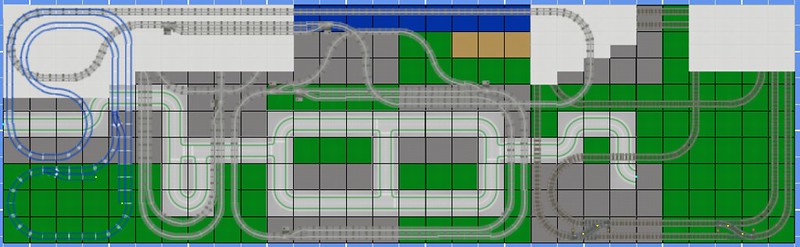 Whole Layout by andyglascott, on Flickr
The Beginning
After all the planning, and clearing away of my last (incomplete) layout, I've finally started building the first module, part of the 4.5v loop. I decided to start here as this will be the quickest era to build, and to a large extent, each era can also be displayed as a stand-alone smaller layout. These three modules will be countryside/farmland, and the trains will reflect the farming side of it when they get built.
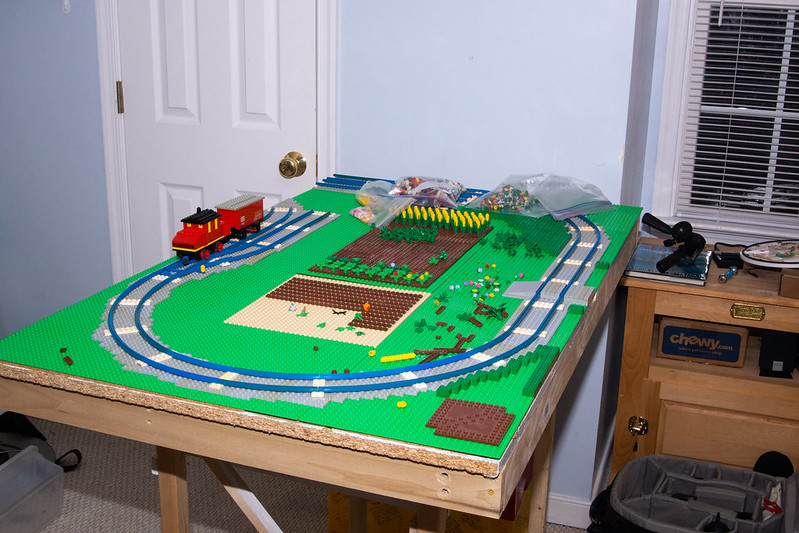 Module 01 Pic 02 by andyglascott, on Flickr
The 12v Wiring
The solution that I've come up with is fairly simple, but does involve taking a drill to some baseplates.... At each of the 12v points or signals I'll drill a small hole through the baseplate and the wood for each module, thread the wire through and attach either the original Lego plugs or a quick connect/release plug/connector so that when the layout is set up I'll use already measured lengths of wire to go from that point to the control panels, which will be on their own module.
This is going to be a heck of a journey, and build, I'll post updates from time to time, particularly at landmark moments such as completing an "era". I always said, growing up, I was keeping my Lego for my kids. It was really only an excuse, and I'm really glad I didn't sell my old blue track even though I didn't, for years, think I'd use it. Sadly my original 4.5v motors, battery boxes, lights and even signals are long gone, but I was only 7 or 8 when I got 7720....
-
I suspect that once a locomotive is sitting on top of the motor any bump will be hardly noticeable. The motor unit is so light on it’s own that any small bump will be noticeable.
-
5 hours ago, Paperinik77pk said:For the yellow sleepers: some hours in the sun, submerged in water mixed with products like Vanish Oxy Action, and these will be again white (keep them monitored during process)

I saw your nice 12v layout - it's amazing!


Thank you. Part of my plan is to leave the sleepers yellowed. I’ve worked out a way to do a large 12v layout that is transportable to shows etc, so am starting a new one from scratch that will have 4.5v, 9v and 12v sections, so the yellowed sleepers will help show the age of the blue track

-
@Paperinik77pk Thanks for the Stud.io wok on the lights. I'm going to at some point play around with these options.
Beyond that, I finally got a video to upload, and the good news is that the other motor arrived and works, so the chances of 7720 getting built have improved.
 IMG_1080 by andyglascott, on Flickr
-
Partly inspired by some recent "retro" style posts, and partly after an idea for my next layout, I decided to see if I could recreate one of my first trains, set 183. I knew I had some of the original parts in my various bins, but obviously it's impossible to say that I only used original parts, partly because the motor and battery car disappeared a long time ago! A Bricklink search turned up both, so I took the plunge and came up with this. I'm missing one of the 1x1x2 windows, but it is available on Bricklink, so will arrive at some point.
 DSC01211 by andyglascott, on Flickr
Like I say, not an authentic replica, but close enough. I did buy 2 4.5v light bricks at the same time and put one in this, I'm not sure if I like it though. I do have the original 1x6 headlight brick I could put in.
 DSC01214 by andyglascott, on Flickr
I have another motor arriving in the next few days that may or may not work, if it does I might have a crack at 7720 as well. I do have video, but it's taking a while to upload from my phone, so I'll add that tomorrow.
-
That is absolutely amazing, I'll have to look out for it next time I'm home.
-
-
Ok, so right now it’s tomorrow in Europe but still today here in the US so will it be European tomorrow or American tomorrow?
-
-
@Axle This is how I've done a 2-wide recessed door. It's basically about having an upright bar on the door and one inside the loco/coach and then using the appropriate part(s) to connect them. I've used this before, as well as the sand coloured piece in these pics, which I couldn't find on Bricklink.
 Mechanism by andyglascott, on Flickr
The missing 1x1 plate is key to allowing the arm to move far enough for the door to open. It may not be necessary if you use a different combination of parts.
 Inside of door by andyglascott, on Flickr
Inside of the door, I've used a 1x2 plate with bar for these.
 Closed by andyglascott, on Flickr
Door closed, and the missing 1x1 plate isn't all that noticeable, particularly when the train is moving!
 Above by andyglascott, on Flickr
And a view from above of the door closed.
Hope these help, feel free to ask if you need more.
-
9 hours ago, Axle said:Unfortunately they do require their section to be taken out to switch between open or closed, otherwise they're pressed against the bricks beside them, if that makes sense? I'm sure there's a solution to make them easily open that i'm missing 🤔
That does make sense alright. I have some 2 wide doors that open fairly smoothly, I’ll get some pictures later to show you the mechanism I’ve used.
-
This is wonderful to see, and a beautiful build. I grew up in Dublin, with a lot of family connections in Cork and have vague ideas one day of modeling some of the abandoned features from there.…
Opening doors are something I always try and include, how easily do these open? While they might be out of proportion to the originals, they add a lot to the coaches.
-
Welcome aboard, always great to see another 12v layout, and that is a huge loop!
-
4 hours ago, Reker1000000 said:Does the diameter of the tube work for the 12v wheels or do you have to narrow it?
I can't remember the exact diameter, can check later, but racing bike inner tubes fit perfectly.
-
If by rims you mean the tires on the motor, I use bicycle inner tube cut to size, it works brilliantly and is dirt cheap for the quantity you can get out of it.
-
8 hours ago, Toastie said:That sounds good! Was about to say yesterday (and then decided not to
 ) - the 12V train stuff was a rather European made line, wasn't it? I forgot. But if so: Europeans like the M-line of screws ...
12v may indeed have been a European thing but this European brought a significant amount to the US when he moved
and then bought up most of the straight 12v track that was available on Bricklink at the time…..
So far I haven’t lost enough of those pesky screws to need to replace them, but that day will come….
-
I think it’s wonderful! Love the extras, such as the waterfall and the smaller tunnels that make it a lot more than a plain mountain. The viewing windows are a great idea, I’ll be doing that on a future layout. My only quibble would be that it might be a bit steep, but that may be just the appearance in the pics and with no other layout around it.
-
3 hours ago, Hod Carrier said:The only thing I'm not so keen on is having to gather up the bits and build it back up for the next
victimparticipant. As you can probably imagine it's not the most stable construction, although each time I built it up I improved the technique and got a little faster than the previous time. It took quite a lot of time and more than a few design revisions to get it to the point where the model would hold it's shape but still break apart in the way I wanted.Could you build it in say 10 sections that went together very easily rather than all the pieces?
-
They’re both brilliant! You should set the second one up at a show on a separate siding with the controller accessible to the public along with a sign saying “please do not touch” and watch reactions.

A Layout in Three Eras - 4.5v, 9v and 12v - Photo update!
in LEGO Train Tech
Posted
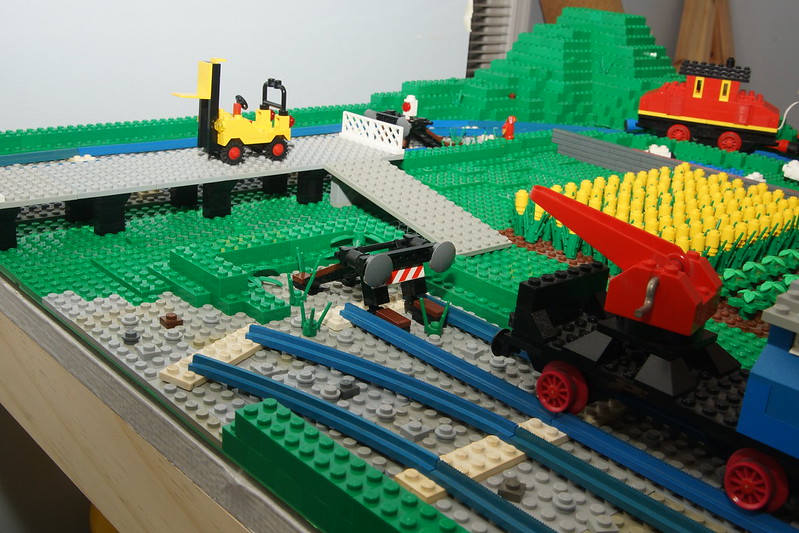
The first section, the 4.5v era is complete! Well, almost, but enough to show last Saturday at Ashland Train Day in Ashland, VA as part of the Richmond VA LUG. And by almost, I mean the top of the third module is flexible space that can be adapted depending on the show/event, so will be remodeled from time to time. Anyway, on to the pics and a video.
The whole 4.5v layout complete for the first time, during set-up last Saturday.
And video of it all in action. It turns out the clutch power on a 40-ish year old battery car is a bit suspect, the lid kept popping off, hence the rubber band to keep it in place on the day. It'll be clear tape next time.
This module doesn't have a lot of detail, just a lot of mountain as it is also one end of the elevated 12v loop that is part of the overall project. I might play with the tunnel entrances a bit over the summer to dress them up a bit.
The top can be repurposed, but will be used each Halloween to dispense candy both at home on the day of and at our church Trunk or Treat, and by October will have more detail to it, but can also easily be turned into a lake or other feature. The conveyor does work, and was fitted only a day or two before the show.
There are a couple more pics and 2 more short videos over on Flickr. I've got a lot on over the next 6 weeks or so, so I suspect work on the 12v section won't start of a couple of months, but putting this together has been a joy.