Search the Community
Showing results for tags 'Truck'.
-
 G'day all. I"m all for the bandits. Sometime you need to haul a lot of stolen stuff like pursuit vehicles for scrapp'n and to provide help in the heat of a chase and battle. "Its a truck" you say, "there slow" you say well 'Lights out' is a little different and this is why. Normal truck Nothing special. HOG steering. Battle mode Fold down rear guards to protect wheels and for side swiping. Extending front chassis to reveal second supercharged methanol drinking V8. You can never have to many V8's with that much power. Fold over half bonnet to become a car scoop. Fold down front grill for spikes. Gull wing doors with missiles on the ends. Pop out or off ( I'm undecided on which one ) battering ram fuel tanks....KaBoooooooom to the vehicle beside you. Possible sleeper box with fold over roof machine gun. Some sort of suspension. Trailer (may be) Push out rim spikes on second axle. Crane with harpoon gun, winch and claw grab. Saw blades, gotta have saw blades somewhere. Side car flipper arm/panel. Front compartment will house a massive jet engine. When in trouble the trailer will break off to reveal the jet turbine which stays on the back of the truck for an instant get away and fry the pursuit car behind you. I maybe a little too ambitious but the only thing stopping me is the hatted colors off all time Cursed black and clean White ( half of my Lego pieces). Here is what I have done so far. Lights Out by Jono Mckinlay, on Flickr
 -
 Greetings, Here's a look at the rear suspension i'm using for a truck I've been working on for six months. I only have time for a couple of hours at weekends. Just wanted to share this with you. Could be a while before it's completed. H
-
 Background: This MOC came about after I finished my wheelie bin loading truck MOD to set 42024; I wanted something else to add to my rubbish truck collection. These types of trucks are used not to empty bins but instead lift and load heavy / bulky items. I have plans for more MOCs and MODs around this theme. Features: - Hand of god steering - Opening cabin doors - Rear loading platform - Crusher - Rear body tipping and opening tail gate Build Process: I spent about 25 hours over 8 days building and testing this. Building the truck was quick and easy, adding and testing each feature took the most time. The whole truck is based on the same scale as 42024. The cabin is based on the cabin from 42024 with some changes.[/size]
 -
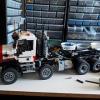
 Hey all, My latest MOC is modeled off of a 10x6 Foden S108 crane truck tractor unit run by Mackenzie Transport of Auckland. There are some differences between the real truck and my MOC such as their trucks are white but mine was made in red due to parts constraints and the other difference being that the original Palfinger truck mounted crane on the truck has a five-stage extension on it but my version only has two-stage extension because that was the most I could have before the crane arm became too large and out of proportion. Photos of the original truck can be found here: https://www.flickr.c...ith/6161598123/ MOC's Features: HOG steering Live axle suspension on the rear axles Pneumatically controlled pendular suspension on the front axles Stabilizers Locking turntable Tilting cab with straight six piston engine under the cab Full interior of cab with suspended seats Motorized truck mounted crane with two-stage extension Custom stickers LED running lights The combination with everything expanded This photo is one of my favourites and shows the custom stickers of badging and the original number plate from the truck The truck on its own Everyone's favourite photo, the under shot This photo shows the controls for the crane (the PF switches) along with the switch and pump for the front air suspension The engine without the cab attached The interior The mechanism for seat suspension LED running lights Now for the trailer, a three axle extending trombone trailer. It has full independent suspension, landing gear and of course an extending deck. The trailer extends 29 studs, bringing it to a total deck length of 122 studs/97.6CM. Trailer when extended with lattice boom load Trailer when retracted Trailer suspension system Underside when extended Underside when retracted Another photo of the combination Statistics: Total length with trailer extended: 173 studs/138CM Length of truck: 77 studs/61.6CM Width: 19 studs/15.2CM Height: Truck weight: 2.4KG Trailer weight: 0.8KG Load weight: 0.2KG Pieces count: 4000 +/- Time to build: 60+ hours This is the first time I have used a white background instead of no background and I am very pleased with the results and will definitely do it again. As always more photos can be found on my Bricksafe and for the first time, a video can be found on my YouTube channel! I hope you enjoy my MOC as much as I do Bricksafe: http://bricksafe.com...e/completed-moc YouTube: https://www.youtube....876u7IUZPRGhwrQ
 -
Location: Aeristus, C04 Tags: Vehicle Job: Driver Start Log: A little different job than usual, as I was tasked with driving a MANTIS Comm. Truck, outfitted with all sorts of communicators and sensors. Still it's a rugged vehicle, and packs a hefty punch with it's large cannon: The various sensors and dishes can be moved quite a bit: Thanks for looking
-
 Just wanted to share my failed MOC. It's a truck with trailer. The truck had rear wheel drive through 2 XL motors and was steered by an M motor with clutch. It also had front lights controlled by a switch in the rear. I never was really a fan of the truck's looks ,especially my makeshift wheel arches made from panels, and I lost interest in building it. On the other hand I was very satisfied with the trailer. It was finished unlike the truck and looked quite smooth to me and had pneumatic legs which worked well. It also had a pair of lights in the rear which connected to the truck's switch with a long extension wire. The back of the trailer didn't look too great either. It also had a bit of sag which can be expected from something this long Here's both of them together. It was quite long, the trailer alone was about the length of 42009 Thanks for reading and hopefully my next MOC will succeed and be far more interesting than this
 -
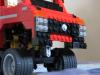
Hey all, For the past few weeks I have been working on my latest project, a 10x6 Foden S108 R4 tractor unit with a truck mounted crane. I am about 70% of the way through and thought that it was about time that I released this project to the world. After having been given a request to build a truck with a crane on it so I thought I might as well go all out As the title implies it is a five axle beastie with the three rear axles driven by two L motors mounted on either side of the chassis and the two front axles steering through a servo motor. As the images show the truck has the chassis built, the rear stabilisers and the forward mounted crane attached, with the crane being a modified version of the 8258's crane, with two M motors mounted in it for movement which will be controlled from a control panel on the left side of the truck. Although the truck is already quite heavy without the cab attached, the hard coupled L motors appear to be able to drive the truck at a pretty decent speed with a reasonable amount of torque backing it up. The one main issue that I have found so far is that the crane, when fully extended, can only reach to the rear of the truck which is a bit of a pain with this being a tractor unit. This Flickr album I found by Hilifta/Mike Cornwall has images of what I am attempting to recreate. NOTE: Don't expect my MOC to have the same colour scheme as those in the reference images due to the limitations of the colours of my parts collection Enough of the rambling on about it, time to give you some idea of how it looks: Then of course, we have the all important bottom shots Things that I still have to complete are the front stabilisers, motorising the stabilisers to make them RC controllable, finish the rear bodywork and build the cab. I will hopefully have more photos to share with you soon, all advice and and comments are appreciated. As always more photos of this build and many of my others can be found on my Bricksafe: http://bricksafe.com/pages/Kiwi_Builder/Technic Cheers
-
 After a long time lurking, I finally found time and space to pick up building myself I picked up a 42009 and 42023 to supplement my brick-based Technic collection from the '80s and '90s with some modern studless. But considering my collection, my building style will be mostly "bricked". I was inspired by Grazi's tow truck and the trucks of 2LegoOrNot2Lego. Specifically, I wanted to built a realistic truck with suspension, drivetrain, etc. The skills of aforementioned gentlemen are out of reach for me, but nonetheless I'm quite proud of my creation: I went a bit overboard with the features: Suspension on all axles Driven rear live axles 4-speed manual gearbox (based on this one from Sariel) 6-cylinder inline engine (hood and bullbar can be titled for access) Front axle controlled with HOG wheel on cab Working steering wheel inside cab Motorized winch Motorized double compressor with two airtanks and automatic shut-off switch It's all a bit tight, but it all works well without illegal construction techniques. I'm not entirely happy with the linkage for the axle suspension: there is too much play around the vertical axis. Also, if you drive the truck backwards over a bump, you lose the front axle More photos on Brickshelf and Bricksafe.
 -
 Hello everybody! I making this topic to showcase my first ever real MOC. I have made things before, but never something exceeding 20cm in length before, or something complex. This MOC is inspired by those beautiful long-nose semi trucks I see on the road everyday here in Canada. I am also inspired by the works of 2LegoOrNot2Lego and Sariel, two people who I say make some of the best trucks out of Lego, visually and technically. For my MOC, I used LDD since I do not have many parts for a semi truck in general, and money wise, I can't afford much right now. This is also my first time using LDD. I have no clue how to use those more advanced programs like LDraw. I am rendering better photos (POV) for my MOC, and an in-depth description of my MOC will follow shortly, but here are some crude teasers :D I made 2 models. One black and one red. Visually, they look the same, except for the color, but internally, they are a bit different. Can you guys guess what features this truck will have? This is my first real MOC, so it is a bit simplistic, but you can still give it a shot! Don't be disappointed to find out it will probably not have most of the extravagant function you guys will hope for :P Aside from the teaser pictures, I didn't make this post for nothing :D I have a questions to ask. I used LDD to make these trucks, and it allows me to generate instructions. But how can I convert the animated instructions into some readable copy? Like a PDF or something, something I can print? I am never gonna sell anything, so I also want to have a PDF file for you guys!
 -
Taking camping to the next level with an eight wheeled off road camper/RV. Vehicle has the following facilities. Lounge/TV, Kitchen, Shower, Toilet, Computer, Skylight Bedroom, Generator, Motorcycle and Hoist. Includes 6 Minifigures, a picnic area and barbeque area. https://ideas.lego.com/projects/92226
-
 Hi all! I am making this project for the contest, i did not finished it yet, but here the time is to share some details about it. Unfortunately i have little time to build(5-10 hours weekly), but i try to finish this vehicle until deadline. The project is a Mercedes Econic garbage truck. I tried to build the truck (mostly the cabin) the same as the real one, but the garbage treatment section is an own creation. I used these pictures for guide: More pics here and here! So let's see some details about the vehicle: dimensions: LxWxH: 80x21x23 stud (63x17x18 cm) pieces: 4100-4200 weight: about 4 kg fake engine: 4 pistons in a row 3 axles, 1. and 3. axles are steerable in different angle, also the steering wheel is turning in the cabin 6 motorized functions with 2 M and 2 L motors and 3 gearbox. Functions: 1 L motor: changing gears 1 L motor: driving / blade sweep 1 M motor: steering / tailgate raiser 1M motor: garbage ejector / slide packer Manual function: cabin tilting Little functions and details: tilt seats, dashboard, openable grille, openable doors on both sides, etc. The video: You can download the LXF file from HERE! (*.rar) Thanks!
 -
Concrete truck Mk II. After the first attempt where things were there were scaling issues I had another crack at it today. Ideas are to have 8 wheels so twin steer. Both drive axles and simple sturdy construction. The functions are: L motor for drive. Servo motor for steering. L motor for the mixing bowl. M motor for the chute. Manual functions will be opening doors, cab tilt and chute swing from side to side.
-
 Hello everyone !! This is my new Moc, a Custom 4x4 Pick-up, it isn't inspired by any real model, although it reminds me of some, but I don't know which one! I started some time ago to build a 4x4 where I used 2 RC Motors. To obtain good performance, I built it as a rc car ..... a chassis with a removable light silhouette that was mounted above it. It worked well, but I had some problems of interference in the system rc, and I was not able to make a good video without seeing an idiot running behind it at one meter away. So, waiting to buy two Lipo batteries, I decided to convert it to PF system (XL motors) and add some detail, since the first version was very simple to save some weight. So this is the result: It 'a 4x4 RC custom Pick up with three differentials and full independent suspensions. It has openable gull-wing doors via manual controls in the trunk, that's openable too, even the bonnet is openable with slowed opening. Under the bonnet, there is a fake working V8 engine with compressor on the top, some minor engine compartment details, like the battery or the radiator cap, and the complete exhaust lines. Even the interiors have a dashboard, pedals, gearbox command.... It uses a servo motor for steering and 2XL motors for drive. Lenght : 56 studs (44.8 cm) Width: 27 studs (21.6 cm) Height: 25 studs (20 cm) Weight: 2,1 kg I will add a video, hopefully during the Christmas holidays. I hope you enjoy! IMG_9672 by Lucio Switch, on Flickr IMG_9687 by Lucio Switch, on Flickr IMG_9695 by Lucio Switch, on Flickr For more and hi-quality pics take a look here: https://www.flickr.c...57649756711806/ or, for more info visit Mocpages: http://www.mocpages.com/moc.php/402617
 -
 Hello Eurobrickers! In the future it will be a Coca-Cola truck with a semi-trailer, but I would like to show you a half of MOC, does it mean the truck, which has drive, steering, up/down 3rd rear axle and a fifth wheel is locked/opened. The truck has also opening doors, opening door in second cabin, a hood can be lifted up to access the engine, which is eight piston engine connected with a rear axle. The second cabin has a removable roof to access a battery box. The stairs you can use as a toolbox or you can put a fire extinguisher Dimensions: length: 64 studs width: 25 studs height: 27 studs weight: over 2 kg Power Functions: drive – PF XL motor steering – PF servo motor up/down 3rd rear axle – M motor locked/opening fifth wheel – M motor 1 x PF battery box 2 x PF IR receiver 2 x PF IR remote control 2 x PF lights Brickshelf gallery
 -

[MOC] RC Micro Truck
Chade posted a topic in LEGO Technic, Mindstorms, Model Team and Scale Modeling
Hi everybody, It's been quite hectic for me over the past 3 months, but I finally got some time to build over the Easter break. I wanted to see if I could build a small RC vehicle using the cargo plane's back wheels (42025). I settled on a truck as it was the easiest vehicle to fit all the PF components in. Below is the result. Specs - 1x L motor at 1:1.33 - 1x Servo - functional hood - functional doors - battery access at back - working front lights - 28Lx11Wx11H (chassis, in studs) - 588g The truck is 4 studs smaller in width (11W vs 15W) compared to what I'm used to and it certainly presented some interesting challenges. It's loosely based on a GMC truck. It's not perfect, but for its size I'm quite happy with it. Unfortunately due to the small size of the wheels, I had to use a 2 stud high technic part from 20 years ago for steering (part 4261). I don't believe there's any new parts that can accommodate this (Please let me know if there is!). More images at bricksafe Once again, any feedback is appreciated. -
 Hi guys, I start this new topic to show you my caterpillar truck in his final form. It took me about five months to finish it! It's powered by one BB, two XL motors and one m motor for steering. The frame is based on Ingmar's mack granite frame but only the rear part. I've changed the front because off the hood's attaches that limits me. The cab, Hood and bumper are all removable. Here's some photos of the truck: Thanks for reading! Do not hesitate to comment!
 -
 Hi everyone! Today i finally introducing to you my greatest at my poing of a view MOC: Lego Technic Euro Tractor Truck Please, enjoy the video! Dimensions: Width - 31 studs (without mirrors) (24 cm) High - 43 studs (without antenns) (34 cm) Lengh - 70 studs (54 cm) Weight - 4.725 Kg Build with thousands of 100% original Lego parts. ~1/10 Scale Power functions used: - 4 XL motors for driving - 1 Servo motor for steering - 1 M motor for gears shifting - 1 m motor for the fake engine and the pump - 5 LED for the lights - 2 Polarity Switches - 3 9V Remote Control Units - 3 Receiver Unit V2 -2 AA Battery boxes -1 AAA Battery box -2 Extension Wire (length 20cm) Functionality: - Driving and steering - 4 speed Sariel's gearbox (RC) - Front independant suspencion - Rear suspencion Cab: - Cab tilting - Doors opening - Working fifth wheel - Detalized cabin (devices, pedals, heater, mirrors) - Suspended seets - Adjustable and working steering wheel - Working V8 fake engine (connected to the pumpl All pics are clickable! Thanks for your attention!
 -
Hey guys. For the last couple of days I've been building on a new project: a Scania WLS. Dutch people may recognize this truck as the dutch military heavy transport truck, transporting containers and flatracks. Here a picture of the real thing: For now I got only a part of the chassis. I am satisfied with the front suspension, and the rear axle is nice and compact, but it has 4 tires per axle, so a differential was impossible at this scale. Also, it does have too much backlash in my opininion. If someone knows how to fix it, that will be nice! And in this scale, again, just like my previous truck, the wheels are too wide to add drive to it. I got some pics here, please comment if you got some tips! And oh, Steering isn't added yet, I found it quite complicated to do it right, I will work on it soon .
-
 Well here's my entry for the contest. I wanted to play a little with the new pneumatics so: A-Model: pneumatic forklift. It features: - Fork lifting of course - Fork tilt - Hog steering and functional steering wheel in the cabin - 4 piston boxer engine driven by the front wheels with differential - Pendular rear suspension - Forks width adjustable (manual function) Couple of images: I don't like cutting original Lego rope, so that's what you see in front of the front wheels. I used about 70-80cm of the 1 meter rope. The 8T gear in front of the seat was something I'd rather not do, but the 12T bevel gear for the drivetrain is right below it. The hog steering axle going right through the middle of the chair is also something I'd rather not have, but in the given space I had 2 choices: place the chair a whole stud forward and have it be too close to the steering wheel or move it a full stud back and have an axle sitting right in the middle of the chair. I decided on a compromise with the chair slightly angled. I used this part in the top of the chair so it wouldn't touch the hog axle, but still made both sides of the chair connected. Fitting the pneumatics with the drive axle and the steering above the drive axle meant I didn't have much room to play with, but it fits perfectly and to protect the pneumatics from the drive axle I added a 2L pin connector and 1L liftarm to the drive axle. Pretty straight forward manual function. I wanted to make the forks foldable too if I couldn't fit in the 10,000 stud limit, but considering the model is 34x14x17.5 (that .5 doesn't really show properly in the images, but the forklift mechanism is about 1/2 stud of the ground) I didn't bother with folding forks. So then the time came to make a B-model. Time to duplicate the main model so I knew for certain I had all the parts: The parts in front of the left one are the things I didn't install when I rebuild it, because I either forgot (diff) or bricklink came later (pneumatics). B-model: Bucket truck I really don't like making B-models, but I think this turned out ok. Of course there are things I'd like to do different, but that's the challenge of a B-model. It features: - Bucket lift (why do I even list this ) - 4 Outriggers - Hog steering - 2 cylinder boxer engine - 170 degree turning crane (manual function, radius only limited by hose length of pneumatics) A couple of more images Outriggers are handled by the small pump, I wanted to use both, but the lengths of hoses I had left were a limiting factor. Doesn't really matter, using the 16L axles to power the rear and front outriggers was already planned and I tried the system with 2 small pumps and they weren't able to really lift the model either, not more than 1 pump managed. One pump manages to get the wheels to have slightly less friction. Speaking of friction. For the outriggers I had to switch some pins on the A-model for LBG 2L frictionless pins to make it easy for the outriggers on the B-model. This change isn't shown in the photos of the A-Model, but can be seen in the images of these 2 models together (6 are easily visible on the front wheels of the forklift) and in the video. No parts were added. For every LBG pin added, one black pin was removed from the table. I find no fun or challenge in cheating the rules of the contest. I also didn't want to use more pins than really needed, where 2 were enough to fix a liftarm, that's what I used on the A-model. I already expected that re-using the A-model's hoses would be a problem, but it worked out ok (even for the turning radius of the crane). Ok, I cheated Lego's current hose code a little (2x black on 1 cylinder is old hose code), but the grey hoses were too short or far too long (which I used on the handpump). Speaking of the handpump, thanks 2LegoOrNot2Lego for your handpumps on BL, both used here Not intended, but this model fits in the same box as the A-model: 35 studs long, 13 studs wide and 17 studs high. A and B model and the parts remaining: Of course I'd like to have made a roof for this B-model, but I didn't really see how anymore with the parts I had left. I then decided to make an open truck like the old american fire trucks. Not that this is really intended as a fire (bucket) truck, but I can't deny that with the white and red it could be used as such (maybe reverse the colours). Here's the video of the models. I combined both into one video: Thank you for your time reading this topic and in closing this image:
 -
 Hey, i would love to share my latest Creation with you guys. Its been a while since my last MOC, but i took the time to build something cool. It is definitely one of my best so far. And for the first time i decided to provide detailed instruction for this MOC. What are the functions of the ZlL E134 Truck: First of all, i used 2x SBricks and 2x 88000 Battery Packs. 2 XL Motos for propulsion 2 L Motors for steering 1 M Motor for gear change (2 speed transmission) 1 LED on the roof (there is a lot of space to use more LED) a working 12 Zylinder Fake Engine behind the cabin. 2965 Parts , about 3,4 Kg. There is still room for improvements. Under the hood is enough space to put in what ever you want. The whole Bodywork can be removed very easy. (modular design) But as always, a short video can show you the Model in action. Instruction: https://rebrickable....nkmad-max-desig Thanks to Madoka for the inspiration with his Tatra 813 Truck. Great work as always.
 -
 Hey Guys, In this thread I'll introduce my race/trophy truck It features caster, kpi, long-travel suspension (front independent, rear fixed-axle) with damping, RWD, manually functional LED lights, hood, doors, extendable door steps, and moon-roof. Rather sizeable, at 4kg, and 65 (L) x 31 (W) x 30 (H) studs in dimension. Weight distribution is 50:50. And here's how it looks underneath... There was no modification to LEGO pieces, and no 3D printed parts were used. However, I've opted to use 3rd party components (mainly the electronics) because where I live, TLG does not deliver. There is a local shop selling LEGO stuff, but is often poorly stocked when it comes to Technic/PF components. While I do realise that these won't integrate readily with LEGO Technic pieces, and wiring will be messy, I was willing to give it a shot because they offer better performance and configurability. I started off wanting to include a gearbox (at least semi-auto if possible), camber and ackermann, full independent suspension, 4WD, etc. But as you'll see in due course, I encountered challenges either directly or indirectly due to my use of 3rd party components . I will provide more details about these later on. For now, suffice to say that there is some sort of a dilemma here - With LEGO PF, I can probably incorporate all these features, but I'll end up with something that drives like a tortoise (which defeats the purpose of having these features in the first place). However, with 3rd party electronics, I'm able to drive much faster, but that also resulted in the need to build a stronger model to withstand occasional crashes, and stronger drive-train to handle greater torque, and all these bits and pieces add to the resulting weight and size (don't forget that I need additional pieces to act as 'bracing' for the 3rd party electronics too). More details later on... For now, I've prepared a short video: In subsequent posts (assuming that there is sufficient interests), I will describe the challenges that I've encountered, and how they contributed to my current design decisions. Roughly, I'm thinking of elaborating on these areas: - Steering Axle/Hub Design (including how I incorporated a 3rd party servo) - Drive-train Design (why and how I gear down the brushless motor way before the wheel portals) - Suspension Design (why do i use this part, among other things) - Any other areas that you guys want to know more about...
 -
Hi Everyone! Today i want to show you my latest creation. It's a Classic Space Truck with Rocket Launcher Trailer. It's inspired by set 462 or 897 and with 6927 colour scheme. Because this is Classic themed, so i make this like old shape. This is the pictures (Sorry for bad pictures quality): Picture for just the truck: Picture of the spaceman on his "computer": Picture of just the Trailer (or with the Rocket): The Function of the landing gear are inspired from set 75875: This is the Picture Gallery/Album. This is the LXF File. All parts colour are exist in real life, but i make substitution for the print of the minifig torso, i use benny's print instead of regular spaceman torso print. Hope you like it.
-
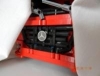
 After my fork rake and the tractor I present you the AROCS SCV:pRC - Specialized Construction Vehicle: partially Remote Controlled Today I would like to present my modification of the Lego 42043 MB AROCS to you. Yes, the setup is unusual for a typical construction truck. I decided to choose this setup because I like the crane setup from the old 8868 truck. The room between the specialized setup, which is inspired by the 8868 crane cabin, got filled with a side tipping bed. I moved the original tipping bed to the trailer. But first, let me tell you what functions it has inside and which of them can be controlled by RC. 1) RC package, supplied by one AA battery box: Driving (XL-Motor, RC) Steering (Servo, RC) Supporting stand (L-Motor, 2 small linear actuators RC) Tipping (L-Motor, 1 big linear actuator for each tipping bed, RC, switching between the two tipping beds possible through gearbox) The RC functions are limited to functions needed while driving the truck or getting ready for working with the clamshell. Because of the heavy weight of this model and the strong XL-Motor I had to replace the cv-joint with a cardan joint. 2) Clamshell package, supplied by one AA battery box: Compressor (shares the M-Motor with the rotation) Rotation (shares the M-Motor with the compressor) The rotation of the clamshell setup can be changed or stopped through the red lever, which you can see on the right side, slightly under the cabin. If you switch on the battery box the M-Motor will run permanently and so will the compressor do. Only the rotation can be turned off through the gearbox. All functions of the clamshell setup are integrated, so there is no cable or tube running through the turntable to the truck. There is no limited turning radius. More pictures are available at my brickshelf album. Please use the thumbnails below, because the brickshelf album is not yet public.
 -
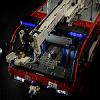
 UPDATE: Rebrickable truck chassis Rebrickable dump bed attachment Truck chassis instructions Dump bed attachment instructions Hi! I want to present my latest MOC, a 6x6 Offroad type European style truck with PF. I have been working on this longer than any previous MOC, slowly improving and perfecting things here and there, and can finally say I am finished with the base model! Oh, and also, the instructions took quite a while to perfect! Firstly I want to say thank you to Alasdair Ryan, Efferman and Blakbird for reviewing my instructions and providing valuable feedback! Special thanks to Alasdair for helping me with some LPub issues I couldn't figure out on my own! So, a little introduction: The idea behind this MOC is to make a sturdy and powerful PF chassis with advanced drivetrain and suspension on all axles. Further I wanted it to be highly adaptable when it comes to equipment to be placed on the back of it, thereby providing people with a good chassis onto which they can mount their own MOCs, and allowing myself the time to develop and publish different implementations to the model in the future. The features of the model are: -6x6 drivetrain powered by two XL motors -Steering via a worm gear, powered by one M motor -Lockable central differential (manual) -Live axle suspension on all three axles -PF "Expansion Bay" to easily integrate up to two more remote controlled PF motors -Working V8 engine Non technical features: -Rack to mount a 9V/AAA/LiPo batterybox in the cabin (for lights, etc) -Openable doors -Lower steps for the crew pivot up if hitting an obstacle -Tiltable cabin -Semi-detailed interior (including gear stick, coffee cups and some instruments) -Manual winch in the front For a lot of WIP photos, renders and high res pictures of the finished model, please visit the appropriate BrickSafe folder Firstly I'll show you a couple of pictures of the internals: The final gear ration result in a fairly low speed, but tons of torque (maybe a little too much, as some U-joints have experienced). Due to the high torque, I saw myself forced to modify the central differential, as I wanted the truck to have some actual offroad capabilities. Let it be known though, that for driving on the floor (both wooden and carpet) this is not necessary at all. Then some more actual pictures of the physical model In the above picture you can see the small 9V batterybox I placed in the cabin to provide power for the blinking roof lights. Also some of the way too long wiring I had to use, as I don't have short ones. There are certain differences to my model compared to the one in the instructions, most notably the rear lights and the roof of the cabin. This is due to me lacking the proper pieces, so it looks a little bit off in the pictures. The obligatory underside shot. Here you can see most of the mechanical side of the drivetrain It's a bit difficult to get good pictures of the suspension working.. The PF Expansion Bay. As you can see the two channels are free, and there is room for a lot of wiring. You can also see the dual white clutch gears used for the steering. It makes it powerful and fast, while still preventing the M-motor from stalling. On the other side is the space taken by the lever to engage the diff lock. I originally had an RC function for this, but it turned out a little unreliable due to the M-motor driving itself back a little after stalling. Also, it took up unnecessary space. Shot of the driver's side interior of the cabin. The cabin tilts forward to allow access to the batterybox... Which can then easily be removed. Here you can also see the V8 and the "fake gearbox" with shift lever and cup holder A shot of the rear of the vehicle, meant to show the available space for additions. Okay, that about sums it up. A couple of notes: I initally wanted to have independent front suspension, but this, together with a lockable central diff took up way too much space. Designing the front axle was a real pain, as it had to be very low to not interfere with the engine. This meant the steering motor had to be placed on the chassis. I first tried to use the servo motor, but it took up too much room. The solution I ended up with is as good as it gets given the parameters I had to work with, although it does have a little slack But it works great! Like I said This is supposed to be a modular build, and I am in the process of developing said modules now. Firstly is a picture of three different LA systems that are all more or less "drop in" additions to the model (you need to remove some of the transverse 7L axles seen in the above picture). The one to the left is used for a side tipping bed, which you can see in the next picture. The other two are to be used with for example standard tipping beds or other modules This is a WIP side tipping bed, using the two small LA setup shown above. It is a bit short maybe, but that is to give room for a rear attachment, like a Palfinger style crane, or a material handler claw, like in the picture below: As you can probably see, this is just a modified version of the Unimog 8110 crane, but with a claw (a la 42006) and an extendable boom. It is manual. EDIT: Also; yay or nay regarding the stickers (from 42025) on the cabin in the above picture? I am also going to make a compressor unit that can fit underneath the bed at the cost of the tipping function. Lastly, here is a taste of the instructions, which you can download here It is currently pending approval at Rebrickable (posted last night, so should hopefully not be too long). In the mean time, here is the parts list And here is the LDD model for those interested (a couple of pieces couldn't be properly attached) So thanks for taking the time to read all this, I hope you like the model, and that some of you will be building it yourselves. If you do, please come back here and post your impressions, along with a picture or two of your build! As always, comments, criticism etc etc are very welcome EDIT 2: The truck is built in white in the instructions, so most white parts can be substituted for any other colour. Also, as I note in the introduction of the instructions, most LBG and DBG thin and normal liftarms are used in the chassis, and can be substituted for other colours. The colours are used to make the instructions as clear as possible
 -
Hello fellow Eurobrickers, I made this MOC some time ago, but as it's never posted anywhere, as most stuff I make, I believe it's good for this contest. It's C - model of very small set #42001, and it even uses the same chassis as A and B models. So I believe it's nothing exceptional, but I hope, you will like it. And I believe, as it's so simple, you can easily recreate it as well. I would say, it's sort of Dakar truck. The reason behind this design is that I didn't want to repeat the A and B models design backbone with part 32009, so I placed this part upwards, and had to make body around it. Eventually I even made the doors open, though they don't stay closed very well either. Anyways, here are some pictures. A nice pencil drawing of this MOC :) Comparison with Unimog gearbox, as I've started to build my Unimog (at last). Comparison with my upgraded version of #9398-B model Front, with doors open and minifig for comparison. Side view Rear Some more pics here: http://www.brickshel...ry.cgi?f=550318